Creating an auto-incrementing number field in a SharePoint Online list can be an incredibly useful tool.
This feature allows for the unique identification of individual list items, making it easier to reference and keep track of them.
To create an Auto-Incrementing Number Field in a SharePoint Online List:
- Create a new list in your SharePoint site.
- Go to your newly created SharePoint list and click on the “List” tab in the ribbon.
- Select “List Settings” located in the toolbar, then scroll down to the Columns section and click on Create column.
- Choose the column type as “Calculated (calculation based on other columns).”
- Give your new SharePoint list column a meaningful name, like “Auto ID” or “Incrementing Number.”
- In the formula box, create a formula that references an existing column and increments its value by 1.
- Select Number as the data type for your new column.
- Save your changes by clicking on “OK”.
In this article, we will guide you through the various methods you can use to set up an auto-incrementing number field in a SharePoint Online list.
But wait, there’s more.
By following these instructions, you will be able to efficiently manage your data and maintain a well-organized list that ensures consistency and uniqueness.
This valuable functionality not only improves your overall SharePoint experience but also enhances the accuracy and reliability of your data.
Let’s get started!
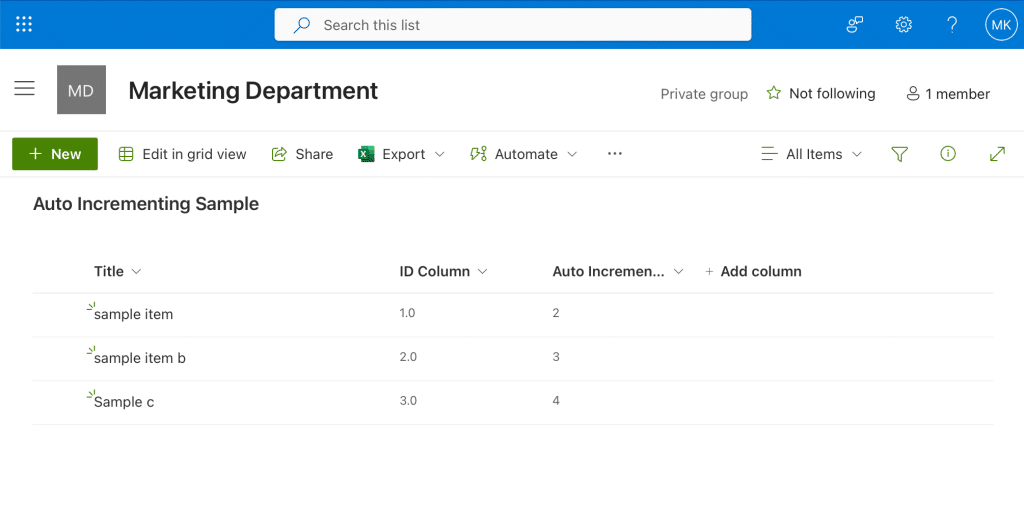
Understanding SharePoint and Auto-Incrementing
SharePoint Online
SharePoint Online is a cloud-based service that helps organizations share and manage content, knowledge, and applications. It allows you to create lists and libraries for managing information and customize the appearance of your SharePoint site.
Essentially, it’s a helpful tool for ensuring that everyone in your organization can easily access and work with the right resources and information.

Auto-Incrementing Number Field
An auto-incrementing number field in SharePoint is like a special column that automatically gives each new item in a list its own unique number that goes up by one.
Furthermore, this is handy for making things like ID numbers or keeping track of the order of items in a list. Alos, you can use this to organize tasks, follow issues, or manage a list of inventory items.
Once you get the hang of SharePoint Online and auto-incrementing number fields, you’ll be able to create really useful, well-organized SharePoint lists for your team to work with.
How to Set Up an Auto Incrementing Number Field in a SharePoint List
To set up an auto-incrementing number field in SharePoint Online, you have a few options:
- Using Calculated Columns
- Using SharePoint Designer
- Using Power Automate
Here is a step-by-step guide on how to use each of these methods.
Method 1: Using Calculated Column
Creating an auto-incrementing number field using calculated columns is a two-step process.
Step 1: Create a SharePoint List
To create a SharePoint Online list:
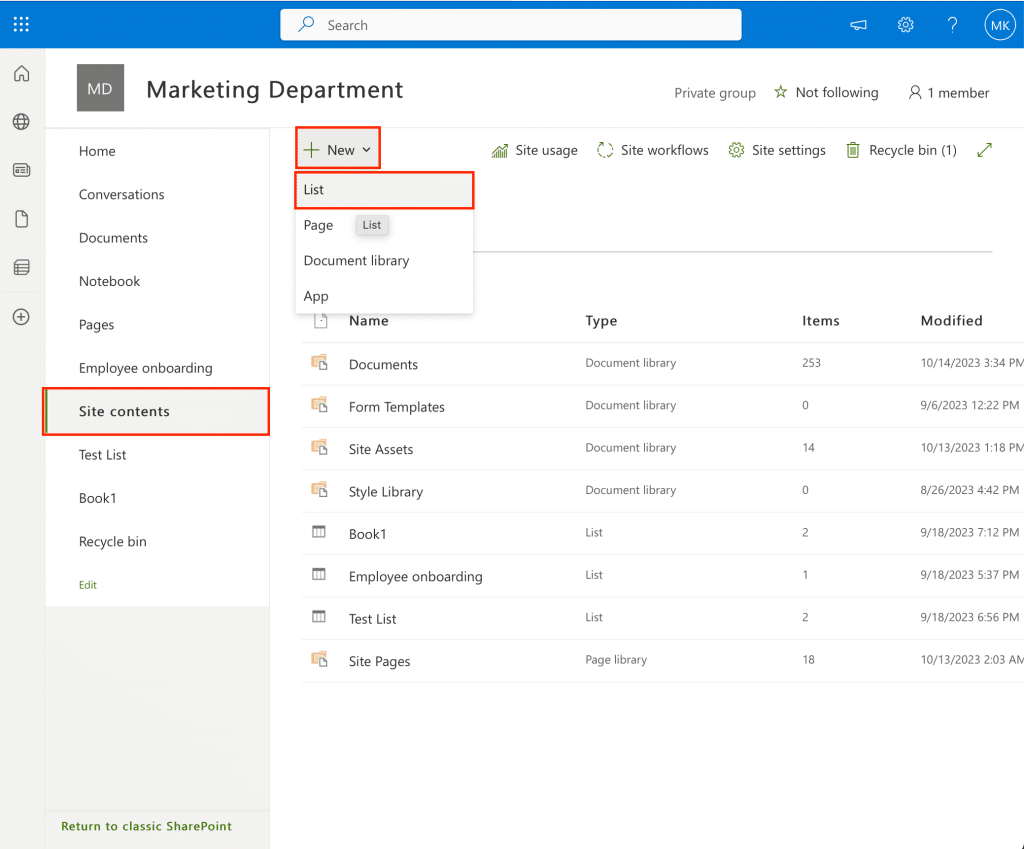
- Navigate to your SharePoint site and click on Site Contents in the left-hand menu.
- Click on the + New button and select List from the dropdown menu.
- Enter a meaningful name for your list and add an optional description. Click on Create to finalize the creation of your SharePoint list.
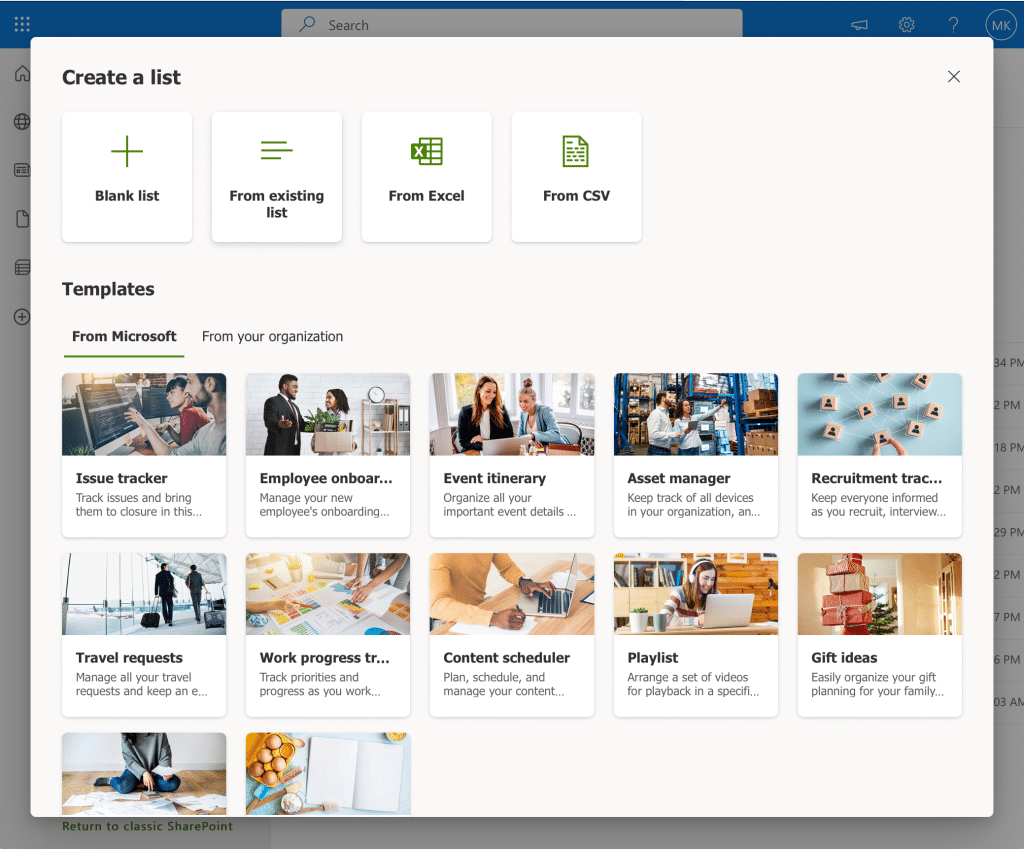
Once your list is created, you’ll see it under the Site Contents section.
Step 2: Adding a Column to the List
Now that your list is ready, proceed to add an auto-incrementing number column:
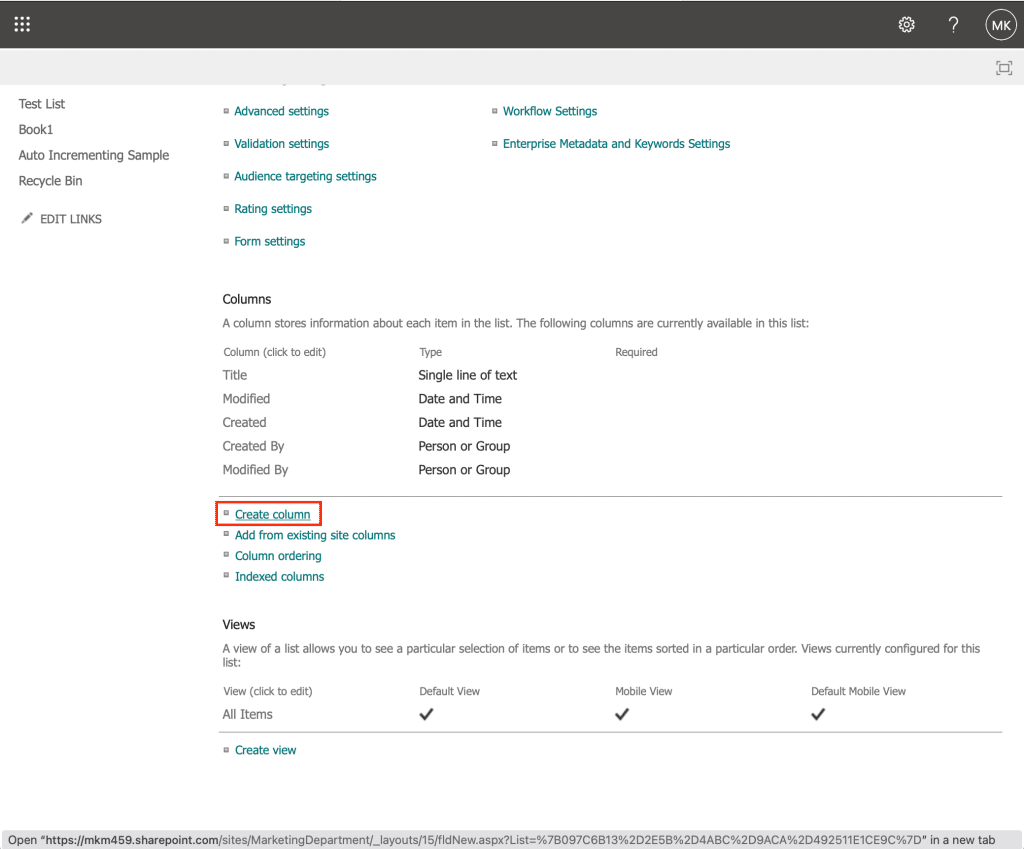
- Click the gear icon to access the security menu and select List Settings located in the toolbar.
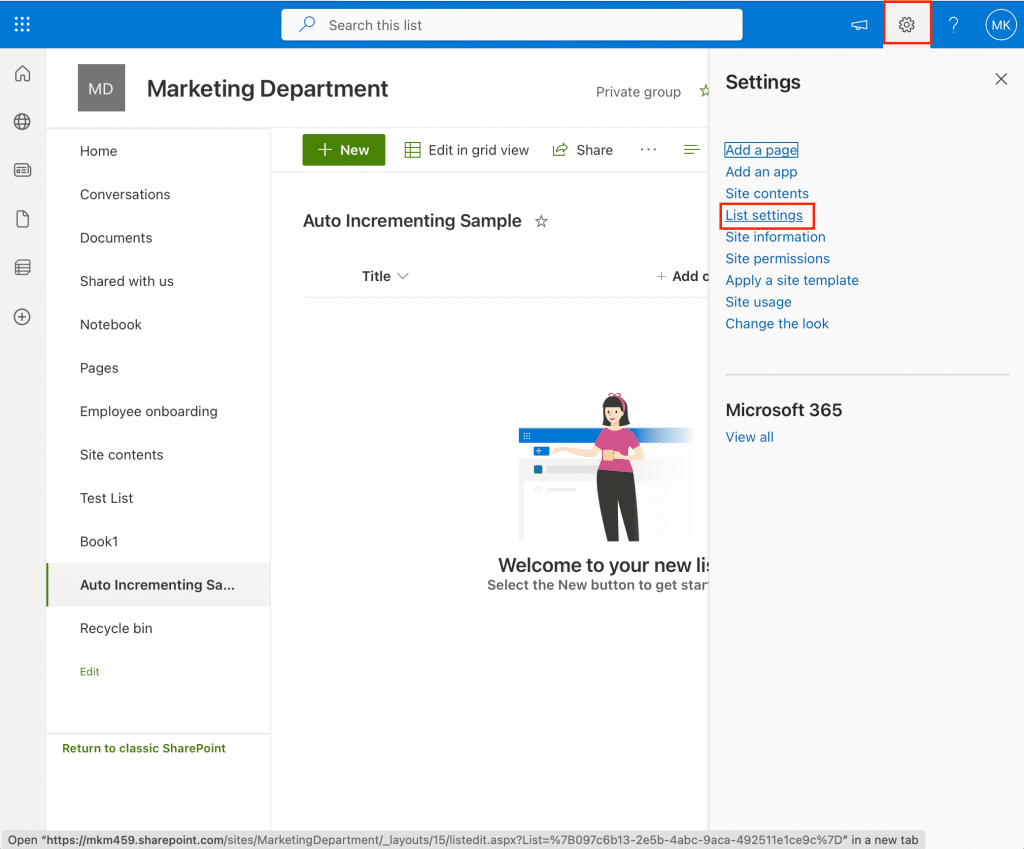
- Scroll down to the Columns section and click on Create column.
- Enter a column name and choose the column type as Calculated (calculation based on other columns).
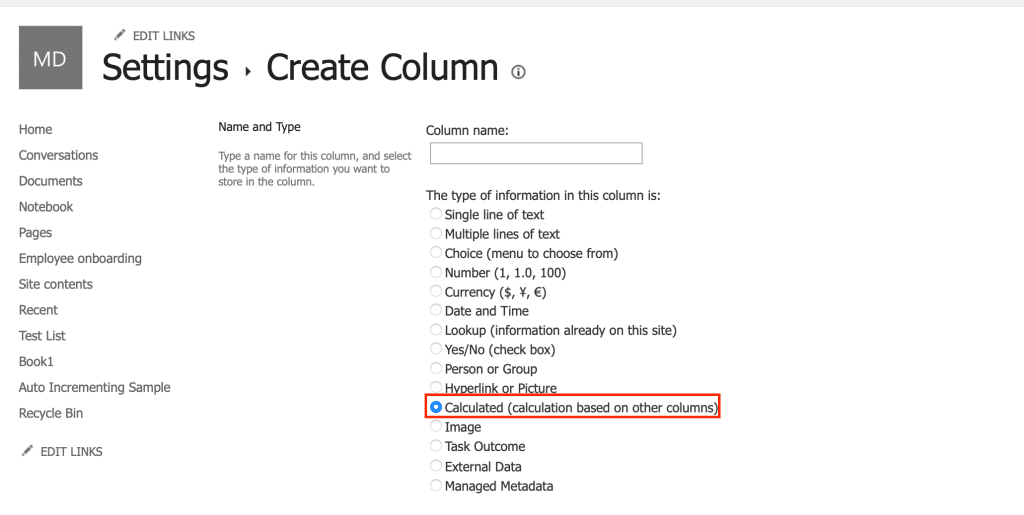
- Give your new SharePoint list column a meaningful name, like “Auto ID” or “Incrementing Number.”
- In the formula box, create a formula that references an existing column and increments its value by 1. For example, if you have a column named “ID,” your formula might look like this: =[ID]+1. You can choose to make the existing column hidden and only have the auto-incremented number column visible.
- Select Number as the data type for your new column.
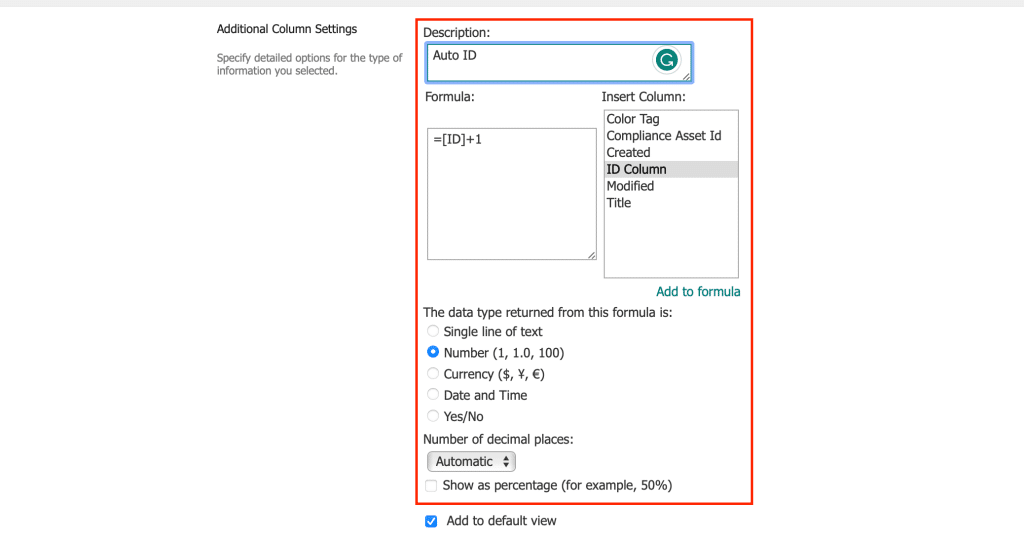
- Click OK to save your changes, and the auto-incrementing number column will be created in your list.
However, it’s essential to keep in mind that this method may not consistently produce an auto-incrementing field since the calculation only updates when you edit this column. For more reliable auto-incrementing solutions, you may consider alternative methods such as workflows or Power Automate.
Method 2: Using SharePoint Designer Workflows
Another option to create an auto-incrementing number field is by using SharePoint Designer to create workflows. Workflows can be triggered when items are added or modified in the list and can increment the value of an auto-increment column.
Here’s how you can do it:
- If you haven’t already, install and open SharePoint Designer. This tool is essential for creating custom workflows.

- In SharePoint Designer, open the SharePoint Online site where your list is located.
- Click on Workflows in the left-hand navigation and then select List Workflow.
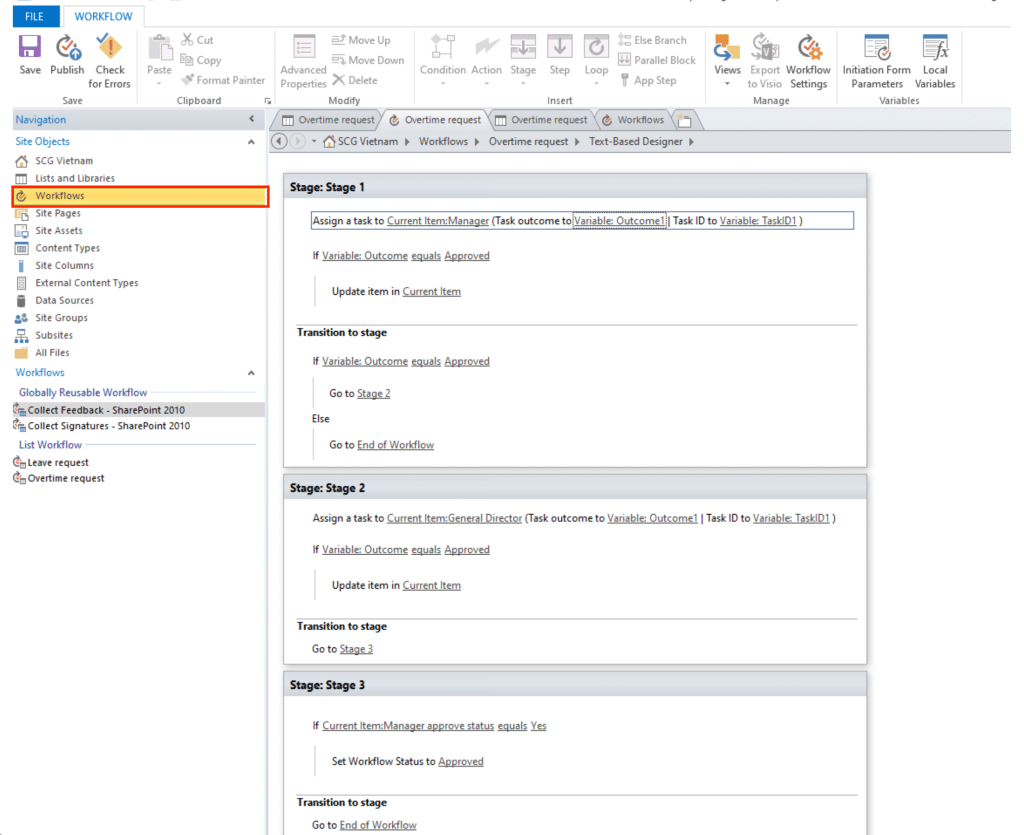
- Choose the SharePoint Online list where you want to create the auto-incrementing number field.
- In your new workflow, add an action to perform a calculation. This can typically be done using the Update List Item or Set Field in Current Item action, depending on your SharePoint Designer version.
- In the action’s settings, specify the column you want to auto-increment, and set the value to the current value of that column plus one. For instance, if you want to increment an “ID” column, you would set the action to [ID] + 1.
- Set the workflow to automatically trigger whenever a new item is added to the list.
- Save your workflow and then publish it to the list.
By creating this custom workflow in SharePoint Designer, you can ensure that your auto-incrementing number field updates consistently each time a new item is added to your SharePoint Online list.
On another note, this method offers more control and reliability compared to calculated columns alone.
Now let’s check out the third method using one of our favorite tools, Power Automate.
Method 3: Using Microsoft Power Automate

Microsoft Power Automate (formerly Microsoft Flow) is another solution for adding an auto-incrementing number field to a SharePoint Online list.
You can create a flow that updates the value of a number column whenever an item is added or modified in the list.
Here’s how to do it:
- Access Microsoft Power Automate, which is a cloud-based automation platform. You can access it through a web browser.
- Create a new flow, which you can trigger based on specific events, such as when a new item is added to your SharePoint Online list.
- Inside your flow, include a When an item is created or modified trigger, specifically for your SharePoint list. This trigger initiates the flow whenever something new is added or changed in the list.
- In your flow, add actions to perform tasks. The key action is to update the SharePoint list item.
- Use the Get items action to fetch the items already in your list and determine the highest number in the number column. This step is important to ensure you don’t start with a duplicate number.
- Add an Update item action in your flow to increase the number for any new item that triggers the flow.
- Set up additional settings for your flow, specifying how often it should run and any conditions that need to be met.
- Test your flow to ensure it works as intended. Once satisfied, save and activate the flow.
By following these steps, you can successfully establish an auto-incrementing number field in your SharePoint Online list.
Explore more about the power of a SharePoint list and Power Automate:
Try out these 4 methods and choose the approach that best suits your requirements and skillset.
Troubleshooting Issues

Issue 1: Auto-incrementing number not working as expected
Solution: Ensure that you have set up your field correctly with the appropriate data type and column settings.
Also, verify that your Power Automate flow or SharePoint Designer Workflow has been set up correctly to automate the incrementation process. If you’re using calculated columns, double-check your formula for any errors.
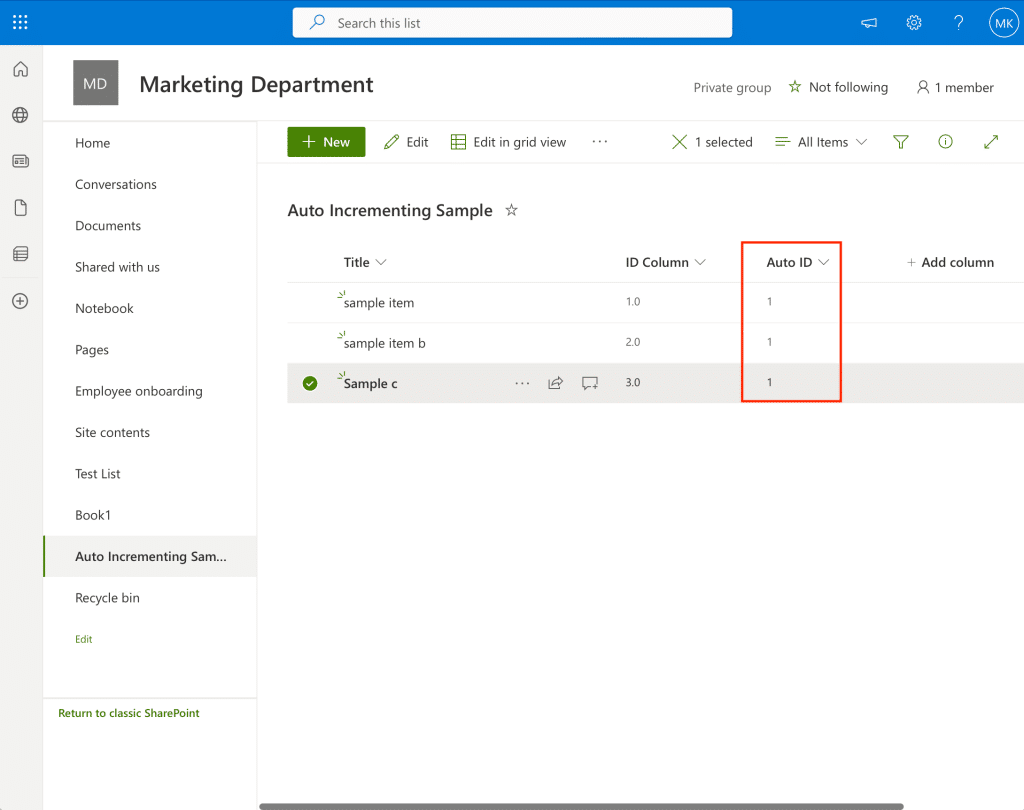
Issue 2: Number Resets to 1
Solution: If the auto-incremented number resets to 1 when you add a new item instead of continuing from the last value, review your flow’s logic, specifically the step responsible for incrementing the number. Ensure that it retrieves the correct maximum value from the number column.
Remember to test and validate your changes to ensure proper functionality before deploying them in a live environment. Not the answer you’re looking for? Consult SharePoint documentation or seek assistance from support forums, like the Microsoft Community forums, to help troubleshoot and resolve any problems you face.
Issue 3: Duplicate auto-increment numbers
Solution: If your SharePoint list experiences duplicate numbers for the auto-increment field, it could be a result of multiple users adding new items simultaneously, causing the flow or workflow to run at the same time.
Consider implementing a locking mechanism or using a secondary list to temporarily store increment requests and process them one at a time.
Issue 4: Erratic Number Sequences
Solution: If the auto-incremented numbers appear out of order or irregular, examine your flow’s trigger conditions and actions. Ensure that they are consistent and accurate. Also, consider using SharePoint Designer workflows for more complex logic if needed.
Final Thoughts

Creating an auto-incrementing number field in a SharePoint Online list can streamline data management and organization. By following the steps outlined in this guide, you can efficiently implement this feature.
While challenges may arise, troubleshooting and careful configuration will help you achieve the desired results.
With this tool at your disposal, your SharePoint Online lists will become more structured and user-friendly, enhancing productivity and collaboration within your organization.
Frequently Asked Questions
What is the best way to add a sequential number generator to a SharePoint list?
One efficient way to add a sequential number generator to a SharePoint list is by utilizing the auto-generated ID column which automatically increments each time a new item is added. Alternatively, you can use either calculated columns with a formula based on the ID column or create a workflow with SharePoint Designer or Power Automate to increase a number field each time an entry is made.
In SharePoint Online, how can I add an ID column to a list that automatically increments?
SharePoint Online automatically includes an auto number column (ID) in every list, which increments for each item added. This ID column cannot be modified or removed, but you can use it as a basis for creating custom, auto-incrementing fields or display it directly in your list views.
How do I add an auto-incrementing number to a SharePoint list’s Title column?
Rather than adding the auto-incrementing number directly to the Title column, it’s recommended to create a separate calculated column that combines the Title and the ID or another auto-incrementing field. For example, create a calculated column with the formula: =CONCATENATE(Title, ” – “, ID). This way, the Title column remains independent, and the auto-incrementing number is clearly visible.
Is there any way to generate a unique, sequential number for each entry in a SharePoint numbered list?
You can accomplish this by either using the built-in ID column that automatically increments or creating custom calculated columns based on the ID column. Additionally, you can use SharePoint Designer or Power Automate to create a workflow that increments a number field for each new entry. Choose the method that best fits your specific requirements and SharePoint environment.


