As SharePoint Online continues to empower businesses seeking seamless document management, team collaboration, and information sharing, it has become increasingly important for administrators to maximize its capabilities and efficiently manage SharePoint Online.
That is where PowerShell comes in. PowerShell allows administrators to automate tasks, manage configurations, and perform bulk operations easily and quickly.
You can connect SharePoint Online to PowerShell in 3 easy steps:

- Install the SharePoint Online Management Shell.
- Connect SharePoint Online to PowerShell.
- Start using SharePoint Online PowerShell cmdlets.
Read on as we show you what this tool has to offer, as well as a step-by-step guide on how to connect to it, manage it, and disconnect from it when you are done using it.
What is PowerShell?
PowerShell is a versatile and powerful tool made by Microsoft that helps you control and automate your computer.
The tool works using:
- Commands: These SharePoint Online commands are like sentences that tell your computer what to do.
- Objects: PowerShell deals with real things on your computer, like files, folders, or settings. It turns these things into “objects” that you can work with, just like you would with physical objects in the real world.
- Cmdlets: To do specific tasks, PowerShell uses special commands called “cmdlets” (pronounced “command-lets”). Each one of the online PowerShell cmdlets has a specific job, such as creating a file or changing a setting.
- Pipelines: You can also combine cmdlets in a “pipeline.” This means one cmdlet’s output can be used as input for the next one. It’s like a series of steps in a recipe.
- Scripting: PowerShell lets you write scripts, which are like short programs that automate tasks. You can save these scripts and run them whenever you need to repeat a task.
Now let’s talk about why companies are using this powerful tool.
Why Use PowerShell?

There are several reasons why companies use PowerShell.
These reasons include:

- Automation: PowerShell excels at automating repetitive and time-consuming tasks. Companies use it to script and schedule jobs, reducing manual work and improving efficiency.
- Remote Management: PowerShell allows IT teams to manage remote servers and devices, making it invaluable for organizations with distributed infrastructure.
- Scripting: PowerShell’s scripting capabilities enable the development of custom solutions tailored to a company’s specific needs. These scripts can streamline complex processes, enforce company policies, and enhance security measures.
- Reporting and Monitoring: PowerShell can retrieve real-time data and generate reports on system performance, security, and compliance. This is vital for keeping systems healthy and ensuring regulatory compliance.
- Integration: PowerShell integrates seamlessly with Microsoft products like Windows Server, Active Directory, and Exchange, making it a preferred choice for organizations heavily invested in Microsoft technologies.
It also supports integration with other systems and services through APIs. - Security: PowerShell provides robust security features, including role-based access control and execution policies.
This helps organizations maintain tight control over who can run scripts and what those scripts can do, reducing security risks.
How To Connect SharePoint Online to PowerShell

Setting up the SharePoint Online PowerShell module is thankfully a fairly easy process and includes several key steps.
Here is an easy-to-follow guide to accomplishing each one:
Step 1: Install the SharePoint Online Management Shell
The SharePoint Online Management Shell is a collection of PowerShell cmdlets designed specifically for managing SharePoint Online.
You can install this module in two ways:
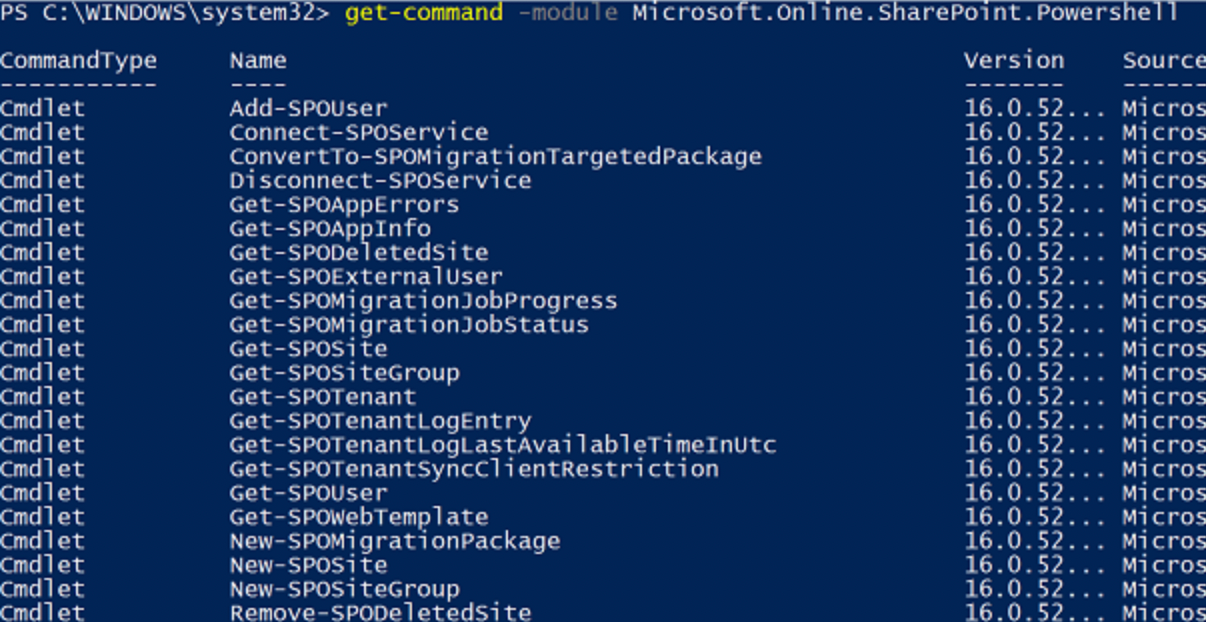
- Via the PowerShell Gallery – To do so, simply run the following command from your Windows PowerShell:
Install-Module -Name Microsoft.Online.SharePoint.PowerShellThis command will make it available for use in your PowerShell console. - Via the Microsoft Website – In the Download Center locate the SharePoint Online Management Shell download page and click download.
Once the installation is complete, you’ll be ready to proceed with connecting to SharePoint Online.
It is essential to ensure that your PowerShell is up-to-date to experience the best performance and compatibility with SharePoint Online so be sure to visit the PowerShell GitHub repository and download the latest available release.
Step 2: Connect to SharePoint Online
You can access SharePoint Online using Connect-SPOService Cmdlet.
This command establishes a connection to your SharePoint Online Administration Center and must be executed before you can use any other SharePoint Online cmdlets.
To accomplish this connection:
- Open SharePoint Online Management Shell by typing Sharepoint in the Start menu and clicking on SharePoint Online Management Shell.
- Run the Connect-SPOService cmdlet. The basic syntax for the Connect-SPOService cmdlet is as follows:
Connect-SPOService -Url https://-admin.sharepoint.com -CredentialReplace with your organization’s domain and with your SharePoint Online administrator or Global Administrator credentials.
Step 3: Start using SharePoint Online PowerShell cmdlets
Success! You are now ready to start managing your SharePoint Online environment using various cmdlets.
Handling Multifactor Authentication (MFA)

If your account uses multifactor authentication (MFA), you might need to use an alternative method to connect to SharePoint Online.
In this case, you can use the Azure Cloud Shell from the Microsoft 365 admin center:
- Go to the Microsoft 365 admin center.
- Select the PowerShell window icon from the upper-right corner of the taskbar.
- Choose PowerShell in the Welcome to Azure Cloud Shell pane.
Please note that you will need an active Azure subscription for your organization that is tied to your Microsoft 365 subscription.
Once you’re connected to the Azure Cloud Shell, you can use the Connect-SPOService cmdlet mentioned earlier to connect to your SharePoint Online organization.
You can now efficiently manage your SharePoint Online environment and automate administrative tasks, making your work more streamlined and effective.

How to Use SharePoint Online With PowerShell
When managing a SharePoint Online site, you’ll need to use the SharePoint Online Management Shell to perform a variety of tasks.
You can use SharePoint Online cmdlets to perform tasks like creating new site collections, managing users and groups, configuring sharing settings, and monitoring site usage.
Common Cmdlets
Here are some of the common cmdlets that organizations use:
Site cmdlets
- Get-SPOSite: Retrieves all Sharepoint sites in your tenant along with their properties, such as their URLs, storage quota, and template.
- New-SPOSite: Creates a new SharePoint site collection. For example:
New-SPOSite -Url https://yourdomain.sharepoint.com/sites/example -Owner "your-email@example.com" -StorageQuota 100 -Template "STS#0"This command will create a new site collection with the specified URL, owner, storage quota, and template. - Set-SPOSite: Modifies the properties of an existing site collection. For instance, you can modify the storage limit for a specific site by using the following command:
Set-SPOSite -Identity https://your-domain/sites/example-site -StorageQuota 0000 - Set-SPOTenant: Modifies properties at the SharePoint Online tenant level. For example, you can disable sharing with external users by running the following command:
Set-SPOTenant -SharingCapability Disabled
User cmdlets:
- Get-SPOUser: Retrieves user information for a specified site collection.
- New-SPOUser: Adds a new user. For example:
New-SPOUser -Site "https://yourdomain.sharepoint.com/sites/sitename" -LoginName "user@yourdomain.com" -Title "Display Name" - Add-SPOUser: Adds a user to a site collection and assigns them a role. For example, to add a user to a site:
Add-SPOUser -Site "https://yourdomain.sharepoint.com/sites/example" -LoginName "user@example.com" -Group "Site Members" - Remove-SPOUser: Removes a user from a site collection.
Group cmdlets
- New-SPOSiteGroup: Creates a new group.
For example:New-SPOSiteGroup -Site "https://yourdomain.sharepoint.com/sites/sitename" -GroupName "Group Name" -PermissionLevels "Full Control" - Set-SPOSiteGroup: Modifies existing groups and their permission levels.
- Remove-SPOSiteGroup: Deletes a group.
- Add-SPOUserToGroup: Adds a user to a group.
For example:Add-SPOUserToGroup -Site "https://yourdomain.sharepoint.com/sites/sitename" -LoginName "user@yourdomain.com" -GroupName "Group Name" - Remove-SPOUserFromGroup: Removes a user from a group.
Permissions cmdlets
- Grant-SPOUserPermission: Grants user permission.
- Set-SPOUserPermission: Modifies user permission.
- Revoke-SPOUserPermission: Revokes user permission.
- Grant-SPOSiteGroupPermission: Grants group permission.
- Set-SPOSiteGroupPermission: Modifies group’s permissions.
- Revoke-SPOSiteGroupPermission: Revokes group’s permission.
By leveraging the power of SharePoint Online cmdlets, you can efficiently manage your SharePoint Online environment and automate administrative tasks, making your work more streamlined and effective.
Task Automation and Scripts

When it comes to creating scripts, you have the option to use various SharePoint Online cmdlets based on your requirements.
You can use the PnP PowerShell module, which provides a large set of PnP PowerShell cmdlets for easier management of SharePoint Online elements.
To automate the execution of your scripts, you can leverage Azure Automation or Power Automate. These services allow you to schedule the execution of your PowerShell scripts at any given time, with the desired frequency.
You can also create triggers based on specific events or conditions that will initiate the script.
Remember to follow best practices, document your code, and test it thoroughly before deploying it to a production environment.
Automating tasks with SharePoint Online PowerShell scripts can save you time, improve management, and optimize your overall SharePoint experience.
Disconnecting Your PowerShell Session

When working with SharePoint Online and PowerShell, it’s important to disconnect from the service when you’re done to ensure resources are freed up.
You can disconnect by simply running the Disconnect-SPOService cmdlet in the PowerShell console.
Disconnect-SPOServiceThe Disconnect-SPOService cmdlet does not require any arguments or additional information to be specified. Executing the command should disconnect the current SharePoint Online service connection.
It’s important to note that, as a Global Administrator, you can also disconnect the service by running the Connect-SPOService cmdlet to create a new connection, which will terminate your existing session.
Remember to always follow best practices and disconnect your session when you have completed your PowerShell tasks in SharePoint Online.
Explore how you can use SharePoint to elevate your Power BI report development:
Final Thoughts
Connecting SharePoint Online to PowerShell opens up a world of possibilities for managing and optimizing your SharePoint environment.
By following the straightforward steps outlined in this guide, you’ve gained the key to unlock the full potential of SharePoint Online.
Whether you’re an experienced admin or just starting your SharePoint journey, the ability to harness the power of PowerShell will simplify tasks, boost productivity, and empower you to make the most of this indispensable platform. Happy connecting!
Frequently Asked Questions
How do I download SharePoint Online Management Shell?
To download the SharePoint Online Management Shell, visit the official download page and click on the Download button. After downloading, run the installer to install the SharePoint Online Management Shell on your system.

Which command connects SharePoint Online with PowerShell?
To connect SharePoint Online to PowerShell, you need to use the Connect-SPOService cmdlet. Replace org-name with your organization’s name and execute the following command:
Connect-SPOService -url https://*org-name*-admin.sharepoint.com
This command will prompt an Office 365 login page, where you need to enter your credentials.
How do I import the SharePoint Online module?
The SharePoint Online Management Shell comes with the module pre-installed and importing is not necessary.
However, if you want to use the SharePoint Online cmdlets in a regular PowerShell session, you can import the module using the following command:
Import-Module Microsoft.Online.SharePoint.PowerShell
Make sure you install the SharePoint Online Management Shell first.
What is the solution for the ‘Connect-SPOService not recognized’ error?
If you encounter the ‘Connect-SPOService not recognized’ error, it is likely that the SharePoint Online Management Shell is not installed or the module is not loaded correctly.
You can download and install the SharePoint Online Management Shell from the official download page and follow the installation instructions.
After installation, try importing the module using the command mentioned earlier in this FAQ.
How do I fix the ‘Could not connect to SharePoint Online’ error?
If you face the ‘Could not connect to SharePoint Online’ error, it could be due to several reasons like incorrect organization name, network issues, or issues with credentials.
Make sure you are entering the correct organization name in the Connect-SPOService command and that your network connection is stable.
If you are still unable to connect, try ascertaining whether you have the required permissions or if there are any issues with your login credentials.
How can I enable modern authentication for Connect-SPOService?
Modern authentication is now enabled by default for Connect-SPOService.
In case you are experiencing issues with multifactor authentication (MFA), it is recommended to upgrade your SharePoint Online Management Shell to the latest version available on the official download page.
This version supports modern authentication and MFA without requiring additional configuration.