
Creating a calendar in SharePoint Online can greatly benefit you by providing a centralized location for managing upcoming events, deadlines, and schedules.
As a part of the Microsoft ecosystem, SharePoint calendars integrate seamlessly with other Microsoft applications, streamlining your team’s communication and collaboration.
To create a calendar in SharePoint Online:

- Access your selected SharePoint site.
- Go to the Site Contents.
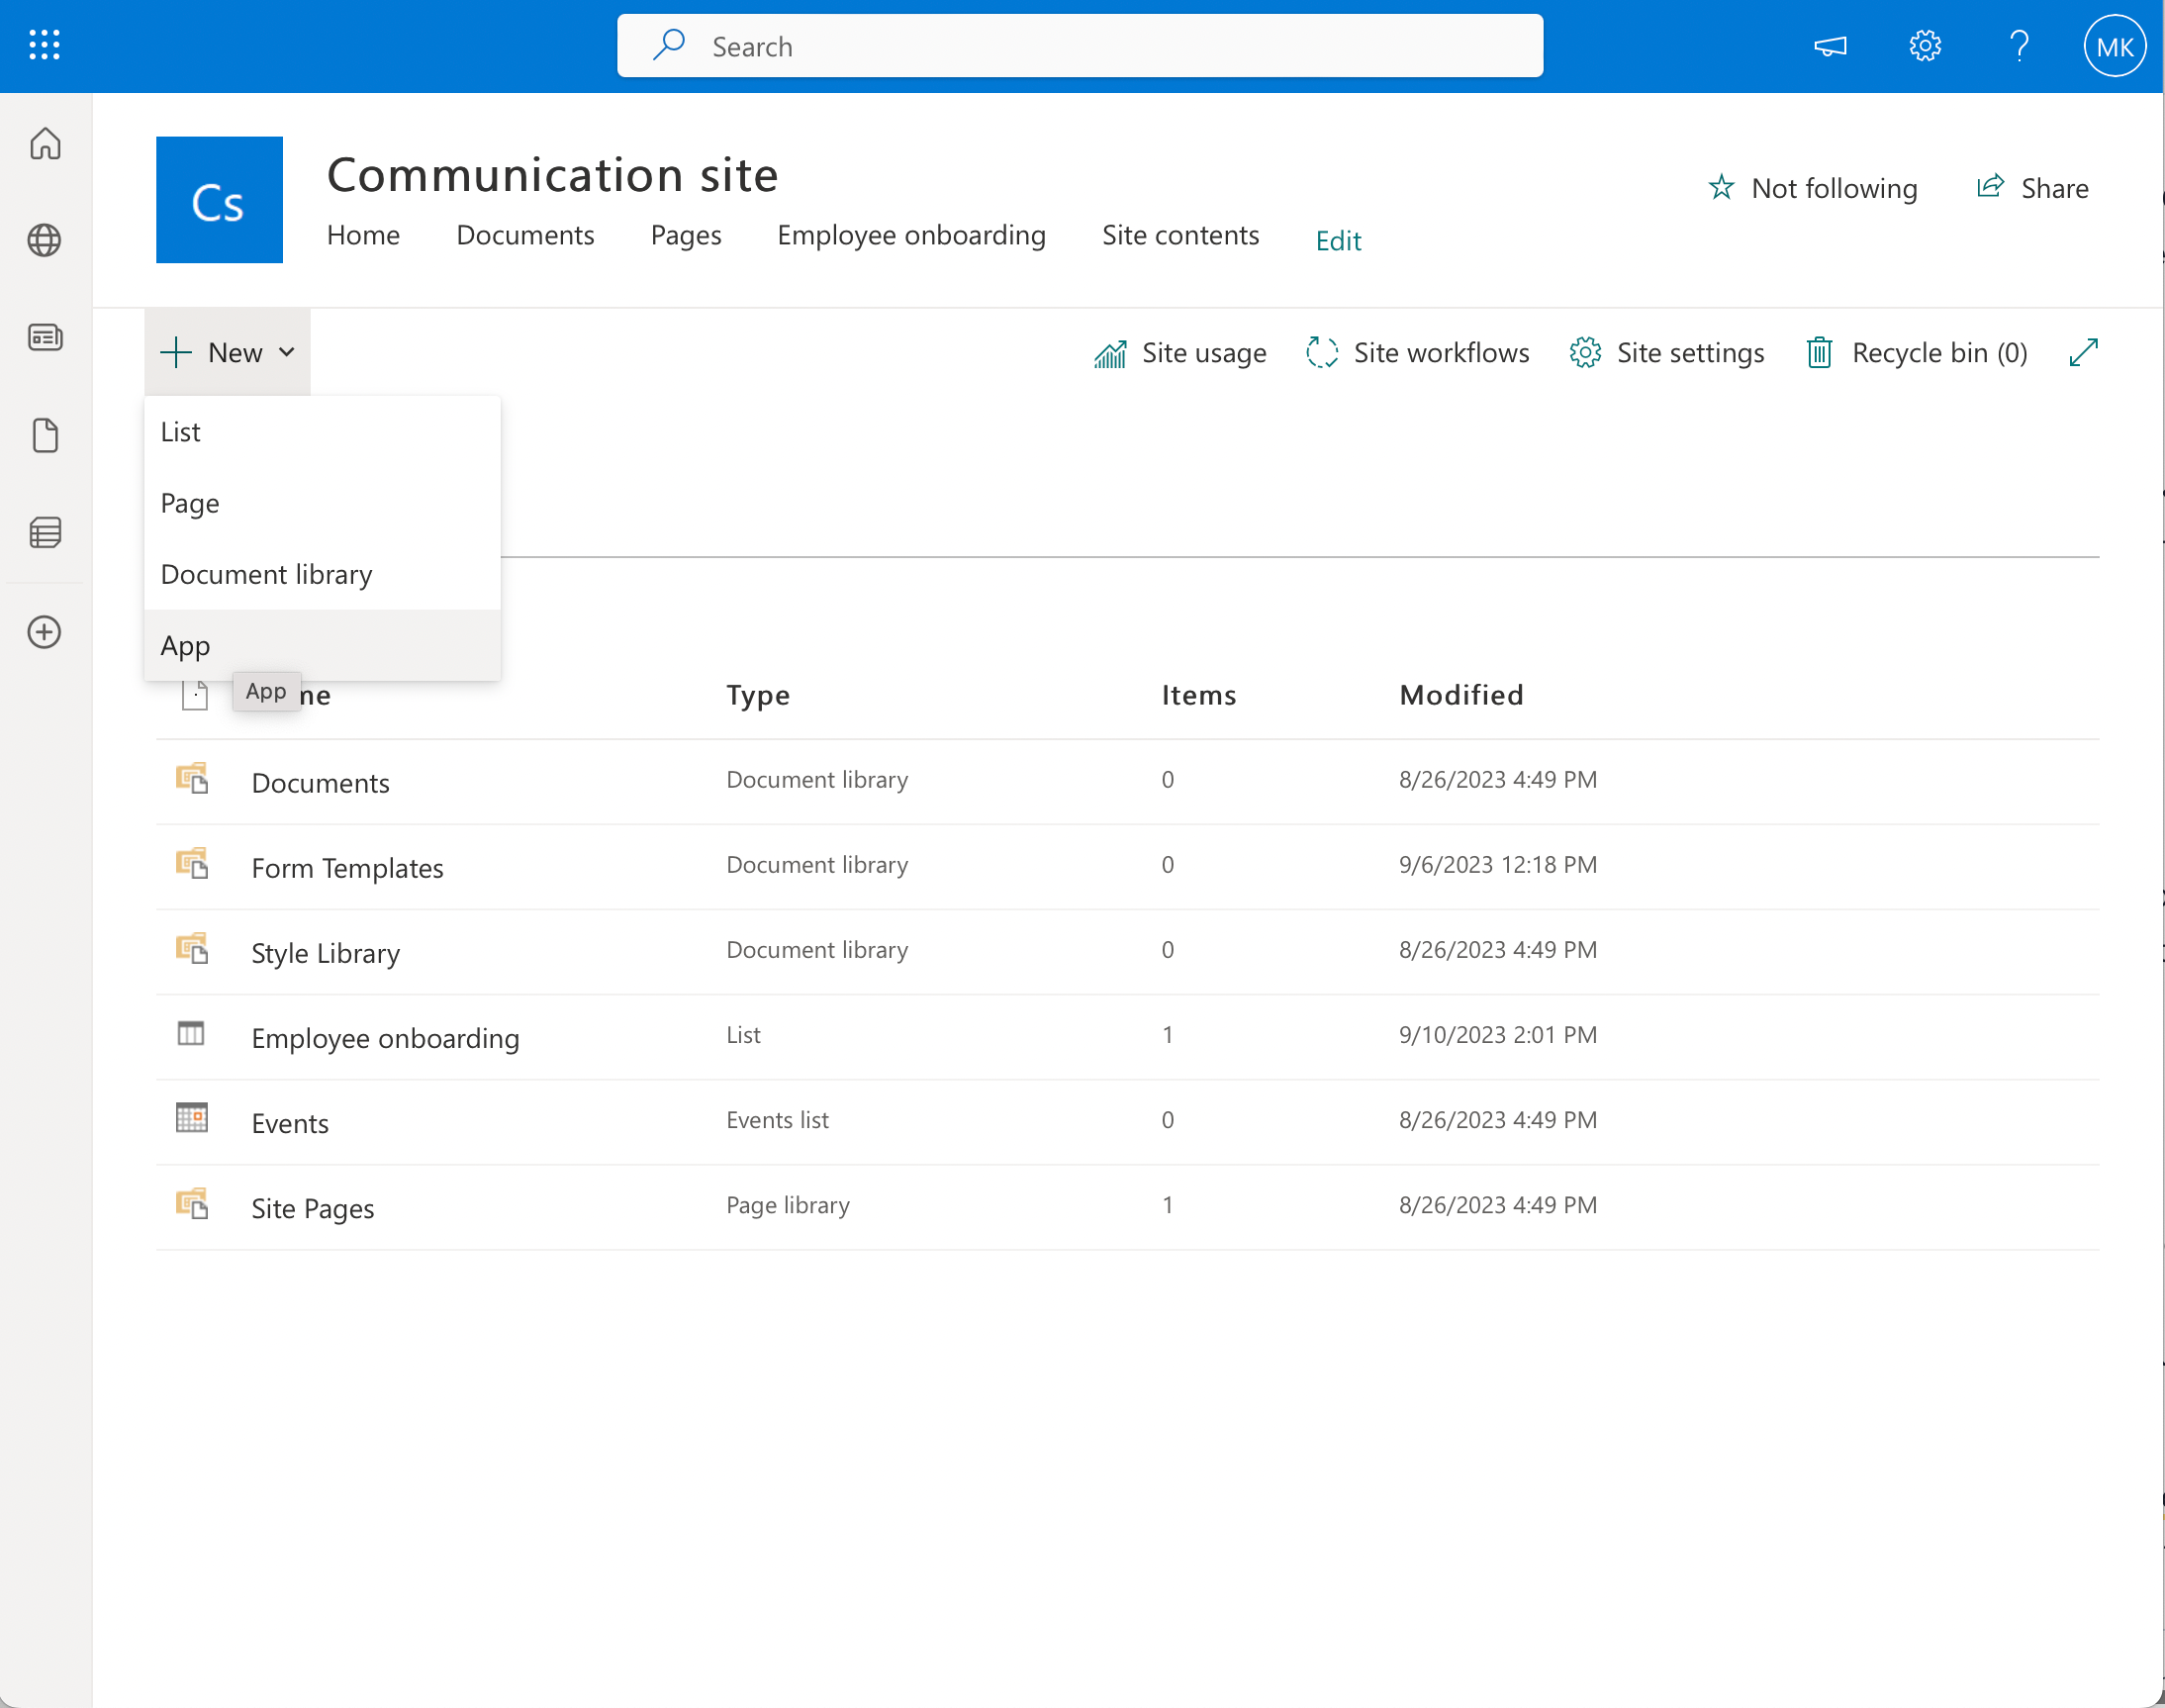
- Click the +New button and select App from the drop-down menu.
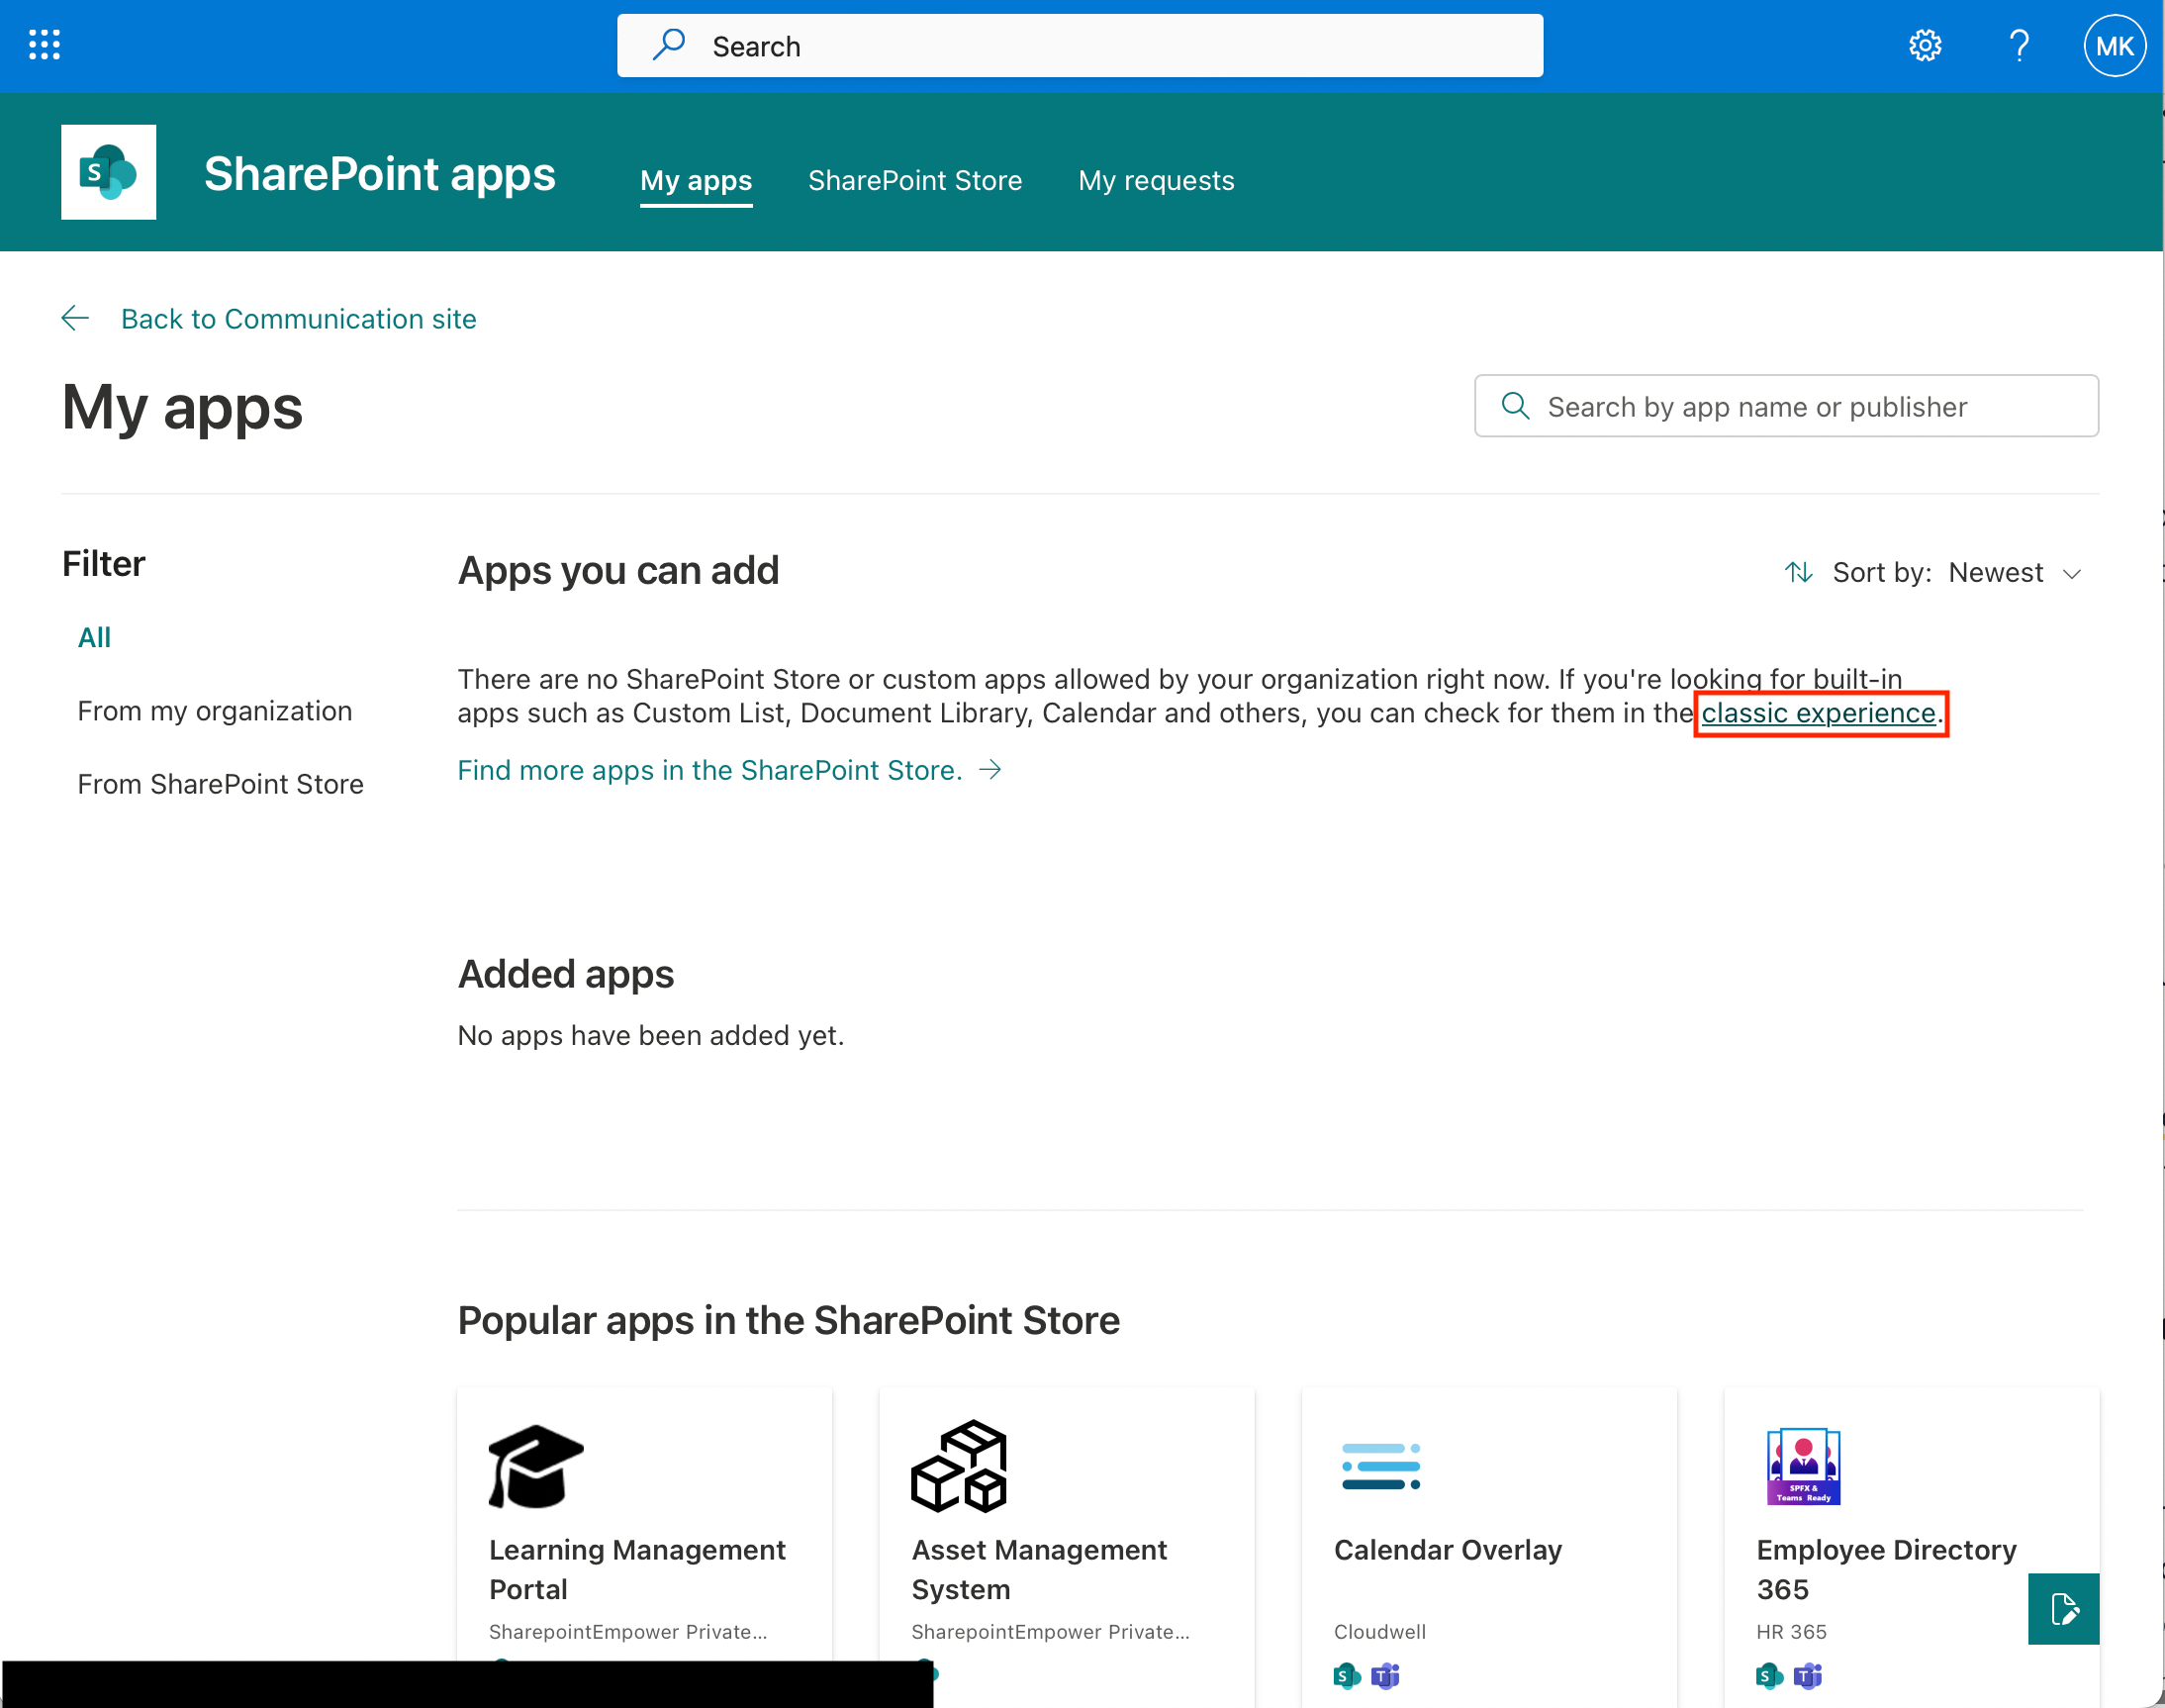
- Click on Classic Experience in the first paragraph.
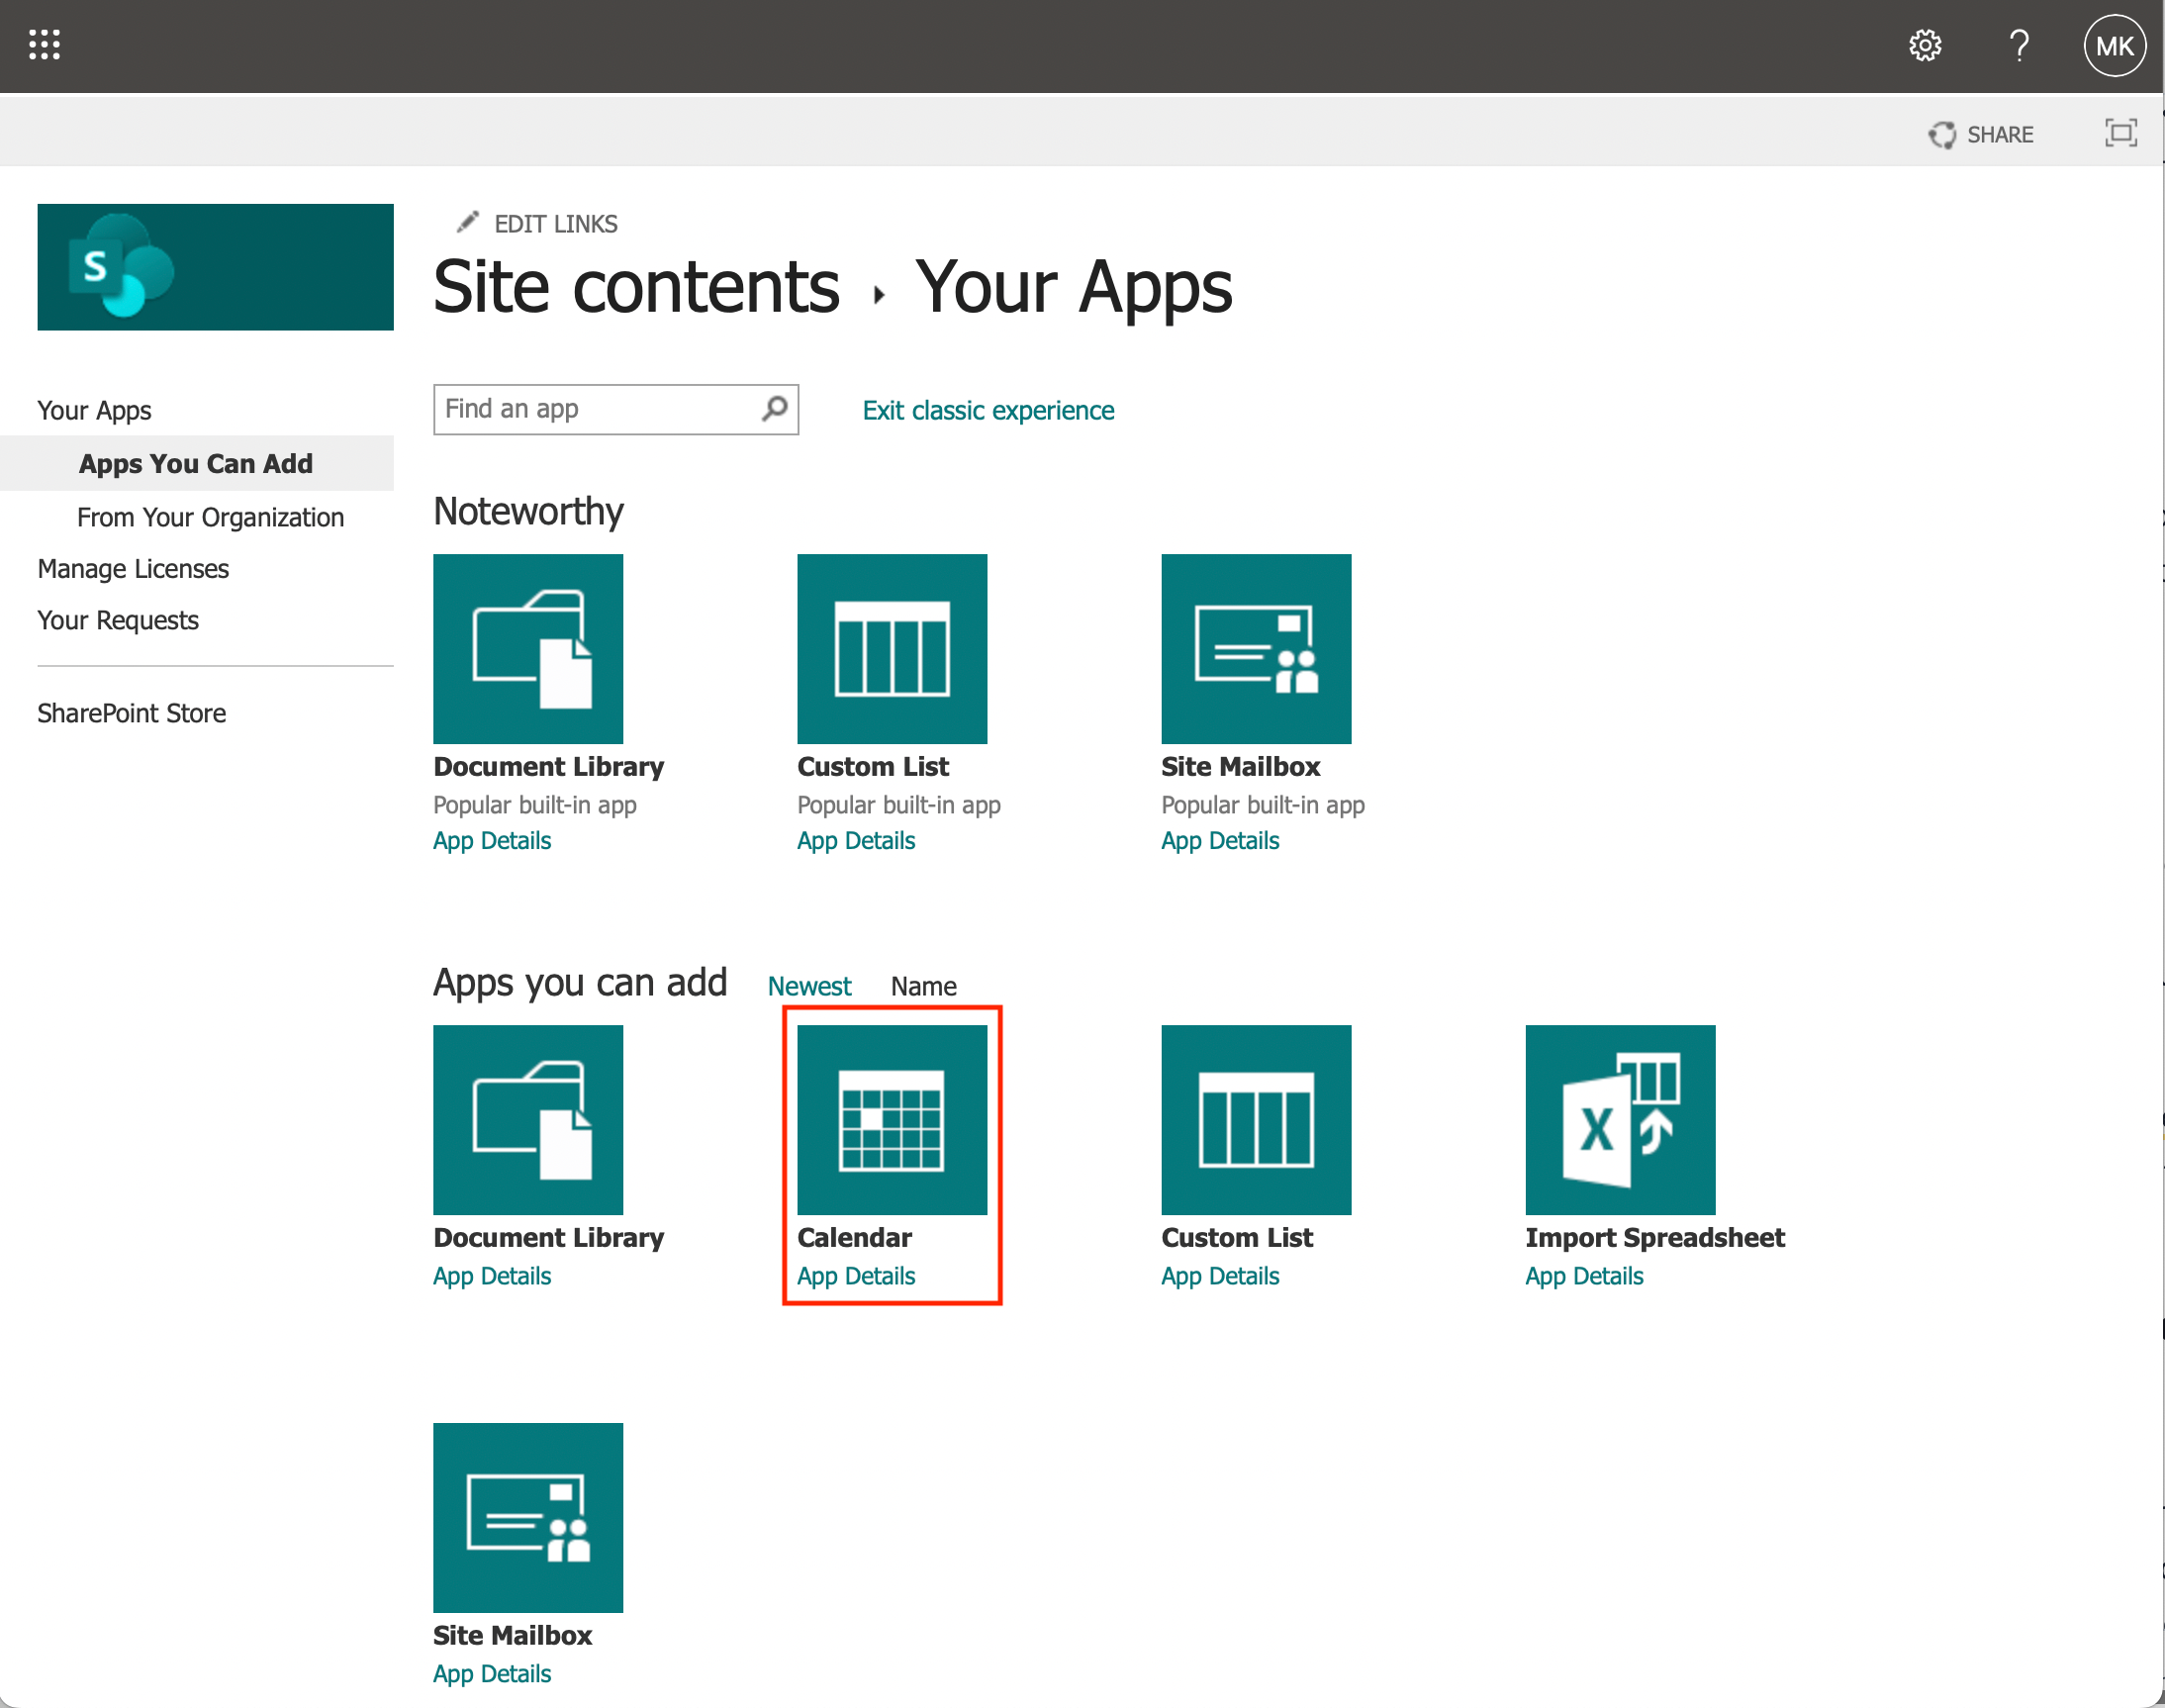
- Select the Calendar app.
- Enter your new calendar’s name and click Create.
But wait, there’s more.
A lot more.
This article will give you an illustrated step-by-step guide to help you create a calendar, customize it, secure it, and integrate it into your other Microsoft products.
SharePoint’s Calendar app ensures that your team stays organized and productive with minimal effort.
So, let’s dive in!
Benefits of Using the SharePoint Calendar
If you need convincing that SharePoint Calendar is worth adding to your SharePoint platform, there are numerous benefits to using the SharePoint Calendar feature for teams and individuals alike.

Here are just some of those benefits:
- Integration with Microsoft 365: SharePoint Calendar seamlessly integrates with Microsoft 365.
This means it works cohesively with other Microsoft applications like Outlook, Teams, and Office applications, making it easy to manage your schedule and stay organized. - Centralized Collaboration: SharePoint Calendar allows teams to maintain a centralized calendar for scheduling events, meetings, and deadlines.
This promotes transparency and ensures that everyone in the organization is on the same page regarding upcoming activities and important dates. - Color-Coding and Categorization: It offers you the option to categorize events using different colors, making it easy to differentiate between various types of activities or appointments.
- Alerts and Reminders: Never miss an important event or deadline again. SharePoint Calendar offers customizable alerts and reminders, sending notifications to users via email or in-app notifications.
- Mobile Accessibility: With SharePoint’s mobile app or responsive web interface, users can access the calendar on the go.
This mobility is crucial in today’s fast-paced work environment, allowing individuals to manage their schedules from anywhere, at any time. - Security and Permissions: SharePoint offers robust security features, allowing you to set permissions at various levels.
You can control who can view, edit, or delete events, ensuring that sensitive information remains protected.
Now let’s get to the step-by-step guide on how to create and use your SharePoint Online calendar.
How to Create a Calendar in SharePoint Online
To add a calendar to your SharePoint Online site follow these 6 easy steps:
- Open your SharePoint site.
- Click on the gear icon in the top right corner and select Site Contents from the dropdown menu.
- Click the New button at the top left of the screen and select App in the drop-down menu.
- Since calendars are a part of Classic Apps in SharePoint, click on classic experience in the 1st paragraph to access the Classic Apps section.
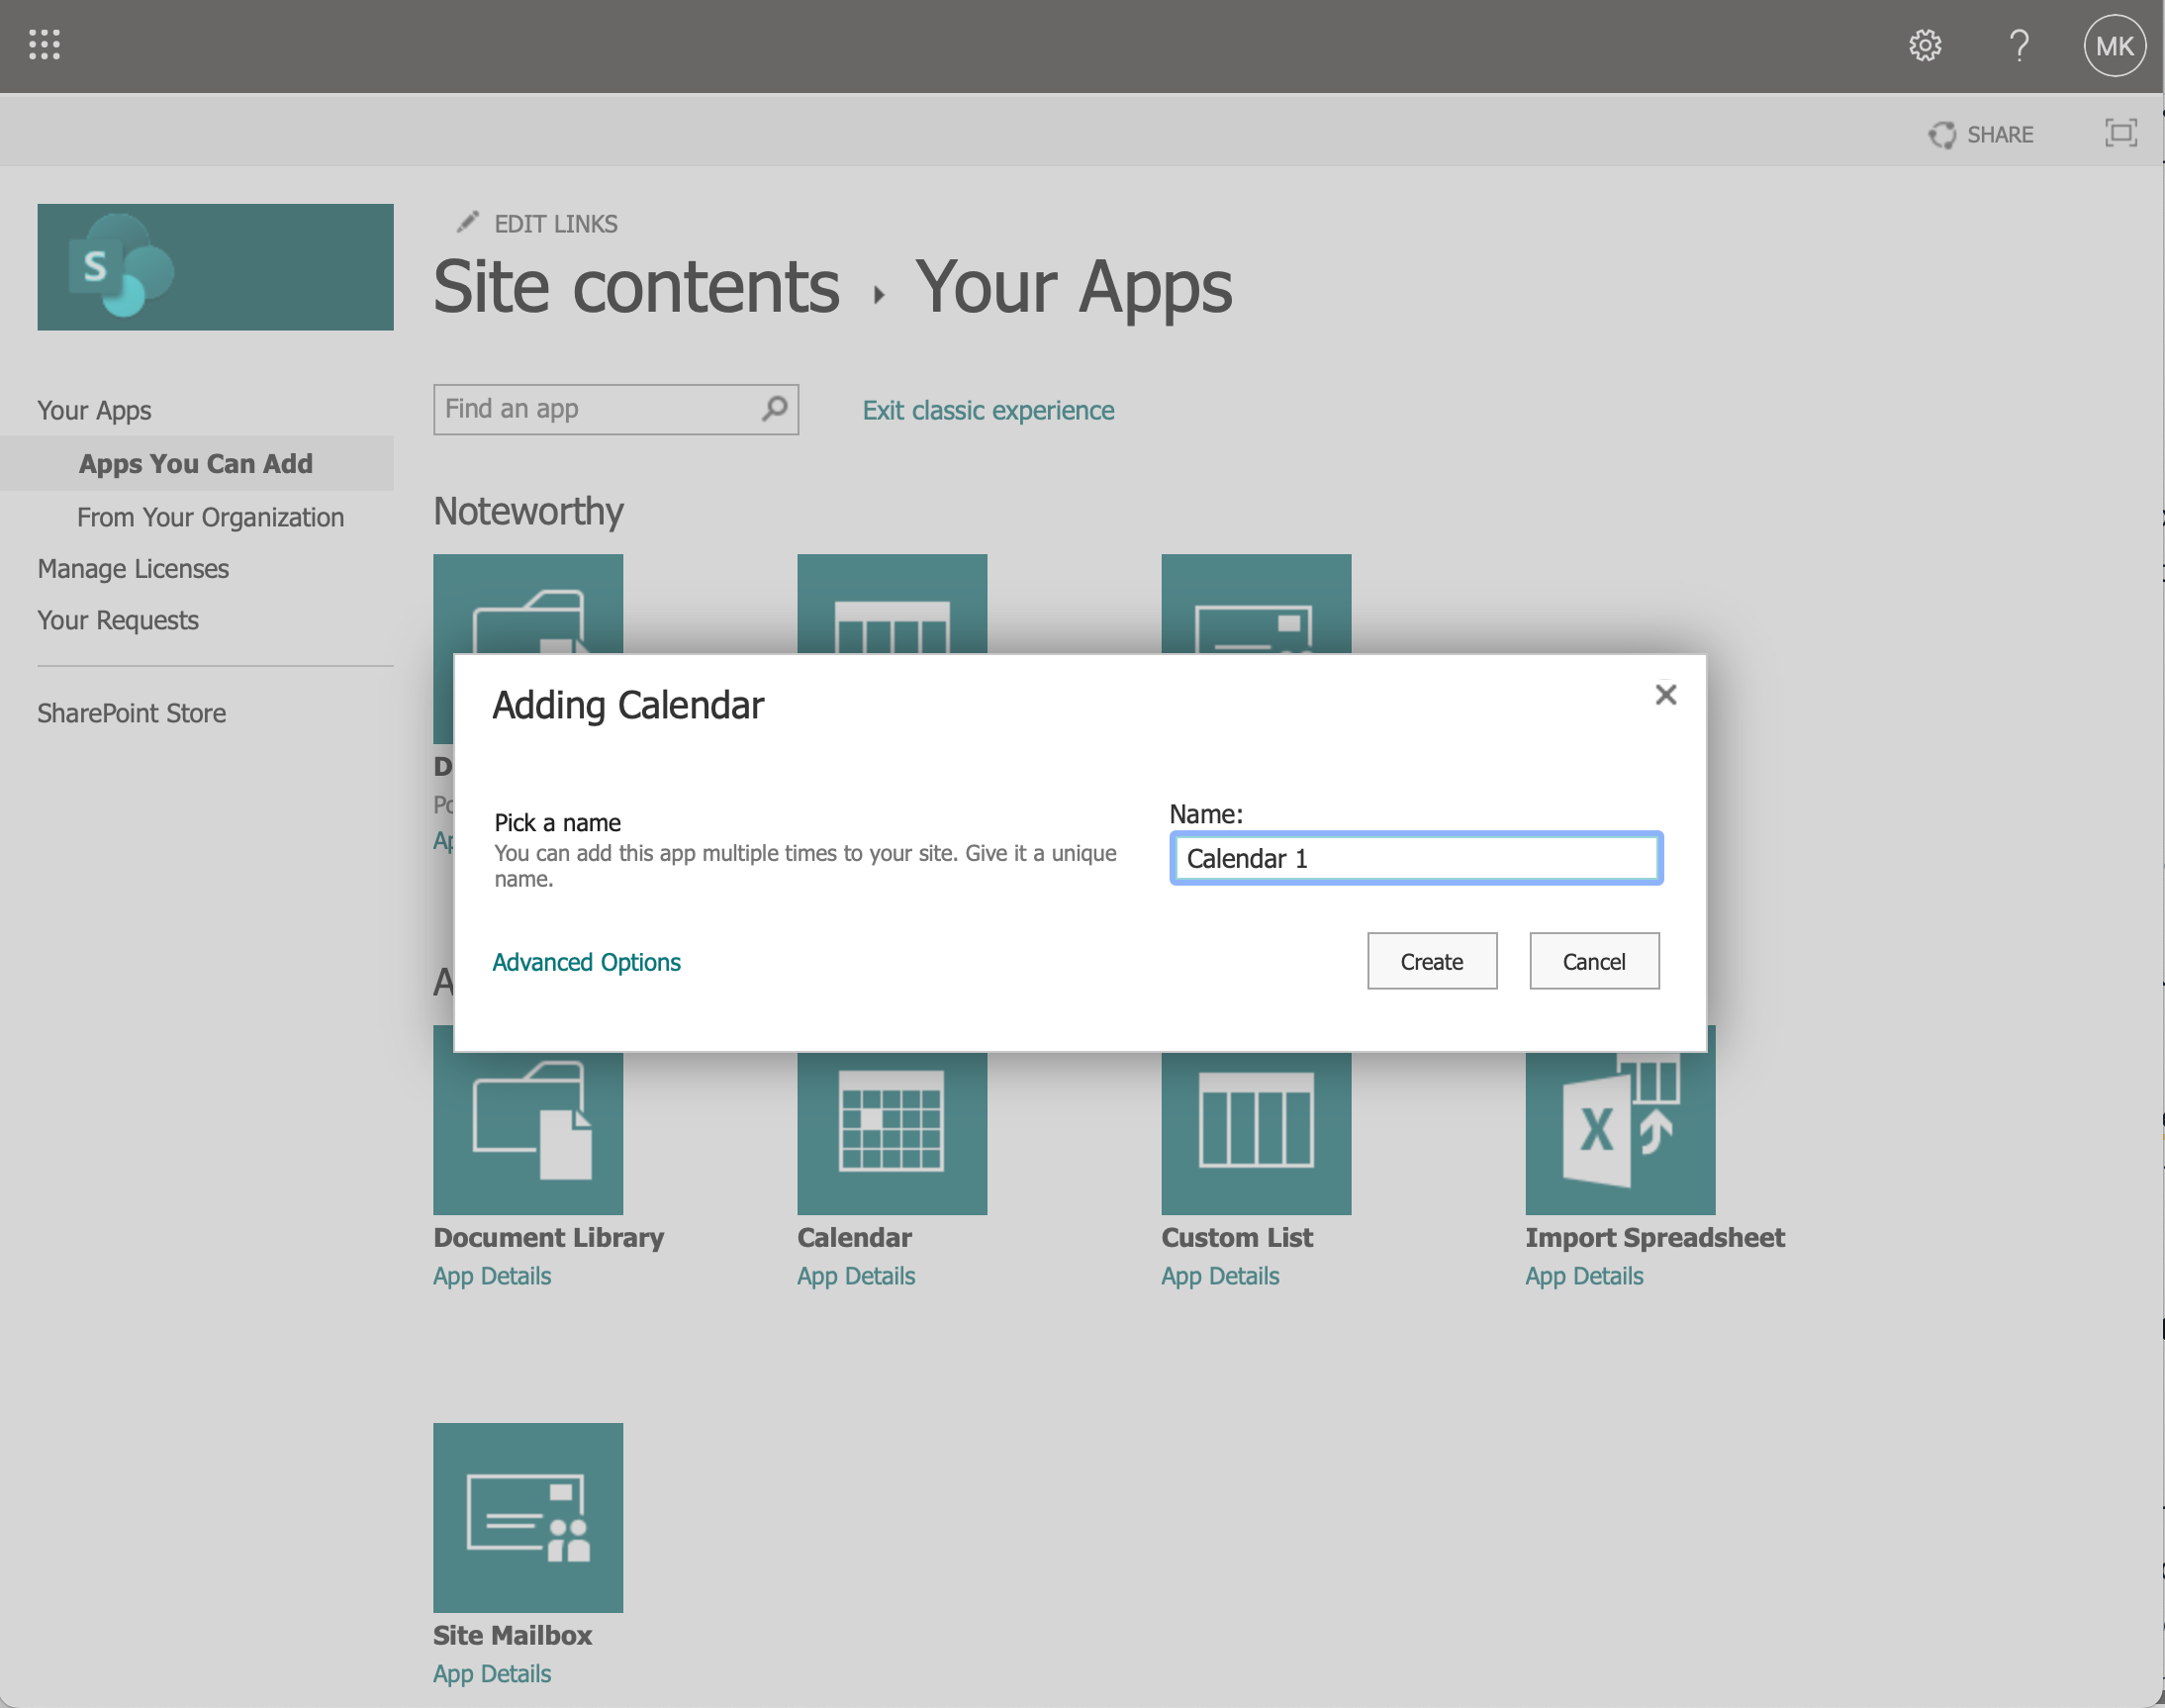
- Scroll down and click on the Calendar web part.
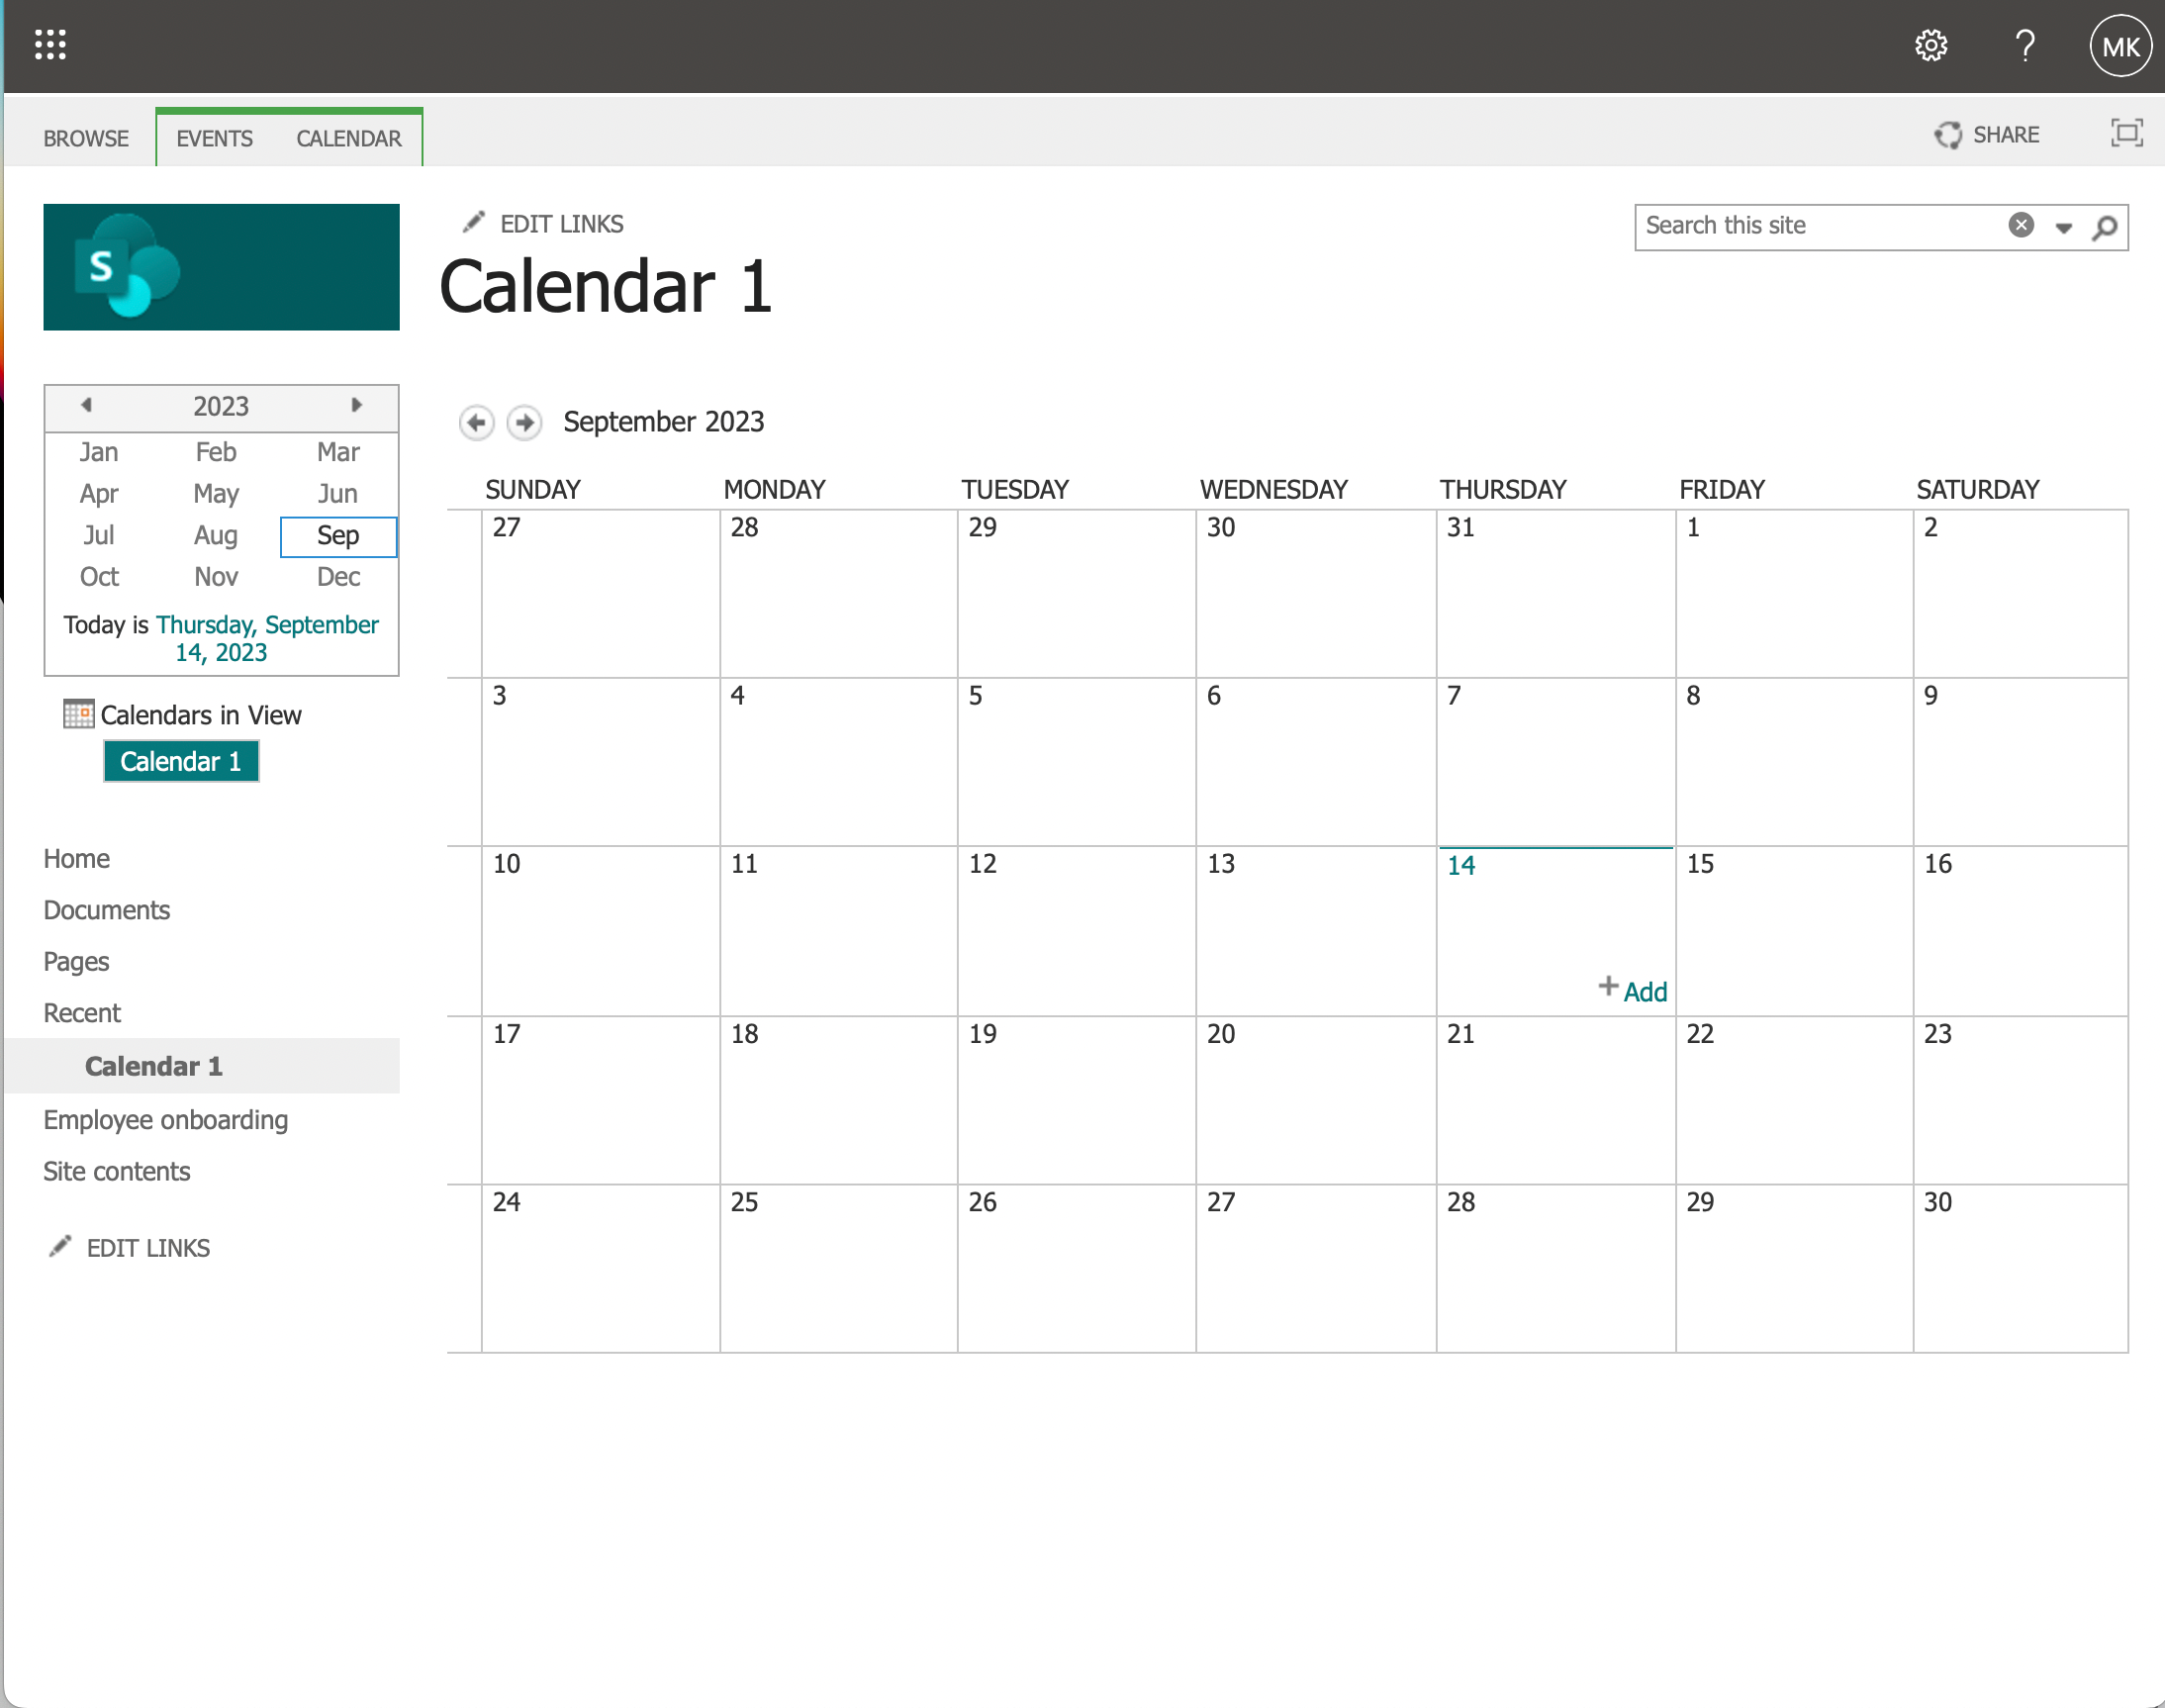
- Type in the desired name of your calendar and click on Create.
Choose a name that is descriptive and relevant to help you identify the calendar easily in the future, especially if you plan to have multiple calendars on your SharePoint site.
Your new calendar will now be added to your SharePoint Online site.
Now that you have added the calendar app, you can further customize your SharePoint calendar and start adding events or appointments.
Customizing the SharePoint Calendar
Creating a New View
To create a new calendar view in SharePoint Online:
- Navigate to your SharePoint site
- Click on the calendar you’d like to customize.
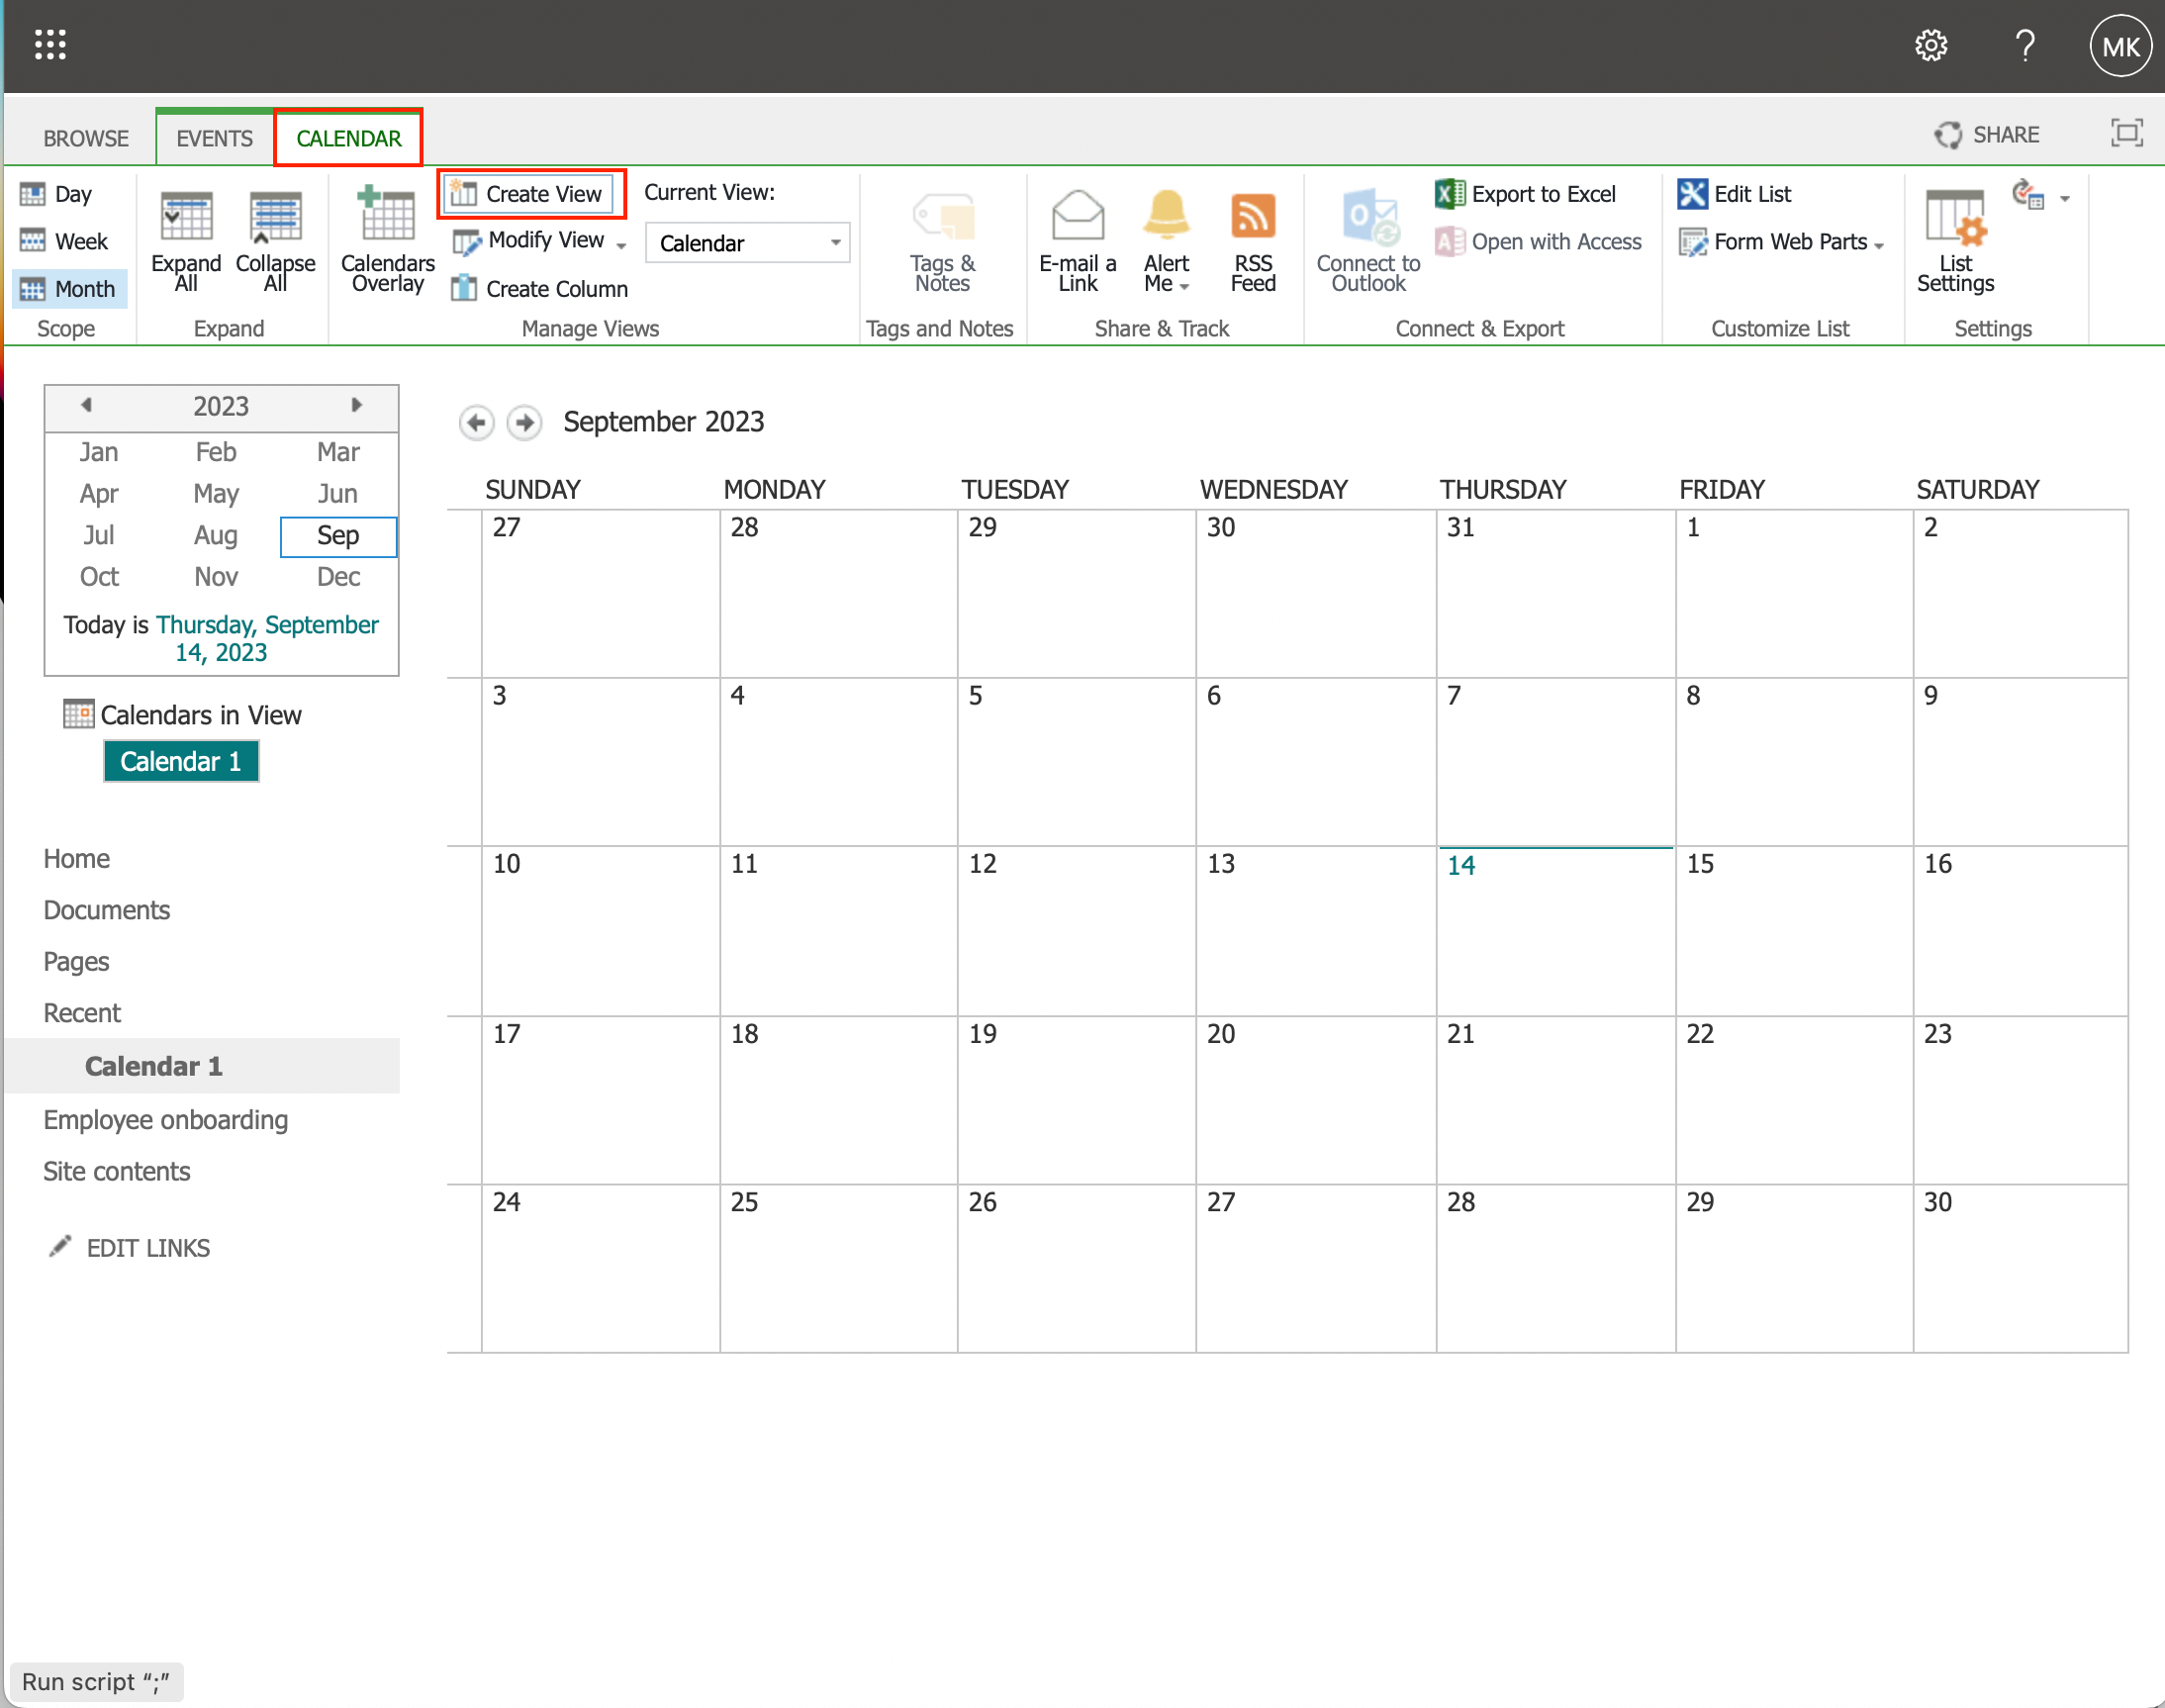
- In the ribbon, click Calendar, then click Create View.
This allows you to add a new view that displays the events in a calendar format.
Adding Events to the Calendar
To add events to your SharePoint Online calendar:
- Start by navigating to the calendar page.
- Click the Add Event button to start creating a new event.
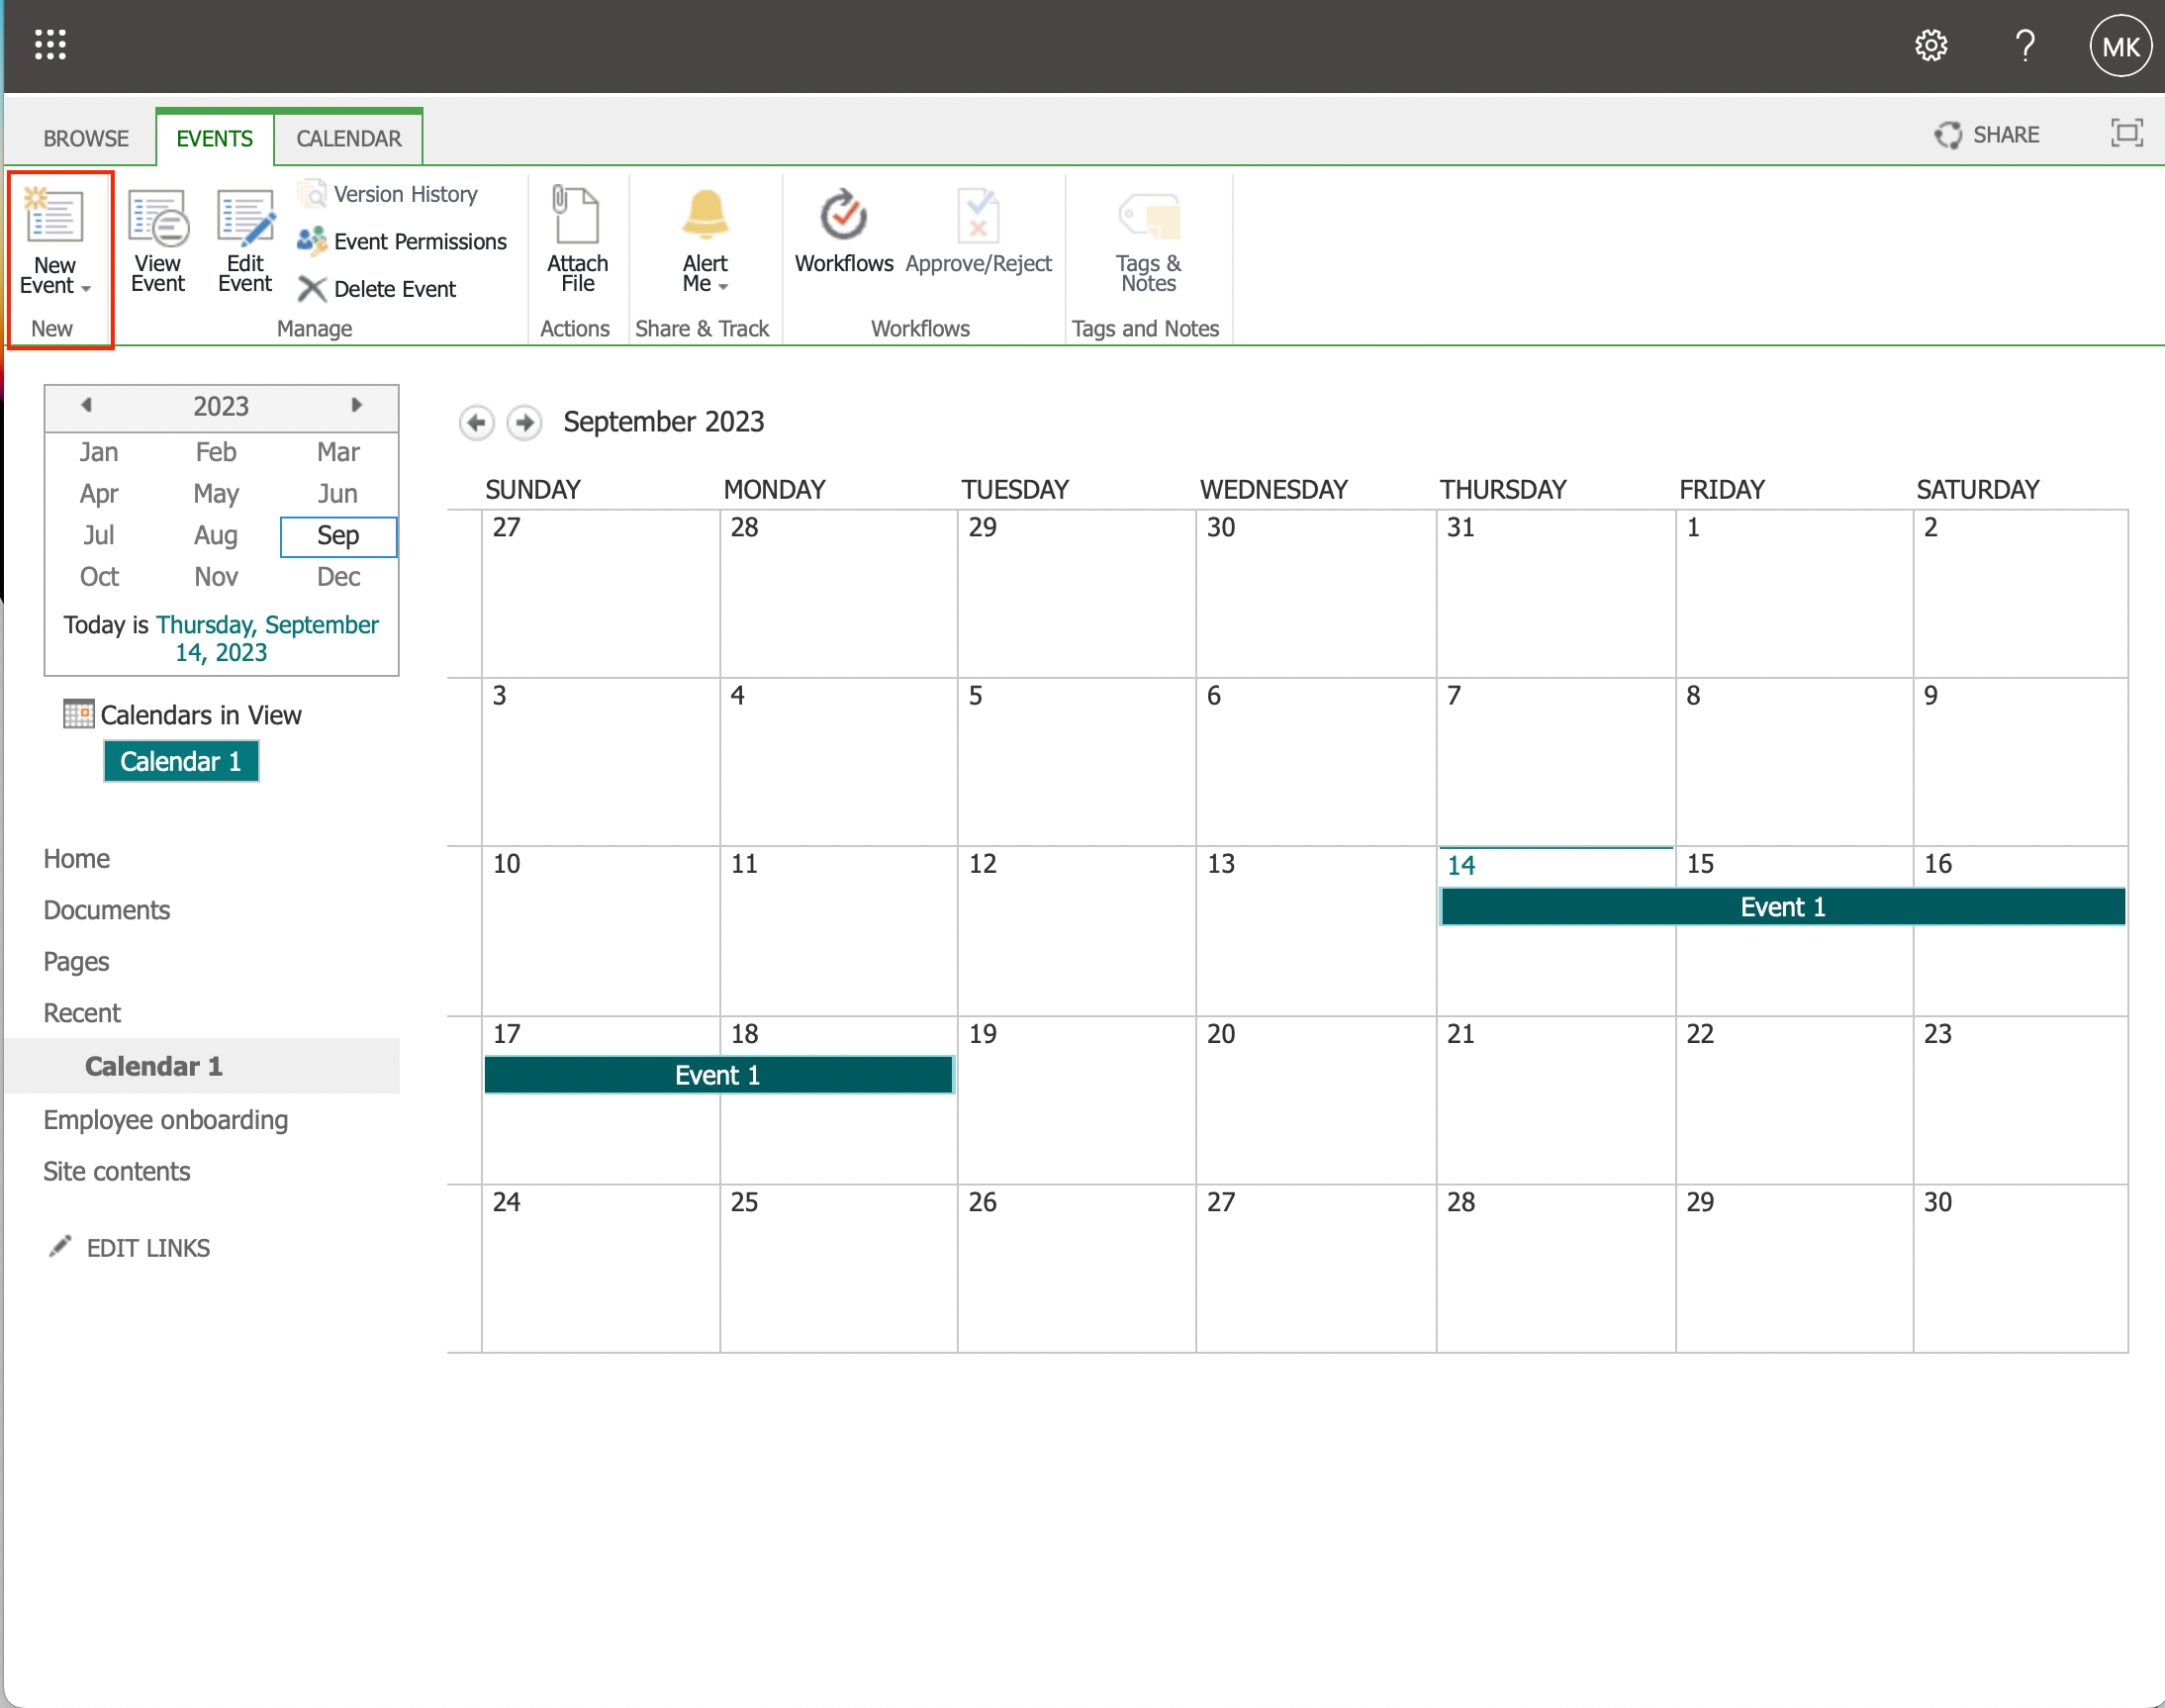
- In the event creation window, give your event a descriptive title.
This will help in easily identifying the event at a glance when viewing the calendar. - Select the start time and end time for your event.
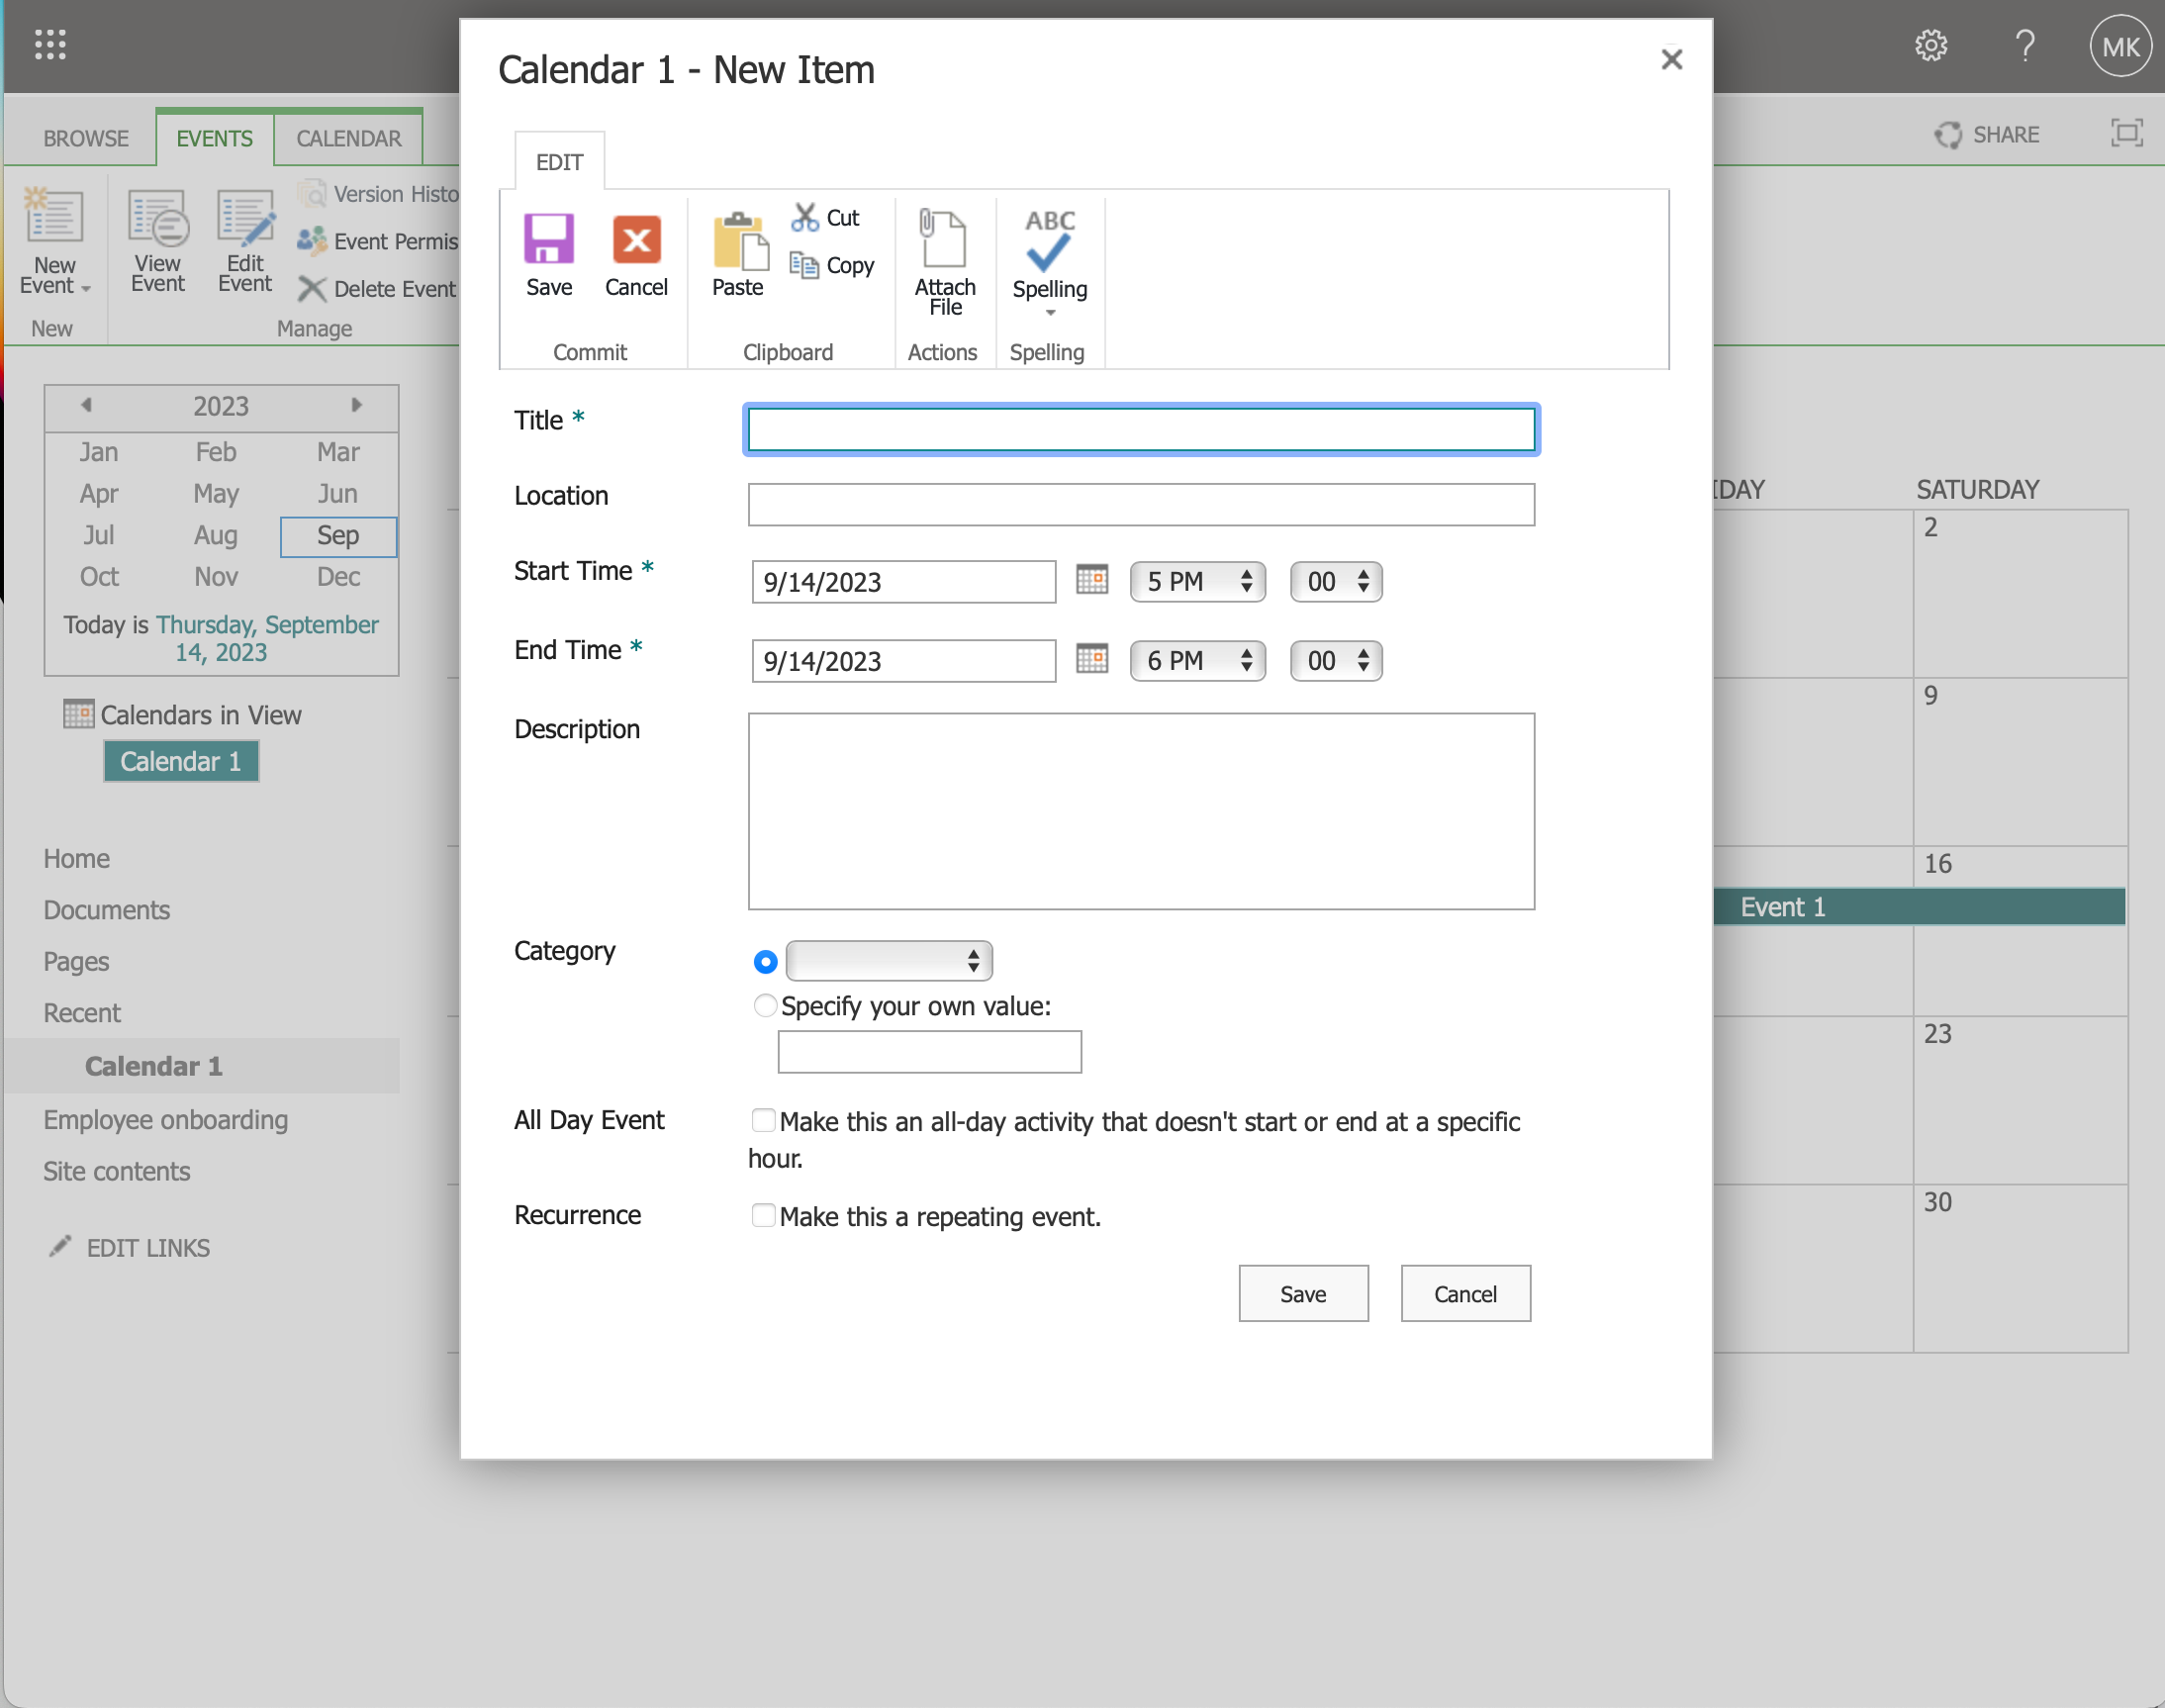
- For increased visibility, you can optionally add an image by clicking the Add Image button in the upper left corner.
It’s important to provide more details by filling in the Description field.
By adding a clear and concise description, you’ll ensure that your team members fully understand the event’s purpose and any necessary preparations.
Integrating with Other Microsoft Products
SharePoint Online calendars can be easily integrated with other Microsoft products such as Outlook and Microsoft Teams to enhance collaboration and communication.
Let’s discuss how to synchronize your SharePoint calendar with Outlook and collaborate using Microsoft Teams.
Synchronization with Outlook
To synchronize your SharePoint calendar with Outlook:
- Navigate to your SharePoint calendar on the site.
- Click on the Calendar tab in the ribbon menu.
- Select Connect to Outlook. This will prompt you to open Microsoft Outlook.

- In Outlook, you will see a pop-up asking you to confirm the synchronization. Click on Yes.
Your SharePoint calendar is now connected to Outlook and can be viewed under the Other Calendars section. Any changes made in either Outlook or SharePoint will be automatically synced.
Collaboration with Microsoft Teams
Integrating your SharePoint calendar with Microsoft Teams can enable better collaboration within your team by sharing important events and deadlines.
To add a SharePoint calendar to your Microsoft Teams channel:

- Open Microsoft Teams and navigate to the desired channel where you want to add the SharePoint calendar.
- Click the “+” icon on the channel’s navigation bar and search for Website.
- Choose the Website app in the list.
- Enter a name for the tab, for example, “Team Calendar”.
- Copy the SharePoint calendar URL from your SharePoint site and paste it into the URL field.
- Click Save to add the calendar to your Teams channel.
Your SharePoint calendar is now accessible within Microsoft Teams, making it handy for team members to view and manage events.
Securing Your SharePoint Calendar
Set Permissions
To ensure the security of your SharePoint calendar, it is important to set the appropriate permissions for different users and groups. This will help you maintain control over who has access to your calendar and what actions they can perform.
Follow these steps to set permissions in your SharePoint calendar:
- In your SharePoint site, navigate to the calendar you’d like to secure.
- Click on the gear icon in the top-right corner and select Site Settings.
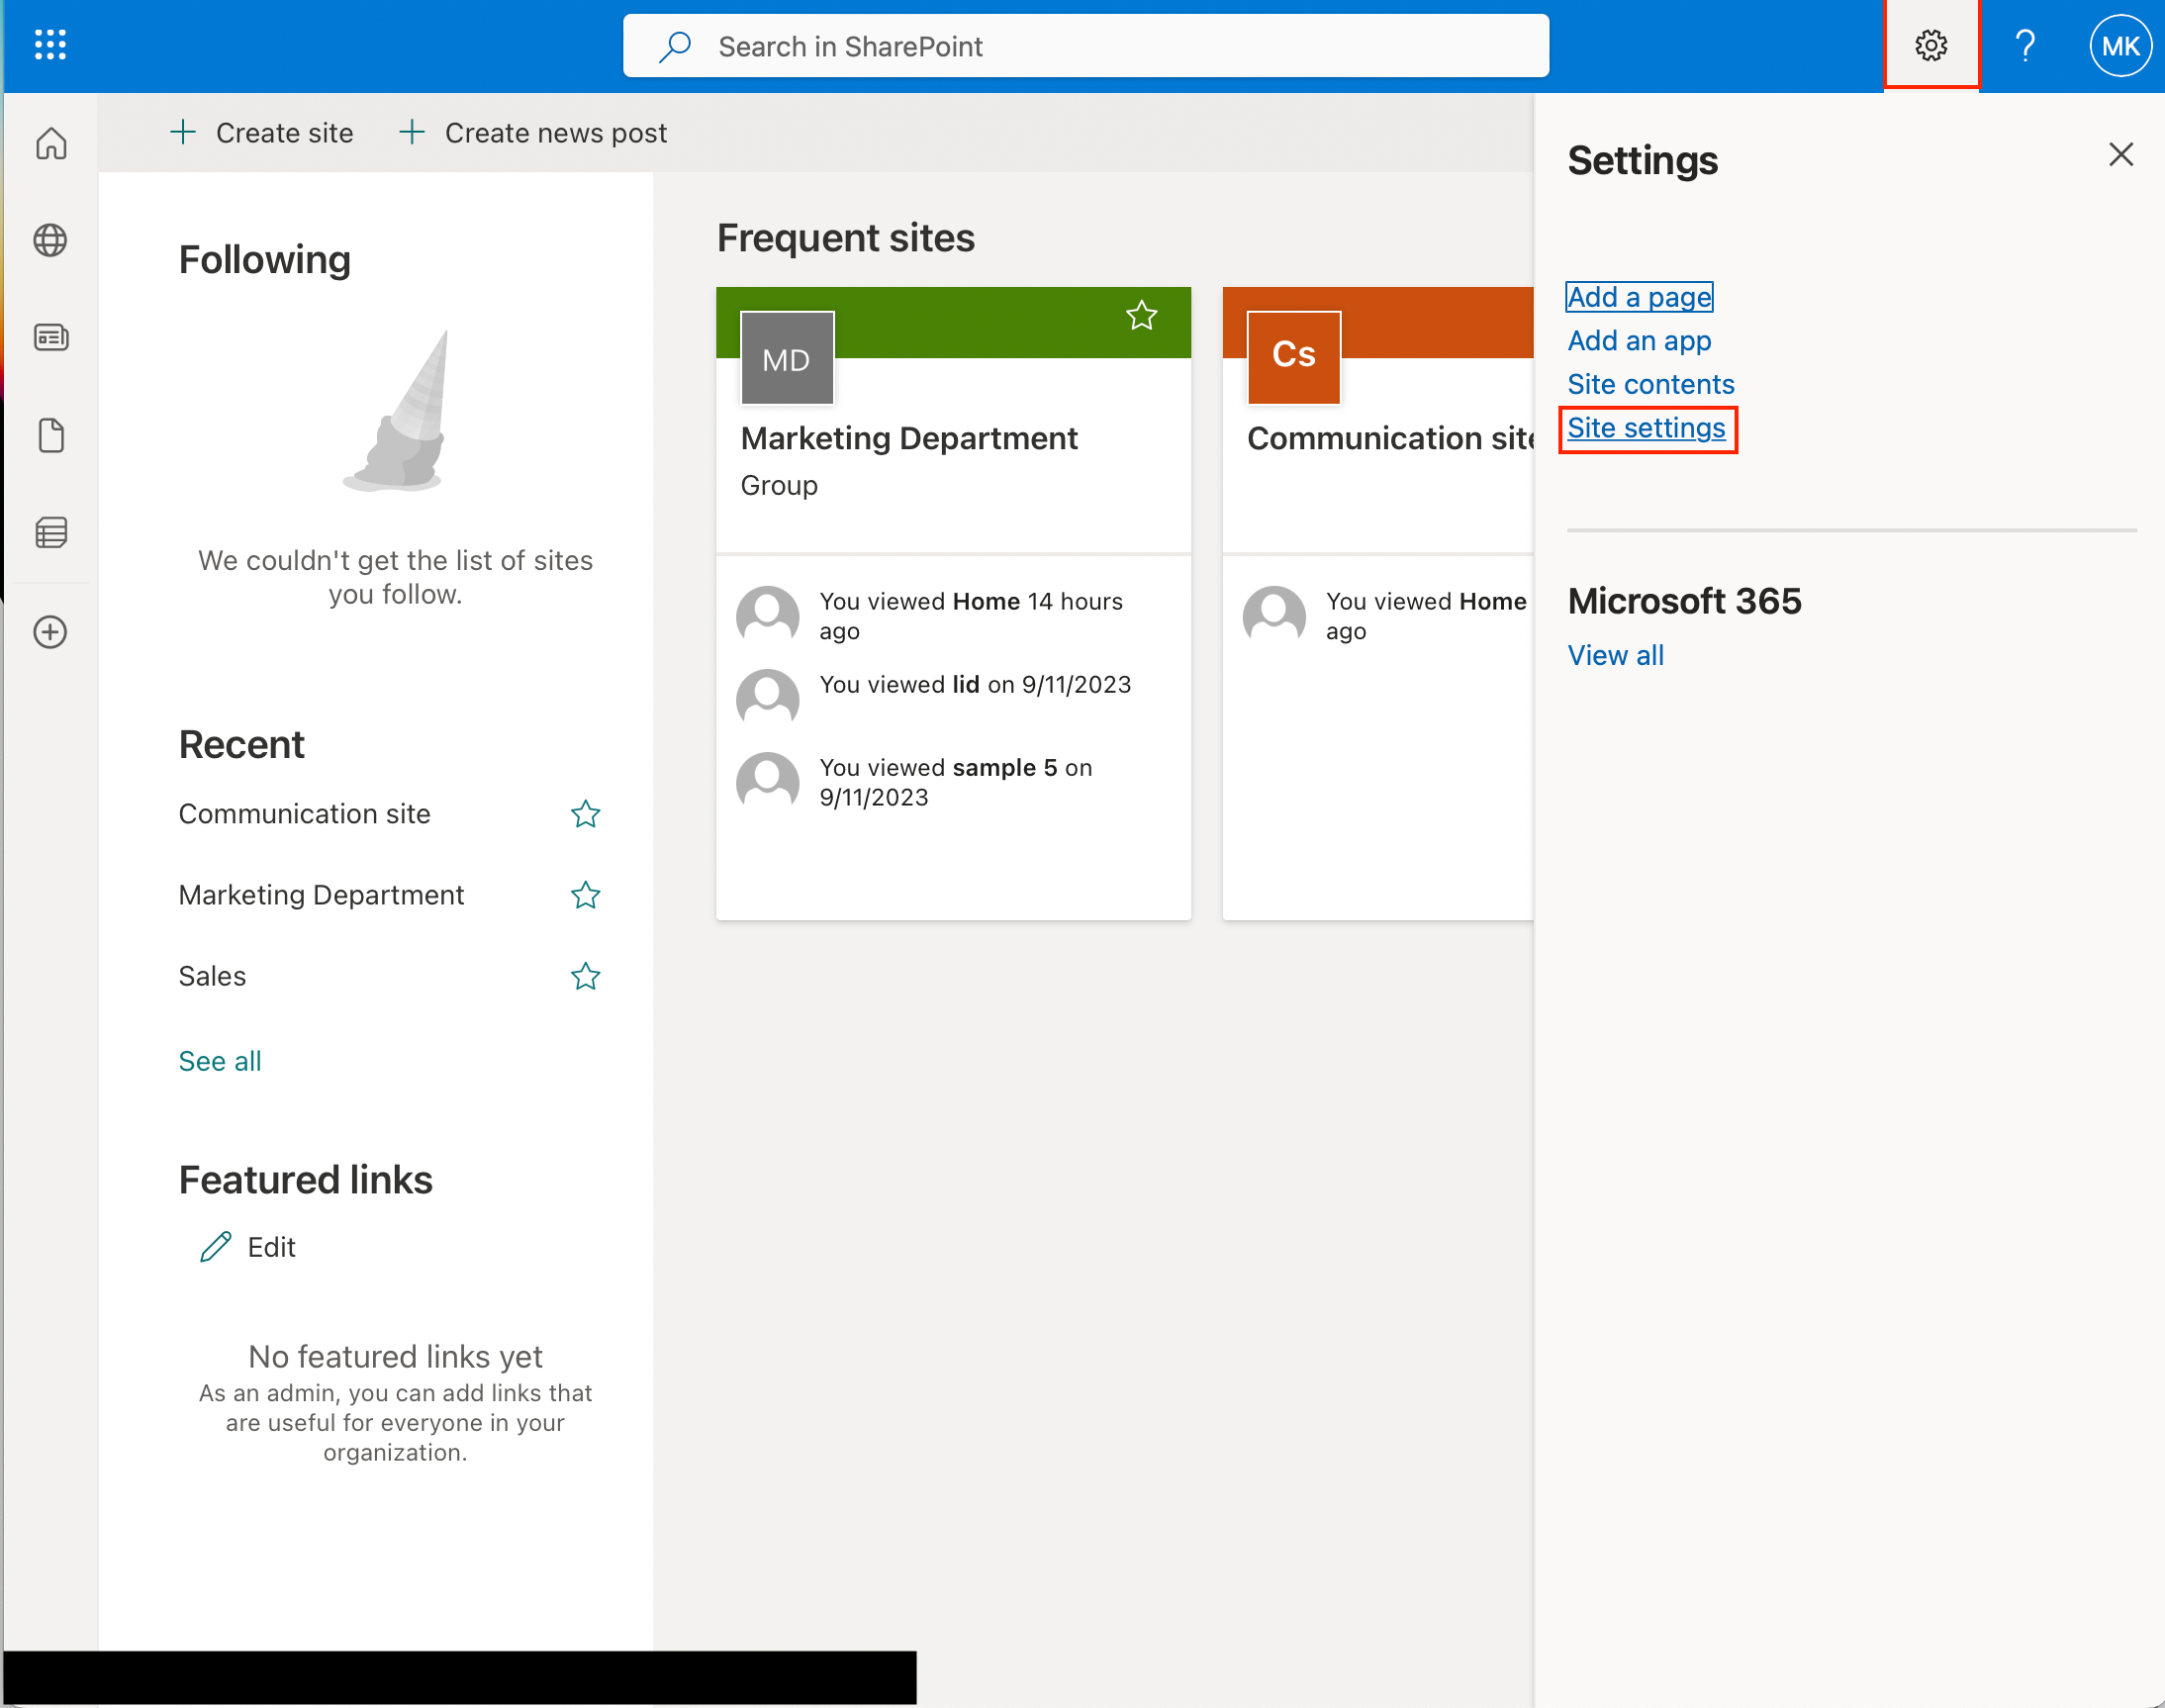
- Under the Users and Permissions category, click on Site permissions.
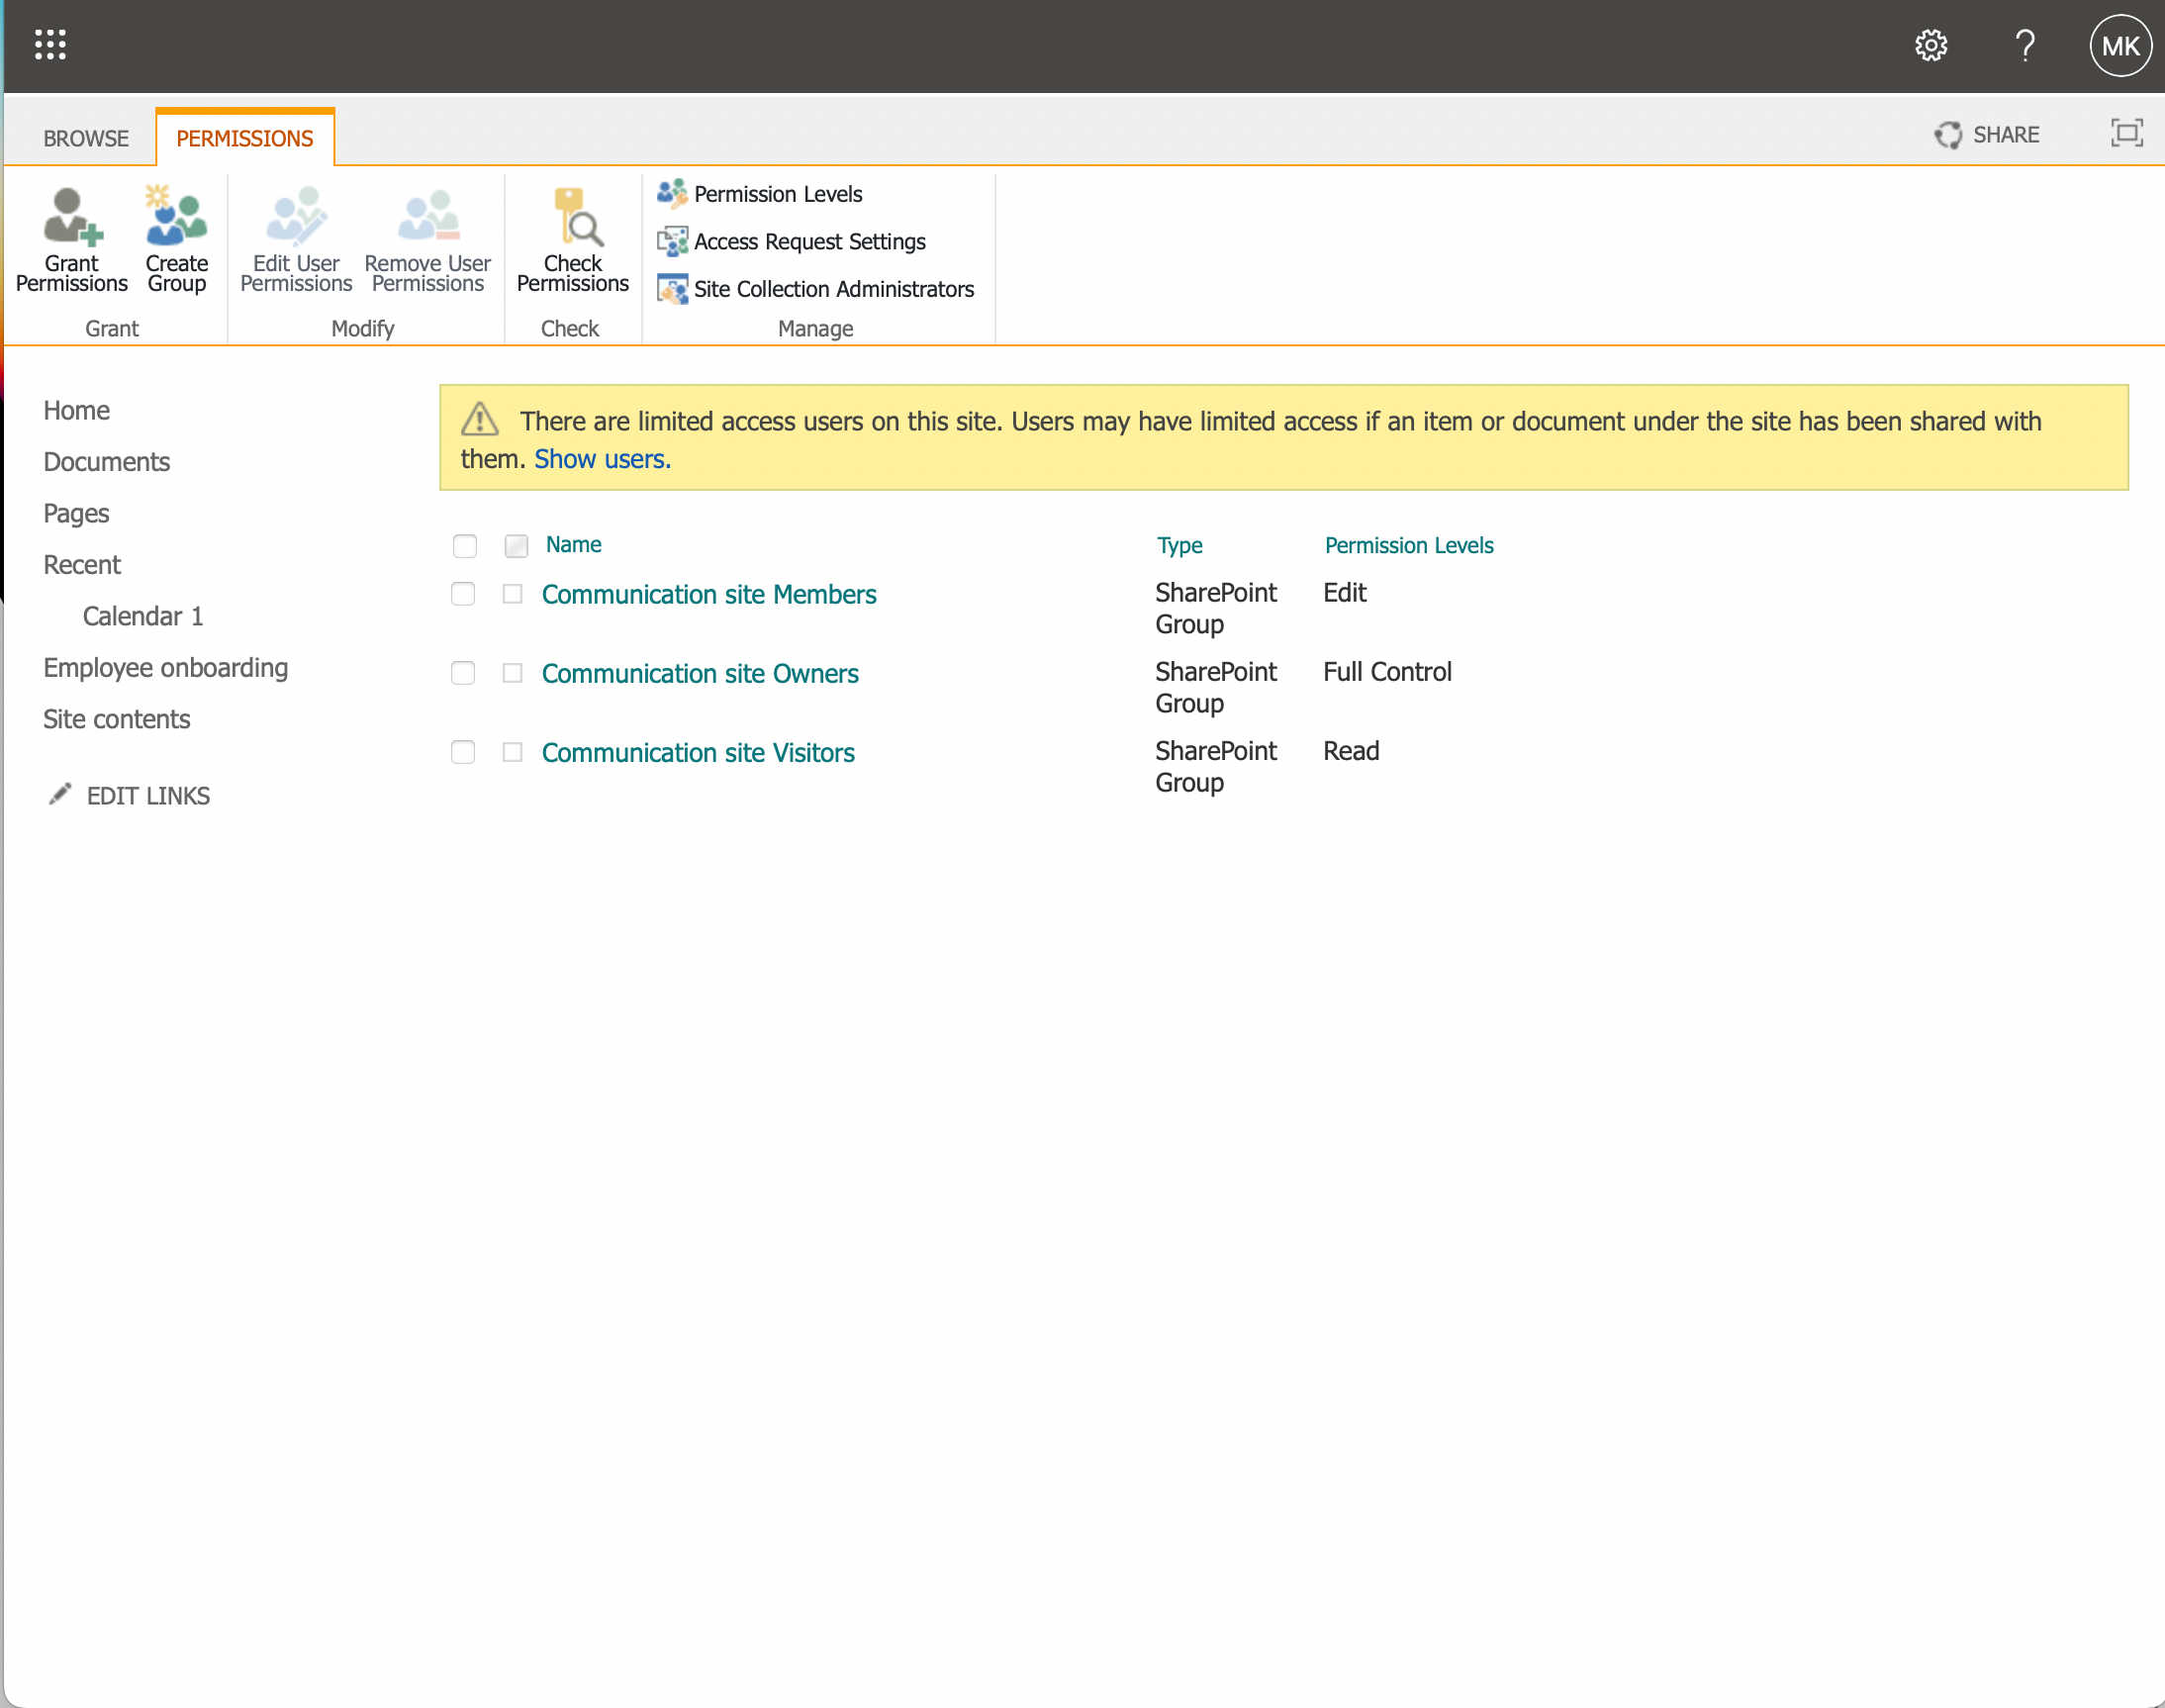
Now, you can add or remove users and groups as needed. Assign the relevant permissions to those users and groups, such as “Read” for view access, and “Edit” or “Full Control” for management access.
By assigning the proper permissions to users and groups, you’ll ensure that only authorized individuals can access and modify your SharePoint calendar.
Ensure you review permissions regularly to keep them up-to-date with your organization’s needs.
Final Thoughts
You have now learned how to create a calendar in a SharePoint Online site.
By following the steps provided, you can create a useful team calendar that can be accessed by your colleagues, ensuring everyone stays informed about meetings, events, and important milestones.
We encourage you to keep exploring further functionalities and customization options to enhance your SharePoint experience.
Explore the power of the integration between SharePoint and Power BI in this video below:
Frequently Asked Questions
How can I add a calendar app if it’s missing in SharePoint Online?
If the calendar app is missing in SharePoint Online, you can try using the classic experience to access it.
Follow these steps:
- Navigate to your SharePoint Online modern site.
- Click on the “New” toolbar and choose “App”.
- On the SharePoint Apps page, click on the “Classic Experience” link to access the classic apps page.
From there, you should be able to find the calendar app and add it to your site.
What are the steps to automate calendar events from a SharePoint list using Power Automate?
To automate calendar events from a SharePoint list using Power Automate, follow these steps:
- Create a SharePoint list with relevant columns for event details.
- Sign in to Power Automate and create a new flow.
- Add a trigger when an item is created, modified, or deleted in the SharePoint list.
- Add actions to create, update, or delete events in the calendar based on the trigger condition.
- Map the SharePoint list columns to the corresponding fields in the calendar actions.
- Save and test the flow to ensure proper automation of SharePoint events web parts.
What is the process to create a calendar view in SharePoint Online?
To create a calendar view in a SharePoint page, follow these steps:
- Navigate to the desired list on your SharePoint site.
- On the command bar, click the View options menu (three-dot icon), and select “Create new view.”
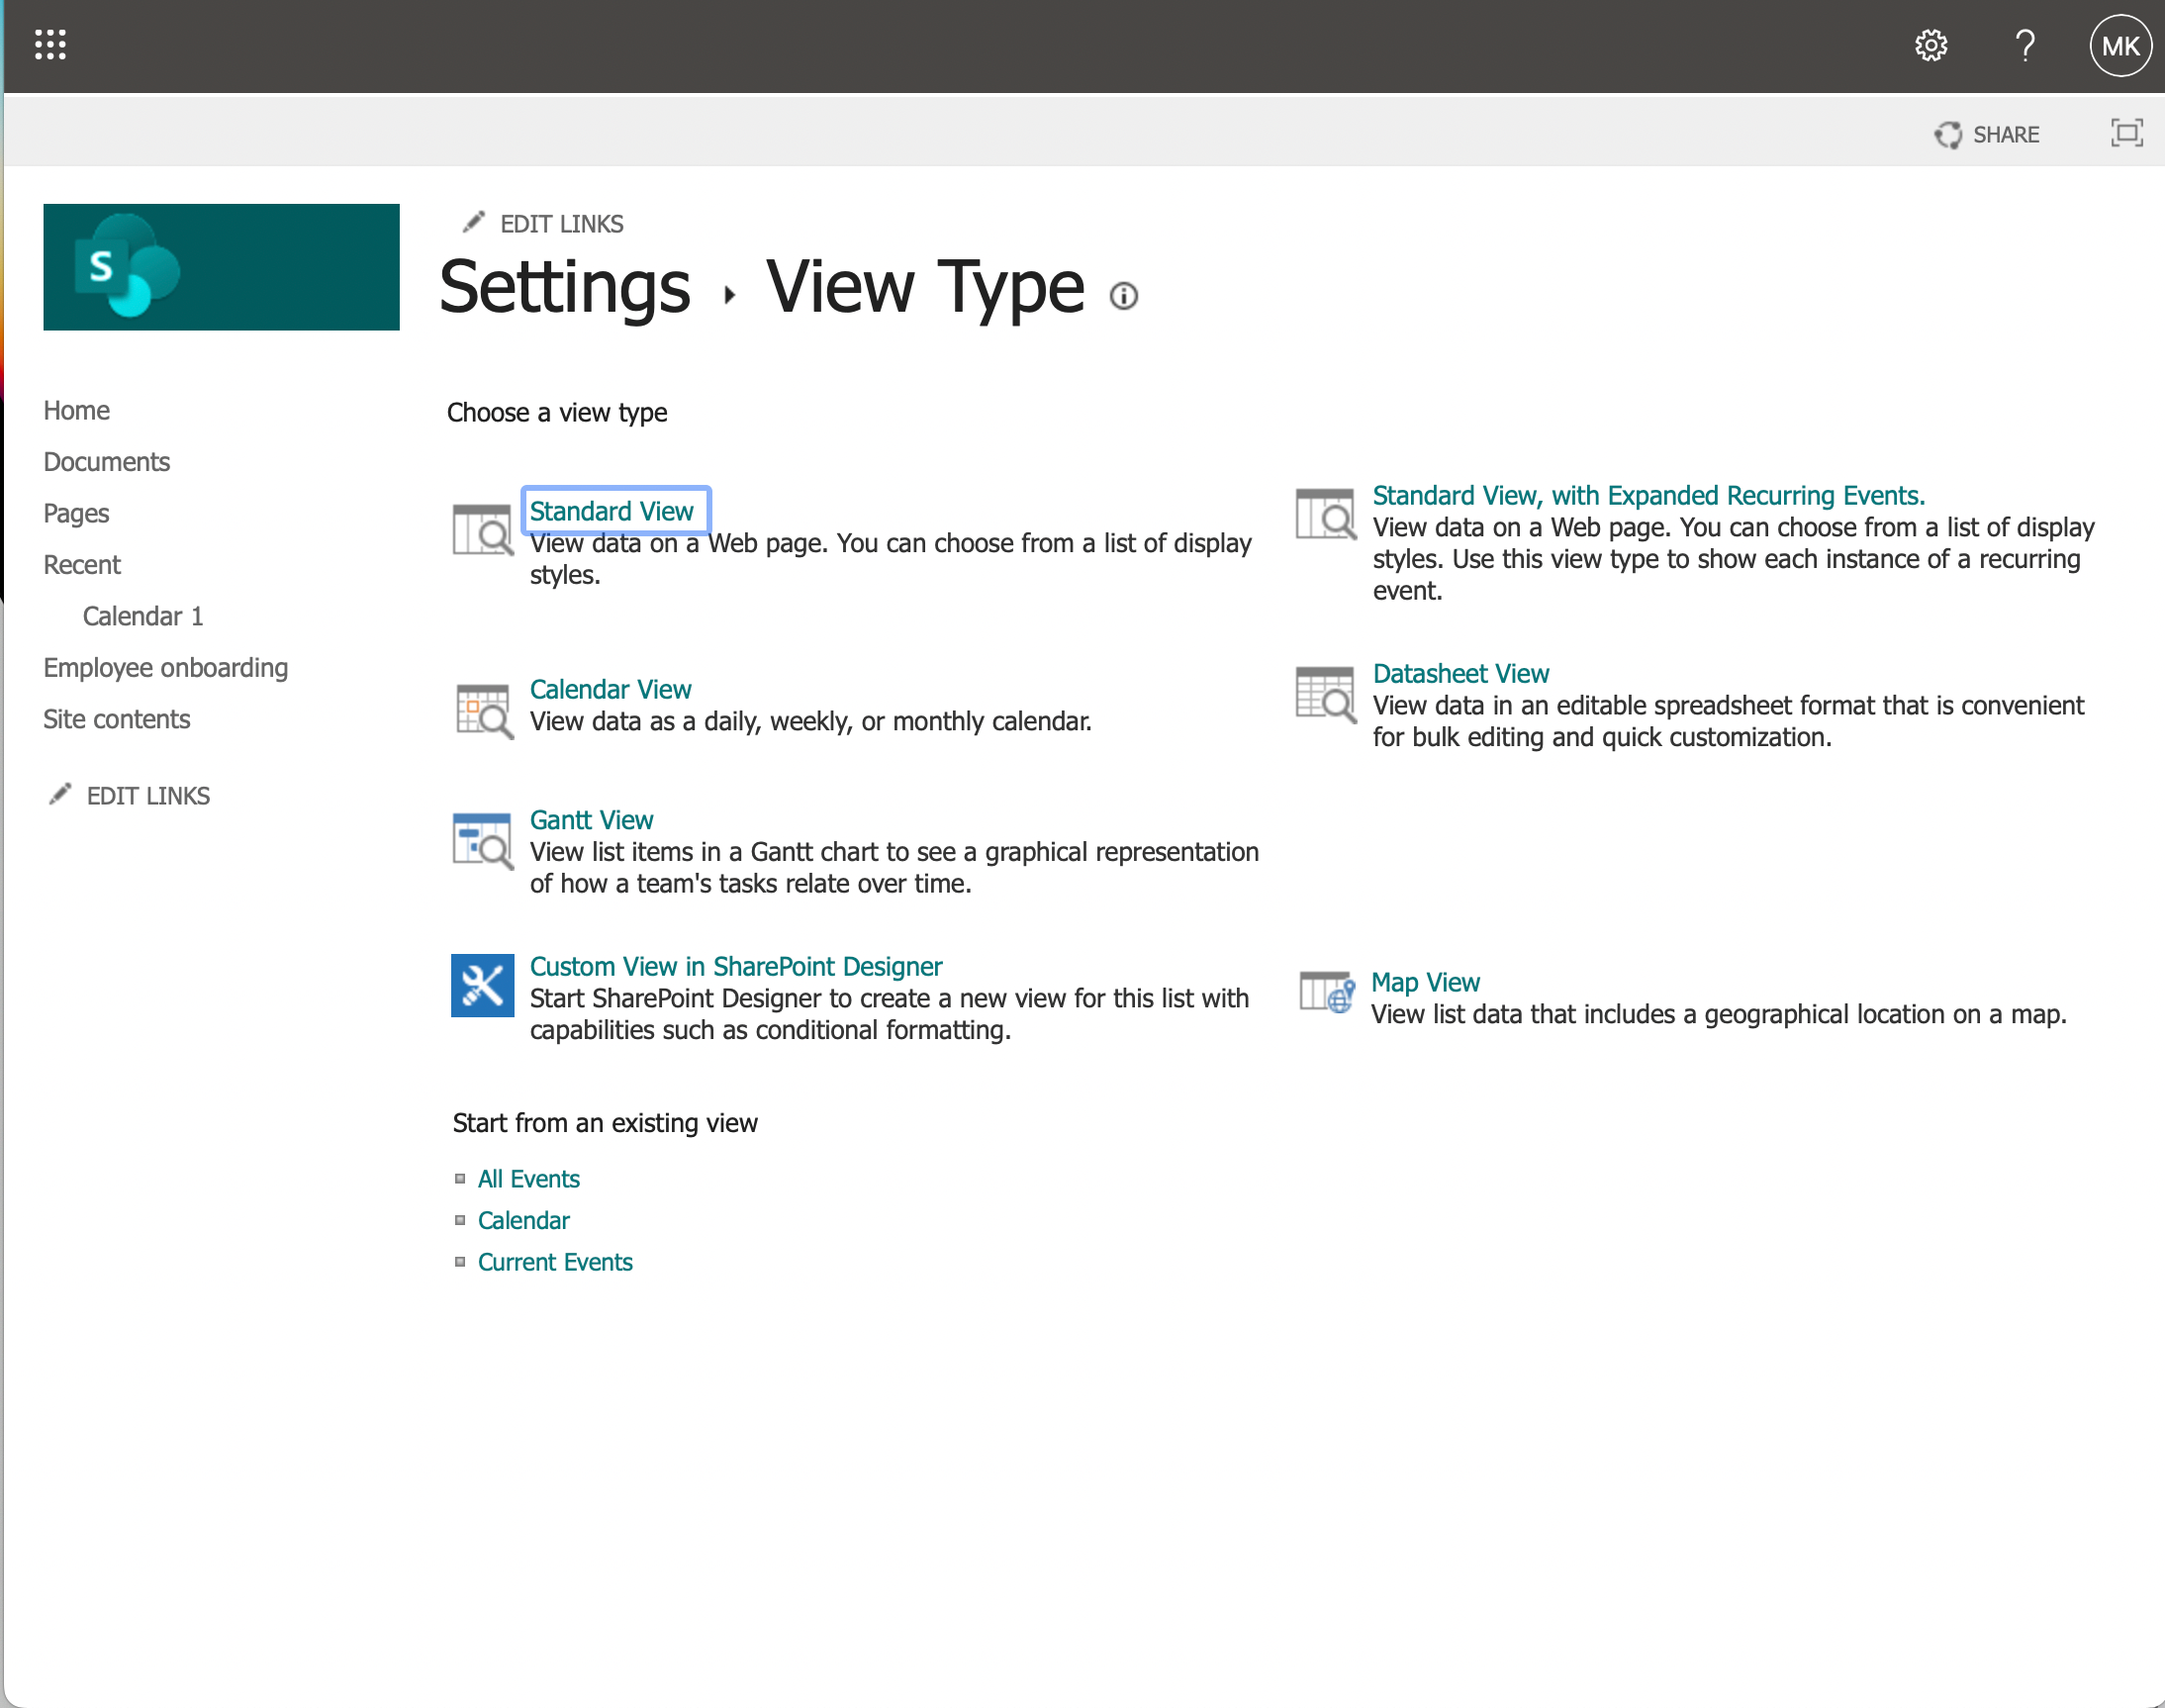
- Provide a name for your view, and under “Show as,” select “Calendar.”
- Define the start and end dates for your calendar view by selecting the appropriate date-based columns.
- Save the view and set it as the default view if desired.
How do I set up an event list for my SharePoint Online calendar?
Setting up a SharePoint online calendar list for your events involves creating a SharePoint List and applying a calendar view to it.
Here’s how:
- Create a SharePoint “Events” list with necessary columns for event details, such as title, start date, end date, category, and description.
- Create a calendar view for the SharePoint list following the steps outlined in the previous question.
- Adjust the view settings to display events in a visually appealing manner, such as color-coding by category or displaying additional information.
What are the steps to sync a SharePoint calendar with Outlook?
To sync a SharePoint calendar with Outlook, follow these steps:
- Navigate to your SharePoint calendar.
- On the Calendar tab, click “Connect to Outlook” in the Connect & Export group.
- When prompted, allow the website to open Outlook.
- In Outlook, click “Yes” to confirm adding the SharePoint calendar to your Outlook folders.
- Your SharePoint calendar will now appear under your Outlook calendars and will sync automatically.


