Are you looking for an easier way to get all of your tedious, routine tasks done quickly and efficiently? If so, then Power Automate may be the solution you’ve been searching for.
This guide to Power Automate provides all the information and examples you need to unlock the full potential of Power Automate’s automated workflows.
Create simple bots during the data entry process to create complex flows that orchestrate end-to-end business solutions – Power Automate can revolutionize your business if done right!

What is Microsoft Power Automate?
Microsoft Power Automate (previously Microsoft Flow) is a powerful automation tool that helps you automate repetitive and manual tasks in a user-friendly way.
With an intuitive drag-and-drop interface, Power Automate is ideal for coders and non-coders alike, allowing you to create rule-based workflows and save time on routine tasks.

To begin automating your process, you can start by visualizing your process flow using a flowchart. This flowchart includes various elements such as steps, variables, loops, and conditions. You can then replicate this flowchart on Microsoft Power Automate to automate your process.
It also offers great flexibility when it comes to implementation – simply customize existing templates or build a custom solution from scratch.
So, you can automate a wide range of tasks with Microsoft Power Automate, making it a powerful tool for businesses.
In this comprehensive guide, we’ll provide an overview of Microsoft Power Automate, and cover its components. We’ll also walk you through the workflow creation process, and provide real-world examples of how it works and how to use it to automate different aspects of workflows.

Power Automate supports over 900 popular apps and services such as Microsoft Office 365, Dropbox, Salesforce CRM , Google Drive, and more, making it a versatile tool for many industries and businesses. Plus, it integrates with other Microsoft products like SharePoint, Dynamics 365, and PowerApps so you can create more powerful and customized workflows, in a low-code way.
How Does Power Automate Work With Microsoft 365 Apps?
Microsoft Office 365 is the application suite essential to the operations of thousands of businesses around the world.
These applications include Microsoft Word, Microsoft Excel, Microsoft PowerPoint, Microsoft Outlook, Microsoft OneNote, Microsoft OneDrive, and other Microsoft products. Each application performs its own specific function, but they generally work independently and do not interact with each other.
Well, that was until Power Automate came into the picture.
With the introduction of Power Automate, these applications can now collect data, communicate with each other and take action based on triggers from other apps. This integration improves productivity and efficiency by automating previously manual tasks.
For example, emails received in Outlook can trigger actions in Excel or OneDrive to streamline workflows and reduce the risk of errors.
Importance of Automation in Business Processes
A business process automation tool like Power Automate provides a user-friendly interface that allows users to create and manage complex workflows without the need for coding or technical expertise.
The global robotic process automation market is on the rise, with a projected compound annual growth rate of 38.2% from 2022 to 2030.
This technology is transforming the way businesses operate, with software robots that can automate day-to-day tasks across various industries

The benefits of automation are numerous and powerful, including:
- It saves time and enables staff to perform higher-level tasks that add more value to the business.
- Improves efficiency by maintaining consistent process speeds.
- Reduces labor costs by performing exceptionally complex tasks, freeing up money that can be used elsewhere.
- Eliminates errors, especially with manual data entry tasks, which can prevent costly mistakes for your business.
Finally, it improves client service by providing quick and efficient communication, allowing you to build better relationships without investing a lot of time
Let’s check out some key Power Automate uses.
Common uses of Power Automate in different industries
Power Automate is a versatile automation tool that can be applied to a wide range of industries and use cases. Here are some examples of how Power Automate is being used in different industries:
- Healthcare: The healthcare industry is one of the most important industries with the essential need for automation. With Power Automate, healthcare organizations can automate tasks and workflows that were previously performed manually, saving time and improving efficiency.
These tasks and workflows include appointment scheduling by integrating with electronic medical record systems. It can also automate medical billing, claims processing, and inventory management, reducing errors and improving turnaround times. - Finance: Frequent uses of Power Automate in finance is accounts payable and receivable management, pricing, approval processes, and data entry. By automating these processes, invoices can be processed and paid quickly, and data reconciled, reducing the risk of errors and late payments.
With Power Automate, data can be automatically imported and reconciled, reducing the need for manual data entry and inaccuracies. - Manufacturing: The manufacturing industry has long been known for manual, labor-intensive processes that are slow and difficult to manage.
The use of automation technologies such as Microsoft Power Automate is essential for manufacturers looking to improve efficiency, reduce costs, and maintain a competitive advantage.
Power Automate can improve manufacturing efficiency by easily automating repetitive tasks and integrating them with existing systems. It can help streamline production processes and order management, enhances machine operation, simplifies data and document processing, and seamlessly integrates with ERP solutions.
Additionally, Power Automate can facilitate automated report generation and optimizes equipment maintenance too. - Retail: Power Automate can give retailers a competitive edge by automating time-consuming tasks and integrating them with systems. Using artificial intelligence, ERP systems, IoT, POS software, and robotics process automation, retailers can streamline processes and improve customer service, saving time and money.
Power Automate helps managers manage inventory, automate order fulfillment, ship, and track sales data while providing her KPI dashboards.

The Key Features of Power Automate
As you now know, Microsoft Power Automate provides a wide range of features that allow users to create custom workflows, integrate applications, and improve collaboration.
Let’s dive into these a little deeper.

Workflow Automation
By using visual flowcharts, users can design custom workflows to handle tasks such as sending notifications, managing approvals, or updating records. The platform supports numerous connectors, enabling seamless integration with popular services like SharePoint, Dynamics 365, and Outlook.
Seamless Integration and Customization
Seamless integration with Microsoft 365 applications, allows users to create automated workflows and initiate tasks directly from apps such as SharePoint, Excel, and Microsoft Teams. To simplify the creation of workflows, Power Automate provides pre-built templates for common tasks that users can customize for their specific needs.
Additionally, Power Automate can integrate third-party apps and services like Salesforce, Google Sheets, Mailchimp, and an extensive library of over 900 connectors, making it a versatile and powerful tool for automating tasks and processes across platforms. become a tool.
To top it off, you can also use Power Automate to post to social media and schedule a few tweets, but that is another story for another day.
Robotic Process Automation (RPA)
Power Automate Desktop introduces Robotic Process Automation (RPA) capabilities, enabling users to automate tasks on their desktop machines. RPA is particularly useful for automating processes involving legacy systems, local files, or screen scraping.
Users can record their actions and use Power Automate Desktop to create bots that replicate these actions automatically.
Mobile App
The Power Automate mobile app allows users to manage and monitor their workflows on the go. The app supports instant flows, enabling users to trigger actions manually through Flow Buttons. Additionally, users can track the status of their flows, receive push notifications, and approve requests directly from their mobile devices.
Security and Compliance
Power Automate complies with Microsoft’s strict security and compliance standards to ensure data protection and privacy. The platform supports data loss prevention (DLP) policies that allow organizations to control the flow of sensitive information between applications. Additionally, Power Automate complies with various industry standards such as GDPR, HIPAA, and FedRAMP too.
Ok, now it’s time to get you up and running.
How to Create & Setup a Power Automate Account
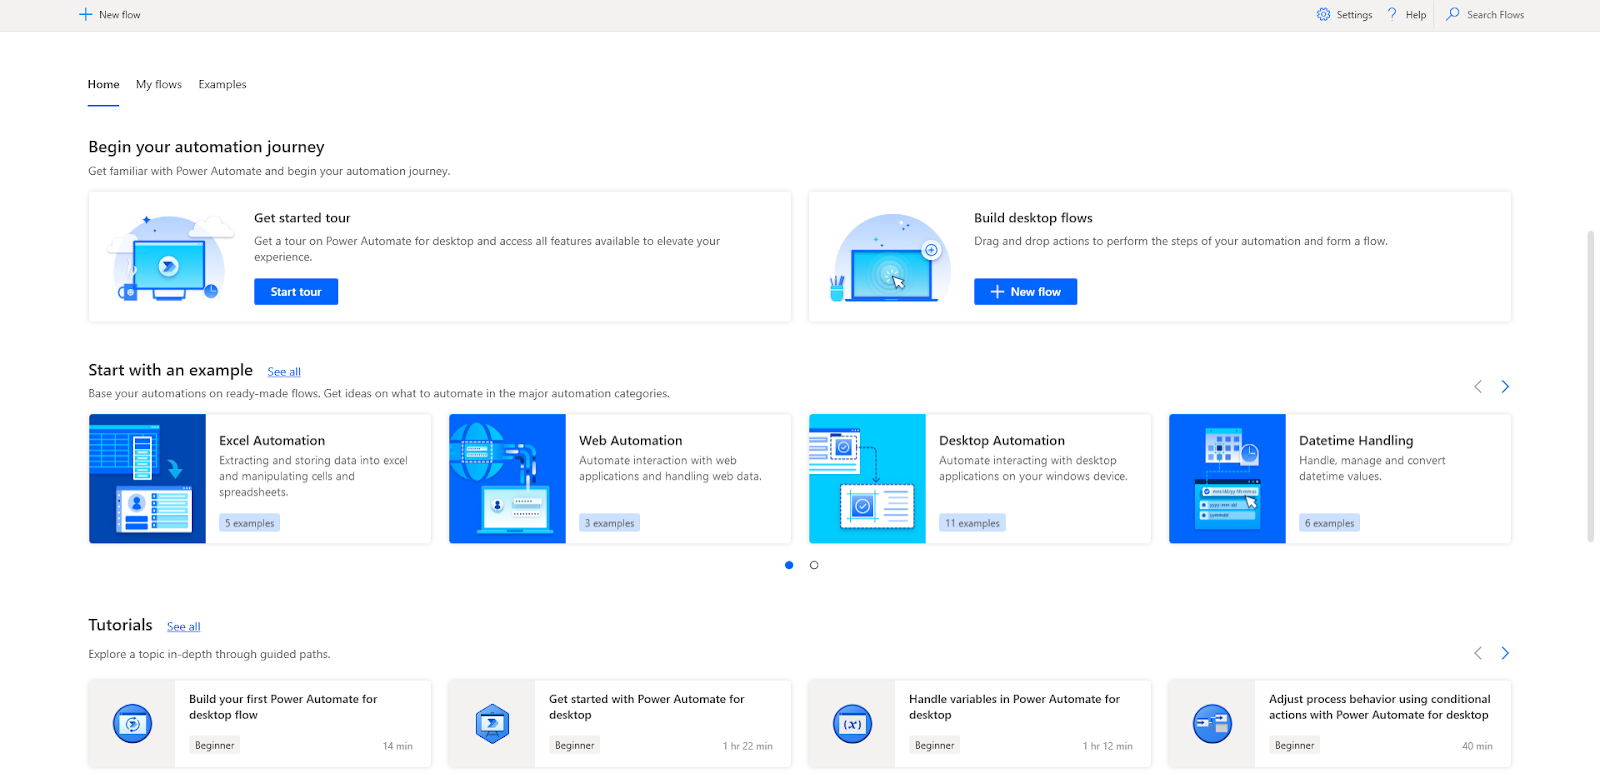
To get started with Power Automate, visit the official Power Automate Website
After signing in, you will land on the homepage, which serves as the central hub for managing your workflows and connectors
Now before you start doing anything, let’s quickly get you on top of a few key concepts.
Power Automate Terminology: Key Concepts and Definitions
As you dive deeper into the world of Power Automate, it’s essential to familiarize yourself with the terminology used throughout the platform.
Understanding these terms will make it easier for you to create, manage, and optimize your flows.
Here’s a comprehensive list of Power Automate terms with clear explanations to help you navigate the platform with confidence:
Flow: A flow refers to various types of workflows to suit different business needs. These flows are a series of automated steps, actions, and conditions that define your automated process.

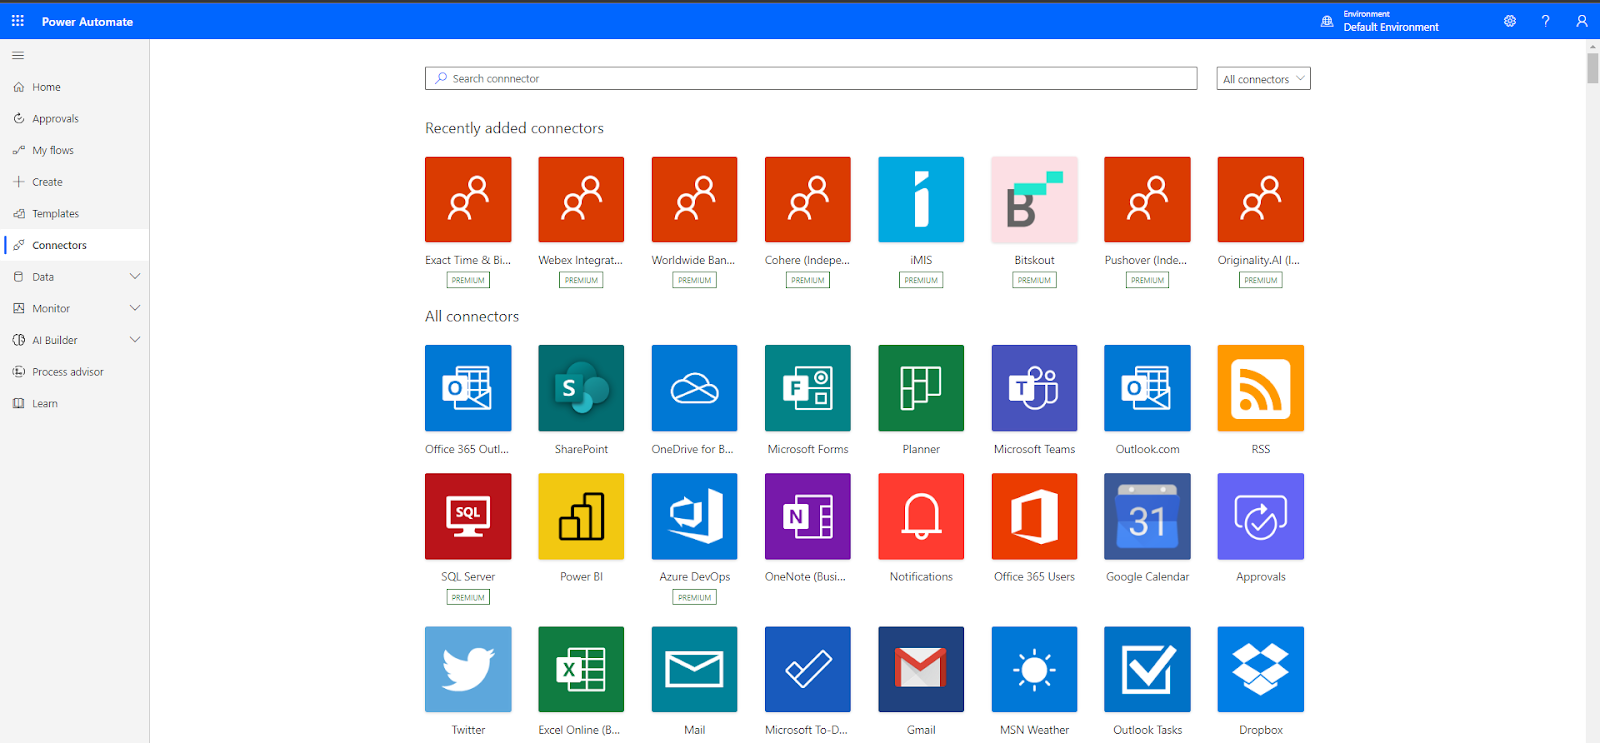
Connector: A pre-built integration that enables the communication between Power Automate and external applications or services.
Connectors allow you to access data and perform actions within connected services.
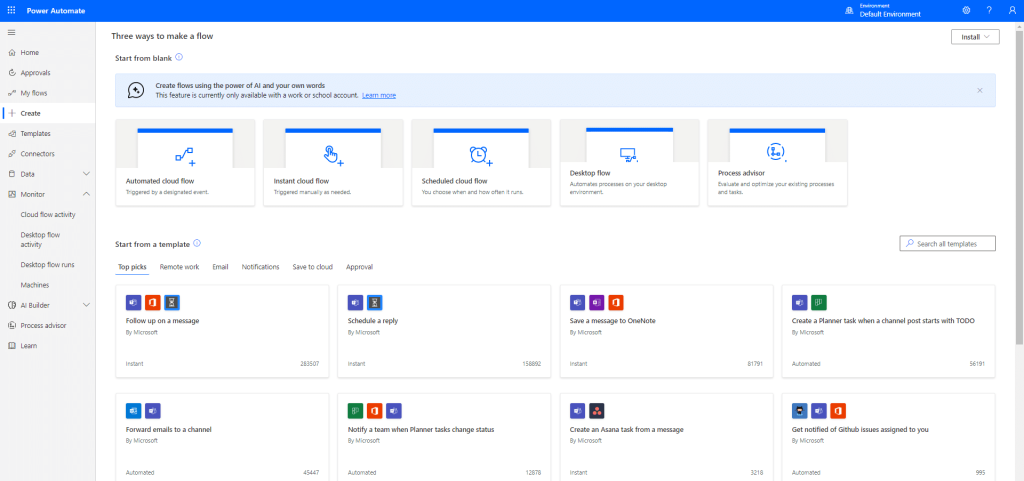
Template: They are prepackaged flows that contain a set of triggers, actions, and conditions to automate a specific task or process. Templates can be used as a starting point for creating custom flows, saving you time and effort.
Alt text: Microsoft Power Automate templates
Trigger: An event or condition that initiates a flow. Triggers can be based on specific events, such as receiving an email, or they can be scheduled to run at predetermined intervals.
Action: A single operation or task performed within a flow. Actions can include sending emails, updating records, or creating new items in a list.
Condition: A decision-making element within a flow that evaluates specified criteria and performs different actions based on whether the criteria are met (true) or not (false).
Loop: A flow control structure that repeats a sequence of actions for each item in a collection or until a specific condition is met. Loops allow you to perform batch operations or apply operations to multiple elements.
Connecting to External Data Sources and Services
Connecting to external data sources and services is a key benefit of using Power Automate.
To connect to an external data source or service, users must provide credentials or an API key to authenticate the connection. Once authenticated, the connector grants access to data and allows the user to perform actions within the connected service.
This feature not only makes Power Automate more versatile, but also simplifies the process of integrating different applications and services to create more efficient and streamlined workflows.
But, establishing the necessary data infrastructure for business insights can be both costly and time-consuming, due to the multitude of data technologies, APIs, and security models involved.
Furthermore, skilled developers with expertise in deploying, configuring, managing, and integrating these technologies are often hard to find and expensive to hire.
Dataverse addresses these challenges by offering an accessible, manageable, compliant, secure, scalable, and globally available SaaS data service.
Formerly known as Common Data Service (CDS), Microsoft Dataverse is a versatile data platform that provides enterprises with a secure, scalable, and easy-to-use solution for managing and integrating data across a wide variety of applications and services.
Dataverse’s unique capabilities enable businesses to build custom applications, automate processes, and create insightful reports using Power Apps, Power Automate, and Power BI.
By leveraging the power of Dataverse in Power Automate, users can create and automate workflows that access and manipulate data stored in Dataverse.
Now, let’s check out the different types of workflows so you can decide what you need to focus on.
Types of Workflows To Help You Get Started
There are multiple different flow types, each designed for a specific automation scenario. Understanding the different flow types and their ideal use case will help you unlock the full potential of Power Automate.
Let’s dive in.
Business Process Flows
Business Process Flows provide a guided user experience that walks users through a specific process.
These flows are organized into stages and steps within each stage. When crafting a business process flow , users should opt for the “Business process flow” choice while initiating a new flow.
This enables you to define the various stages involved in the process and determine the actions to be executed at each stage.
Business Process Flows are specifically designed for Dataverse and can only be used with Dataverse tables, Dynamics 365, or model-driven applications.
They require additional licensing on top of standard Microsoft 365 licenses.
Desktop Flows
Desktop Flows utilize Robotic Process Automation (RPA) to automate tasks on a user’s desktop machine.
To create Desktop Flows, users need to download and install the Power Automate Desktop application. These flows are suitable for automating tasks involving legacy software, Excel sheets, or screen scraping.
A free version of Power Automate Desktop is available for Windows and Mac users, but some scenarios may require upgrading to a premium license.
Cloud Flows
In Power Automate, “cloud flows” refer to flows that are designed and run entirely in a cloud-based environment. These flows require no on-premises infrastructure or resources and can be easily accessed and managed from anywhere with an internet connection.
User interactions such as pressing a button on a web page or mobile app, or even pre-defined schedules such as running at a specific time each day can also serve as triggers for these flows.
There are three types of Cloud Flows:
1. Automated Flows
Automated flows are the most common type of flow in Power Automate. These flows automatically trigger workflows when events occur in your data source.
For example, a workflow can be triggered when an item is added to a SharePoint list or a file is uploaded to a SharePoint document library.
Automated flows work with over 900 different connectors and require no manual intervention.
Alt text: Microsoft Power Automate Automated Flows
2. Instant Flows
Unlike automated flows, instant flows require user interaction to trigger the workflow.
These can be started manually from Power Automate, Power Apps, or other applications such as SharePoint, OneDrive, or Microsoft Teams.
Instant flows can also be triggered by HTTP requests and used with Power Virtual Agents.
Examples of instant flow triggers are flow buttons, selected items in SharePoint, message actions in Teams, and selected rows in Excel.

4. Scheduled Flows
Lastly, we have scheduled Flows. These flows run on a predefined schedule, ranging from seconds to days. They are useful for tasks like sending automatic reminders or notifications.
Users can define the frequency and start time for these flows, which then execute the corresponding actions based on the schedule.

Choosing the Right Cloud Flow
When you open Power Automate, you’ll be prompted to choose from the three cloud flow options.
To determine which type best suits your needs, consider the following:
- If you’re automating tasks based on events in cloud services, opt for an automated cloud flow.
- If you require manual triggering for repetitive tasks, choose an instant cloud flow.
- If you need your automation to run periodically based on a schedule, select a scheduled cloud flow.
For a detailed explanation and examples of each flow type, we recommend referring to our previously published article, “Power Automate Flow Types and When to Use Them,” which breaks down each flow type and offers valuable insights on when to implement them in your automation journey.
Now let’s get onto the triggers and actions.
Role of Triggers and Actions in Power Automate
Triggers and actions are the building blocks of workflows in Microsoft Power Automate. Trigger conditions are events or conditions that start a flow, and actions are the tasks that the flow performs when the trigger occurs.
There are many trigger conditions available in Power Automate, such as when a new email arrives in your mailbox or when a new item is added to a SharePoint list.
Actions include sending reply emails, saving email attachments to OneDrive, sending notifications, updating list item fields, and more.
Power Automate also allows you to create custom triggers and actions using Azure Functions or HTTP Webhooks. To create a flow in Power Automate, first, select a trigger and add actions to run when the trigger fires. You can also add conditions, loops, and other elements to control the automation flow.
Advanced Power Automate Techniques
Let’s look at a few advanced techniques.
Using Variables and Expressions in Power Automate
Variables and expressions are essential components in Power Automate, enabling users to store, manipulate, and reuse data within their flows. Here is how you can use variables and expressions in Power Automate:
- Initiate a variable: Use the “Initialize variable” action to define a variable, specifying its name, type, and initial value. For example, to create a variable named “count” with an initial value of 0, use the following action:
Action: Initialize variable
Name: count
Type: Integer
Value: 0 - Set or modify a variable’s value: Use the “Set variable” action to update a variable’s value during the flow execution.
- Utilize expressions: Expressions can be used in various actions and conditions to perform calculations, manipulate text, or evaluate data. For instance, you can use the “addDays” function to calculate a future date or “concat” to join strings.
- Reference variables and expressions: To reference a variable or expression, simply include its name wrapped in “@{}” syntax within the appropriate field.
Implementing Conditional Logic and Loops
Conditional logic and loops bring flexibility and control to Power Automate flows, allowing you to create more dynamic and adaptable workflows:
- Conditional logic: Use the “Condition” action to evaluate an expression and execute different actions based on the result. The “Switch” action can also be used to handle multiple possible outcomes.
- Loops: The “Apply to each” action allows you to iterate through a collection of items and perform actions for each item. For more complex looping scenarios, use the “Do until” action to execute a set of actions until a specified condition is met.
Creating Custom Connectors and APIs
Custom connectors and APIs extend Power Automate’s capabilities, allowing users to integrate their flows with external services and applications.
Custom connectors: Develop a custom connector to connect Power Automate to an external service or application. This enables you to access and utilize the external service’s functionality within your flows.
For example, you can create a custom connector for your company’s internal API, enabling seamless integration with Power Automate.
AI-powered enhancements: Integrating AI tools like ChatGPT and DALL-E 2 can further enrich your Power Automate workflows. Microsoft’s Dynamics 365 Copilot, an AI-powered virtual assistant, is one example of how AI can enhance the user experience and improve efficiency on the Dynamics 365 platform.
This innovative tool uses natural language processing and machine learning algorithms to interpret user queries and provide relevant responses.
Now, let’s check out some practical examples.
2 Practical Applications of Power Automate in Real-World Scenarios
To illustrate the potential of Power Automate, let’s consider a few examples of how it can be used in different business scenarios.
You can find more such real-world use cases workflows at EnterpriceDNA blogs.
Example 1: Send Bulk Emails with Instant Cloud Flow in Power Automate
In this example, we’ll walk you through the process of using Instant Cloud Flow to send an email to 50 users simultaneously, saving you time and effort.
Step 1: Set Up Your Instant Cloud Flow
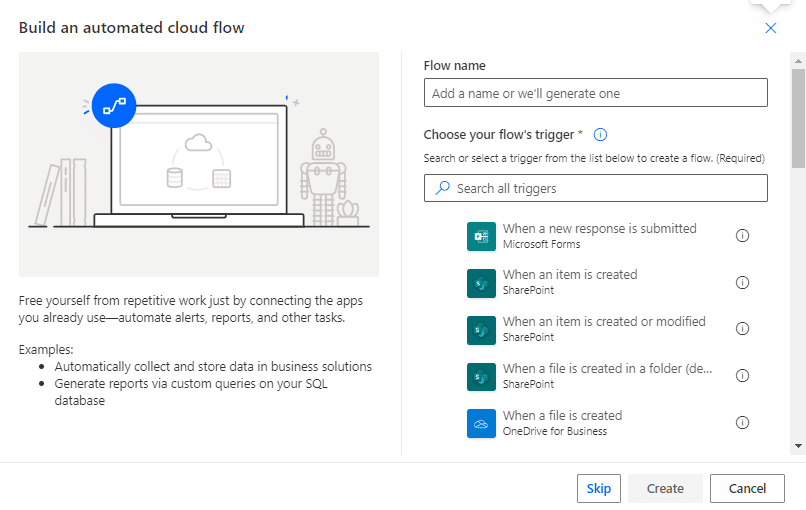
- Navigate to your Power Automate dashboard and select “My flows” on the left side. Click the “+New Flow” button and choose “Instant Cloud Flows” under New Flow.

- Name your flow (e.g., “Custom Mail”) and select “Manually trigger a flow” as the trigger option. Click “Create.”

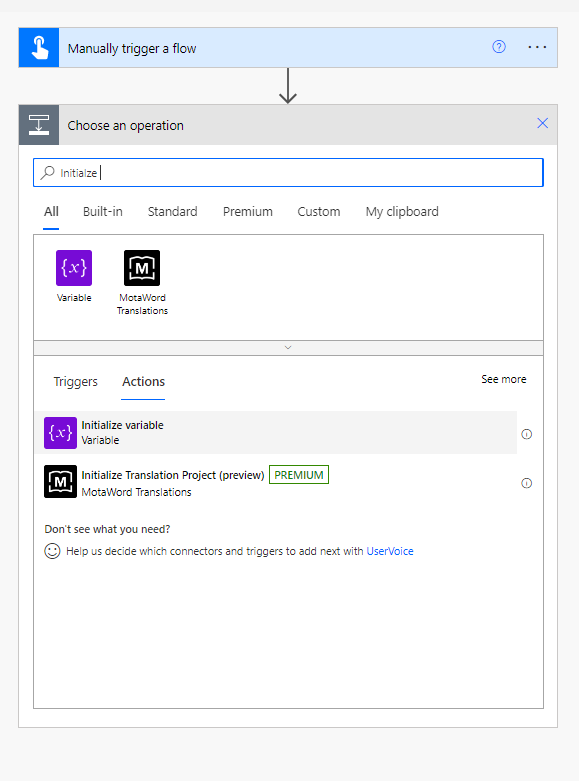
- Proceed to the next step by clicking “Next Step”. Now, search for “variable” and select “Initialize Variable.”
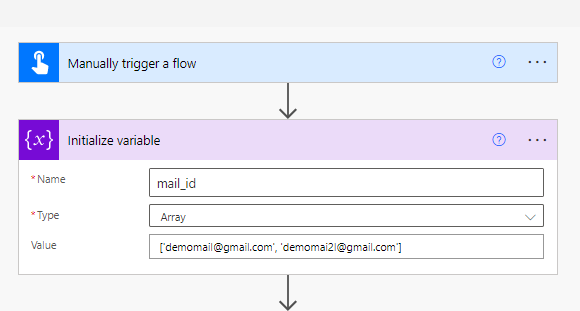
- Enter a name for your variable, change the Type to “Array,” and manually input the email addresses in the Value field using the following format:
- Separate email addresses with commas (,)
- Enclose each email address in quotes (“abc@domain.com”)
- Enclose the entire list of email addresses in square brackets ([])
- Click “Next.”
Step 2: Configure the Flow
- Look for “Control” and select “Apply to each.” If you can’t find it, search for it or locate it in the Built-in section.
- Click on “User Email” from the dynamic section.

- Click “Add an action button,” select the “Standard” tab, and choose your desired email system (e.g., Office 365 Outlook). Choose “Send an email (V2).”
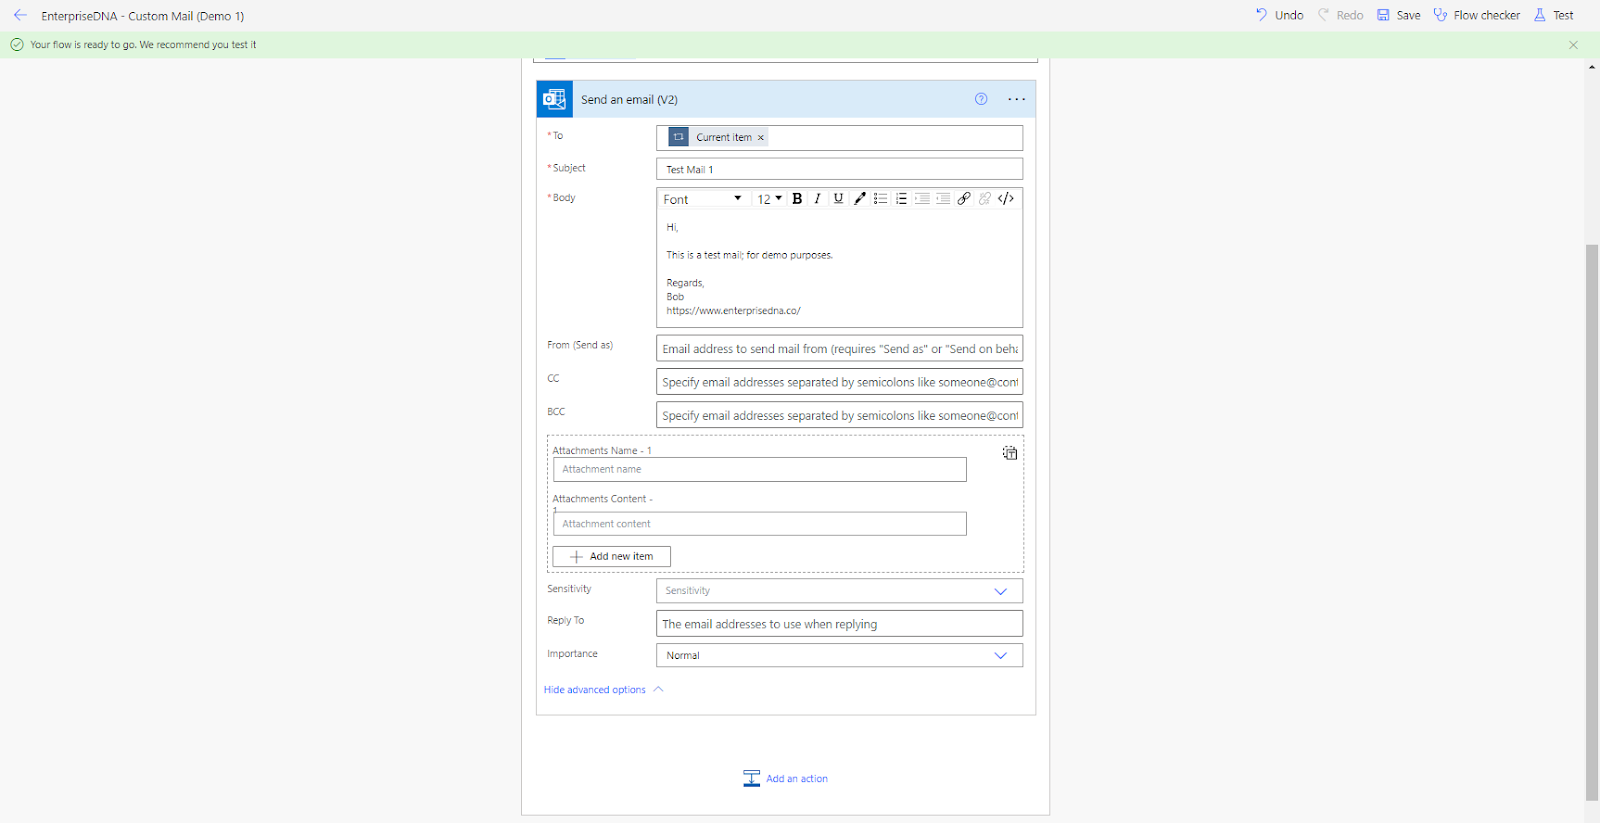
Step 3: Customize the “Send an email (V2)” Action
- Configure the following options:
- To: Use the dynamic content to select the “current item.”
- Subject: Input the email subject line.
- Body: Write the email message and format it as desired, including links, font size, and text styling.
- Click “Show Advanced Options” to access additional settings:
- Attachments: Add any necessary attachments.
- Importance: Set the priority level (Low, Normal, High).
- Reply to: Specify the email address(es) for replies.
- Save your settings when finished.
Step 4: Test Your Flow
- Click “Test” in the top right corner.
- Choose “Manually” and click “Test” again. Continue by selecting “Run Flow.”

- Confirm that the emails have been successfully sent to all recipients.
Example 2: Migrating Excel Data to a Sharepoint List
Migrating Excel data to a SharePoint list can be a tedious process, especially when dealing with simple tracking sheets. However, Power Automate offers a convenient solution that streamlines the migration process.
In this guide, we’ll show you how to convert an Excel table into a SharePoint list using Power Automate.
Step 1: Set Up an Instant Flow
- Set the flow type to “Instant” and use the “Manually trigger a flow” option.
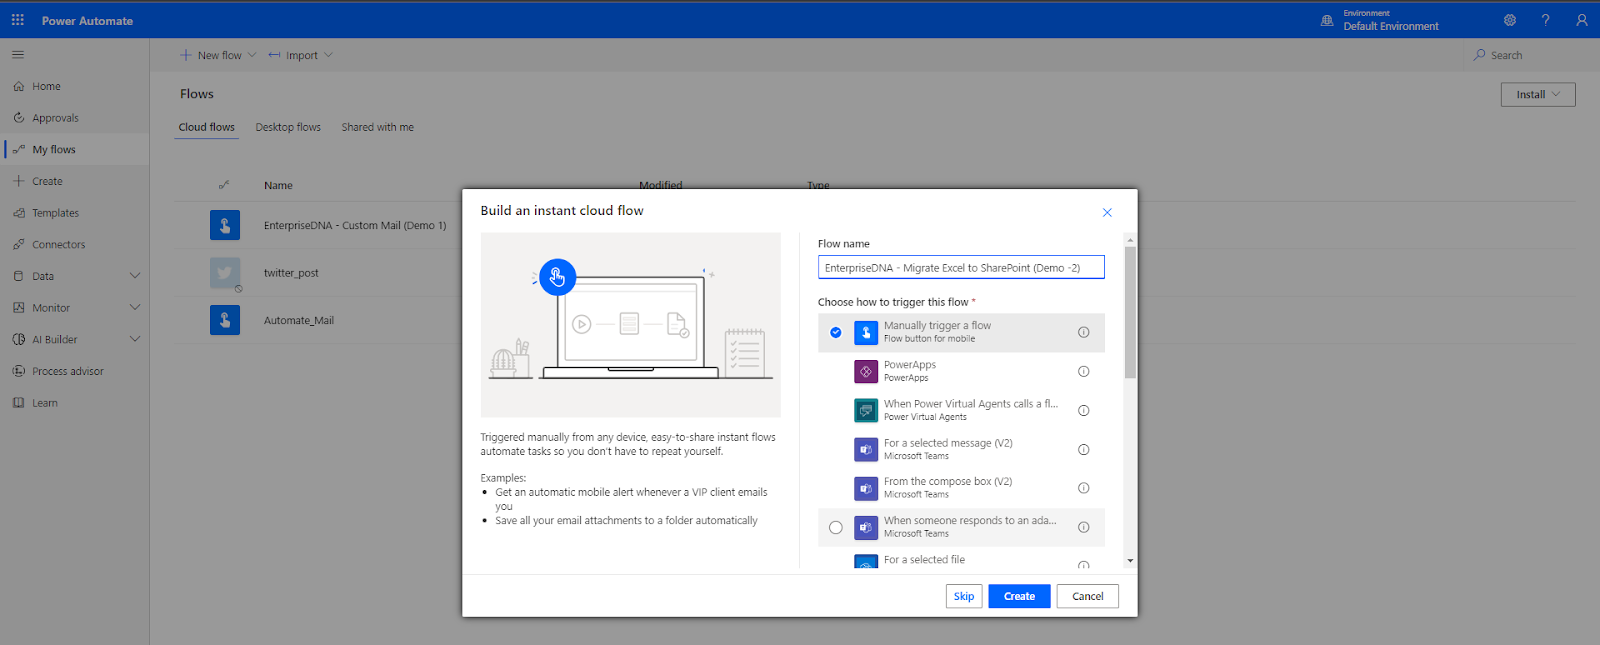
- Add the “List rows present in a table (Excel Online Business)” action. This action queries the rows from the table in an Excel file.

Step 2: Upload the Excel File to OneDrive or SharePoint
- Upload your Excel file to OneDrive or SharePoint and provide the location in the “Location” property of the “List rows present in a table (Excel Online Business)” action. In this example, we uploaded the file to the “Book” library of the SharePoint site containing our list.

Step 3: Configure the Flow to Add Items to the SharePoint List
- Use the “Apply to each (Condition)” action to iterate through each row returned by the “List rows present in a table (Excel Online Business)” action.
- Within the “Apply to each (Condition)” action, add the “Create item (SharePoint)” action to create an item in the Request list.

- Rerun the flow after making the necessary changes to the file.
Step 5: Verify the Successful Migration
- Once the flow completes successfully, navigate to your SharePoint list to view all the newly created list items.
By now, you should have a good idea of what Power Automate is capable of. Like anything you do, it is important to understand best practices.
Let’s check them out.
6 Best Practices for Power Automate
To get the most out of Power Automate, it’s important to follow best practices when creating and managing your flows.
Here are some of them:
1. Managing flows and Automation Processes
Plan and design your flow
When automating tasks with Power Automate, it’s tempting to start building flows right away, (believe me), but planning is key to a successful implementation.
For large projects, planning can help you avoid platform limitations, maintainability and performance issues.
Before you start, it’s important to gather all the information you need, such as license type, run volume, and business process complexity.
Then, identify the triggers, actions, and conditions needed, and outline the flow’s overall structure. This initial planning phase will help you avoid potential issues and ensure a smoother flow creation process.
Leverage built-in templates
Power Automate offers a wide range of built-in templates that you can use as starting points for your flows. Explore these templates to find the one that best suits your needs and customize it accordingly.
Templates save you time and help you learn best practices from pre-built flows.
Utilize error handling and notifications
To make your flows more robust and fault-tolerant, implement error handling mechanisms, such as using “Scope” actions to group related actions and handle errors or exceptions.
Additionally, consider adding notifications (e.g., email or Teams messages) to alert you when errors occur, allowing you to address issues promptly.
Optimize flow performance
Power Automate imposes certain limits and constraints on running flows. To ensure optimal performance, please note the following:
- Minimize the number of actions in your flow to reduce the risk of hitting these limits.
- Use “Filter Query” options in actions like “Get items” or “Get rows” to retrieve only the required data, reducing the load on your flow and improving its efficiency.
Keep your flows organized and maintainable:
As your flows grow in complexity, it becomes crucial to keep them organized and maintainable. Use the following tips to achieve this:
- Provide clear, descriptive names for your actions, variables, and connectors.
- Use comments to explain the purpose of specific actions or sections in your flow.
- Group related actions within “Scope” actions to create a modular and organized structure.
2. Testing & Debugging Workflows
Testing and debugging workflows in Power Automat is essential to ensure that your flow functions correctly and achieves its intended purpose
Power Automate provides several tools and techniques to test and debug your flows.
- Use environments: Utilize different environments within your organization’s tenant to separate the development, testing, and production stages. This practice helps to reduce bugs and ensures a smoother development process.
If you’re using premium licensing for Power Apps, take advantage of this feature.
- Monitor: The Monitor tool in Power Apps helps you diagnose app issues and track network requests and responses in real-time.
It provides insights into the name, control, and property of the formula, where the issue is happening within the app, the request, and response details.
- Trace function: Use the Trace function in conjunction with the Monitor tool to log custom messages and gain insights into the performance and issues within your app. This function helps you understand the app’s workings and identify potential bottlenecks or problem areas.
- Power Apps Test Studio: It is a feature designed to make it easy to test and validate your app during the development process. It provides an environment for creating and running test cases for your canvas app, ensuring that your app works as expected before deploying it to your end users.
Test Studio can be found in the Power Apps Maker Portal by navigating to the menu under the Advanced Tools section on the left.
Power Automate vs Other Automation Tools
In the ever-expanding landscape of automation tools, Microsoft Power Automate stands out as a powerful and versatile solution, but it’s not the only option available.
Competing platforms such as Automation Anywhere, UiPath, and Zapier also offer robust automation capabilities, each with its own strengths and capabilities.
Power Automate stands out for its seamless integration with Microsoft 365 products, easy-to-use interface, and wide range of built-in connectors. On the other hand, Automation Anywhere and UiPath are known for their advanced robotic process automation (RPA) capabilities, more complex needs, and large-scale applied enterprise automation.
When choosing the right automation tool for you or your business, it’s important to consider factors such as the specific needs, your existing software ecosystem, and the level of complexity of the process you want to automate.
3 Awesome Advantages of Power Automate
There is so much to love about Power Automate, but here are 3 things we love about it.
- Extensive Connector Library: Power Automate offers the most comprehensive list of connectors, with over 900+ connectors currently available. Additionally, the platform adds 10-30 new connectors each month, ensuring that it stays up-to-date with the latest apps and services.
This continuous addition of new connectors further enhances the versatility of the platform, making it a reliable choice for businesses of all sizes. - Ease of Use: Power Automate is designed to be user-friendly, with a drag-and-drop interface that makes it easy for users to create workflows without any coding knowledge. It also offers a wide range of templates that users can customize to fit their specific needs, further simplifying the automation process.
- Power Automate’s New AI Builder: As the use of generative AI increases in the industry, AI Builder is a valuable tool that gives companies a competitive edge. Companies can save time and resources by automating complex processes while improving accuracy and precision. AI Builder’s intuitive interface and pre-built templates make it easy for users to create custom machine-learning models without coding skills.
This democratization of AI will enable companies of all sizes to take advantage of machine learning and AI without investing in expensive data science teams.
Additionally, AI Builder integrates seamlessly with other Microsoft products, allowing users to further automate their workflows.
An example is that businesses can use AI Builder to extract data from invoices and receipts and use Power Automate to send that information to other apps like Dynamics 365 and Excel.
This integration helps companies streamline processes, reduce errors, and ultimately improve efficiency and productivity.
3 Limitations of Using Microsoft Power Automate
- Costs add up with paid plans: Power Automate offers a free plan, but with limitations such as a maximum flow frequency of 15 minutes.
Organizations with more complex workflows and a greater need for automation may need to upgrade to a paid plan. Power Automate costs vary by plan and usage. Premium plans start at $40 per user per month. These paid plans come with higher flow advanced features and options that are important for businesses with high automation needs.
However, plan costs can quickly add up, especially in large organizations with many users. Therefore, it is important that organizations carefully assess their automation needs and usage before committing. - Performance impact due to complex workflows: Power Automate may experience a considerable drop in performance when executing complex workflows.
This can affect the efficiency and speed of the program, leading to delays and reduced productivity. - No Parallelization: Power Automate supports only sequential workflows, which means that actions are executed in a fixed order. This can be a limitation for businesses that require parallel or conditional workflows.

To Power Automate or Not To Power Automate?
That is the question…
In summary, Microsoft Power Automate is an invaluable tool for businesses looking to streamline operations and improve efficiency.
Power Automate helps organizations save time, reduce human error, and improve overall productivity by automating repetitive tasks and integrating with a variety of services and applications.
With a rich connector library, easy-to-use interface, and powerful features, Power Automate is a versatile solution for companies across industries.
By leveraging best practices, incorporating AI enhancements, and understanding the types of workflows available, organizations can unlock the full potential of Power Automate and revolutionize their operations.
As you begin your automation journey, remember to plan, test, and optimize your workflows to ensure success and maximize the benefits of this powerful automation tool.
Like to know more about Power Automate? Start learning with our free courses and improve your data skills in no time!