
In today’s fast-paced digital world, syncing folders in SharePoint to your desktop can make collaboration and file sharing a breeze.
However, there may come a time when you no longer need a folder synced to your desktop.
In such situations, knowing how to unsync a SharePoint folder becomes essential.

To unsync a SharePoint folder:
Locate and click on the Microsoft OneDrive icon in your Windows taskbar or Mac menu.
Click on the gear icon to open Help & Settings.
Select Settings on Windows or Preferences on Mac, to access the OneDrive configuration.
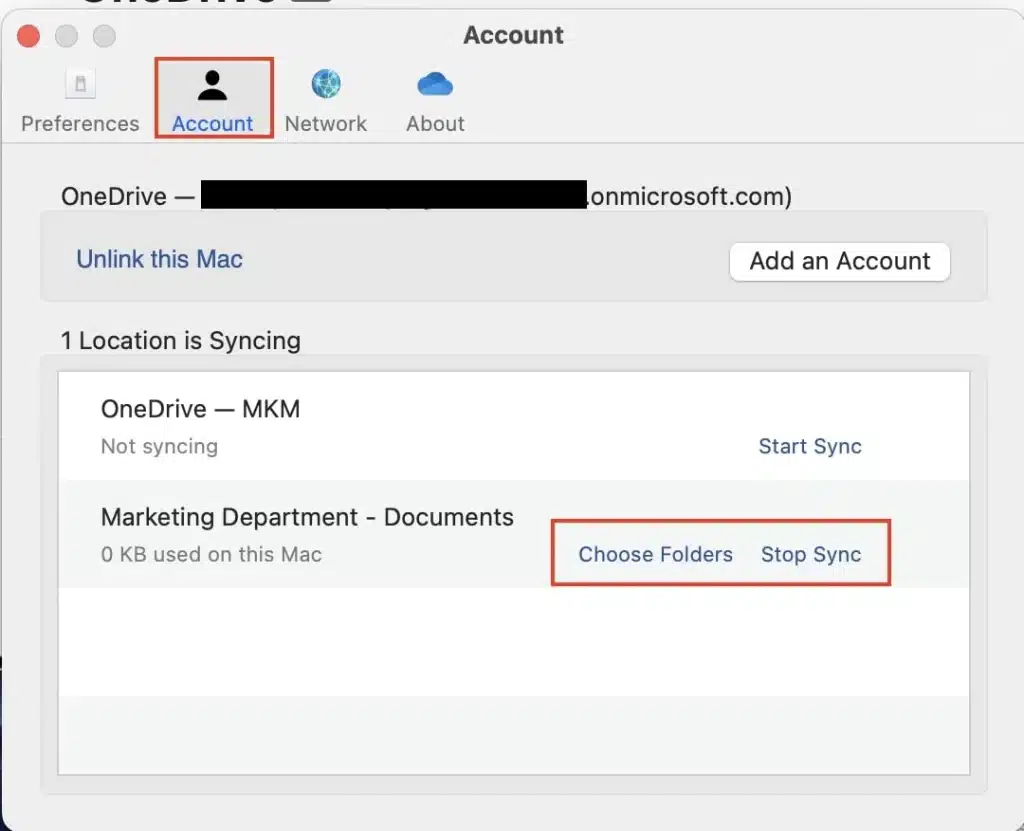
Click the Account tab in the toolbar menu.
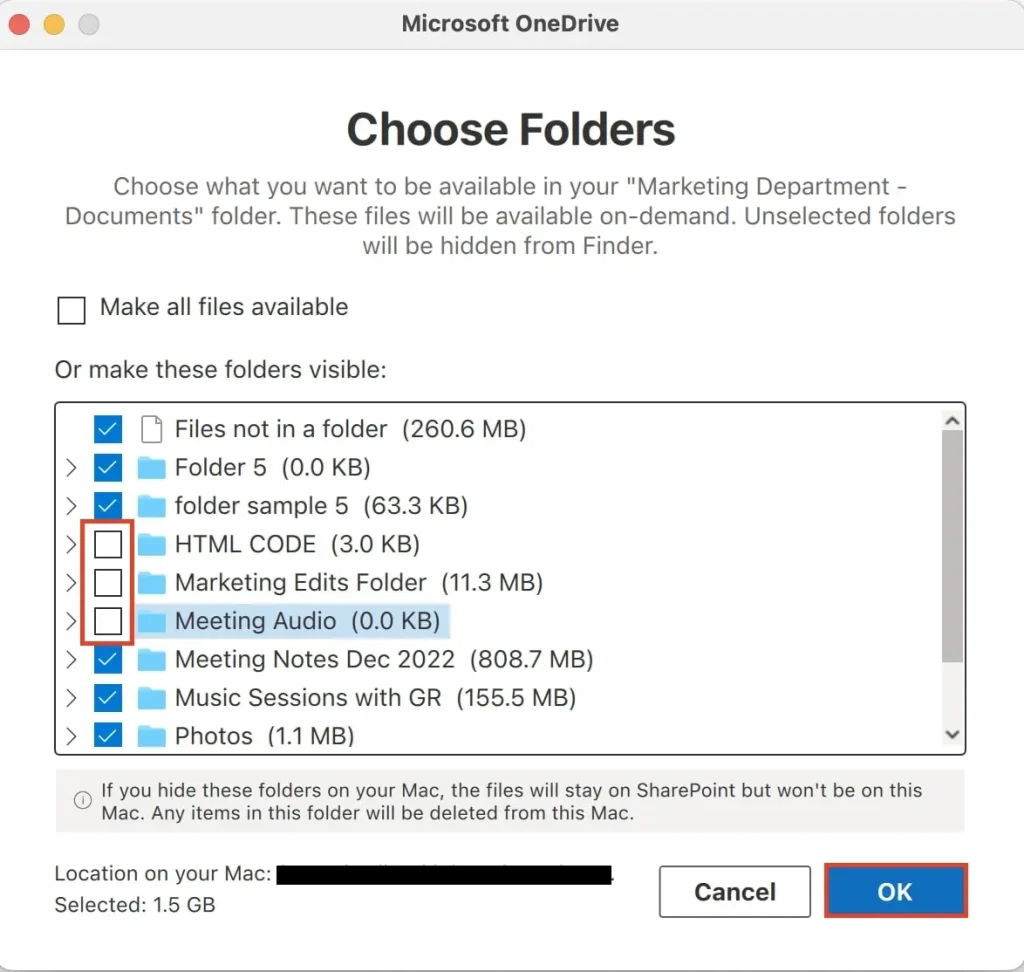
Click on Choose folders.
Uncheck the folders you want to stop syncing, and then click OK.
This article will guide you through the process of unsyncing SharePoint folders step by step.
We will also give you effective solutions to troubleshooting issues you might encounter.
Following these instructions will enable you to manage your synced folders efficiently, maintaining a clutter-free computer workspace.
Let’s dive in!
Preparatory Steps Before Unsyncing
Before you begin the process of unsyncing a SharePoint folder, it’s important to take a few preparatory steps.

These steps ensure that your SharePoint files remain safe and accessible even after you unsync them.
Check File Status: Make sure that all the files in your SharePoint folder are fully synced. This means that the latest versions of your files are updated both in the cloud (SharePoint) and on your local computer.
You can check this by looking at the sync status indicators on the files.

Backup Important Files: It’s a good practice to back up important files before making changes to their sync settings. This way, you can avoid accidental loss of data.
You can back up your files by copying them to a different location on your computer or to an external hard drive.
Understand the Impact: When you unsync a folder, it will no longer automatically update its contents between your computer and SharePoint.
Any changes you make to the files in the unsynced folder on your computer won’t be reflected in SharePoint, and vice versa.
By following these steps, you can smoothly transition to unsyncing your SharePoint folder without losing any important data or encountering unexpected issues.
Now let’s show you how to unsync successfully
Step-by-Step Guide to Unsync SharePoint Folder
To unsync a SharePoint folder, you will need to follow a few simple steps.
Locate and click on the OneDrive icon in your Windows taskbar or Mac menu. It could either be a white or a blue cloud icon.
In the OneDrive menu, click on the gear icon to open Help & Settings.
From the dropdown list, select Settings on Windows and Preferences on Mac, to access the OneDrive configuration. A dialog box will appear presenting you with several options.

Click the Account tab in the toolbar menu.
Click on the blue Choose folders link under the SharePoint site where your selected files or folders are located. If you want to unsync the entire site click the Stop Sync link.
If you clicked Choose folders, you will see a list of all the folders currently syncing with your SharePoint Online environment. Uncheck the folders you want to stop syncing, and then click OK.
Confirm your choices by clicking OK again on the OneDrive panel.
If you are using File Explorer, you can also unsync a SharePoint folder by:
Navigating to the synced folder and right-clicking on it.
Select Settings.
In the menu that appears, choose Stop Syncing.
Click Yes to confirm your decision.
Remember that stopping the syncing process for a folder does not automatically delete the local files on your computer.
If you wish to remove those files, you need to delete them manually. Doing so will not affect the files stored in SharePoint Online.
By following these steps, you can effectively manage your syncing process and ensure that only the necessary folders are synced with your SharePoint document library.
But, unsyncing might not always be the best way to go. Pausing your SharePoint sync might be more aligned with your needs.

Pausing and Resuming Sync
Sometimes, you may want to pause the sync process temporarily. Perhaps you’re experiencing issues with the SharePoint folder or you want to conserve system resources for other tasks. Pausing the sync may be a great option.
Thankfully, pausing and resuming the sync is quite simple.
To pause the sync process:
Locate and click on the OneDrive icon in your Windows taskbar or Mac menu. It could either be a white or a blue cloud icon.
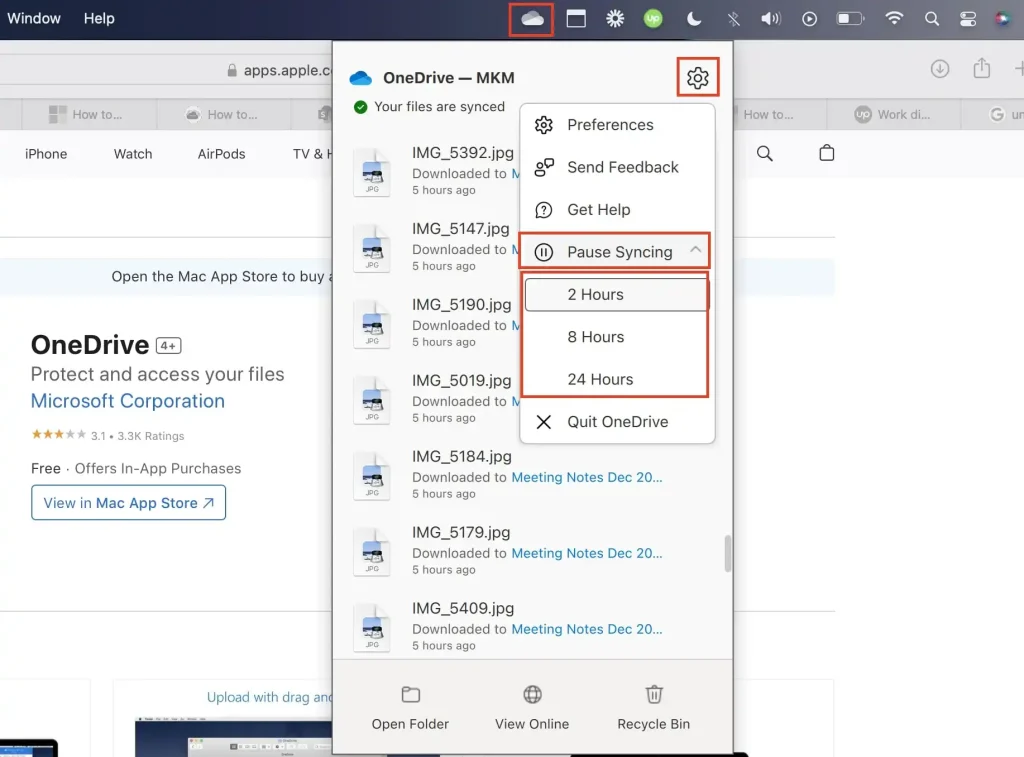
In the OneDrive menu, click on the gear icon to open Help & Settings.
In the dropdown that appears, click Pause syncing and select the desired duration (e.g., 2 hours, 8 hours, or 24 hours).
During the pause, your local changes will not be uploaded to SharePoint, and any updates made in SharePoint will not be reflected on your device.
However, once the set pause duration is over, the sync will automatically resume.
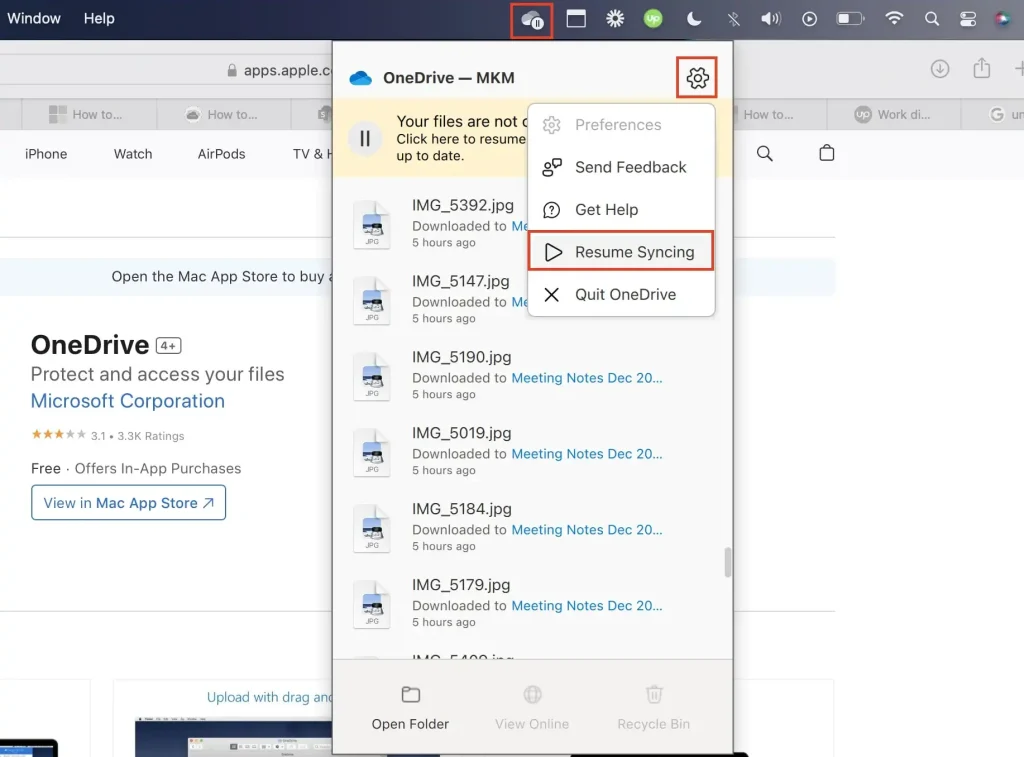
When you want to manually resume the sync process before the set pause duration is over, follow these steps:

Locate and click on the OneDrive icon in your Windows taskbar or Mac menu.
In the OneDrive menu, click on the gear icon to open Help & Settings.
Click Resume syncing in the dropdown that appears to sync files once more.
After resuming the sync, your device and SharePoint folder will start updating and syncing with each other once more.
By utilizing the pause and resume options, you can efficiently manage the sync of your SharePoint folder. This ensures your local and online files are always up to date and in sync.
Remember to check your device’s and SharePoint’s sync status occasionally, specially after making significant changes to the files in the folder.
Troubleshooting Common Unsyncing Issues
When unsyncing a SharePoint folder, you might encounter some common issues.
Here’s how to troubleshoot them effectively:
Troubleshoot 1: Sync Errors During Unsyncing
Problem: Sync errors may appear if the process is interrupted or if there are file conflicts.
Solution: Ensure all files are fully synced before attempting to unsync. If you encounter an error, try restarting the OneDrive app and repeating the unsync process.

Troubleshoot 2: Unable to Find the Unsync Option
Problem: The option to unsync the folder is not visible or available.
Solution: Make sure you are using the latest version of OneDrive. If the problem persists, try accessing the sync settings from the OneDrive icon in your system tray instead of right-clicking on the folder.
Troubleshoot 3: Re-syncing Issues
Problem: Difficulty in re-syncing the folder back to SharePoint.
Solution: Verify that you have the correct permissions for the SharePoint folder. Try re-syncing from the SharePoint online interface by navigating to the folder and selecting the sync option.

Troubleshoot 4: Synced Folder Not Appearing in Settings
Problem: When using the “Choose Folder” option during unsyncing, the synced folder may not appear, usually due to a temporary disconnection or sync issue.
Solution: Ensure a stable internet connection and access the settings again. If the problem persists, restart OneDrive and attempt to access the settings.
Troubleshoot 5: Unsyncing Restrictions on Specific SharePoint Document Libraries
Problem: Warnings indicate restrictions on unsyncing certain SharePoint libraries.
Solution: Review and adjust library-specific sync settings. If restrictions persist, seek guidance from a SharePoint administrator.
By understanding and applying these troubleshooting steps, you can resolve most issues that arise during the unsyncing process.
If problems continue, consider seeking additional support from your IT department or consulting Microsoft’s online resources for more advanced solutions.

Final Thoughts
Successfully unsyncing a SharePoint folder helps in effectively managing your storage and files. This article has guided you through the essential steps and tips for a smooth unsyncing process, from preparation to execution and troubleshooting.
Remember, careful attention to synchronization details and following these instructions can prevent data loss and sync errors.
With this knowledge, you can efficiently manage your SharePoint and OneDrive files, ensuring an organized and streamlined digital workspace.

As you continue to master SharePoint, find out how to use it in your Power BI development:
Frequently Asked Questions
How do I stop syncing a SharePoint folder?
To stop syncing a SharePoint folder, click the white or blue cloud icon in your Windows taskbar. Click on the gear icon to open “Help & Settings.” Select “Settings” from the dropdown menu, then click the blue “Choose folders” link. Uncheck the multiple folders you want to stop syncing and click “OK.” Click “OK” again on the OneDrive panel.
How to remove a synced SharePoint folder without deleting it?
After stopping the sync, you can delete the locally stored files on your computer without affecting the SharePoint folder. Go to the folder in File Explorer, right-click on it, and select “Delete.” This action will only remove the folder from your computer, and the data will still be accessible on SharePoint.
How can I unlink a folder from OneDrive and SharePoint?
First, stop syncing the folder following the steps mentioned above. Once the sync is stopped, you can remove the folder from your computer’s File Explorer without affecting the data stored on OneDrive or SharePoint.
How do I unsync a local OneDrive folder from my computer?
To unsync a OneDrive folder from your computer, click the white or blue cloud icon in your Windows taskbar. Navigate to the gear icon and click on “Help & Settings.” From the dropdown menu, select “Settings,” then click the blue “Choose folders” link. Uncheck the folder that you want to unsync, and click “OK.” Finally, click “OK” on the OneDrive panel.


