As you work on your Microsoft Excel spreadsheets, it’s common to use various formulas to perform calculations. Knowing how to show and access these formulas can be extremely helpful.
There are more than ten ways to show formulas in Excel. Some methods operate on a single cell, and other ways will show every formula in a worksheet.
This article shows examples for every method, which will help you understand which to choose for your immediate requirements. Let’s dive into each method in turn.
Let’s go!
1. Excel Shows Formulas While You Are Typing
You create a formula in Excel by typing an equal sign (=) into a cell, followed by a function or a combination of functions, cell references, and operators.
As you are typing, Excel displays the formula until you press the enter key or the tab key. However, the display only shows the portion of the formula that fits in the cell.
For example, the picture below shows a cell with the following formula: “=A1+B1+A2+B2+A3+B3+A4+C4”.
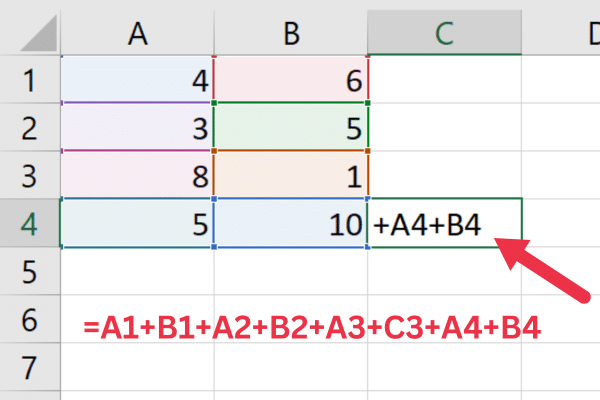
Notice how only the final portion of the formula is visible within the cell. The next methods in this article will show ways to fully display formulas in your Excel files.
2. Using The Formula Bar
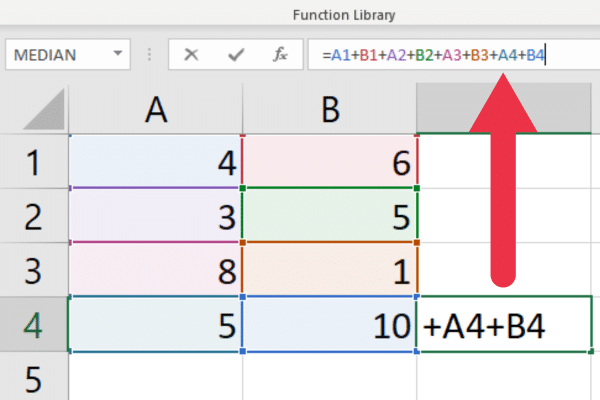
The Formula Bar shows the entire formula in a single cell. This makes it a useful tool for checking and editing formulas one cell at a time.
To use it, simply click on the cell containing the formula you want to view. The formula will appear in the Formula Bar, located just above the Excel spreadsheet.
You can modify the formula in the Formula Bar and press Enter or Return to update it in the cell.
3. Toggle The “Show Formulas” Option on The Formulas Tab
By default, the results of a formula are shown in a cell. You can change this behavior in a worksheet with these steps:
Go to the Formulas tab.
Click the “Show Formulas” command in the Formula Auditing group.
This ensures that all cells in the worksheet will show the formula instead of the result. You can revert to the default behavior by clicking the button in the formula tab again.
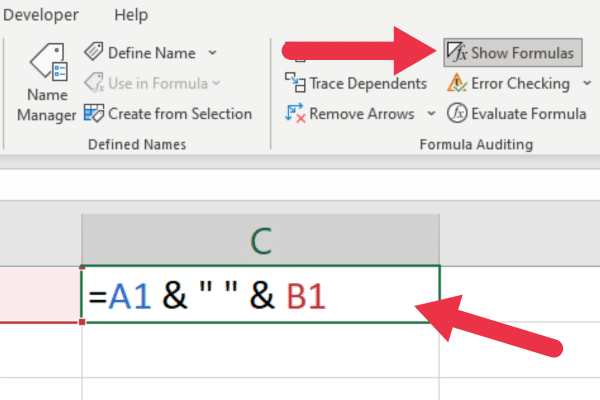
Enabling this option also lets you print formulas instead of each calculated value. You can then set the print area in Excel and the output will have the formulas within that range.
4. Display Formulas With Keyboard Shortcuts
Excel provides keyboard shortcuts to show all the formulas in your Excel worksheet. The keyboard shortcut command depends on whether you are using a Mac or a Windows device.
Windows users
Press Ctrl + tilde (~) or Ctrl + accent grave (`) to show or hide formulas.
The tilde or grave accent key appears on the top left of most keyboards. You’ll find it below the Esc key and to the left of the number keys.
Mac users
Press Cmd + ` to hide or display formulas in Excel.
5. Using The FORMULATEXT Function
The FORMULATEXT function allows you to view the formulas in adjacent cells or within a separate column while preserving the layout of your Excel sheet.
Follow these steps:
Select an empty cell where you want to display the formula.
Type “=FORMULATEXT(reference)” in the selected cell, where “reference” is the cell containing the formula you want to display.
Hit Enter or Return, and the referenced formula will be displayed as text in the selected cell.
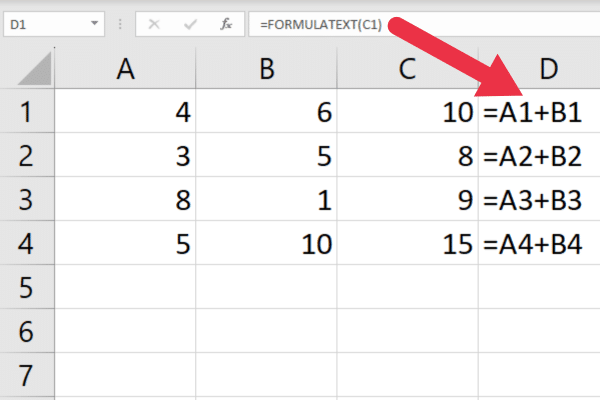
This function is useful when you need to display formulas in a different cell to their calculated values or when creating Excel tutorials for other users.
For example, if you’re showing how to count distinct values in Excel, you can display the formula as well as the results.
6. Formatting Cells as Text
When you format a cell as text and enter a formula, Excel treats what you’ve entered as a string. Follow these steps:
Go to the Home tab.
Choose a cell or range of cells.
Expand the drop-down in the Number group.
Choose the text option.
When you enter a formula into the cell, Excel will display the formula instead of the calculated result.
7. Displaying a Single Formula as Text
When you want to display a formula as a text string, you can add an apostrophe before the equal sign. This will prevent Excel from interpreting the formula as a function or calculation.
For example, instead of typing =A1+B1, type ‘=A1+B1. (Yes, add the ‘ before the =)
By doing this, the cell will display the formula as text, while still allowing you to view it in the formula bar. The apostrophe doesn’t appear in the cell unless it is in edit mode.
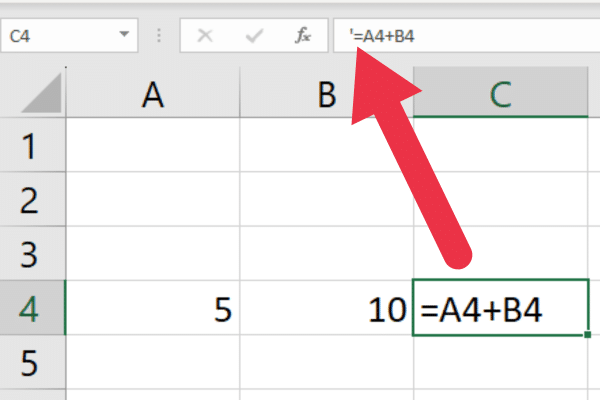
You can also manually add the space character instead of an apostrophe. However, the indentation (extra space) will be visible in the cell. The advantage of the apostrophe is that it is invisible.
8. Using Find-And-Replace to Show All The Formulas as Text
You can use the find-and-replace feature in Excel to display all formulas as text. Follow these steps:
Go to the Home tab.
Select the range of cells with the formulas you want to change.
Expand the “Find & Select” drop-down and choose “Replace”.
Type the equal sign (=) in the “Find what” input field.
Type an apostrophe followed by the equal sign (‘=).
Choose the “Formulas” option from the “Look in” drop-down menu.
Click the “Replace All” button to apply the changes to the selected cells.
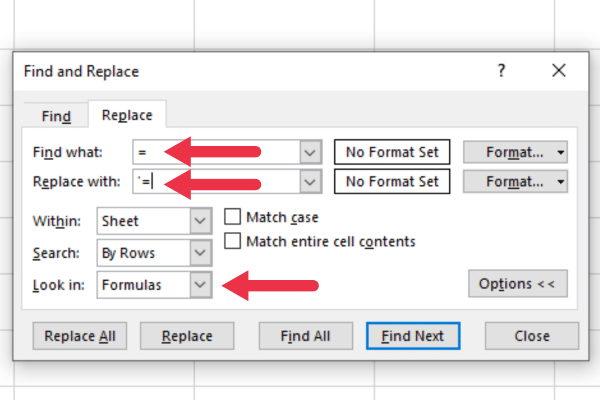
You can also use a keyboard shortcut to open the Find & Replace dialog box by pressing Ctrl + H and switching to the Replace tab.
9. Customize File Options For a Worksheet
You can customize Excel file options to change the way formulas are displayed. Follow these steps:
Click the “File” tab (or the Office button in Excel 2007).
Choose “Options” from the menu.
In the “Excel Options” dialog box, select “Advanced” from the left pane.
Scroll down to the “Display options for this worksheet” section.
Check or uncheck the “Show formulas in cells instead of their calculated results” option as per your preference.
Click “OK” to save your changes.
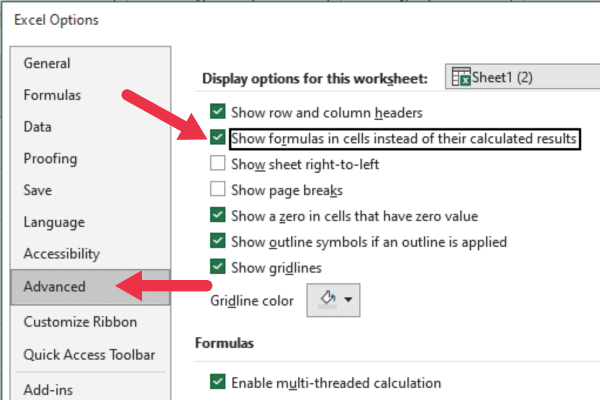
This ensures that all formulas are shown in the active spreadsheet.
10. Use The Evaluate Formula Tool
The Evaluate Formula tool shows a step-by-step evaluation of the selected formula, making it easier to identify issues. Follow these steps to launch the tool:
Go to the Formulas tab.
Click “Evaluate Formula” in the Formula Auditing group.
The pop-up tool shows the formula in the cell. You can use the Evaluate button to step through each function within the formula.
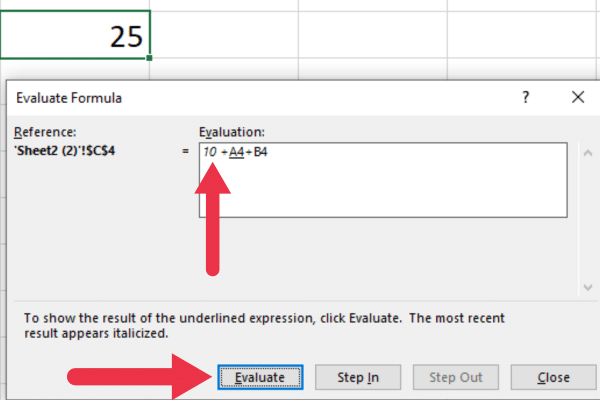
This tool, along with features such as tracing precedents, will be helpful when investigating circular references in Excel.
11. Show Hidden Formulas in Protected Worksheets
If you can’t use the above methods to show formulas, they may be hidden in a protected worksheet (or workbook) or a locked column in Excel.
You may also want to protect your worksheet when sharing with other users but want to allow your colleagues to see the formulas.
To view hidden formulas when the worksheet is protected, follow these steps:
Go to the Review tab.
Click “Unprotect Sheet”.
Choose the selected range of cells with formulas.
Right-click and choose “format cells” from the drop-down.
Go to the Protection tab of the pop-up window and uncheck the Hidden box.
Final Thoughts
You have learned eleven ways to show formulas in Microsoft Excel.
Some methods, such as within a protected worksheet, are only needed in specific scenarios. Other methods can be applied to most of your requirements.
Try several different ways, and you will soon have a favorite method that will help you work more effectively with formulas and functions.
So there you have it! Showing formulas in Excel is a trick that can save you a ton of time and hassle. With just a few simple keystrokes, you can switch between viewing your formulas and seeing the results of your calculations.
Whether you’re a seasoned Excel pro or just starting out, this is a skill you’ll want to add to your toolbox. So, the next time you’re working on a spreadsheet, give it a try and see how much easier it can make your life!


