
If you are working with sensitive or complex data in Excel, you may find it useful to lock certain columns to prevent accidental changes. This can help you maintain data integrity and prevent errors.
In this article, we will show you how to lock columns in Excel using two methods:
Using the Format Cells options to lock specific columns.
Using the Protect Sheet feature to protect all columns from changes.

Why Locking Columns in Excel is Important
Locking columns in Excel can be a crucial step in protecting your data and formulas. It ensures that important information is not accidentally or intentionally altered or deleted.
Here are four reasons why it’s important:
1. Prevent data loss
When you have a large dataset with multiple columns, it can be easy to accidentally delete or modify data in the wrong column. Locking columns prevents this from happening and ensures that your data remains intact.
For example, suppose you’ve set up a large volume of data for running a paired sample T-test in Excel. You probably won’t want to input the data again. Protect yourself by protecting the columns!
2. Protect formulas
Excel formulas are the backbone of many spreadsheets. Locking columns that contain formulas ensures that they are not accidentally deleted or modified.
This is especially important when sharing spreadsheets with others.
3. Control access
Locking columns can help you control who has access to certain information.

You can lock columns that contain sensitive data, such as financial information or personal data, to ensure that only authorized personnel can access them.
4. Save time
Locking columns can save you time in the long run. When you have to spend time fixing errors or recovering lost data, it can be a major time sink.
By locking columns, you can prevent errors and data loss, which saves you time and effort.

How to Lock Columns in Excel Using Cell Formatting
All columns are locked in Excel by default. However, the locking property isn’t enabled until the worksheet is protected.
This means that if you want to lock specific columns, you must unlock all cells in the worksheet first. Then you choose your columns and set their locked property.
Here are the steps to follow:
Step 1: Select all cells in the worksheet
You can select all cells by using the keyboard shortcut Ctrl-A.
Alternatively, click the green triangle in the top-left box of the sheet.
Step 2: Open the Protection Tab in the Format Cells Dialog Box
Right-click, on the selected cells and choose “Format Cells” from the drop-down menu.
Alternatively, you can go to the Home tab, click on the “Format” drop-down, and select “Format Cells.”
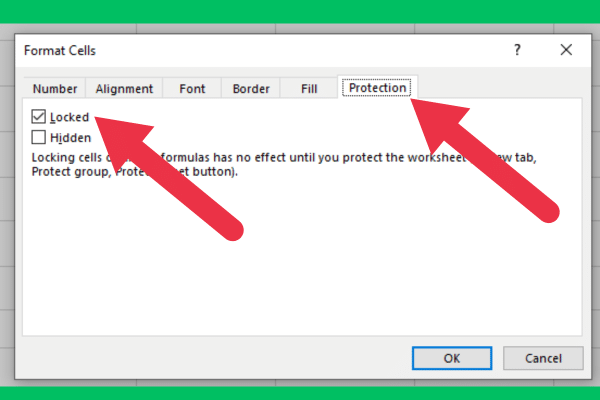
Step 3: Uncheck the Locked Box
In the “Format Cells” dialog box, click on the “Protection” tab. Here, you will see the options for locking and hiding cells.
Step 4: Select the Column(s) to be Locked
Click on the column header to select the entire column you want to lock.
You can select multiple columns by holding down the Ctrl key while clicking on the column headers.
Step 5: Open the Protection Tab in the Format Cells Dialog box
Repeat step 2.
Step 6: Check the Locked Box
Check the ‘Locked’ option to lock the selected columns. This will prevent anyone from editing or deleting the contents of the locked cells.

If you don’t want users to even see the column, check the ‘Hidden’ option.
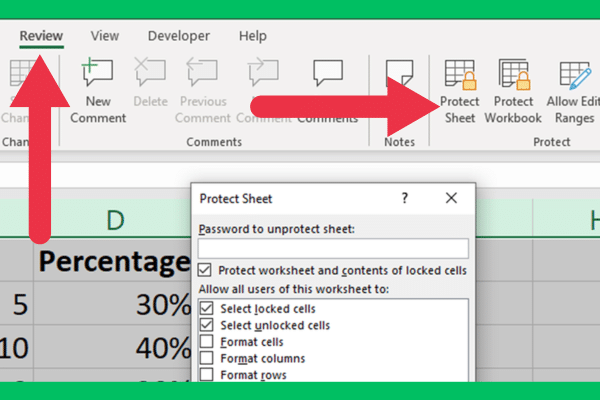
Step 7: Click on ‘Protect Sheet’ in the Review Tab
Step 8: Enter a Password (Optional)
If you want to add an extra layer of security, you can password-protect the locked cells. This will prevent anyone from unlocking or editing the cells without the password.
To add a password, stay on the previous screen (Protect Sheet in the Review Tab). Enter a password in the top box of the list of options that appear.
How To Lock Columns In Excel By Protecting The Worksheet
If every column in your worksheet should be protected from editing, then you don’t need to go through a tedious process of selecting all columns and ticking the locked check box.
Instead, you can simply protect the entire sheet. To do so, go to the Review tab and select “Protect Sheet” from the menu.
How To Unlock Columns
There will be times that you need to rework the data in a locked column.
To do so, follow these steps:
Go to the Review tab and click “unprotect sheet”.
Edit the unlocked cells.
Go to the Review tab and protect the sheet again.

How To Freeze A Locked Column
You may want to freeze the leftmost column after it has been locked. To freeze column A, you use a freeze panes command with these steps:
Select the entire column.
Go to the View tab in the ribbon.
Click Freeze Panes.
Choose “Freeze First Column”.
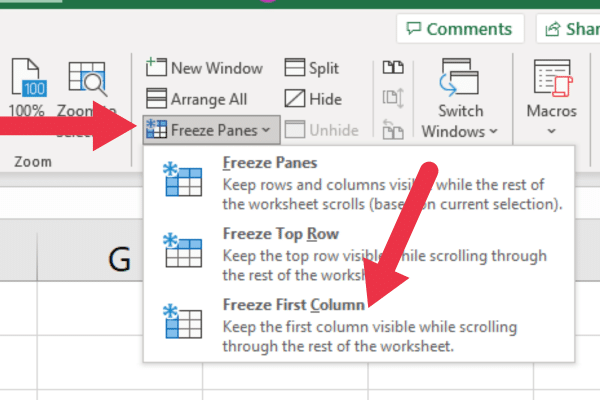
You can explore other options for freezing panes here. The window gives you several ways to freeze rows. You can freeze the top row (first row) using the same steps as we provided for the first column.
You can also set up split panes here.
6 Tips for Locking Cells And Columns in Excel
Here are six tips to keep in mind before you protect columns or lock cells in Excel:
Consider which columns contain sensitive or important data that should not be changed or deleted.
Consider protecting the entire sheet to protect all the cells.
It’s useful to lock formulas with complex calculations.
Consider locking specific cells to be more selective.
If you plan to share your Excel spreadsheet with others, remove any passwords or restrictions that may prevent them from accessing or editing the file.
Test your file to make sure that it works as expected. Try editing cells that should be locked to ensure that they cannot be changed.
It’s Time to Use Your New Excel Skills
This article showed you how to lock specific columns in Microsoft Excel. You can also lock rows or cells in Excel too.
You usually lock specific cells to protect a small set of data. However, locking cells in your Excel sheet may miss some important data that should not be edited.
Instead, you can lock multiple rows and columns using the same formatting options. By locking one or more columns, you can lock formula cells and vital data in your Excel worksheet.
Remember that protecting sections can help you prevent accidental changes to important data, and can make it easier to work with large spreadsheets.


