
Microsoft Excel‘s Visual Basic for Applications (VBA) is a powerful tool. It helps you automate and customize multiple tasks in the spreadsheet program. Learning how to view and run VBA code in Excel is extremely useful because it helps you to save time on repetitive tasks. In other words, VBA coding improves your overall efficiency.
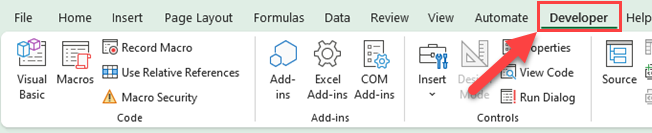
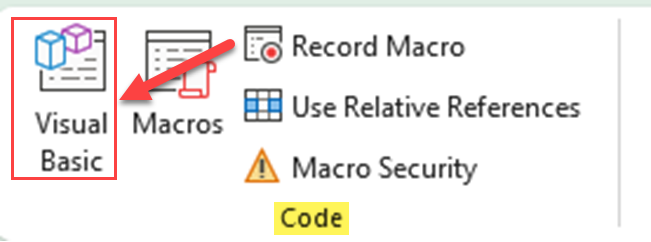
To view VBA code in Excel, start by opening Excel and the workbook of interest. Navigate to the “Developer” tab on the Ribbon — if it’s not visible, activate it by going to “File”, “Options”, “Customize Ribbon”, and then check the “Developer” option. Once you navigate to the “Developer” tab, click on “Visual Basic” to launch the VBA Editor.
In this article, you’ll learn how to access VBA code in Excel as well as get an understanding of the tools and techniques needed to get started. By getting familiar with the VBA editor, you‘ll open up a whole new world of possibilities for improving your workbook processes and simplifying tricky tasks.

Let’s dive in!
Accessing the VBA Environment
In this section, you’ll learn how to access the VBA environment within Excel by enabling the Developer tab, using a keyboard shortcut, and locating existing macros. This guide will help you navigate through the VBA code and make customizations to your Excel workbooks.
1. Enabling Developer Tab
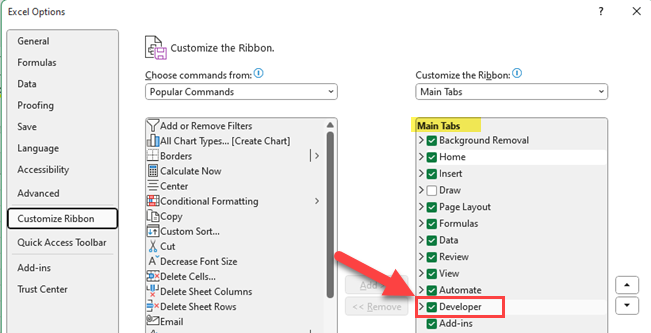
To access the VBA environment, you first need to enable the Developer tab in the Ribbon. Follow these steps to do so:
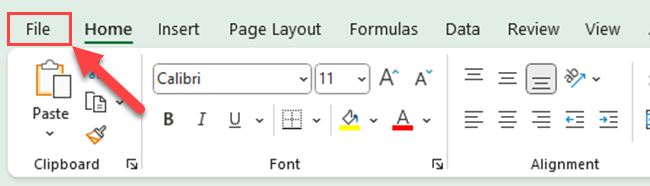
- Open the Excel file and click on the File tab.

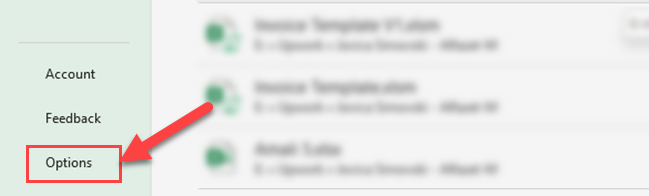
- Select Options to open the Excel Options Window.
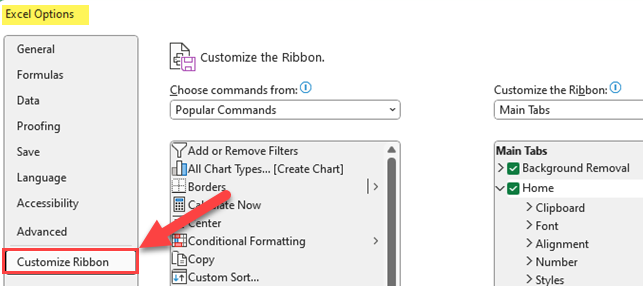
- Click on Customize Ribbon of the Excel Options dialog box.
- In the right panel, under the Main Tabs section, check the box next to Developer in the dropdown list.
- Click OK to save your changes.
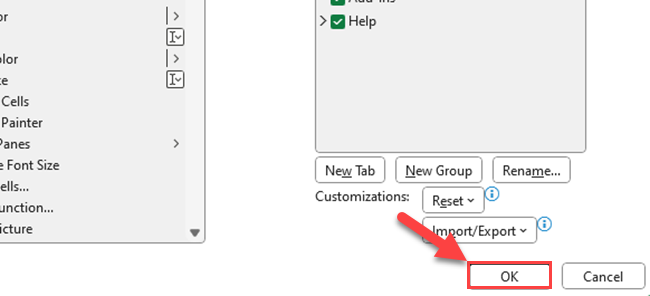
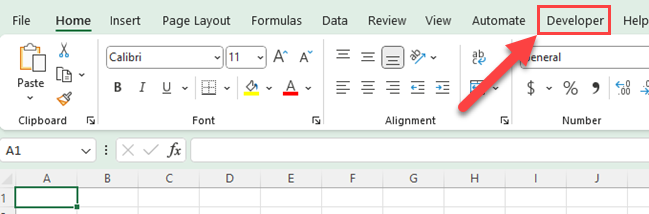
The Developer tab should now be visible in the Excel Ribbon.
2. Using Keyboard Shortcut
You can access the VBA environment using a keyboard shortcut as well. Press ALT + F11 to open the Excel Visual Basic Editor.
3. Viewing Macros
To view and manage the code for your Excel macros, go through the following steps:

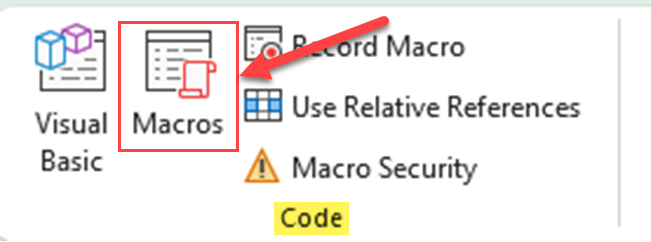
- Click the Developer tab in the Excel Ribbon menu bar.
- In the Code group, click on the Macros button.
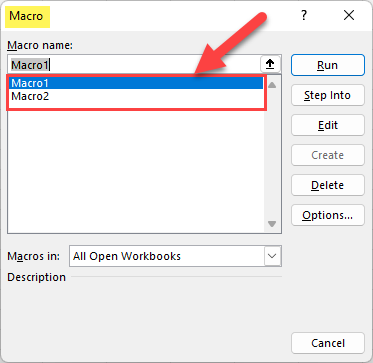
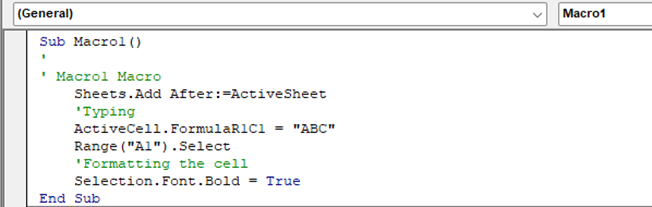
- In the Macro dialog box, you will see a list of available macros in your workbook.
- Select the macro you want to view, and click the Edit button.
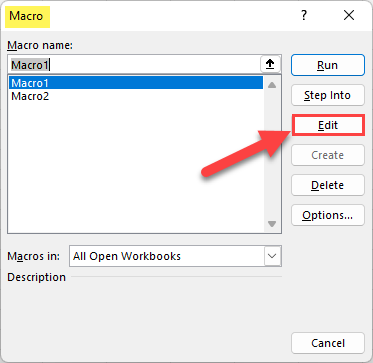
The Visual Basic Editor will open, allowing you to view and modify the code for the selected macro.
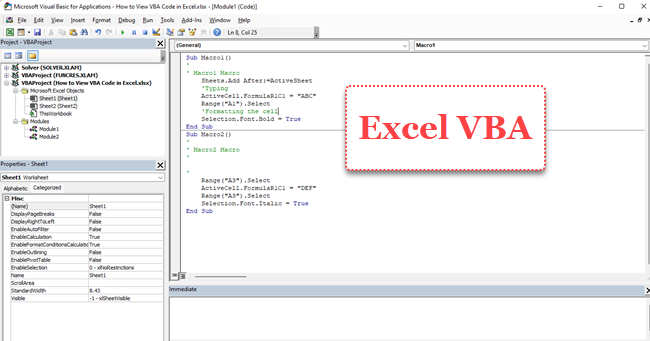
Exploring the VBA Editor in Excel
The Visual Basic for Applications (VBA) Editor is an integral part of Excel that allows you to access and modify code embedded in your workbooks.
In this section, we’ll dive into the VB Editor and explore its essential components: the Project Explorer, Code Window, and Properties Window.
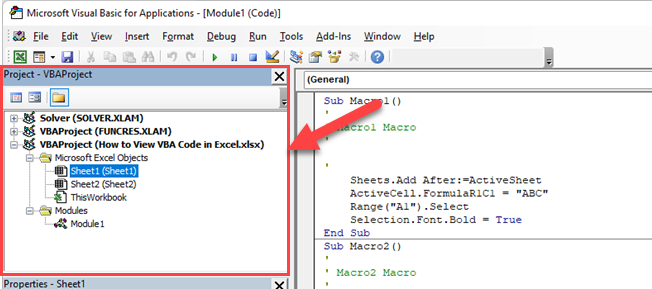
1. Project Explorer
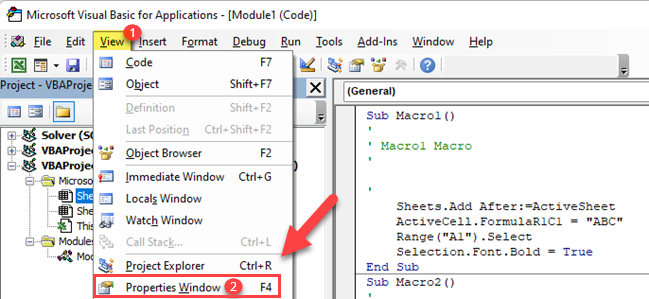
The Project Explorer is the hierarchical tree view where you’ll find all open workbooks, as well as their respective VBA modules, objects, and code. To access Project Explorer, go to the quick access toolbar, click on the “View” tab, and then select “Project Explorer”.
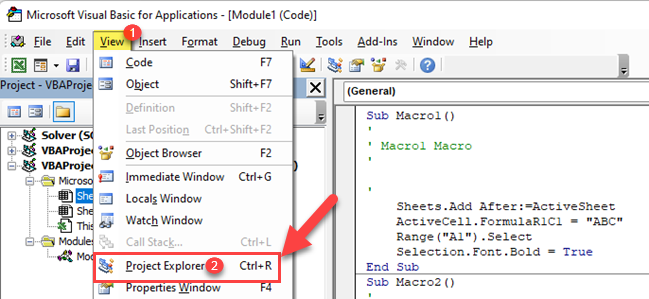
You can also simply press Ctrl+R to access the Project Explorer.
You’ll see a list of your Excel workbook files, each with a “+” icon that you can expand to reveal the objects and modules within.
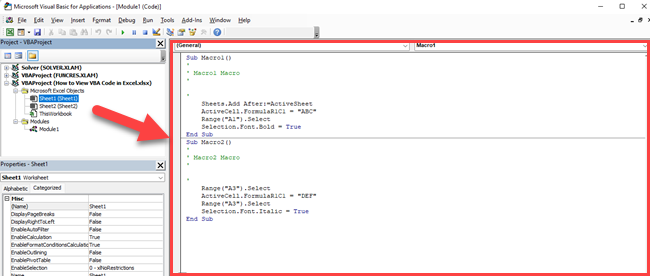
2. Code Window
The Code Window is the main area where you’ll write, edit, and view your code. When you select a module or object in Project Explorer, the corresponding code will be displayed in the Code Window.
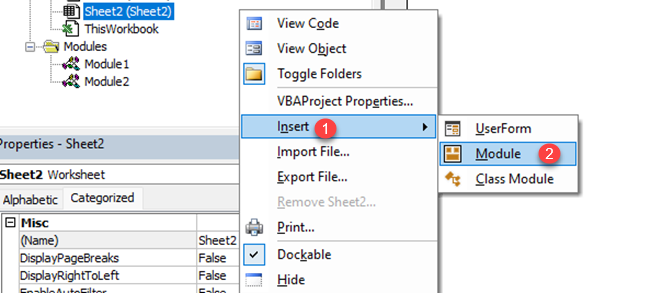
If you want to create a new module, right-click on the desired Excel sheet in the Project Explorer, choose “Insert”, and then click on “Module”.
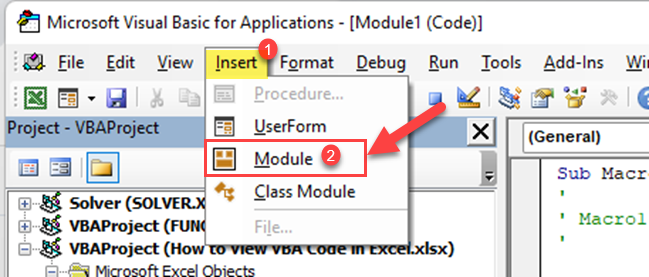
You can also go to the “Insert” tab and click “Module” to add a new module.
This will add a new module to store your code.
When writing code, you can make use of the VBA Editor’s features like code completion and syntax highlighting, which help to make your code more readable and easy to understand.
3. Properties Window
The Properties Window allows you to view all the properties and modify the properties of the selected objects in your VBA project.
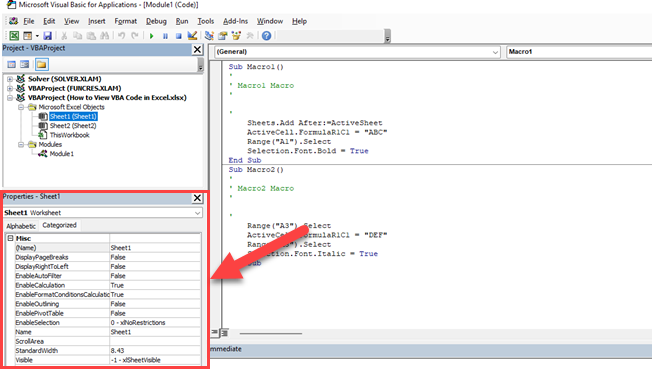
To open the Properties Window, head to the menu bar, click on “View”, and then select “Properties Window” or press F4.
The Properties Window will display a list of properties connected with the currently selected object in the Project Explorer, such as its name or visibility.
With a solid understanding of the VBA Editor’s key components – Project Explorer, Code Window, and Properties Window — you’ll be able to use and change Visual Basic code in your Excel workbooks.

Working With VBA Modules
Knowing VBA modules is super helpful because they let you automate stuff, customize things, and handle data like a boss in Microsoft Office programs. You can make tasks go smoother and come up with personalized solutions. When you understand VBA modules, you can boost your productivity and get things done faster and better.
In this section, you’ll learn how to work with VBA modules in Excel. VBA modules include procedures that define the actions your code performs. We’ll discuss inserting a module, removing a module, and managing module properties.
1. Inserting a Module
- Open the Excel VBA Editor by pressing Alt+F11 or clicking the Developer tab and then Visual Basic.
- After you open Visual Basic Editor, go to the Project Explorer window.
- Right-click on your workbook (it usually starts with “VBAProject”) and select Insert > Module.A new module is added to the Project Explorer under the “Modules” folder.
2. Removing a Module
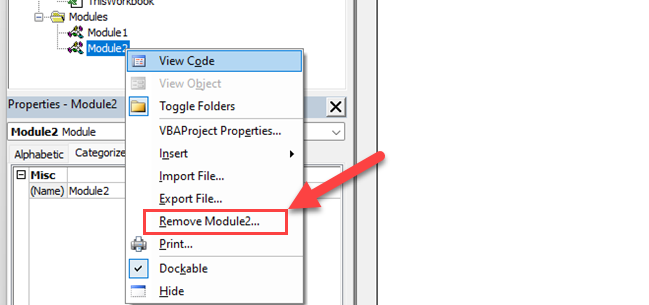
- In Project Explorer, locate the module you want to remove.
- Right-click on the desired module and select Remove Module.
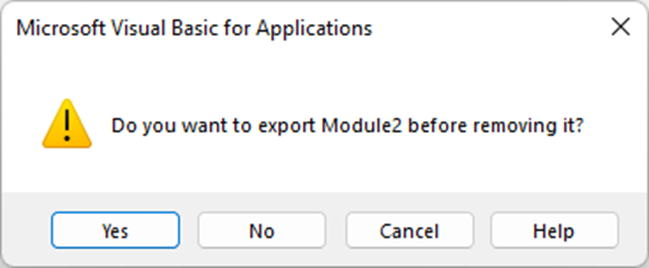
- A confirmation dialog will appear. If you want to keep a backup of the module, click No to export it before deleting it. Click Yes if you’re sure you want to delete it.
3. Managing Module Properties
- With the module selected in the Project Explorer, click View > Properties Window (or press F4) to display the module properties.
- In the Properties Window, you can modify the module’s name under the (Name) property (the first property). It’s good practice to give the module a descriptive name related to its functionality.
- Remember to save your changes by clicking File > Save or pressing Ctrl+S.
By following these steps, you’ll efficiently manage your VBA modules, helping you keep your code organized and easy to maintain.
Now that we’ve gone over the various ways you can work with VBA modules, let’s discuss how to navigate your code in the next section!
Navigating VBA Code
So, you want to dive into the world of VBA code? Well, buckle up, because navigating Visual Basic code is like exploring a secret maze of commands and functions. It’s all about understanding the language and finding your way around to create amazing automation and customization. Let’s get started!
1. Searching and Finding Code
To find and view VBA code in Excel, first open the VB editor by clicking the Developer tab and selecting the Visual Basic button or simply pressing the ALT key + F11 keyboard shortcut.
Once the VBE is open, use the Project Explorer window (CTRL+R) to navigate through the folder structure of your workbook. When you find the desired module or Excel sheet tab, double-click it to open the respective object code window.
2. Organizing Code With Comments
As you work with Visual Basic code in Excel, organizing and understanding your code is important. For that, you can add comments to your codes. To add a comment to your code, start the line with an apostrophe (‘).
The comment will be shown in green text, and the VBE will not run the comment lines when running the code.
This technique can be helpful to explain the purpose of specific lines or blocks of code, making it easier for you (and any other users) to comprehend the logic behind the code.
3. Debugging Tools
You may sometimes get errors when handling Visual Basic code. Debugging tools included in the VBE can help you identify and fix these problems. Some valuable debug features are:
- Step Into (F8): Executes the code line by line, allowing you to follow the code flow and monitor variable values at each step.
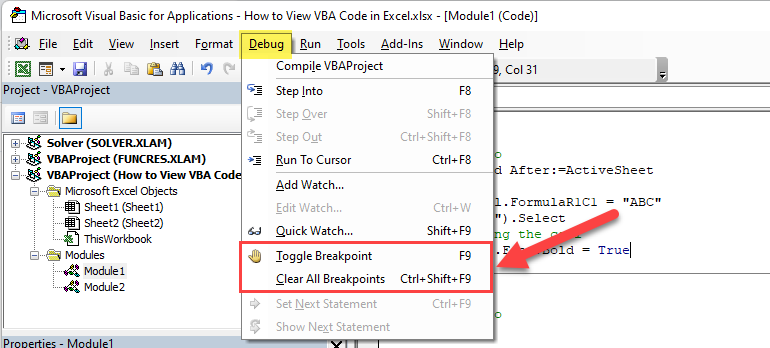
- Breakpoints: Click on the gray area to the left of a code line or press F9 to create a breakpoint, which will pause code execution at that specific line. This is useful for isolating specific sections of the code and verifying the functionality.
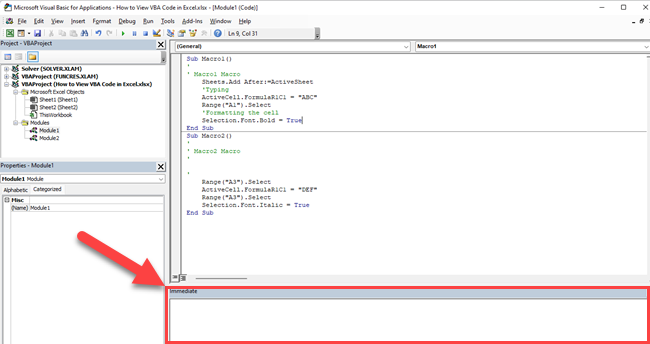
- Immediate Window (CTRL+G): Allows you to execute single lines of code and display the results. This feature can help test and auto-syntax check various parts of your code without running the entire script.
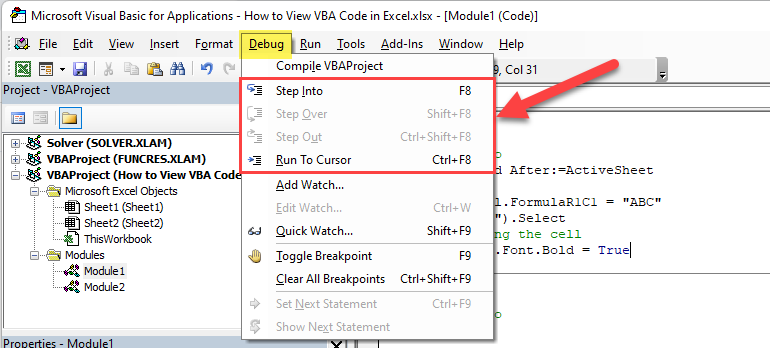
By utilizing these tools and techniques, you can efficiently navigate, understand, and debug your Visual Basic code in Excel.
VBA Code Customization
If you want to make Microsoft Office programs bend to your will, Visual Basic code customization is the way to go.
With a bit of coding know-how, you can tweak those apps to match your exact preferences. Get ready to unleash your creativity and personalize your work experience!
1. Creating Custom Functions

With VBA, you can create custom functions (also known as User Defined Functions or UDFs) to enhance your productivity and optimize your workflow in Excel. To create a custom function, open the VBE by pressing Alt + F11.
In the editor, go to Insert > Module to create a new module for your function. Now, you can start writing your custom function with the Function keyword and specify its inputs, calculations, and outputs.
For example, to create a custom function that adds two cells and multiplies the result by a specified factor, you can use the following code:
Function MultiplySum(cell1 As Range, cell2 As Range, factor As Double) As Double
    MultiplySum = (cell1.Value + cell2.Value) * factor
End Function
To use your new custom function in an Excel worksheet, simply type =MultiplySum(A1, B1, 2) into a cell, replacing the cell references and factor as needed.
2. Applying Custom Styles
VBA provides a range of options for customizing the appearance of cells in your Excel worksheets. One way to apply custom styles is through the Cells object. You can modify the font, background color, number format, and other properties of individual cells or whole ranges.
For example, to apply bold text and specific background color to a cell range, use the following code:

With Range("A1:B10").Interior
    .Pattern = xlSolid
    .PatternColorIndex = xlAutomatic
    .Color = RGB(153, 204, 255)
End With
Range("A1:B10").Font.Bold = True
Remember to customize the cell range, font properties, and color values according to your needs.
3. Implementing Add-Ins
Add-ins are a powerful way to extend the functionality of Excel, and you can use VBA to create your own or to implement existing ones. To create an add-in, save your VBA module with the custom functions or code in a new Excel workbook, and then save the workbook as an Excel Add-In (*.xlam) file.
To load the add-in into Excel, go to File > Options > Add-Ins and click the Excel Add-Ins button, then browse and select your newly created *.xlam file.
To customize the ribbon and make your add-in functions more accessible, go to File > Options > Customize Ribbon. Here you can add new tabs, groups, and buttons to the ribbon, and assign your custom functions or macros to these buttons for quick access.
By effectively using custom functions, styles, and add-ins, you can significantly enhance your productivity in Excel, tailor the software to your specific needs, and streamline your daily tasks.
Final Thoughts

By now, you should feel confident and knowledgeable about viewing Visual Basic code in Excel. The key steps to remember are:
- Access the VBE by pressing Alt + F11 in Excel.
- Use the Project Explorer within the VBE to navigate to the modules, forms, and objects that contain the code.
- Open and modify the macro code by double-clicking the appropriate module or object in Project Explorer.
With these guidelines in mind, you can confidently navigate and work with VBA in Excel. Remember, expertise comes with practice and exploration, so continue learning and applying your skills to develop efficient and customized solutions for your Excel projects. Happy coding!
To learn more about how to use Excel and its formulas, check out the video below:
Frequently Asked Questions
How do I access the VBA editor in Excel?
To access the VBA editor in Excel, first, ensure the Developer tab is visible. If it’s not, click File > Options and select Customize Ribbon. Then, check the box next to Developer in the right pane. Now, click the Dev tab and select Visual Basic or use the shortcut Alt + F11 to open the VBA editor.
What’s the Excel shortcut for displaying VBA code?
The shortcut for displaying the VBA code in Excel is Alt + F11. This opens the Visual Basic Editor where you can view, edit, or create new code and macros.
How can I view VBA code step by step in Excel?
To view code step by step in Excel, use the VBA editor’s debugging tools. Open the VBA editor with Alt + F11. Then, set a breakpoint by clicking the left margin next to a line of code or by pressing F9. Now run the code using F5 or Run > Run Sub/UserForm. Execution will pause at the breakpoint. Use F8 to step through the code line by line.
How to edit VBA code within Excel?
In the VBA editor (accessed with Alt + F11), locate the module containing the code you want to edit in Project Explorer. Double-click the module to open it in the editor window. Make your changes to the code and save them by clicking File > Save or using the shortcut Ctrl + S.
Can I add VBA to the Excel ribbon?
Yes, you can add VBA macros to the Excel ribbon. To do this, right-click the ribbon and choose Customize the Ribbon. In the Choose commands from drop-down, select Macros. Choose the macro you want to add, create a new custom group or select an existing one, and click Add to include your macro in the ribbon.
How to open VBA in Excel on a Mac?
On a Mac, you can also access the VBA editor in Excel. Press Fn + Option + F11 or go to Tools > Macro > Visual Basic Editor from the menu bar to open the Visual Basic Editor on your Mac.


