
Struggling to move Files in SharePoint? Don’t worry, we’ve all been there.
Knowing how to move files efficiently in SharePoint is an essential file management skill.
We’ll show you how to get it done efficiently and successfully.

So how do you move files?
There are 4 main methods to move files in SharePoint:
Using the ‘Move to’ Option in the SharePoint Interface.
Using the Drag-and-Drop Functionality.
Using the OneDrive Sync.
Using PowerShell Scripting.
This article offers you a go-to guide, with clear step-by-step instructions for each method.
No matter your technical skill level, we’ve got you covered. We’ll also share important best practices and troubleshooting tips to keep you moving forward without a hitch.
Say goodbye to digital clutter and hello to organized, accessible content.
Let’s get started!


Step-by-Step Guide to Move Files in SharePoint
Moving files or folders in SharePoint can be done through various methods, each suited to different needs and expertise levels.
The top 4 methods to move SharePoint files include:
Using the ‘Move to’ option in the SharePoint interface.
Using the Drag-and-Drop functionality.
Using the OneDrive Sync.
PowerShell scripting for advanced management.
Here is a step-by-step guide for each method.

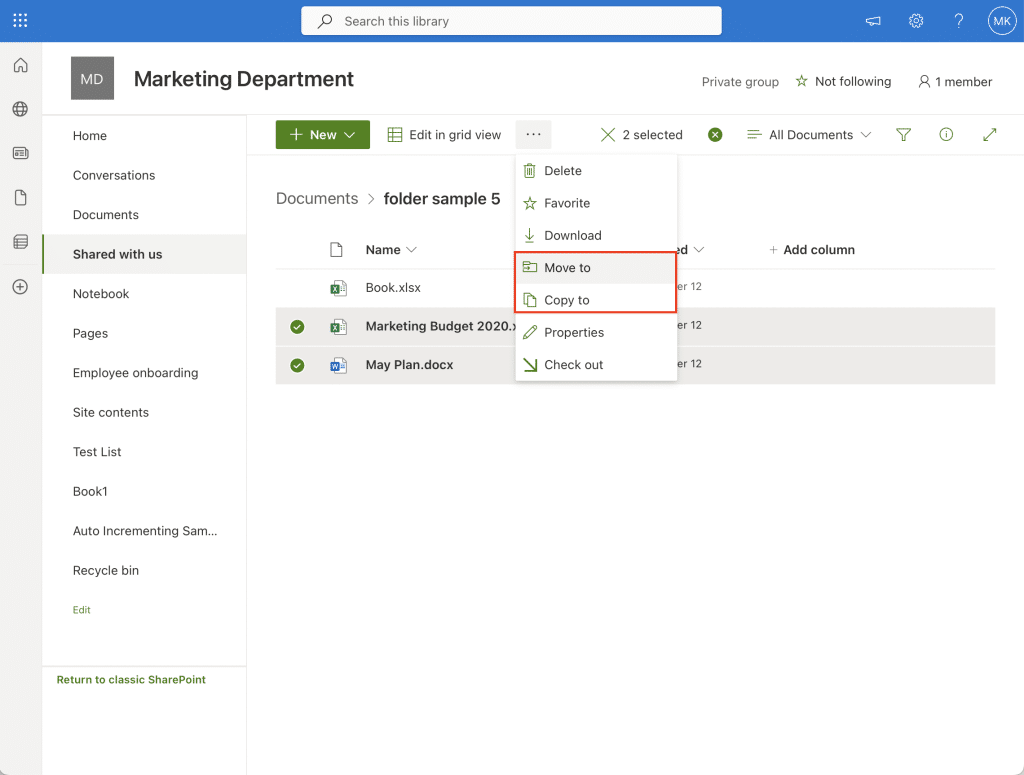
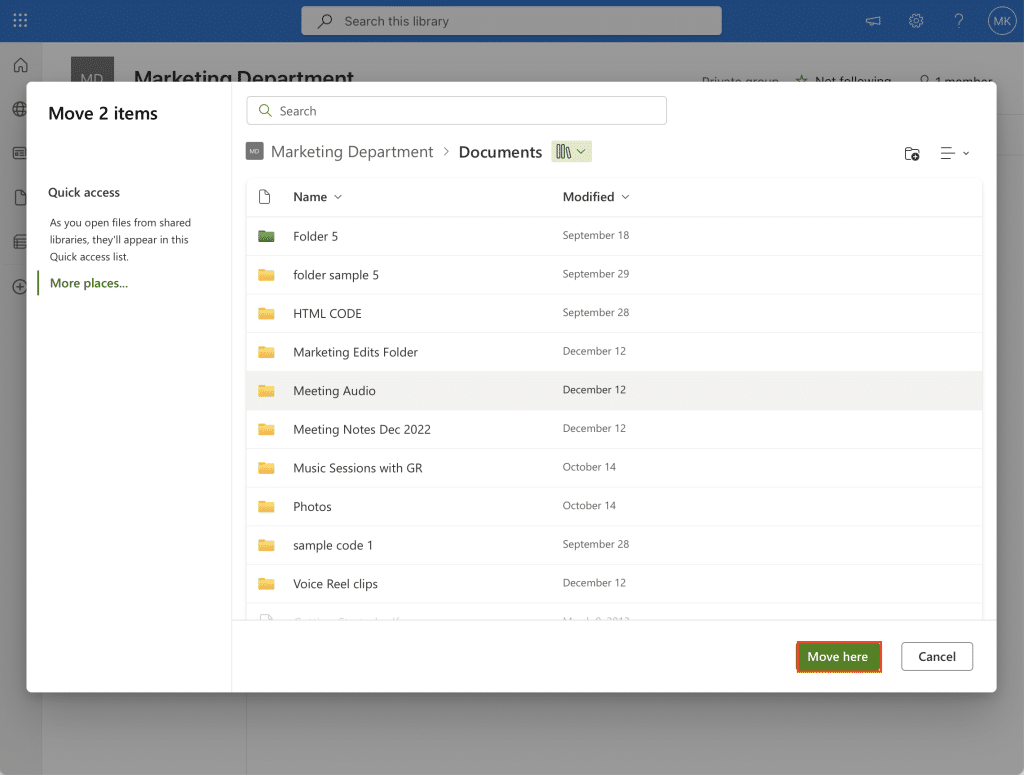
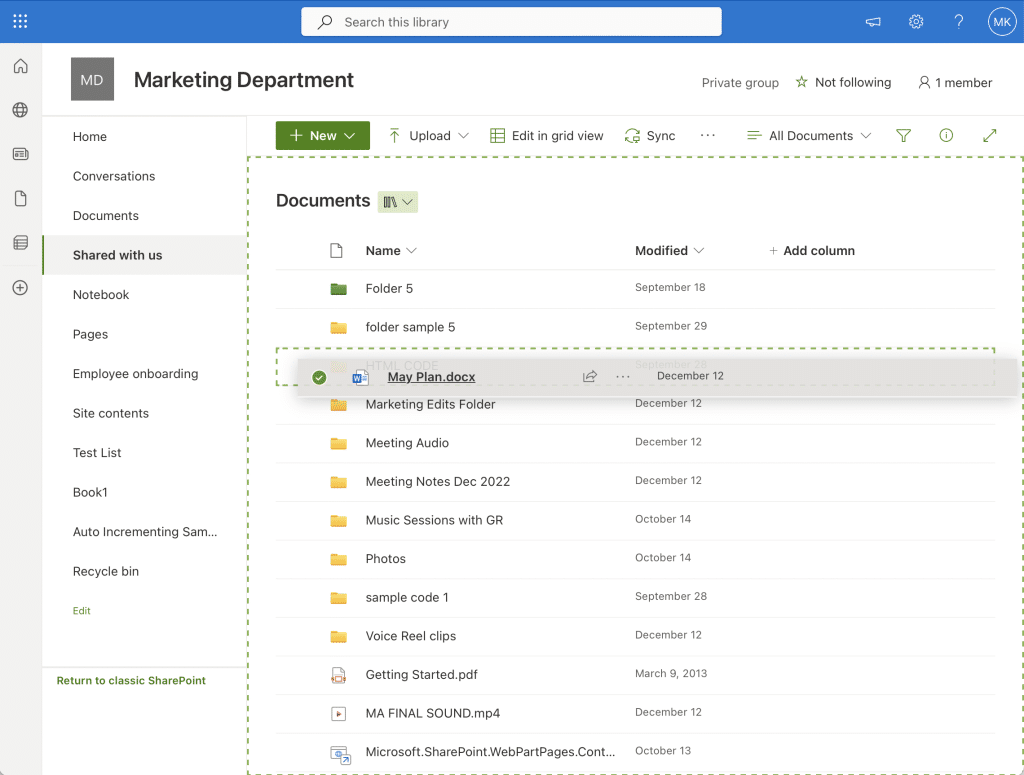
Method 1: Using the ‘Move to’ Option in the SharePoint Interface
When it comes to managing SharePoint files, you can move SharePoint files by using SharePoint’s native ‘Move to’ or ‘Copy to’ options.
To do this:
Select the desired files or folders in a SharePoint document library.
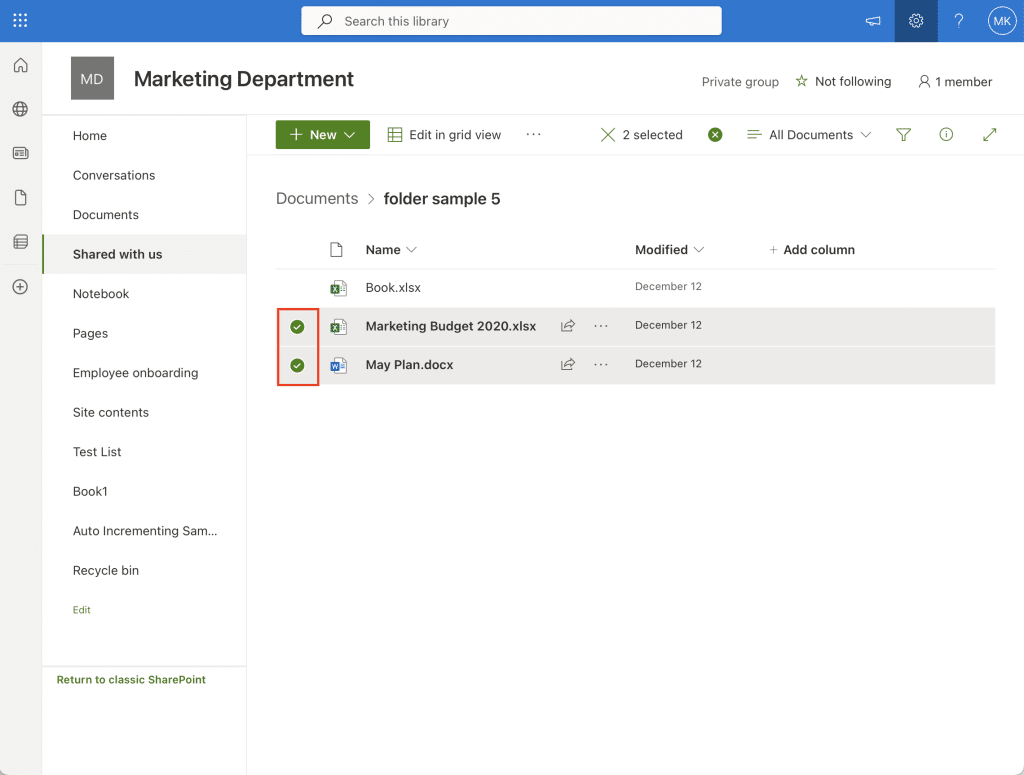
Click on the Move to or Copy to option in the command bar at the top of the page.
Choose the new location in SharePoint for your selected files and click Move here or Copy here.
This method is perfect if you need to move files occasionally or in small batches. It doesn’t require any technical expertise and is easily accessible within the SharePoint platform.
Keep in mind that if you choose to copy files, the file will be duplicated and will be available in both the destination site or folder and the original location.
Another fairly straightforward method is the drag-and-drop method.
Method 2: Using the Drag and Drop Functionality
This method mimics the familiar drag-and-drop experience found in many file management systems.
To use this method:
Open the SharePoint library that has the files you wish to move.
Select the files or folders you want to move.
Drag them to the destination folder within the same SharePoint site.
Drag and drop is suited for quick, ad-hoc file organization. It’s best used for reorganizing files within the same site and is as simple as managing files on your personal computer.
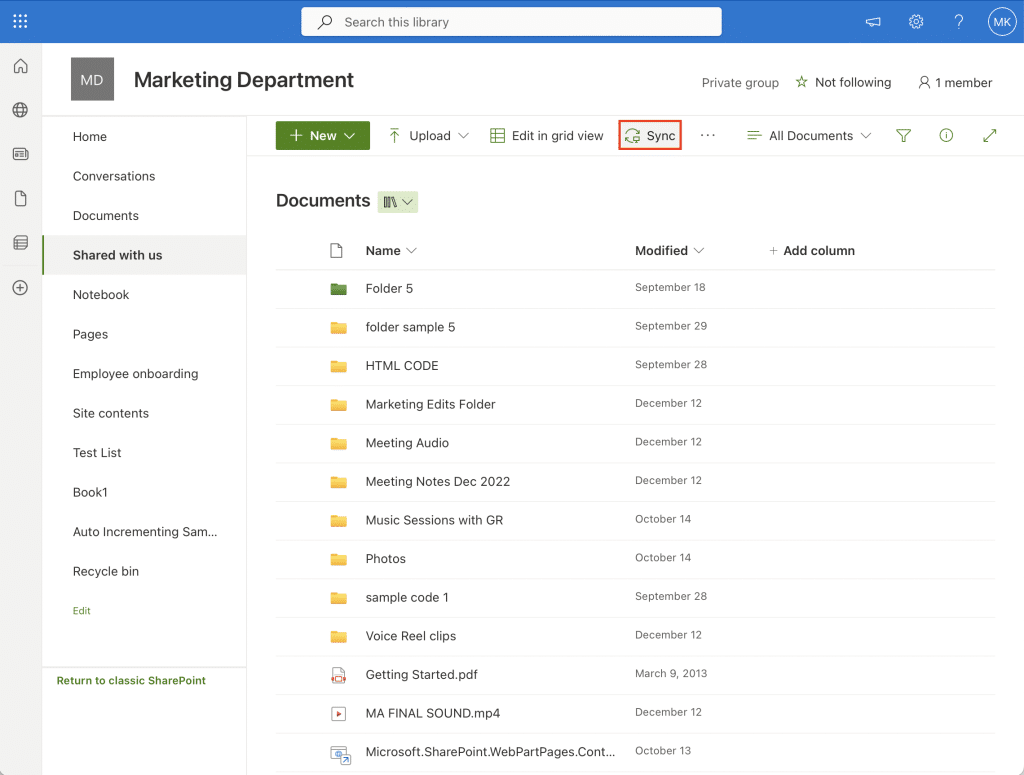
For those who generally work with SharePoint files offline, the OneDrive sync might be the right option for you.
Method 3: Using the OneDrive Sync
For those who prefer working with files locally, the OneDrive Sync Client provides a seamless bridge between SharePoint and your local machine.
To do this:
Sync your SharePoint document libraries to your local system using the OneDrive sync client.
Once synchronized, you can drag and drop files around using Windows Explorer or Mac Finder. You can also create folders to move your files to.
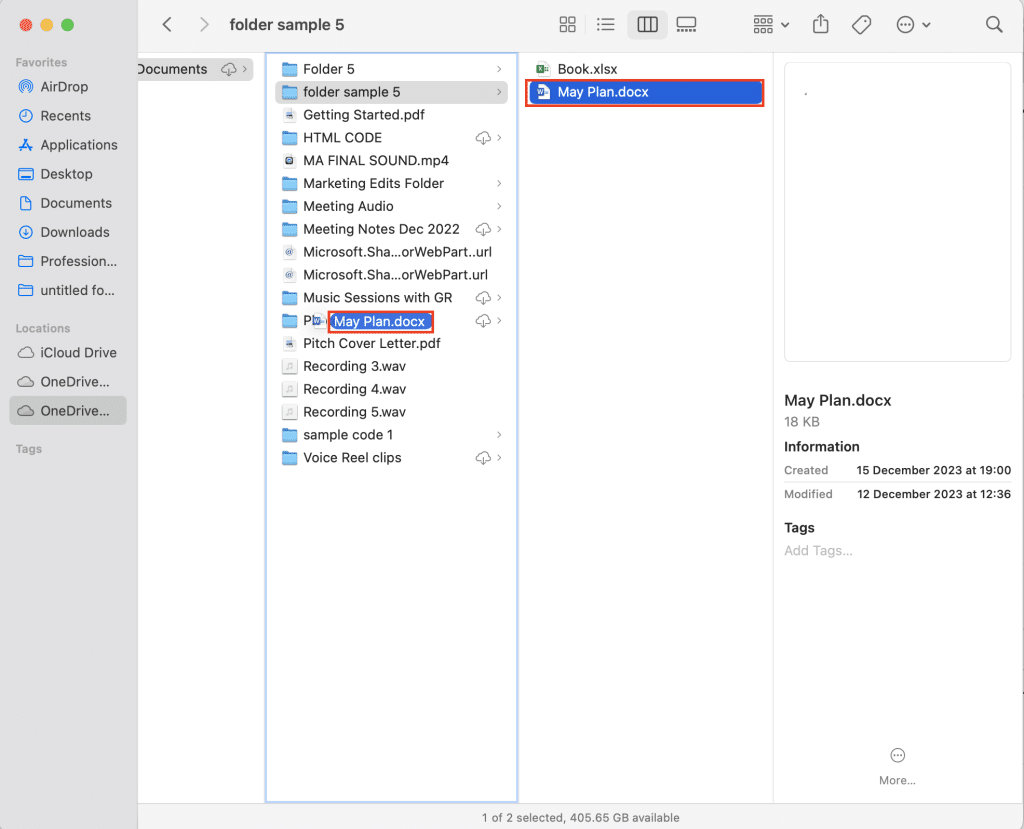
Changes made locally will automatically sync back to SharePoint.

This method is excellent for managing large numbers of files, working offline, or when preferring a desktop experience. It’s particularly useful when transferring multiple files between SharePoint and your local system.
Then there is the last method for those well versed with scripting.
Method 4: Using PowerShell Scripting
PowerShell scripting is a powerful method if you are an administrator or if you are comfortable with scripting. It allows for transferring files in bulk or applying specific conditions to the file movement.
To use this method:
Open the PowerShell ISE (Integrated Scripting Environment) or your preferred PowerShell editor.
Defining your source and destination document library. These are typically URLs to the SharePoint sites or specific libraries where your files are currently stored and where you intend to move them.
Run the script in PowerShell. Ensure you have the necessary permissions on both the source and destination sites.
Here is an example script for SharePoint Online:
# PowerShell Script for Moving Files in SharePoint Online

# Set source and destination URLs
$sourceURL = "https://yourtenant.sharepoint.com/sites/sourceSite/SourceLibrary"
$destURL = "https://yourtenant.sharepoint.com/sites/destinationSite/DestinationLibrary"

# Credentials and Connection
$credentials = Get-Credential
Connect-PnPOnline -Url $sourceURL -Credentials $credentials

# Move files from source to destination
Get-PnPListItem -List "SourceLibrary" | ForEach-Object {
    Move-PnPFile -ServerRelativeUrl $_.FieldValues.FileRef -TargetUrl $destURL -Force
}
The script will connect to the SharePoint Online site, enumerate the files in the specified source document library, and move them to the destination library.
This approach is best for large-scale moves, repetitive tasks, or when specific conditions are required for moving files. It’s particularly useful for administrators managing large SharePoint environments.

These four methods offer a range of options from simple, user-friendly approaches to more technical, script-based solutions. Depending on the scale of the task, and your technical proficiency, they can effectively cater to most of your SharePoint file management needs.
So is there anything you can do to make your file transfer more successful?
Best Practices for Moving Files in SharePoint

When you’re transferring SharePoint files, it’s important to do it right to keep your data safe and easy to find.
Here are some simple but key tips to follow:
Tip 1: Back Up Your Files
Before you start moving many files, it’s crucial to back them up. This step is like insurance; it ensures that even if something goes wrong during the move, you won’t lose any important information.
Think of it as creating a safety net for your data – if anything unexpected happens, you have a backup to fall back on.

Tip 2: Check and Preserve Links
Moving files can sometimes break links in other documents. To prevent this, check the connections of your files before moving them.
This way, you ensure that all your links still work and that people can find what they need without any hiccups. It’s like making sure all the roads in a city still lead to the right places after a big change.

Tip 3: Perform a Test Move
Before moving everything, do a small test move in a separate area. This is like a rehearsal for the big move.
It helps you spot and fix any issues before they affect your entire system. Think of it as a practice run to make sure the actual move goes smoothly.

Tip 4: Keep Track of File History
When you move files, try to keep their version history and details (metadata) intact. This includes information like who created the file and when it was last changed.
Remember that when transferring files, only the latest version is moved. To move a previous version, restore that version and then move it.

Tip 5: Communicate with Your Team
If you’re transferring files used by others, let your team know. Tell them where the files are going and how to access them afterward. It’s like moving a shared resource in an office – everyone who uses it should know where to find it.


Tip 6: Update Your Links
After moving the files, go through your documents and update any links that lead to these files. This prevents confusion and ensures that people can always find what they’re looking for. It’s like updating the address book so that all the addresses are current and correct.

By following these straightforward tips, you can move SharePoint files efficiently, keeping your workspace organized.
But if you do have trouble moving your SharePoint files, here is what you can do to solve common file transfer issues.
Troubleshooting Common Issues in SharePoint File Movement
Moving SharePoint files can sometimes lead to unexpected issues. Being prepared to troubleshoot these problems is key to maintaining a smooth workflow.
Here are some common challenges you might encounter and how to resolve them:
Issue 1: Dealing with Move Errors
File Size Limitations: SharePoint has a maximum file size limit. If you encounter an error while moving large files, check the file size. Splitting the file or increasing the site’s file size limit (if possible) can resolve this issue.
Permission Issues: If you’re unable to move a file, it might be due to a lack of permission. Ensure you have the necessary rights to both the source and destination folders. If not, request the required permissions from your SharePoint administrator.

Issue 2: Resolving Broken Links After Moving Files
Manual Link Updates: After moving files, some links may become broken. Manually update these links to point to the new file locations. This task can be time-consuming but is essential for maintaining document integrity.
Using Link Fixing Tools: Consider using SharePoint tools or third-party software designed to find and fix broken links. These tools can automate the process and save time.

Issue 3: Addressing Synchronization Problems with SharePoint Online
Check Sync Status: If files aren’t syncing properly after being moved, check the synchronization status in the OneDrive client. Look for any error messages or status indicators.
Re-sync Document Libraries: Re-syncing the entire library can sometimes resolve synchronization issues. You can do this by stopping the sync for the affected library and then setting it up again.
By effectively addressing these common issues, you can ensure that file movement in SharePoint is a seamless process. It’s important to approach these problems methodically, checking for the most common issues first, and then exploring more complex solutions if needed.
Being proactive and prepared to handle these challenges will significantly enhance your SharePoint management experience.

Final Thoughts
Moving files in SharePoint might seem daunting at first, but with the right methods and a bit of know-how, it becomes a straightforward task.
Remember, whether you’re dragging and dropping files, or writing a PowerShell script, there is a method that fits your needs and skill level.
And if you ever run into trouble, simple troubleshooting steps can usually get you back on track.
Don’t forget the golden rules: back up your files, keep your links updated, communicate changes with your team, and check permissions. By following these tips and using the methods best suited to your task, you’ll find that managing files in SharePoint can be a smooth and efficient process.
Then take your SharePoint expertise to the next level by exploring how you can use SharePoint in your Power BI development:
Happy file moving!
Frequently Asked Questions
Why can’t I move a document in SharePoint?
If you’re unable to move a document in SharePoint, it might be due to:
Insufficient Permissions: You might not have the necessary permissions to perform the move operation on that document or within the target location.
Document Lock: The document could be checked out by another user, preventing its movement until it’s checked back in.
Versioning Conflict: Document versioning settings could be causing conflicts when trying to move a document to a location with different versioning settings.
Also, if you have added a document library as a web part, the ‘Move to’ and ‘Copy to’ options will not appear.
How do I move a file in SharePoint to another folder?
To move a file in SharePoint to another folder:
Navigate to the document library containing the file.
Select the file, click “Move to” then choose the target folder within the same library. For copying files use the “Copy to” option.
Confirm the move, and the file will be relocated to the new folder while retaining its metadata and version history.
How do I allow moving files in SharePoint?
To allow moving files in SharePoint, follow these steps:
Access the document library’s settings.
Under “Permissions and Management,” click on “Permissions for this document library.”
Adjust user permissions by selecting the desired group/user, then checking the “Edit” or “Contribute” permission level, which enables file moving among other actions.
Why can’t I move a folder in SharePoint?
Moving a folder is efficient if you want to move all the files in the folder. In SharePoint, you might be unable to move a folder due to:
Limited Permissions: Insufficient rights might prevent you from moving folders or items within them.
Checked-out Items: If a file within the folder is checked out, the folder can’t be moved until the file is checked in.
Folder Size: Large folders might encounter size limitations or timeouts during the move process.
Why do I encounter errors when transferring files to a different site in SharePoint?
This issue arises when the file with the same name already exists at the destination, or when the file or folder contains properties that will not be compatible at the new location.
Specifically, if you transfer files across different sites in SharePoint, ensure that both the source and destination libraries have the same custom metadata. If they don’t, you might lose certain properties during the move, leading to these errors.


