
Ready to delete your SharePoint site? It really is as easy as 1,2,3 and 4!
To delete a SharePoint site:
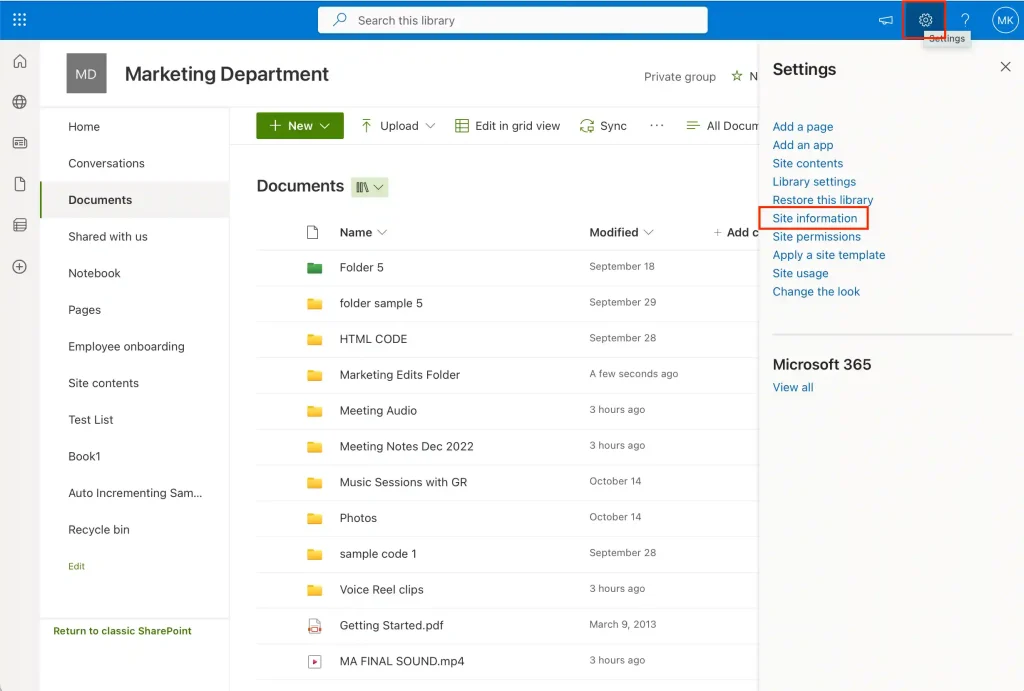
Navigate to the SharePoint site you want to delete.
Click on the gear icon, located in the top-right corner, and select Site Information from the dropdown menu.
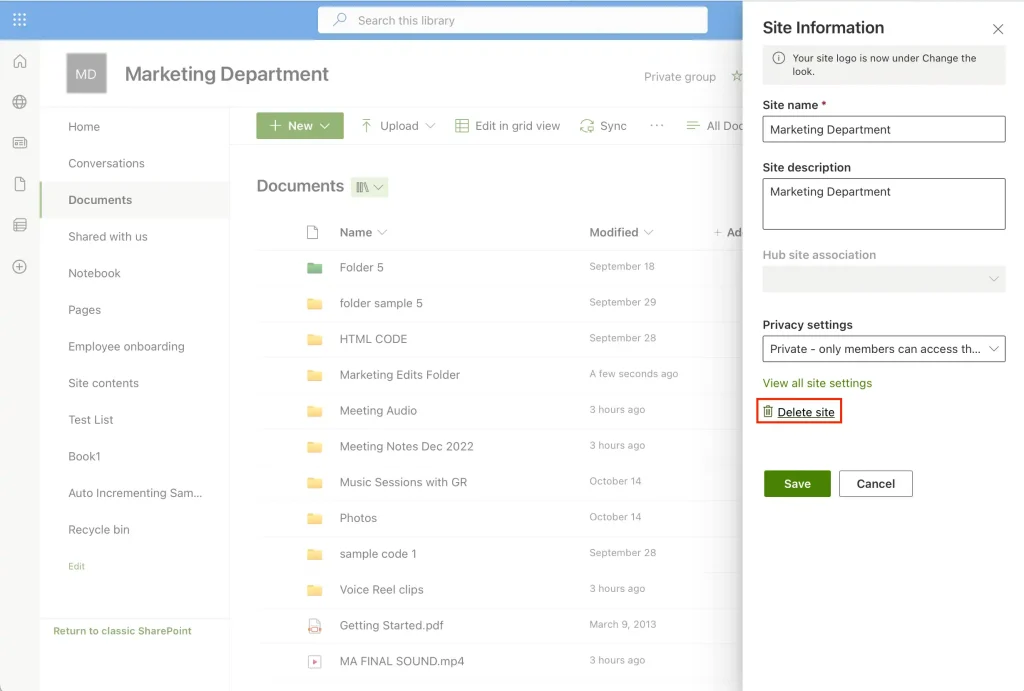
In the Site Information panel, click on Delete site.
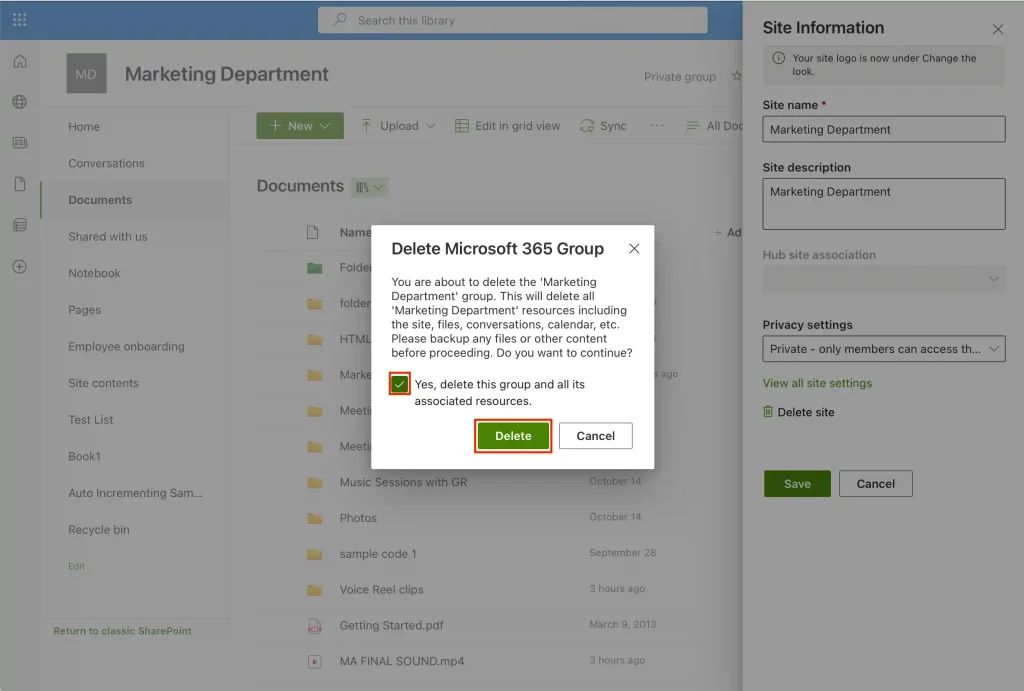
Confirm that you want to delete the site by clicking the checkbox in the pop-up and then click Delete.
But wait, there’s more.

There are a few things you need to know before you hit “delete.“
Following this guide will enable you to confidently navigate through the deletion process and ensure a seamless transition after deletion.
Pre-Deletion Considerations
Before you proceed with deleting a team site or communication site, it’s important to take some key steps to ensure that the deletion process goes smoothly. You also want to prevent any unintended consequences.
Consideration 1: Checking Site Usage and Importance
First, assess the role and importance of the site within your organization.
Is it actively used? Does it contain critical information or resources? Understanding its role will help you decide whether deletion is the best action.
Additionally, talk to the people who use the site. This could include team members, department heads, or anyone who relies on the site regularly. Their input is crucial in understanding the impact of deleting the site.


Consideration 2: Backing Up Essential Data
Before you delete anything, make sure to backup important files and data. You never know when someone might need something from the deleted site.
You can use SharePoint’s built-in tools to back up documents and lists. Alternatively, you might use third-party software designed for SharePoint data backup.

Consideration 3: Communicate with Site Users
Let users know about the planned deletion. This advance notice saves them time to save necessary information and reduces surprises.
Also, If you’re moving resources to a new location, provide clear instructions on where to find them post-deletion.
Remember, deleting a SharePoint site is a significant action. It’s important to be thorough in these pre-deletion steps to avoid losing important information and to minimize disruption for your users.
Now let’s get to our step-by-step guide on how to delete sites in SharePoint.

How to Delete a SharePoint Site: 4 Top Methods Explained
There are 4 main ways you can delete a SharePoint site.
These are:
Deleting a Modern Site method
Deleting a Classic Site method
Using the SharePoint Admin Center
Using Powershell

Let’s start with how to delete a modern SharePoint site.
Method 1: Deleting a Modern Site Method
To delete a modern site in SharePoint:
Navigate to the SharePoint site you want to delete.
Click on the gear icon, located in the top-right corner, and select Site Information from the dropdown menu.
In the Site Information panel, click on Delete site.
Confirm that you want to delete the site by clicking the checkbox in the pop-up and then click Delete.
Keep in mind that deleting a site will not only eliminate its content but also all its subsites and associated data, such as lists and site settings.
Remember, you can only delete a SharePoint site if you have the appropriate permissions, such as being a SharePoint administrator or a Site Owner.
Contact your SharePoint administrator if you need assistance or lack the necessary permissions.
Following these steps and taking the necessary precautions will help ensure a smooth and successful deletion process.
For those who prefer to use the classic version of SharePoint, here is how you can delete a classic site.

Method 2: Deleting a Classic Site Method
To delete a classic site in SharePoint:
Navigate to the SharePoint site you want to delete.
Click on the gear icon, located in the top-right corner, and select Site Settings from the dropdown menu to access the site settings page.
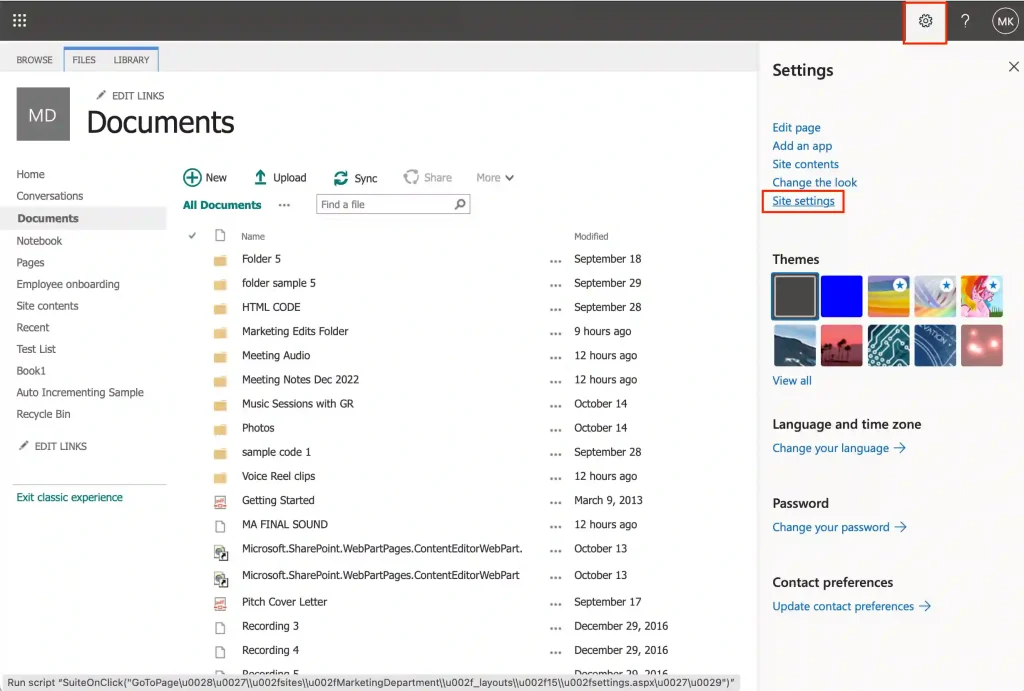
Under Site Actions click Delete this site.
Click OK.
Now, let’s move to a method specifically used by SharePoint administrators.
Method 3: Using the SharePoint Admin Center
For SharePoint administrators, the SharePoint Admin Center provides a more comprehensive and controlled environment for site management, including site deletion.
To delete a site using the Admin Center:
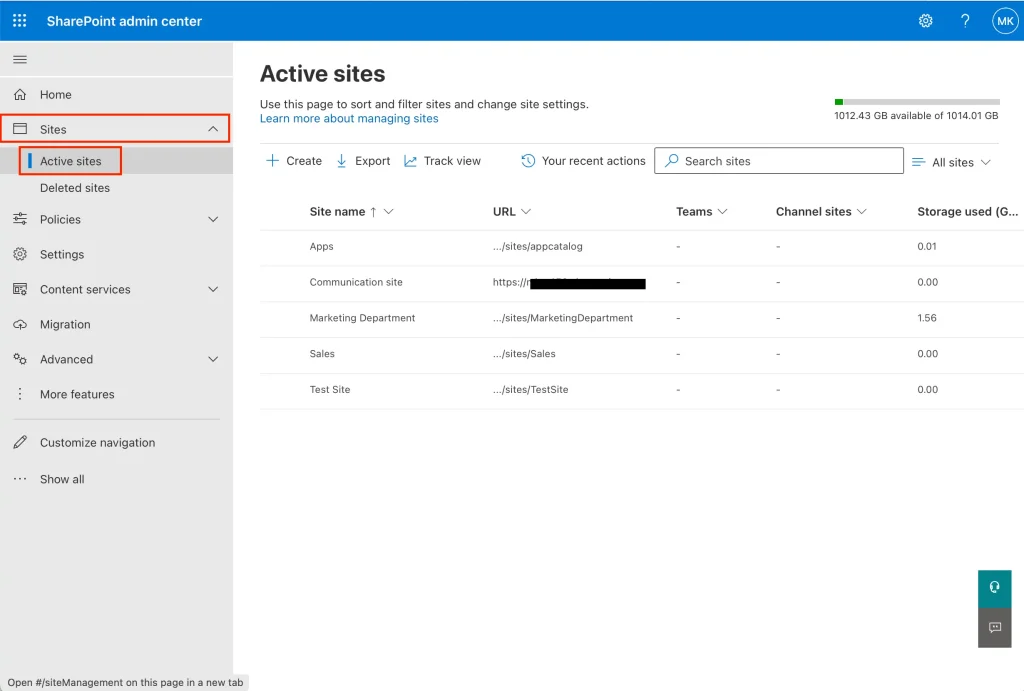
Log into your SharePoint Admin Center account with administrative privileges.
Click Sites in the vertical menu bar.
Under Active Sites, select the site you want to delete.
In the toolbar, click on Delete.
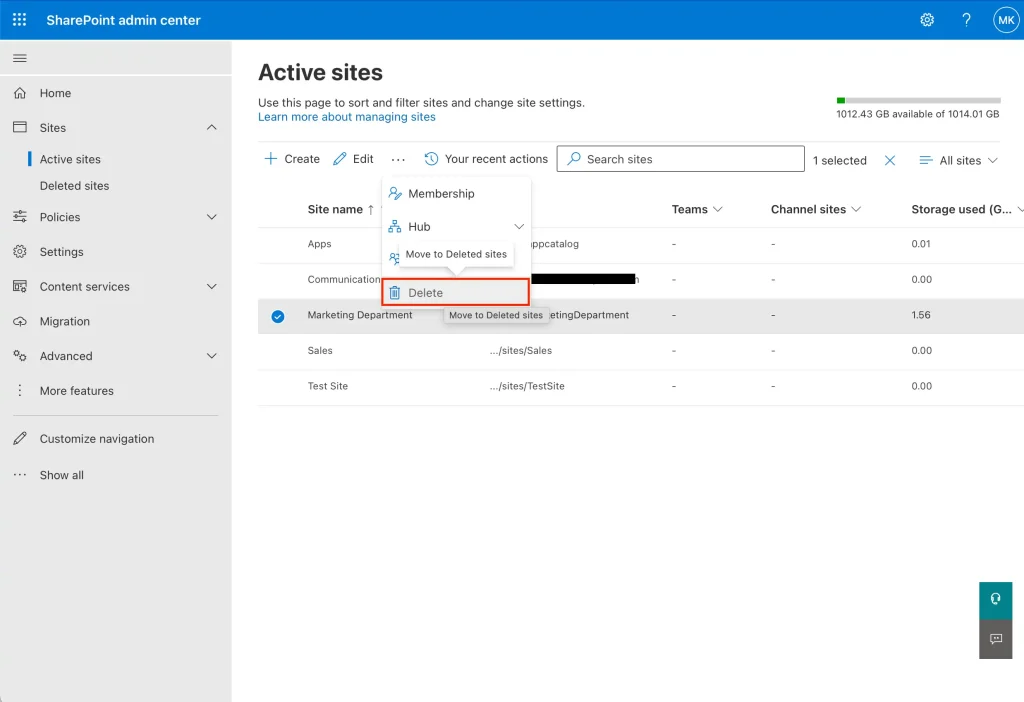
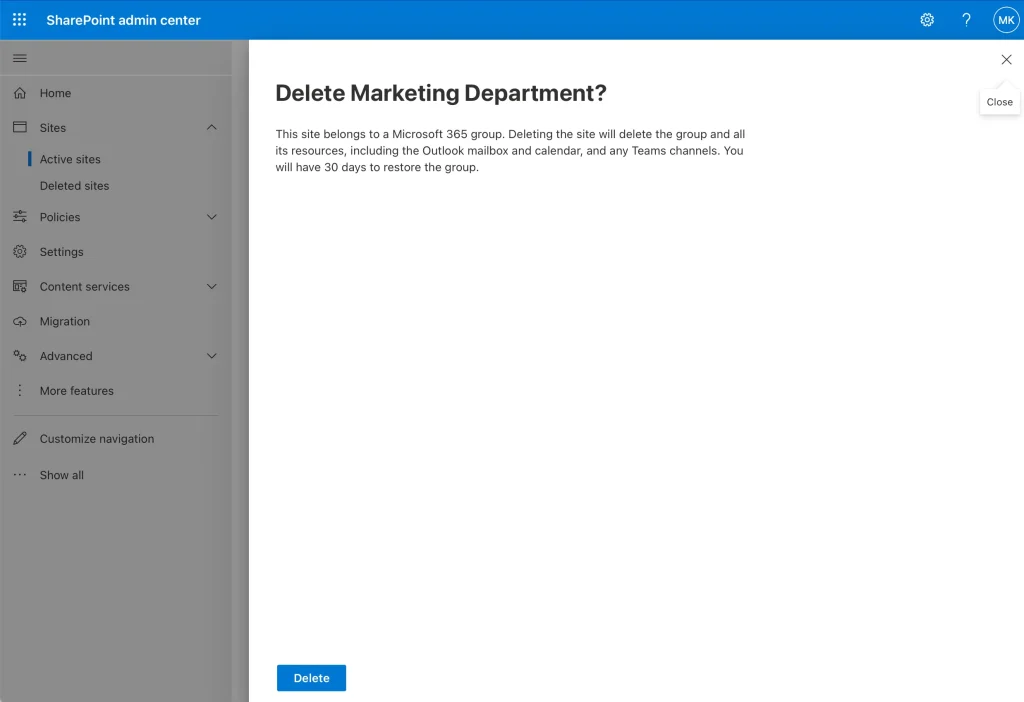
Click Delete in the pop-up to confirm deletion.
For those who are well-versed in scripting, there is a deletion method just for you.
Method 4: Using PowerShell
PowerShell is a powerful scripting tool that can be used for various administrative tasks in SharePoint, including site deletion. This method is generally suited for experienced administrators who are comfortable with command-line interfaces.

To delete a SharePoint site using PowerShell:
Open SharePoint Online Management Shell as an administrator. If you don’t have it, you can download and install the SharePoint Online Management Shell from the Microsoft website.
Ensure that you have the necessary permissions to execute scripts and manage SharePoint sites.
If you’re working with SharePoint Online, use the Connect-SPOService cmdlet to connect to your SharePoint Online Admin Center. For SharePoint Server, you’ll typically connect to the site collection you intend to work with.
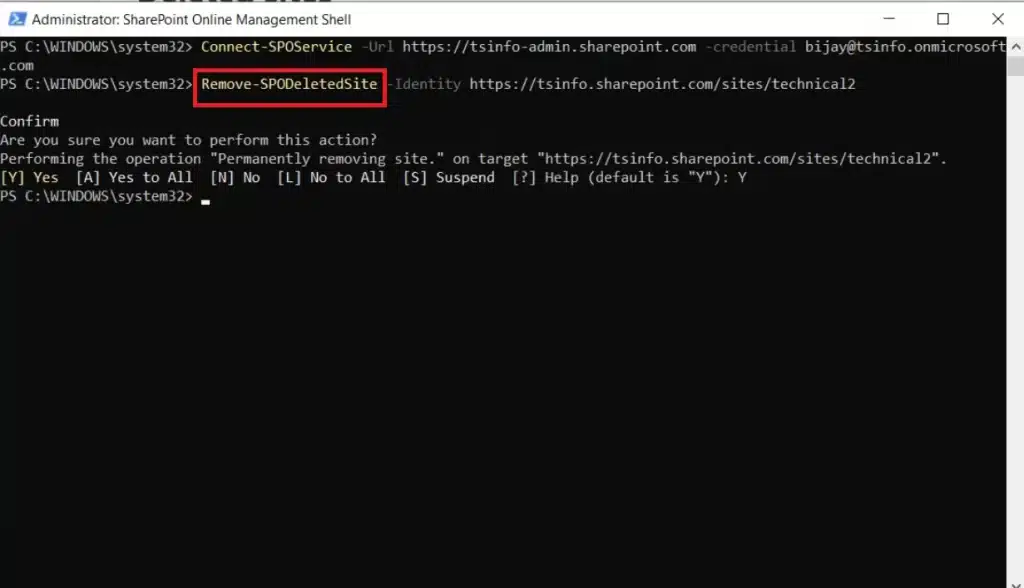
Use the Remove-SPOSite cmdlet for SharePoint Online or Remove-SPSite for SharePoint Server to delete the site.
For example, in SharePoint Online, the command might look like this:
Remove-SPOSite -Identity "https://yourdomain.sharepoint.com/sites/yoursite"Deleted sites in SharePoint Online are moved to the Recycle Bin and retained for a period. To permanently remove a site from the Recycle Bin, use the Remove-SPODeletedSite cmdlet.
For instance:
Remove-SPODeletedSite -Identity "https://yourdomain.sharepoint.com/sites/yoursite" PowerShell may prompt you to confirm the deletion. Read the warning messages carefully before proceeding.
After confirmation, the site will be deleted.
Remember that using PowerShell commands can have immediate and irreversible effects.
Using PowerShell for SharePoint site deletion is efficient and effective, especially when dealing with multiple sites or complex environments.
However, it requires a good understanding of PowerShell commands and SharePoint architecture.
Take a look at how you can use PowerShell on yet another vital Microsoft tool, Power BI:
Now, if you have completed your site deletion and realize you may have made a mistake, it is possible to restore your deleted site.
How to Restore a Deleted Sharepoint Site
If you accidentally clicked on the delete button on a SharePoint site, don’t worry. It’s possible to restore it.
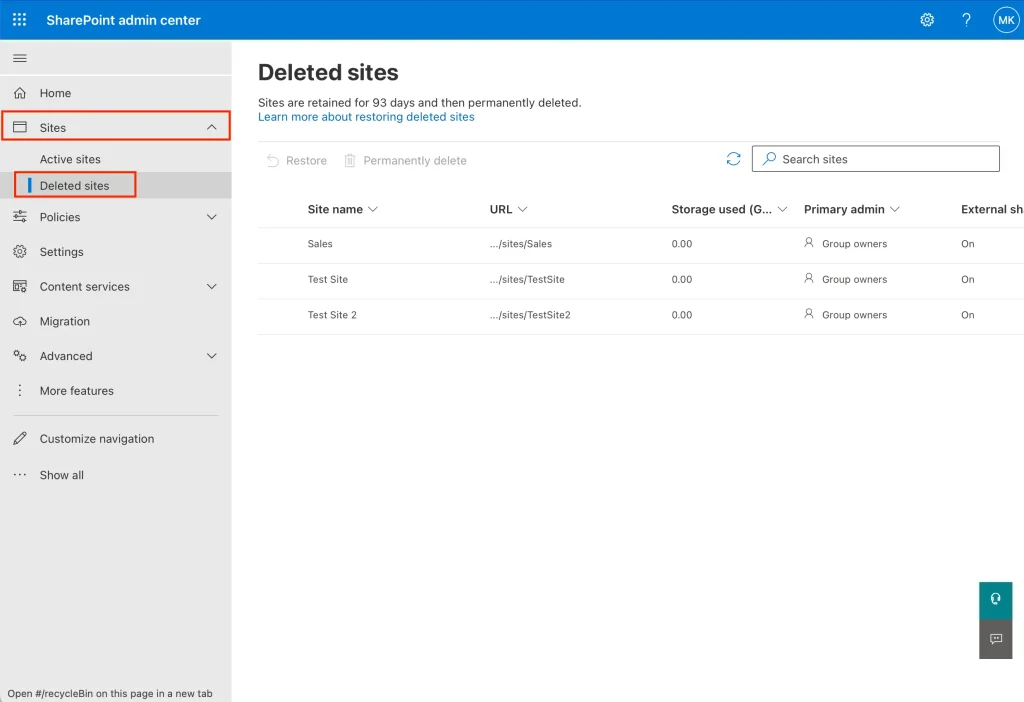
Luckily, SharePoint stores deleted sites in the site collection recycle bin, from where a site collection administrator can usually restore them.
To restore, follow these steps:
Log into your SharePoint Admin Center account with administrative privileges.
Click Sites in the vertical menu bar.
Under Deleted Sites, select the site you want to restore.
Select the site and click Restore.
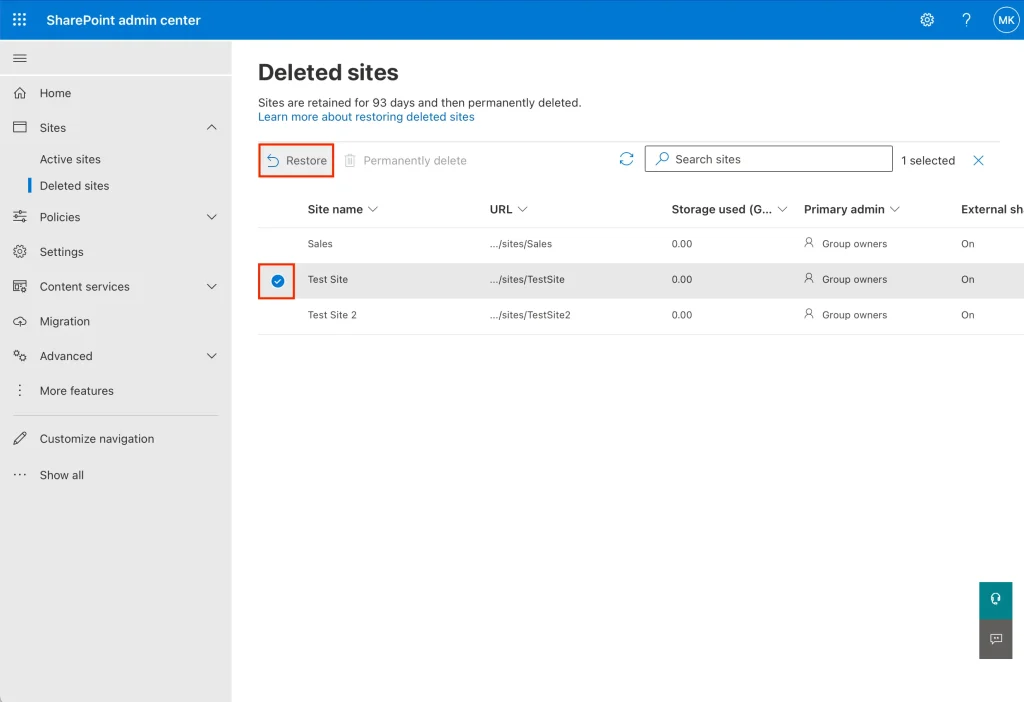
This will restore the site and its contents, including its settings, history, and subsites.
Remember that the Restore button will only appear if one site is selected and not for multiple sites.
Before you go through the process of deletion and restoration, you might want to think of alternatives to site deletion in SharePoint.
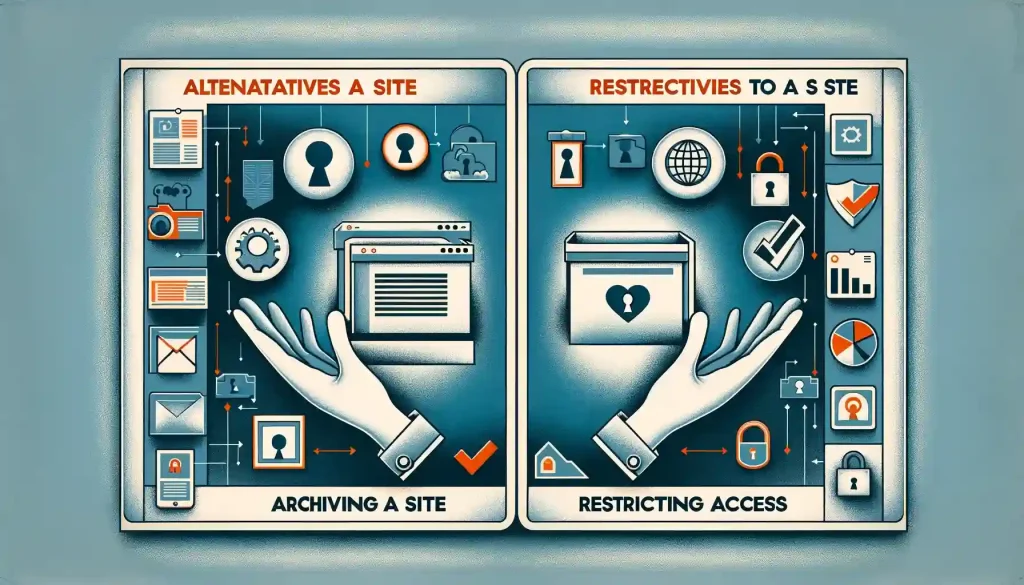
Alternatives to Site Deletion
Sometimes, completely deleting a SharePoint site may not be the best course of action. Thankfully, there are alternatives that can be considered, depending on the specific needs and circumstances.
Two such alternatives include:

Archiving a site
Restricting access to a site
Alternative 1: Archiving a Site
Instead of deleting a SharePoint site, archiving offers a way to preserve the site’s data for future use or compliance needs without keeping it active.
This process involves exporting the site’s content to a secure, long-term storage solution, either by using SharePoint’s own archiving features or by saving the content in a manageable format elsewhere.
Archiving is particularly beneficial for maintaining historical records and ensuring valuable information remains accessible for future requirements.

Alternative 2: Restricting Access to a Site
Another alternative to deletion is restricting access to the site. This approach keeps the site and its content intact but limits who can view or interact with it.
By changing the site’s permissions, access can be confined to site administrators or a designated group of users.
Restricting access is an excellent strategy for sites that are no longer actively used but might be needed in the future or when the content should only be available to a select audience.
This method ensures the site remains available for potential future use without exposing it to the wider user base.

Both archiving and restricting access provide ways to handle SharePoint sites that may not be currently needed without permanently deleting them. These methods ensure that the site and its content can be preserved for future use, compliance, or record-keeping purposes.
Final Thoughts
When restoring a SharePoint site, ensure you’re confident in the process and knowledgeable about the site’s contents.
It’s important to maintain a clear and neutral tone while discussing the restoration process with your team or organization.
Regardless, restoring a deleted SharePoint site is a straightforward process that can be quickly done through the site collection recycle bin, provided the necessary permissions are in place, and you follow the correct steps.
Frequently Asked Questions
How do I permanently delete a SharePoint site?
To get a SharePoint site permanently deleted, follow these steps:
Go to the SharePoint admin center.
Select “Sites” and then “Active sites.”
Choose the site you want to delete, click “Delete” and confirm the deletion.
Why can’t I delete a SharePoint site?
You might be unable to delete a SharePoint site due to insufficient permissions, being a member of a group with restricted access, or the site being locked or on hold. Additionally, if the site is associated with certain features or settings, deletion might be restricted.
To verify the permissions:
Go to Settings
Click on Site permissions> Advanced permissions settings> Permission Levels> Full Control
How do I delete in SharePoint?
To delete a SharePoint item:
Select the item you want to delete.
Click the Delete option from the menu or press the Delete key.
Confirm the deletion in the prompted dialog box.
What happens to a deleted SharePoint site?
When a SharePoint site is deleted, it’s moved to the Recycle Bin where it can be restored within a certain retention period i.e., 93 days. After that, it’s permanently deleted, including its content and configurations.
How do I make a SharePoint site inactive?
To make a SharePoint site inactive:
Go to Site Settings > Site Closure and Deletion.
Set a closure policy with a timeframe for inactivity.
Once inactive, the site will be flagged for deletion according to the policy, and you can choose to delete or retain it.
What happens to the content within a site when I use the ‘Delete Site’ link?
All content within the site, including documents, lists, and sub-sites, will be deleted. This is why it’s crucial to back up any important data before deletion.


