
Whether you need to make room for new data or reorganize your information, knowing how to properly insert multiple rows can improve your efficiency.
To insert multiple rows in Excel, you can use the context menu, keyboard shortcuts, or the Ribbon interface. You can also use VBA for more dynamic row insertion. These methods give you flexibility and efficiency when inserting multiple rows in Excel, making it easier to manage your data.

In this article, we’ll explore the different ways to insert multiple rows in Excel. Each method will have examples to help you better understand the concepts.

5 Ways to Insert Multiple Rows in Excel
In this section, we will explore 6 ways to insert multiple rows in Excel.
Specifically, we will discuss the following:
- Inserting Rows Using Context Menu
- Using Keyboard Shortcuts
- Inserting Rows through the Home Tab
- Using VBA to Insert Rows
- Inserting Rows with Helper Column
1) Inserting Rows Using Context Menu
In this section, we’ll discuss how to insert multiple rows in an Excel spreadsheet using the context menu.
The context menu appears when you right-click on an item in Excel and provides various options to you.
To insert multiple rows using the context menu method, follow the steps given below:
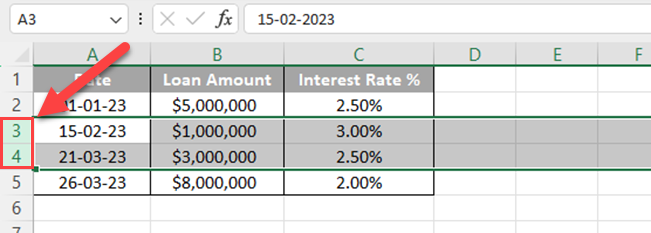
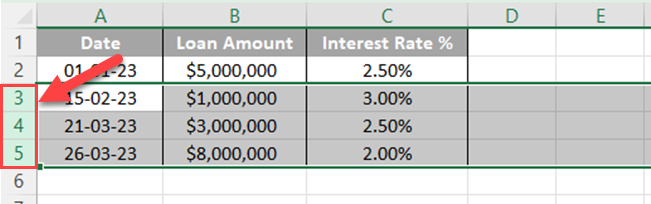
Step 1: Select The Rows
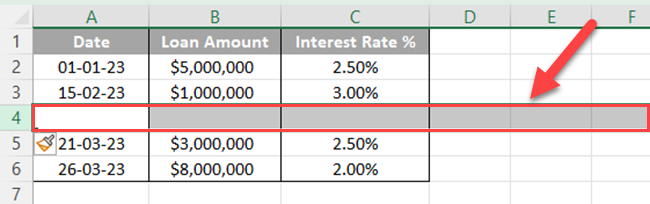
Decide where you want to insert the new rows. If you want to insert multiple rows, you need to select an equal number of existing rows.

For example, if you want to add two new rows, select two rows of your data set.
To do this, click on the number of the first row you want to select, hold down the Shift key, and click on the number of the last row you want to select.
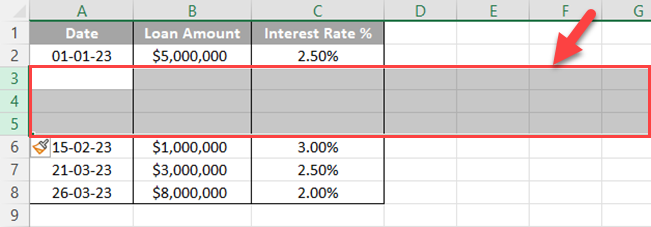
Step 2: Right Click
After selecting the appropriate number of rows, right-click anywhere within the highlighted area.
This action will open the context menu with various options.
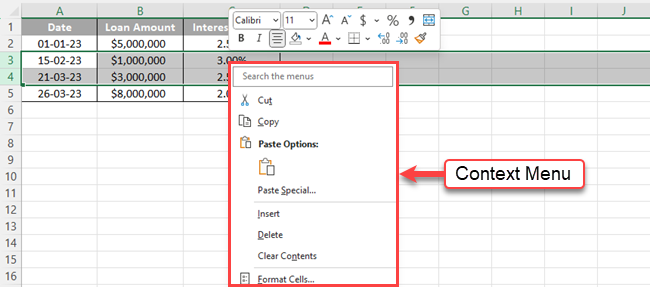
You can also press the Menu key on your keyboard to open it. It is in between the right-side Alt key and the right-side Ctrl key.
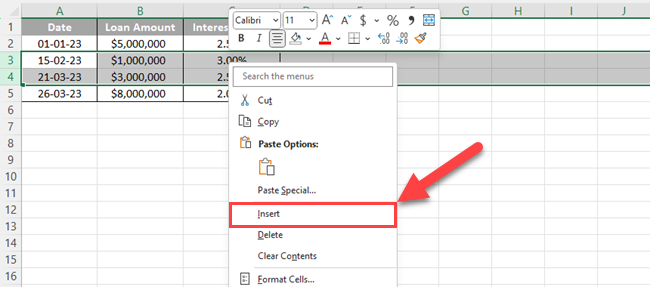
Step 3: Choose Insert
In the context menu, you’ll find an option called ‘Insert.’
Click on it, and Excel will insert the same number of rows that you initially selected as blank rows above the highlighted area.
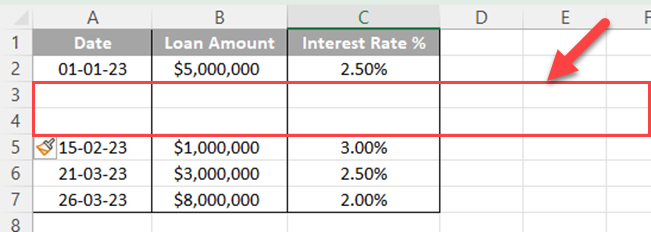
Every selected row will insert a new blank row.
By following the above steps, you can easily insert multiple blank rows in your Excel spreadsheet.
2) Using Keyboard Shortcuts
You can use keyboard shortcuts to insert multiple rows in Excel. In this section, we will discuss how you can use keyboard shortcuts to insert multiple rows.
We will look at shortcuts for both Windows OS and MacOS.
1) Windows Keyboard Shortcuts
Inserting multiple rows in Excel using keyboard shortcuts is both quick and efficient. For windows users, follow these steps:
Step 1: Select Number of Rows
First, select the number of rows you want to insert.
You can do this by clicking on the row number on the left side of the worksheet and dragging it to select multiple rows.
In this case, three rows are selected. Click on row numbers to select the entire rows.

Step 2: Insert New Rows
Once the rows are selected, press Ctrl + Shift + +(plus sign on the main keypad) to insert the new rows.
If you are using the numeric pad, the shortcut would be Ctrl + +(plus sign on the numeric pad).
2) MacOS Keyboard Shortcuts
For Mac users, the process of inserting multiple rows in Excel remains largely the same, but the shortcuts differ.

You can follow the steps listed below if you are a Mac user:
- To select multiple rows, click the row number at the left side of the worksheet, and drag to select the desired number of rows.
- After selecting the rows, press Cmd + Shift + +(plus sign on the main keypad). If you want to use the plus sign on the numeric pad, the shortcut is Cmd + +(plus sign on the numeric pad).
3) Inserting Rows through the Home Tab
The Home tab in Excel simplifies the process of inserting multiple rows in your spreadsheet.
Below, we’ll discuss the Insert Sheet Rows feature available on the Home tab.
To insert multiple rows into your spreadsheet using the Home tab, you can follow the steps listed below:
Step 1: Select The Rows
First, select the number of rows you want to insert.
For example, if you need to add a single row, click on a row number and select the entire row.
Step 2: Go to The Home Tab
Once you have selected the rows, go to the Home tab on the Excel Ribbon, located at the top of your Excel window.
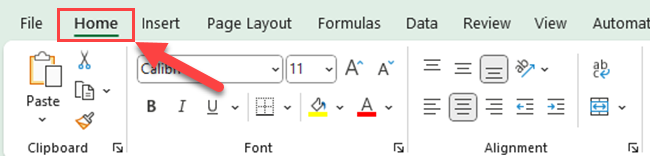
Step 3: Insert The Rows
In the Home tab, locate the Cells group and click on the Insert button.
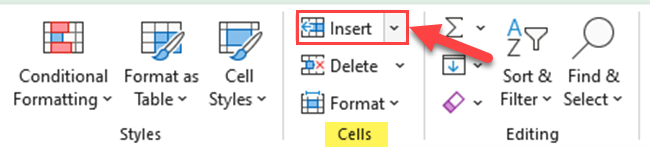
Excel will immediately add the specified number of rows to your spreadsheet.
4) Using VBA to Insert Rows
Using Visual Basic for Applications (VBA) in Microsoft Excel can be a powerful tool for automating tasks, such as inserting multiple rows.
VBA provides a more flexible and efficient way to perform this action, especially when dealing with large datasets or repetitive operations.
To insert multiple rows using VBA, you will first need to access the VBA editor.
Press Alt + F11 to open the VBA editor, then create a new module to write your code.
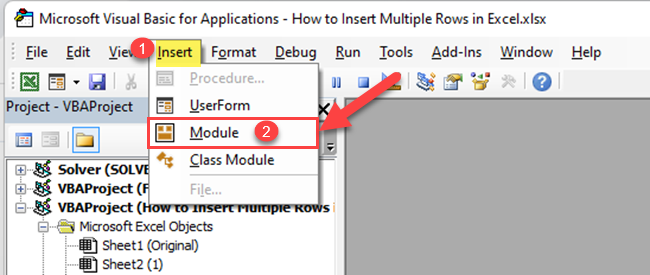
In this example, we’ll be working with a sheet called “Sheet1” and inserting several rows at specific positions.
We will talk about 3 methods that you can utilize to insert rows using VBA.
Method 1: Insert rows into a specific range
You can insert rows in a specific range by specifying the range and then calling the EntireRow.Insert method.
The following is an example of this method:

Sub InsertMultipleRows()
    Worksheets("Sheet1").Range("5:8").EntireRow.Insert
End Sub
This code will insert four blank rows in the range of rows 5 through 8 and shift down any existing rows accordingly.

Method 2: Insert Rows Above a Specific Row
If you want to insert rows above a specific row, you can use the ListRows.Add method.
The following is an example of this method:
Sub InsertRowsAbove()
    ActiveSheet.ListObjects("Table1").ListRows.Add(5)
End Sub
This code will insert a new row above row 5 in the table named “Table1” on the active sheet.

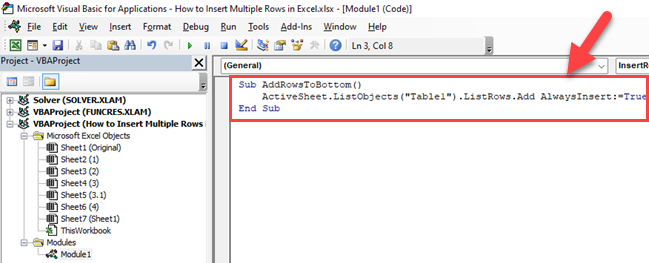
Method 3: Add Rows at The Bottom of The Table
To insert rows at the bottom of a table, you can set the AlwaysInsert parameter of the ListRows.Add method to True.
The following is an example of this method:
Sub AddRowsToBottom()
    ActiveSheet.ListObjects("Table1").ListRows.Add AlwaysInsert:=True
End Sub
This code will add a new row to the bottom of the table named “Table1” on the active sheet.
5) Inserting Rows With Helper Column
Using a helper column is an efficient way to insert multiple rows in Excel. This approach helps you maintain data integrity while sorting and filtering your data set.
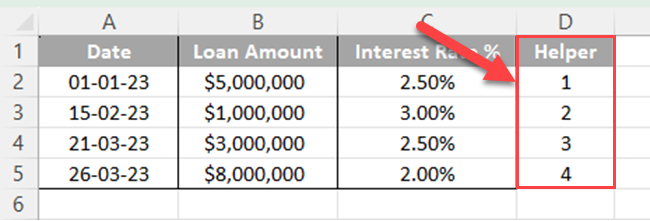
First, create a new column next to the data set that will act as the helper column. In this column, input the values that will help you sort the contiguous rows, depending on your objective.
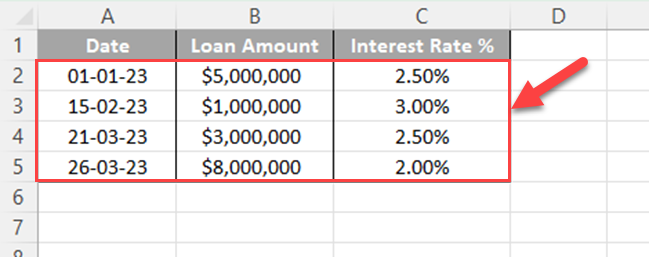
For example, consider the following data set:
If you want to insert a single row for each existing row, you can follow the steps listed below:
1) Add a helper column and insert sequential numbers.
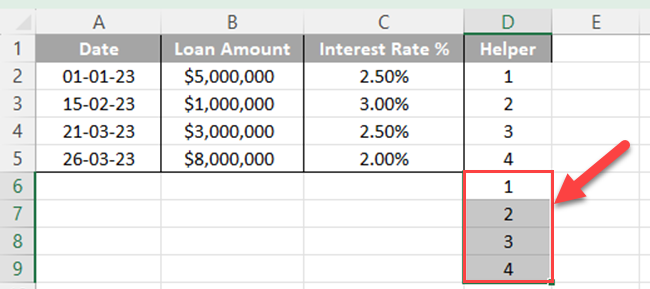
2) Copy the sequential numbers and paste them below the last cell of the helper column.
3) Select the entire data set and sort it based on the values of the helper column.
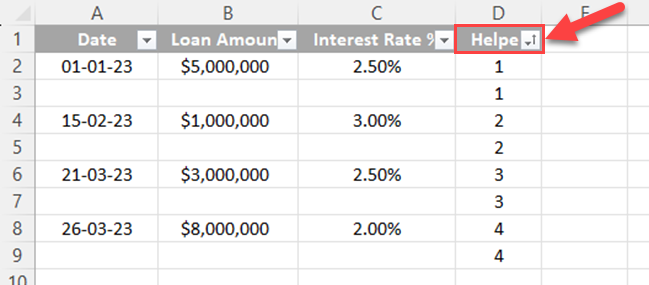
4) Delete the helper column.
This method ensures that your data is sorted correctly, and the new rows are inserted in the appropriate locations.
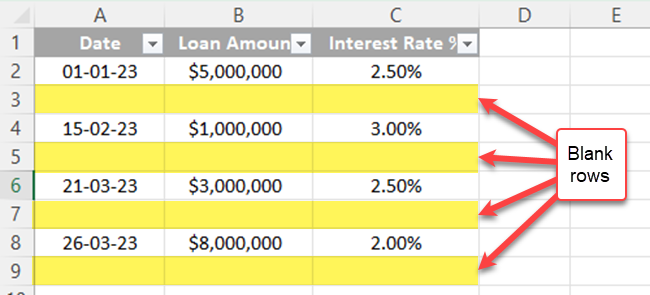
How to Add Multiple Rows in Tables
In Microsoft Excel, adding multiple rows to Tables is an essential skill to improve your data organization and overall worksheet appearance.
To insert multiple rows into an Excel Table, follow the steps listed below:
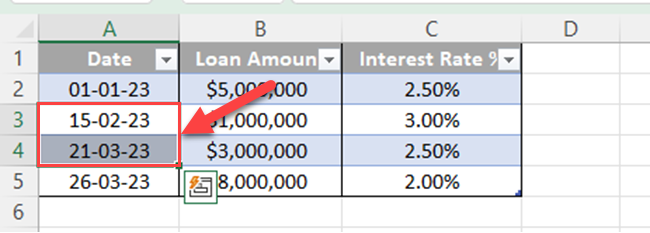
1) Select the cell or cells that corresponds to where you want the new rows to appear.
For instance, if you want to add two rows, select two cells within the column.
2) Right-click the highlighted cells and click Insert in the context menu. Then, click the “Table Rows Above” option.
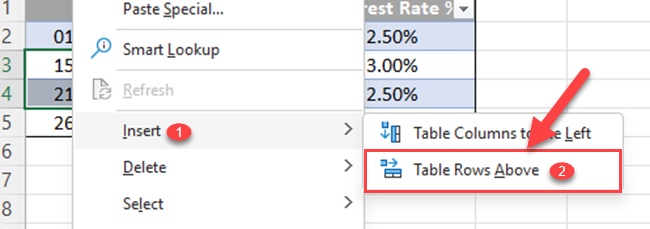
This action inserts the same number of rows as you initially selected above the specified cell.
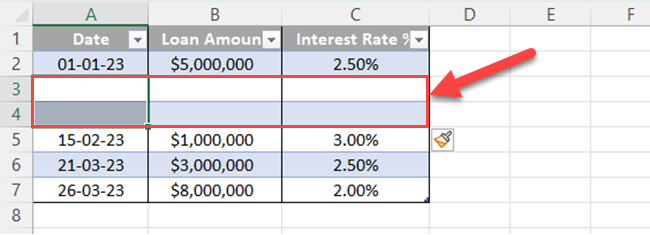
The above example shows how to insert multiple rows in Excel tables, maintaining the integrity of your data and improving the organization of your worksheet.
Learn more about Excel and Power Query by watching the following video:
Final Thoughts
Understanding how to insert multiple rows in Excel can significantly streamline your data organization and manipulation tasks.
Mastering it can save you countless hours of manual adjustments, making it a vital tool in any data enthusiast’s toolbox. In today’s data-driven world, the ability to handle and control data effectively is more valuable than ever.
Learning to insert multiple rows in Excel is a skill that allows you to harness the power of data. So, use it wisely and see how it adds an edge to your analytical abilities.
Frequently Asked Questions
In this section, you’ll find some frequently asked questions that you may have when inserting multiple rows in Excel.

How can I add several rows at once in Excel?
To insert multiple rows at once in Excel, first, select the number of rows you want to insert.
Click on the row number on the left side of the worksheet and drag the cursor down to select the desired number of rows.
Right-click on the selected rows and click “Insert” from the drop-down menu.
What is the process to insert multiple rows in Excel on different platforms?
The process for inserting multiple rows in Excel varies slightly between platforms like Windows, Mac, and Excel Online.
On all platforms, you can use the Insert Rows option after selecting the desired number of rows. However, the keyboard shortcut is different:
- Windows: Ctrl + Shift + plus sign (+)
- Mac: Cmd + Shift + plus sign (+)
Which shortcut allows adding multiple rows in Excel?
The keyboard shortcut to add multiple rows in Excel is Ctrl + Shift + plus sign (+) for Windows, and Cmd + Shift + plus sign (+) for Mac.
After selecting the desired number of rows, press the shortcut to insert the additional rows.
Is there a way to insert multiple rows in Excel based on a cell’s value?
Yes, you can use VBA (Visual Basic for Applications) to insert multiple rows based on a cell’s value.
This requires writing a VBA script that checks the cell value and inserts the required number of rows.
However, be aware that using VBA may require some programming knowledge.
How do I insert numerous rows simultaneously using Google Sheets?
To insert multiple rows in Google Sheets, follow these steps:
- Select the number of rows you want to insert (left-click on a row number and drag down).
- Right-click on the selected rows.
- Click “Insert X rows above” or “Insert X rows below,” where X is the number of selected rows.
Can I automatically insert rows in Excel based on specific criteria?
Yes, you can automatically insert rows in Excel based on specific criteria using the IF function, conditional formatting, and VBA.
However, this process may require some advanced knowledge of Excel formulas and VBA programming.
If you’re not experienced with these advanced Excel features, you may want to seek assistance or consult online tutorials.


