
Microsoft Excel is still one of the world’s favorite software programs for handling data. One of its main functions is the ability to move rows and columns of information. This is useful for making data look better and impressing your boss.
To move rows in Excel, follow these simple steps:
- Open the worksheet
- Select the row you want to move by clicking its number on the left side
- Then while holding the Shift Key, drag it to where you want it to be. A black line will show where it’ll go.
- Release the mouse button, and the row will be moved.
It’s an essential skill, and it can be that simple, but, it’s not the only way.

Read on, and et’s explore the best options and quickest ways for you to move rows in Excel.

In this article, you’re set to gain comprehensive insights into how to effectively move rows in Excel. We’ll delve into the simple and complex facets of this task, showcasing step-by-step instructions on how to move single rows, multiple rows, and even non-consecutive rows.
So, let’s get started!
1. Drag and Drop Techniques for Rearranging Rows
One simple way to move rows without overwriting existing data is by dragging and dropping. To do this, you can follow the below steps.
1. Select the row you want to move by clicking on the row number.
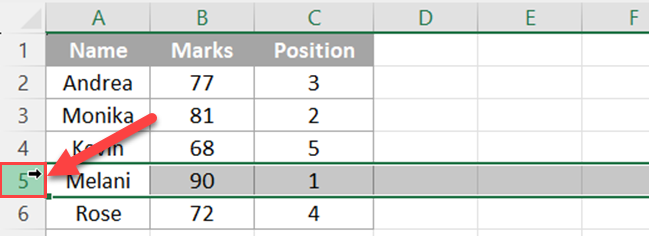
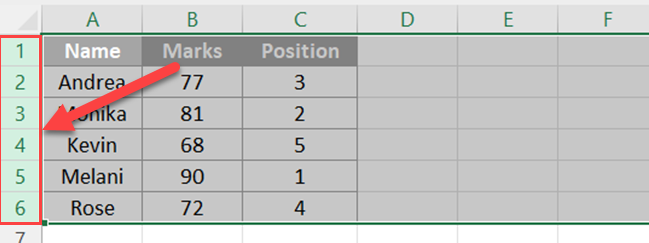
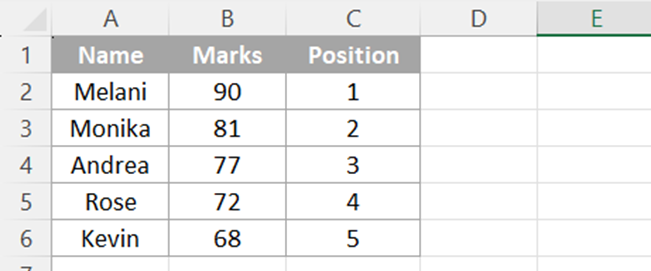
Assume that, in the below table, you want to move Melani’s details, just below the column headers.

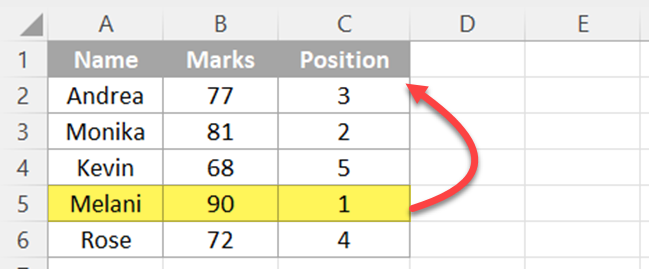
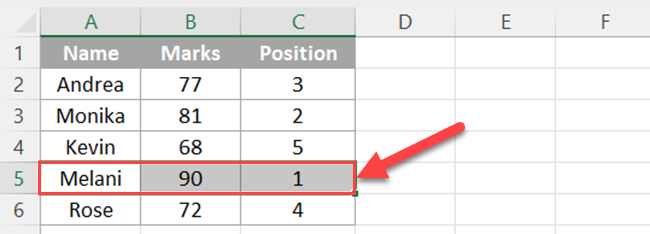
If you want to move the entire row, click on the row number (which is 5 in this case). When you select the row it will be highlighted by a green border.
If you want to move only the selected cells of a row, just select those cells like the below image.
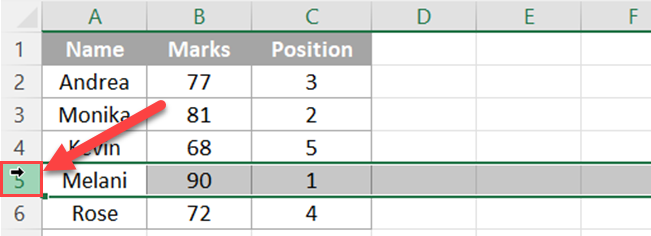
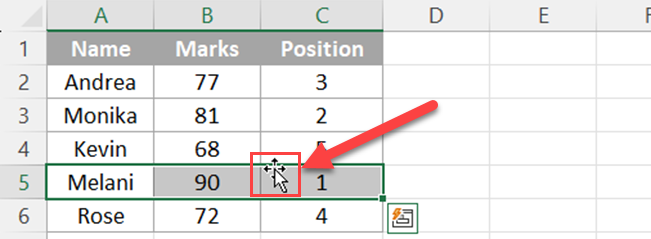
2. Move your cursor over the border of the highlighted row until the mouse cursor turns into a four-arrow icon.
3. Press and hold the Shift key on your keyboard.
4. Click and hold the left mouse button, then drag the row to the desired position.
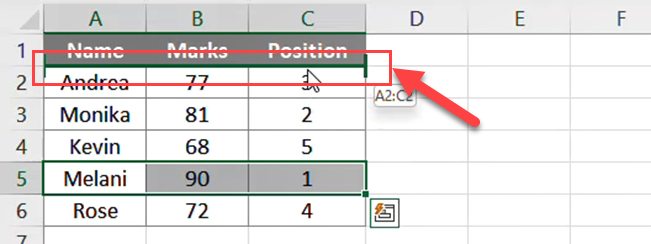
If you are not holding the Shift key while dragging, Excel may replace your existing data.
5. Release the left mouse button.
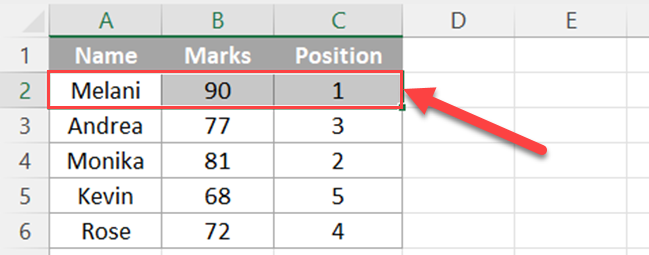
Then, the row will be moved to the new location.
You can also use the drag-and-drop method to move multiple rows as well.
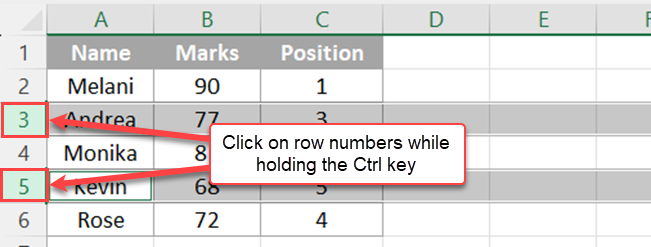
For moving multiple rows which are non-adjacent, you can select rows while holding the Ctrl key (or Cmd on Mac).
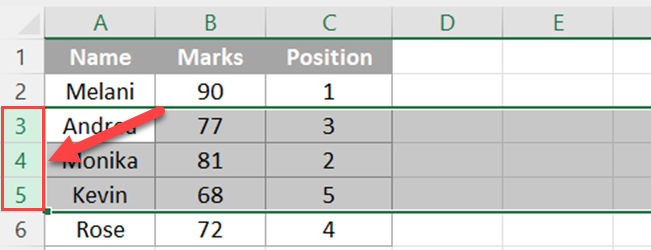
In case you need to move a group of consecutive rows, Select the first row and then, while holding the Shift key, click the row number of the last row in the group to select rows.
After you select rows, follow above same steps 2-5.
Using the mouse and these drag-and-drop techniques, it is easy to rearrange single or multiple rows in Excel, whether they are consecutive or not.
With practice, you’ll become more proficient and confident in using these methods and handling your Excel spreadsheet efficiently.
2. Cut Command for Relocating Rows
The cut command technique is a simple and efficient method for relocating rows in Excel. This approach is suitable for users of all experience levels due to its straightforward nature.

In this section, we’ll walk you through the steps of using the cut command method to move rows in an Excel spreadsheet.
1. First, select the entire row that you want to move. To do this, click on the row number on the left side of the spreadsheet.
2. Next, right-click on the selected row and choose the “Cut” option from the context menu.
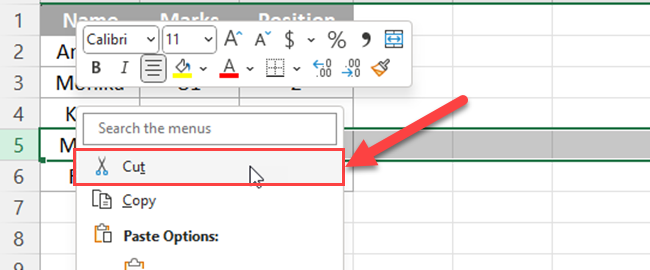
Alternatively, you can use the keyboard shortcut Ctrl+X to perform the same action.
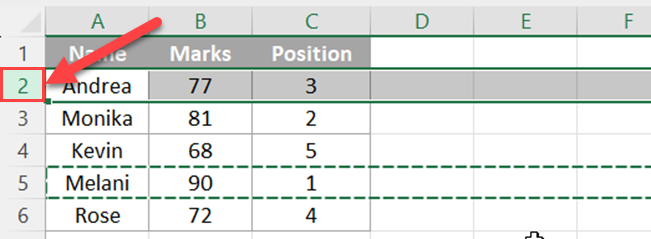
3. Now, go to your desired location, which is the row where you want to move the selected data, and select that row.
4. Finally, right-click and choose the “Insert Cut Cells” option from the context menu.
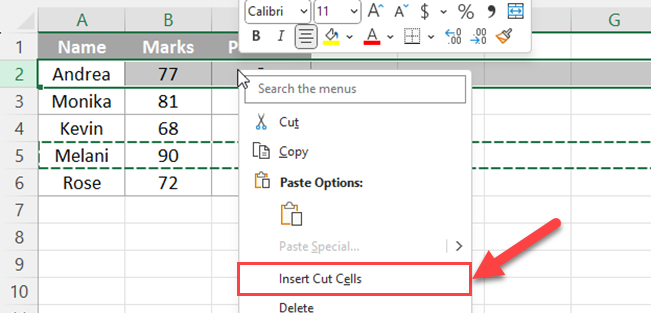
Then, rows will be arranged as follows.
It is important to note that you have to avoid clicking the Paste option or using the keyboard shortcut Ctrl+V to paste the data. If you mistakenly do that, the original row will be overwritten with the data you moved unless it is an empty row.
By following these simple steps, you can rearrange your spreadsheet data with ease while maintaining a clear and organized workspace.
3. Sorting Rows in Excel
Sorting rows in Excel is a useful technique for organizing data in your spreadsheet. This process allows you to rearrange the existing rows based on the content of specific columns.
In this section, we’ll discuss the steps to sort rows in Excel confidently and clearly.
1. First, select the range of rows you want to sort, including the column headers if present.
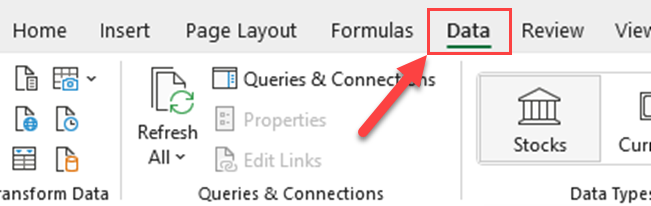
2. Go to the Data tab on the ribbon.
3. Click the Sort button in the Sort & Filter group.
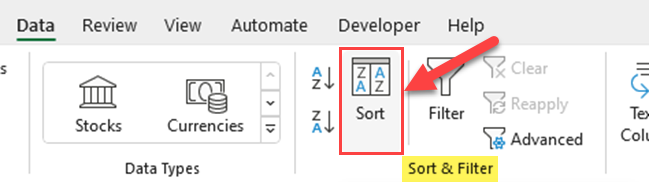
This opens the Sort dialog box where you can configure your sorting preferences.
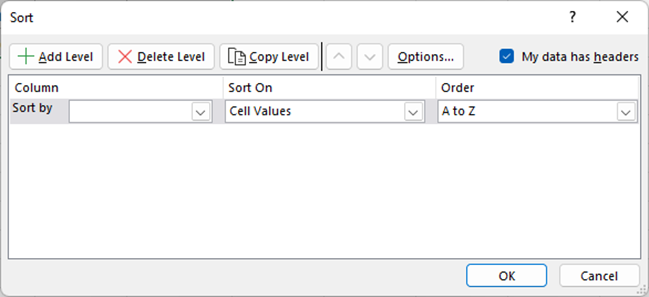
4. To sort, simply choose the desired column from the Sort by drop-down menu. You can also select the order of sorting, either from A to Z (ascending) or from Z to A (descending), using the Order dropdown.
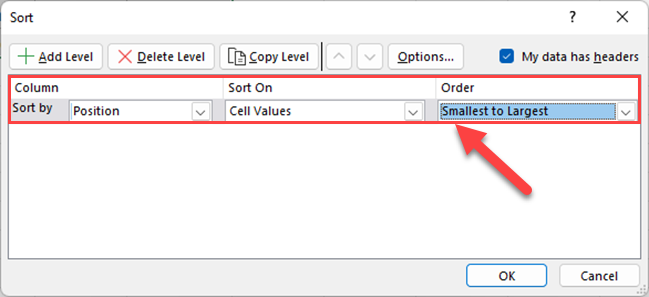
5. Click the “OK” button.
Now, all the rows are moved and sorted as below.
If you want to sort using multiple columns, click the Add Level button to add a new sorting level. You can add as many levels as needed, and Excel will sort the rows based on the order of the levels.
Also, remember that sorting rows is not limited to just text-based data. You can sort number-based and date-based data as well. Simply select the appropriate data type from the Sort On the dropdown list in the Sort dialog box.

4. Using the SORT function to Move Rows
One effective way to move rows in Excel is by using the SORT function.
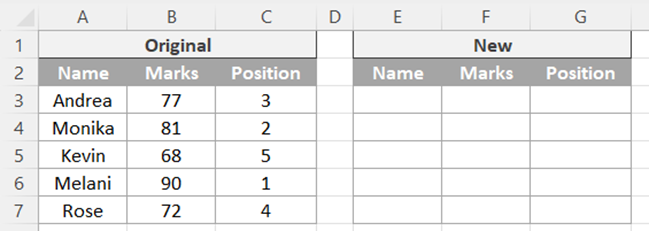
Let’s say that you want to create a new table of the below table by arranging rows based on the position.
Select the first cell of the new data table and type the below formula.
=SORT(A3:C7,3,1)
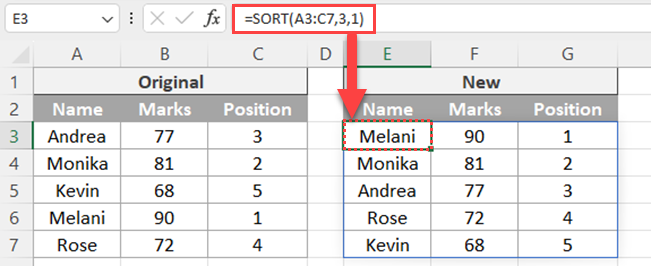
The syntax of the SORT function is =SORT(array,[sort_index],[sort_order],[by_col]).
For the array argument, select the rows that you want to move.
Next, enter the column number that you want to use for the sorting. In this case, it is 3 as the “Position” is the 3rd column of the selected data range.
For the third argument, select 1 if you want to sort ascending order and select -1 if you want to sort descending order.
5. Rearranging Rows with VBA Macros
In Microsoft Excel, you can efficiently rearrange multiple rows using Visual Basic for Applications (VBA) macros.
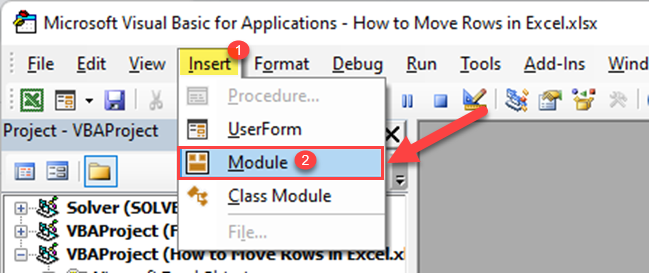
1. First, create a new VBA macro by pressing ALT+F11 to open the VBA editor.
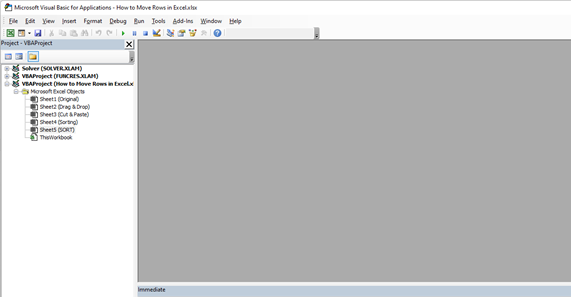
2. Then go to Insert > Module to create a new code module.
3. Next, copy the following code into the module:
Sub MoveRowsDown()
    Dim NumRows As Long
    Dim TargetRow As Long
    Dim ws As Excel.Worksheet

    NumRows = 7 'Number of rows to move
    TargetRow = 33 'Target row to move to

    Set ws = ActiveSheet 'Select active worksheet
    ws.Range("A1").Resize(NumRows).EntireRow.Cut
    ws.Range("A" & TargetRow + NumRows).EntireRow.Insert shift:=xlDown
End Sub
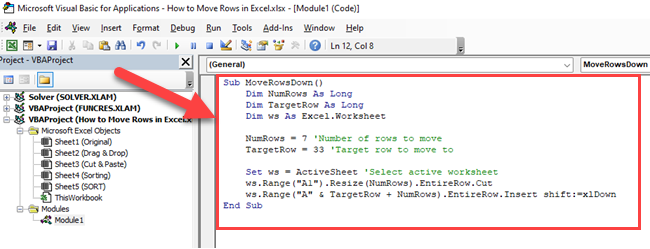
This VBA code moves a range of rows down to a specific target row. You can customize the NumRows and TargetRow variables to fit your needs. When you run this macro, the specified rows will be cut and inserted at the target position, ensuring that data is not duplicated.
When working with dynamic data, you may need to find the last row in a target column programmatically. To do this, use the xlUp method as demonstrated in the following VBA code:
Dim LastRow As Long
LastRow = Cells(Rows.Count, "A").End(xlUp).Row
Incorporate this snippet into your VBA function, replacing “A” with the desired column letter. This code will find the last used row in the specified column and store it in the LastRow variable.
Sometimes, you may need to move a row relative to its current position. The Offset property can be employed to accomplish this task:
Sub MoveRowWithOffset()
    Dim ws As Excel.Worksheet
    Dim TargetRow As Long
    Dim NumRows As Long

    NumRows = 3 'Number of rows to move
    TargetRow = 5 'Row to move

    Set ws = ActiveSheet
    ws.Rows(TargetRow).Offset(NumRows).Insert shift:=xlDown
    ws.Rows(TargetRow).Resize(NumRows).Cut Destination:=ws.Rows(TargetRow).Offset(NumRows)
    ws.Rows(TargetRow).Offset(1).Resize(NumRows - 1).EntireRow.Delete
End Sub
In this VBA macro, the TargetRow is moved by a specified number of rows using the Offset property. This code will insert rows beneath the TargetRow, cut the rows from their original positions, and paste them in the newly inserted spaces.
By applying the above methods, you can quickly and confidently rearrange rows in Excel, streamlining your data manipulation tasks and enhancing your productivity.
Final Thoughts
In this article, we have discussed five methods for moving rows in Excel: the drag method using the mouse, cut and paste, and rearranging rows using the Data Sort feature, SORT function, and VBA code. Each method has its own advantages and limitations, but all five are effective ways to move rows in your spreadsheet.
To ensure efficiency and accuracy when working with Excel, it’s essential to select the appropriate method for your specific needs. The drag method offers a quick and visual way to move rows, while the cut command method provides more precision for those who prefer using keyboard shortcuts.
On the other hand, the Data Sort feature can be a powerful tool for organizing large datasets by specific criteria.
By implementing these methods and maintaining a skillful approach to Excel, you’ll increase your productivity and enhance your ability to manipulate and analyze data in the spreadsheet platform.
If you’d like to learn how to remove duplicate rows in Power Query based on conditions, watch the below video:
Frequently Asked Questions
How do you rearrange rows in Excel?
To rearrange rows in Excel, you can use the “Sort & Filter” function available in the “Home” tab. Simply click on the header of the row you want to sort and choose either “Sort A to Z” or “Sort Z to A” based on your preference.
Alternatively, you can also manually move rows by selecting the row, holding the shift key, and dragging the row to its new position.
How do I move an entire row in Excel without replacing it?
To move an entire row without replacing it, select the row you want to move by clicking on its heading. Then, right-click and choose “Cut” or press “Ctrl+X”. Next, select the row where you want to insert the cut row, right-click and choose “Insert Cut Cells”. This will shift the existing rows down and insert the cut row without replacing any existing data.
What is the shortcut for moving a row in Excel?
There isn’t a direct keyboard shortcut for moving a row in Excel. However, you can use a combination of shortcuts to achieve the same result: select the row (Shift+Space), cut the row (Ctrl+X), select the destination row (arrow keys), and insert cut cells (right-click menu key, followed by “I”).
How to swap rows in Excel?
To swap rows in Excel, you can use a temporary row as a placeholder. Cut the first row you want to swap (Ctrl+X), create a new row where you want it to move to, and paste the cut row. Repeat the process for the second row, and then delete the temporary row after pasting the second row.
How can I move rows using keyboard shortcuts?
As mentioned previously, you can move rows using a combination of keyboard shortcuts:
- Select the row: Shift+Space
- Cut the row: Ctrl+X
- Navigate to the destination row: Arrow keys
- Insert cut cells: Right-click menu key, followed by “I”
Is it possible to move rows in Google Sheets like in Excel?
Yes, moving rows in Google Sheets is similar to Excel. You can select the row by clicking its heading, then use the “Cut” (Ctrl+X) and “Insert Cut Cells” functions.
Alternatively, you can also manually move rows by selecting the row, holding the shift key, and dragging the row to its new location.


