Have you ever felt stuck in a spreadsheet maze with too many numbers? Well, that’s where Excel Solver comes to the rescue!
Excel Solver is a powerful add-in that comes pre-installed with both Windows and Mac versions of Excel. It is designed to assist in “what-if” analyses, allowing you to find optimal solutions for complex decision problems. Solver can help you identify maximum or minimum values for a specific cell, referred to as the objective cell, while considering certain constraints or limits on other cells within the worksheet.
Adding Solver to your work routine can make it much easier to create smart business and engineering plans.
Also, with Solver’s helpful tools, you can easily check different situations and find the best solution. This way, you can make better decisions on where to put your resources and be more efficient in your work.
Great! Let’s dive in!

Understanding Excel Solver
With Excel Solver, you can find optimal solutions for various types of problems, such as linear programming and optimization problems.
Let’s look at how to set it up and start using it.
How to Enable Excel Solver?
To get started with Excel Solver, you first need to enable the add-in. It comes pre-installed with both Windows and Mac versions of Excel, but you need to activate it manually.
Excel Solver Windows Users
For Windows users, follow the steps below:
Step 1
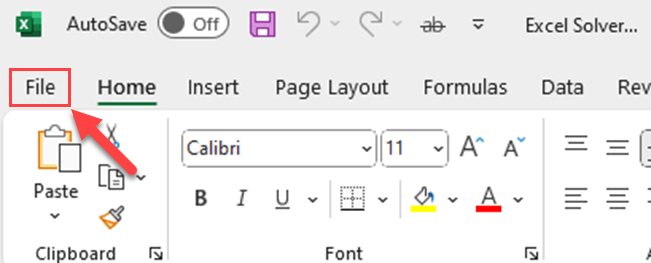
Open Excel and go to the File tab.
Step 2
Click on Options.

Step 3
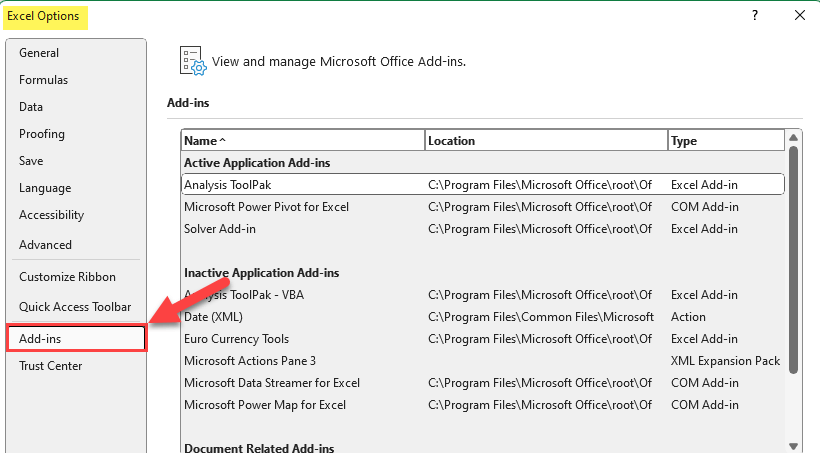
Click Add-Ins.
Step 4
Select Excel Add-ins from the Manage box and click Go.

Step 5
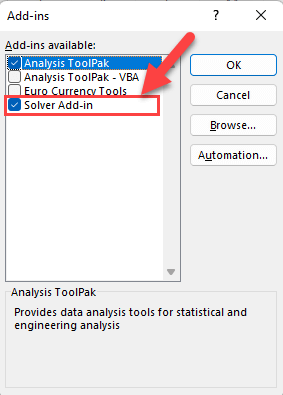
Check the box next to Solver Add-in, then click OK.
Now you’re ready to start using Excel Solver!
Excel Solver for Mac Users
For Excel for Mac users, the steps vary depending on your version.

For Excel 2016 for Mac, follow these steps:
Open Microsoft Excel and click on the Tools menu.
Select Excel Add-ins from the menu.
In the Add-ins available box, check the box next to Solver Add-in and click OK.
For Excel for Mac 2011, follow these steps:
Open Microsoft Excel and click on the Tools menu.
Select Add-ins from the menu.
In the Add-ins available box, check the box next to Solver and click OK.
If you’re using Microsoft 365, the process is the same as the one outlined for Windows users.
Once you’ve loaded the Solver Add-in, the Solver command will be available in the Analysis group on the Data tab.

Now that you have successfully activated the Solver Add-in, you’re ready to start using it for various analysis tasks.
Excel Solver is an excellent tool for finding optimal solutions to problems involving constraints, or for testing what-if scenarios in your spreadsheet data.
As you explore it further, you’ll find it a powerful and versatile resource for your data analysis needs.
How to Define the Problem?
The first step is to clearly define the problem you want to solve.
Start by setting up your Excel file with a clean and organized worksheet.
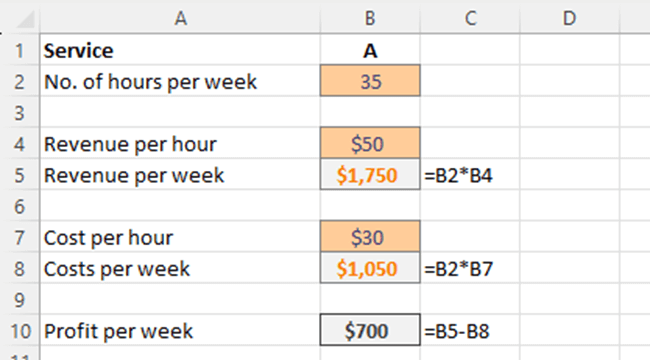
Now, you have to identify your objective, the decision variables, and any constraints on those variables.
Objective cell:
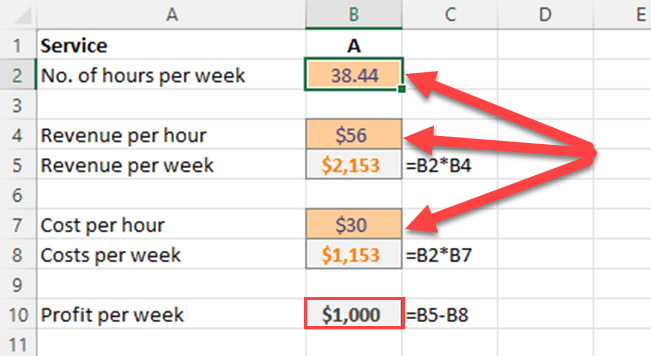
In the above problem, if your objective is to get a $1,000 profit per week, cell B10 would be the objective cell.
Variable Cells:
Your variable cells should be easily identifiable and separate from other input data. These cells will be edited by Solver to find the optimal solution.
In the above problem, changing cells are the number of hours per week (Cell A2), revenue per hour (Cell A4) and cost per hour (Cell A7).
Constraints:
Constraints can be limitations or requirements that need to be fulfilled. Determine the constraints that affect your decision variables and objective.
Add these constraints to your worksheet, and clearly indicate their relationship to your decision variables using Excel functions (e.g., SUMIFS, COUNTIFS).
For example, you might have a maximum number of hours per week is 45 and a minimum cost per hour is $30.
With your problem defined and organized in your Excel workbook, you are now ready to use the Excel Solver function to find the optimal solution.
Clearly defining your problem is a crucial first step; it allows Solver to efficiently analyze your data and generate accurate results.
How to Use Excel Solver Parameters Dialog Box?
Once you’ve set up your problem, follow these steps to use Excel Solver:
Step 1
Go to the Data tab.

Step 2
Click Solver in the Analysis group.

Step 3
In the Solver Parameters dialog box, enter the objective cell in the first cell reference box and click “max”, “min” or “Value of” as per your objective. If you select the “Value of” option, specify the value in the box.

Step 4
Enter the decision variable cells. You can use commas to separate non-adjacent cells.

Step 5
Add constraints for the particular solution.
To specify constraints in Excel Solver, you need to click on the “Add” button in the Solver Parameters dialog box. By doing so, you can define the formulas and limitations for your decision variables.
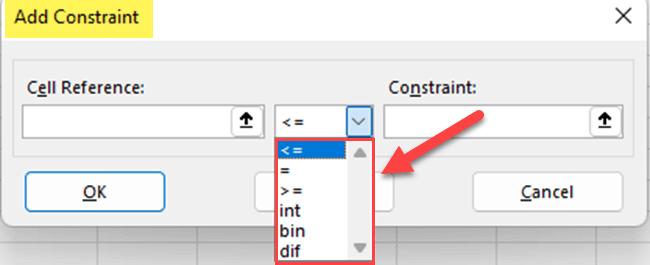
Remember, constraints can be related to each other using operators like equal to (=), less than or equal to (<=), or greater than or equal to (>=).
Additionally, Solver provides specialized constraint types such as Alldifferent.
This constraint is particularly useful when you need to ensure that all decision variables have distinct values. For instance, when assigning tasks to employees, you can use the Alldifferent constraint to prevent any overlap.
Here are some common types of constraints you might encounter:
General Constraints: These constraints can involve any type of comparison, such as A1 = B1, A1 >= B1, or A1 <= B1.
Binary Constraints: Use these when you need to represent a “yes/no” decision. For example, A1 = binary, only allows the values 0 or 1.
After adding constraints for the current scenario, Solver displays each existing constraint in the “Subject to the constraints” box.

When you’re setting limits for a problem, it’s important not to make them too strict, or Solver might have a hard time finding a solution. But if your limits are too loose, you might get results that don’t make sense. Finding the right balance between the two is crucial for getting accurate solutions.
Step 6
Choose the right solving method for your problem.
The three main solving methods available in Excel Solver are Simplex LP, GRG Nonlinear, and Evolutionary.
For linear programming problems, go with Simplex LP.
For smooth nonlinear problems, use the GRG Nonlinear method.
For non-smooth, non-linear problems with multiple optima, opt for the Evolutionary algorithm.

Remember, the ultimate goal is to efficiently find the optimal solution, whether that’s maximizing or minimizing the value in your objective cell. By selecting the appropriate solving method, you can efficiently use Excel Solver to achieve your desired result.
Step 7
Click Solve.

Next, a box called Solver Results will pop up. Here are some things you can do from there.
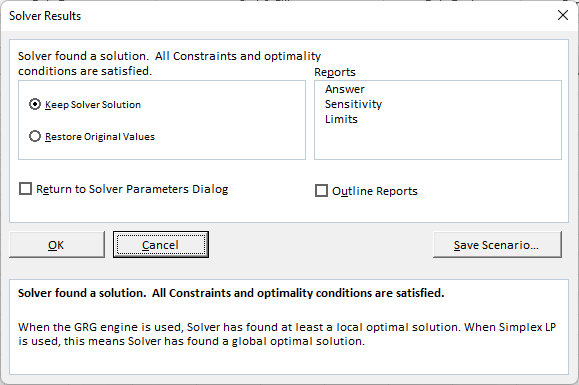
Keep Solution Values: If you want to keep the answers in your worksheet, just click “Keep Solver Solution” in the Solver Results box.
Restore Original Values: To go back to how things were before you clicked “Solve,” click on “Restore Original Values.”
Pause or Stop Solver: If you need to stop the solution process, press the Esc key. Excel will recalculate the worksheet using the last values it found.
Create a Report: After Solver figures out a solution, you can make a report by choosing a report type in the Reports box and clicking OK. The report will show up on a new worksheet. If Solver doesn’t find a solution, you might still get some reports or none at all.
Here are some details you can find in these reports:
Answer Report: This report shows the original and final values of the objective function and decision variables. It also records the solving method, Solver option settings, and statistics like iterations and time required to solve the problem.
Sensitivity Report: A Sensitivity report offers insights into the effects of varying the parameters on the objective function, such as shadow prices and allowable increase or decrease in the constraints.
Limits Report: This report illustrates the feasible range for the decision variables, subject to constraints if they are modified.
Save Scenario: If you want to save the values for later, click “Save Scenario” in the Solver Results box. Give your scenario a name in the Scenario Name box, and you’re done!
If you select “Keep Solver Solution” and press “OK”, you’ll get the optimal solution.
Troubleshooting and Support
When using the Excel Solver Add-in, you might run into some issues. Here are some easy tips to help you troubleshoot problems and get support.

Loading Solver Add-in:
If you’re having trouble loading Solver Add-ins, make sure to select Excel Add-ins in the ‘Manage’ box. For Excel 2007, click the Microsoft Office Button, then choose ‘Excel Options,’ followed by ‘Add-Ins,’ and ‘Excel Add-ins.’
For Excel 2010 and later versions, click ‘File,’ ‘Options,’ ‘Add-Ins,’ and ‘Excel Add-ins.’ Then, check the Solver Add-in box and click ‘OK.’
Issues with Convergence or Optimal Solution:
If your model isn’t converging or providing the best solution, try these steps:
Adjust Solver options by limiting ‘Max Time’ and setting a small value for iterations to check the current values.
Consider using a different algorithm like Generalized Reduced Gradient (GRG) or Non-Smooth optimization, depending on your problem.
Handling Binary Constraints:
Dealing with binary constraints can be tricky. Make sure to correctly define them in the ‘Solver Parameters’ dialog box under the ‘Cell Reference,’ ‘Constraint,’ and ‘Bin’ options.
Loading and Saving Models:
If you need to load or save models efficiently, use the ‘Load Model’ and ‘Save Model’ options in the Solver Parameters dialog box. This helps you import previous models or save current ones for later use.
Final Thoughts
Excel Solver is like a super-smart assistant for making things easier in your work. It helps with tasks like figuring out the best way to allocate resources, manage budgets, and maximize profits.
Once you get the hang of it, you’ll be able to solve tricky problems and make smart decisions for your organization. It’s a handy tool that can make your work life smoother and more efficient.
Interested in unlocking the power of AI, Excel, Power BI, and Python working together?
Check out the video below to see how they can team up to do amazing work!
Frequently Asked Questions
How to set up constraints in Excel Solver?
To set up constraints in Excel Solver, you need to follow these steps:
Open the Solver Parameters dialog box by clicking on “Solver” in the Data tab’s Analysis group.
Define your objective cell and the desired optimization (minimum, maximum, or specific value).
Click on the “Add” button in the Solver Parameters dialog box to open the “Add Constraint” window.
In this window, select the cell reference or range for which you want to set a constraint.
Choose the appropriate operator (equal to, less than or equal to, or greater than or equal to).
Enter the constraint value or cell reference in the Constraint box, and click on the “OK” button.
Which algorithms are used in Excel Solver?
Excel Solver uses three algorithms for different types of optimization problems:
Simplex LP: Suitable for linear programming problems and works well for optimizing linear equations with linear constraints.
GRG Nonlinear: Useful for solving smooth nonlinear problems and works with nonlinear equations and continuous variables.
Evolutionary: Designed for solving non-smooth, non-linear problems with integer or discrete constraints.
What are common example problems for Excel Solver?
Common example problems for Excel Solver include:
Product mix optimization: Determining the optimal mix of products to maximize revenue or profit.
Portfolio optimization: Allocating funds in a portfolio to minimize risk and maximize returns.
Time and resource allocation: Scheduling tasks and allocating resources to meet deadlines and constraints.
Traveling salesman problem: Finding the shortest route to visit a series of destinations.
How to optimize between two values using Solver?
To optimize between two values using Solver, you can set up a constraint with the objective cell and the desired minimum and maximum values. Add two separate constraints, one with the “greater than or equal to” operator and the minimum value, and another with the “less than or equal to” operator and the maximum value.
Can Excel Solver find the sum of combinations?
Yes, Excel Solver can find the sum of combinations. You can use Solver to identify the optimal combination of values within a given range that will result in a specific sum or achieve the desired objective, such as maximizing or minimizing a function.
How to find a specific value using Solver in Excel?
To find a specific value using Solver in Excel:
Open the Solver Parameters dialog box.
Select the objective cell, which contains the formula you want to reach a specific value.
Choose the “Equal to” option in the “Equal to” dropdown menu.
Enter the specific value for the objective cell in the “Target Cell” box.
Set up constraints, if necessary, and click on the “Solve” button. The Solver will then adjust the input variables to reach the desired specific value.


