Imagine for a moment that you’re a maestro, ready to orchestrate a symphony of tasks — a tantalizing tune of productivity. Your baton? Power Automate. Your sheet music? Flows. But just like how every melody needs a starting note, every flow needs a trigger.
Power Automate trigger conditions are specific stipulations set within a Power Automate flow that determine when that flow should be initiated. Essentially, these conditions serve as a “gate” for the initiation of a process, only opening when certain criteria are met. The criteria can be as simple as a certain date and time, or more complex, like an email being received with a specific subject line.
Trigger conditions play a crucial role in optimizing Power Automate flows and serve as the initial spark that sets off an automated workflow. In this article, we’re going to go over what are trigger conditions and how to set them up in Power Automate.

Let’s get started!
What Are Power Automate Trigger Conditions?
Power Automate is a versatile tool developed by Microsoft that’s aimed at streamlining repetitive tasks and boosting efficiency in organizations of all sizes.
Central to the successful implementation of Power Automate workflows, also known as “flows”, are components called “triggers.” A trigger in the Power Automate context is an event that initiates the execution of a workflow. In other words, a trigger is a condition that, when met, sets a flow into motion.
Think of triggers as the starting point or the first step of any flow. They essentially monitor for specific events, and when these events occur, they “wake up” the flow to start its operation.
For example, a trigger condition could be something as simple as the arrival of an email in your Outlook inbox, a new row added to an Excel spreadsheet, or a new item being added to a SharePoint list. Triggers can also be more complex, monitoring multiple conditions across different applications.
How to Set Up Triggers in Power Automate
Setting up triggers in Power Automate is a straightforward process that can be mastered with a bit of practice. This section will guide you through the steps to set up both simple and complex

Setting Up Simple Power Automate Trigger Conditions
Here’s a step-by-step guide to setting up a simple trigger in Power Automate:
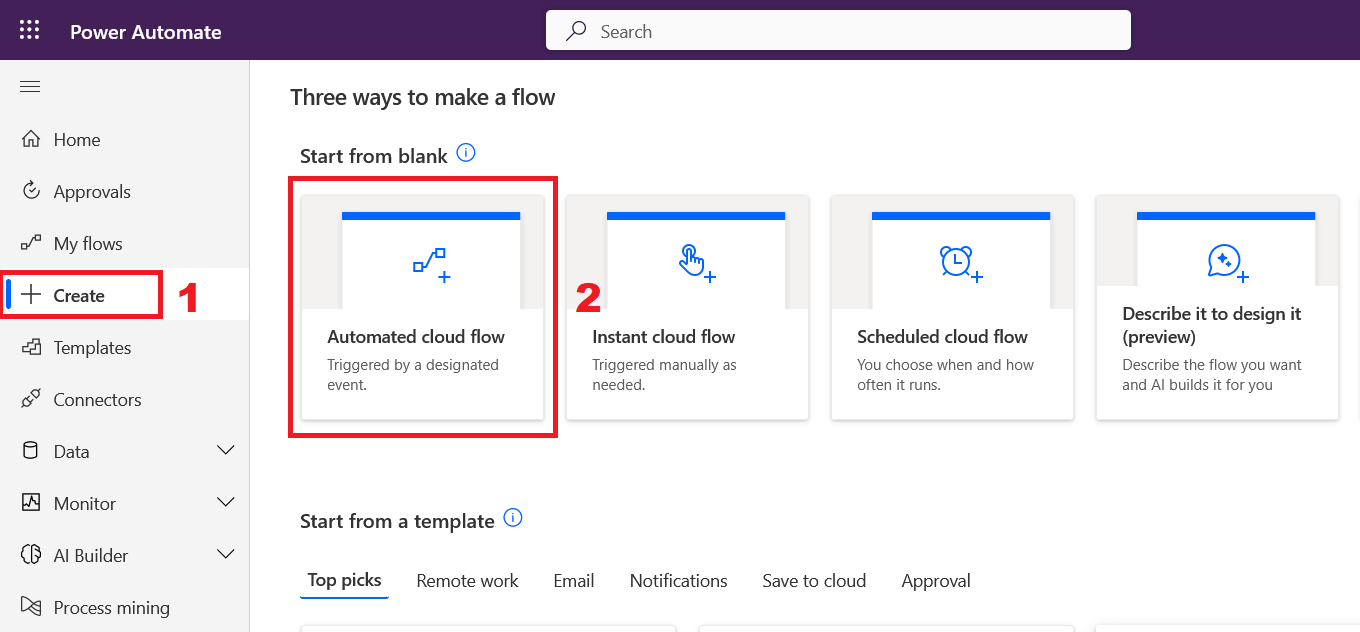
1. Sign in to Power Automate: Visit the Power Automate site and sign in with your Microsoft account from the upper-right corner.
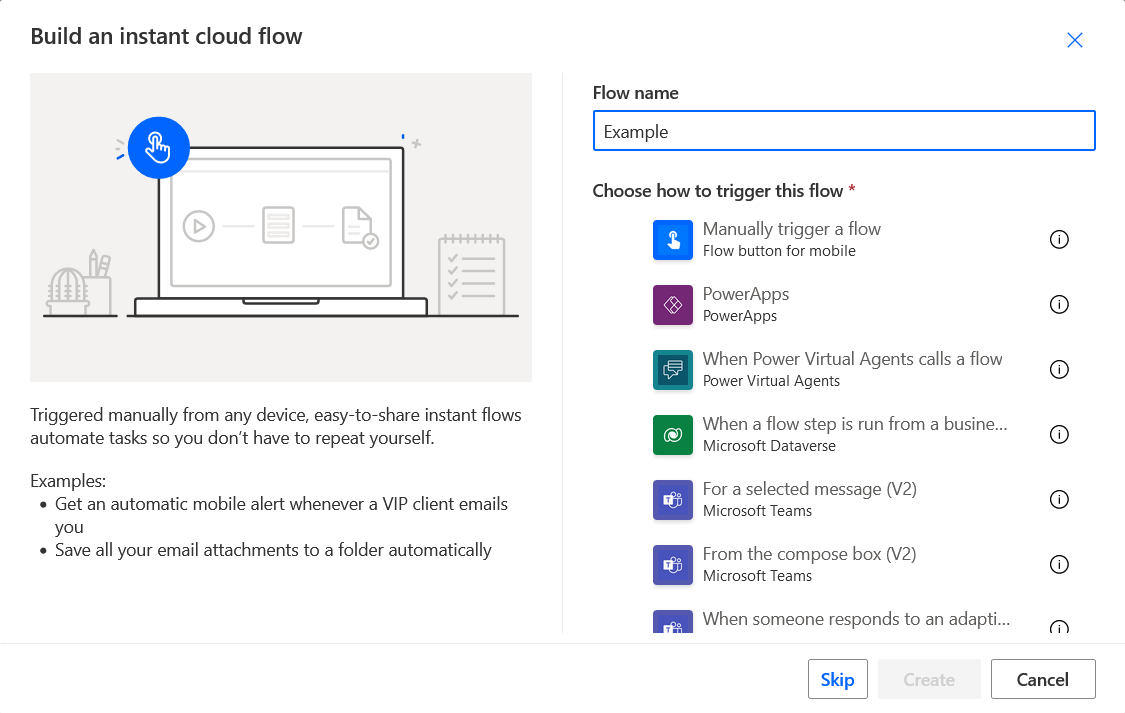
2. Create a new flow: Click on “Create” on the left side of the screen and choose the type of automated flow you want to create, such as an “Automated cloud flow” with an automated trigger.
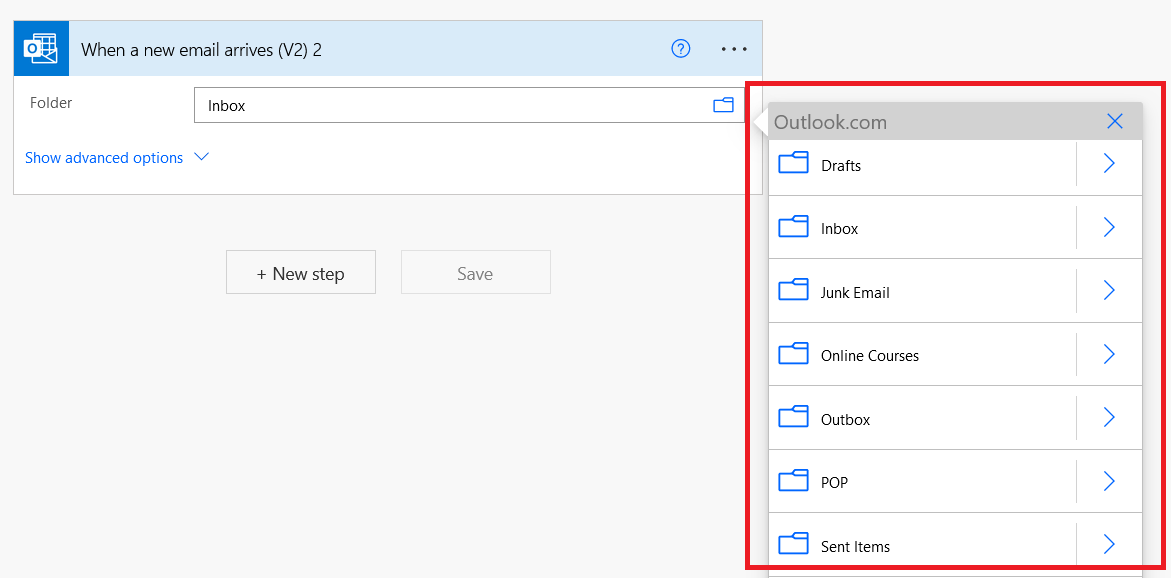
3. Choose your trigger: In the “Choose your flow’s trigger” box, select the application and then the specific trigger you want to use. For instance, you might choose “When a new email arrives” for Outlook as your only trigger.
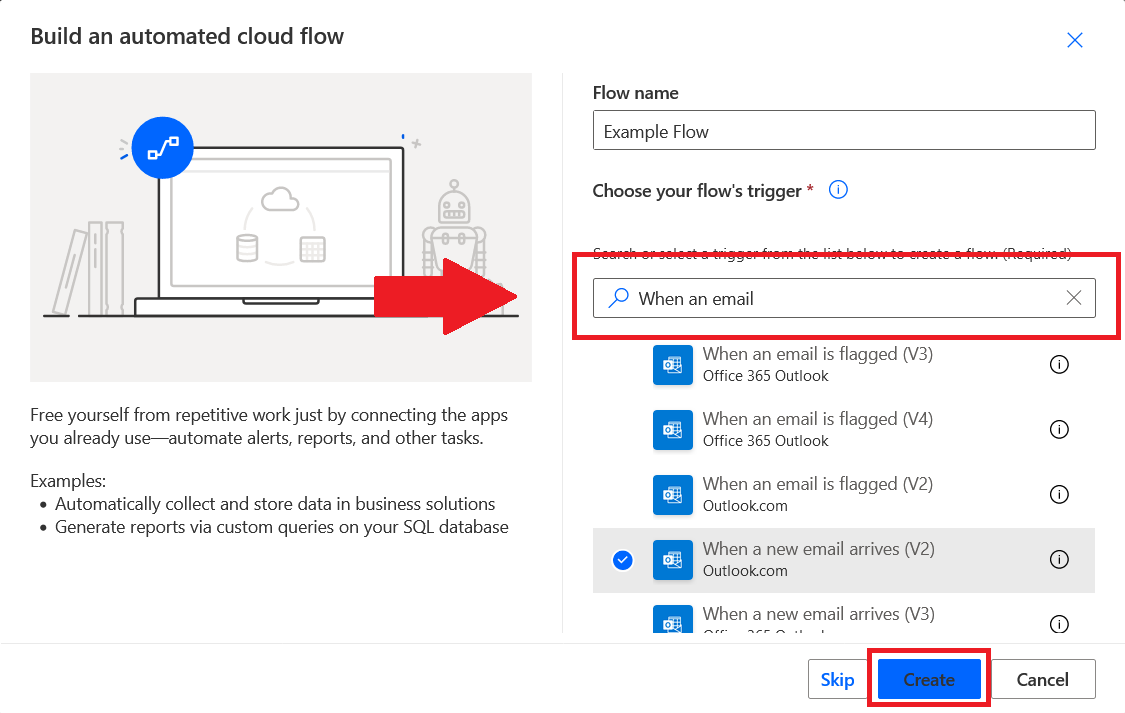
4. Configure your trigger: Based on the trigger you selected, you may have to configure some additional details. For an email trigger template, you might need to specify a particular folder in your inbox.
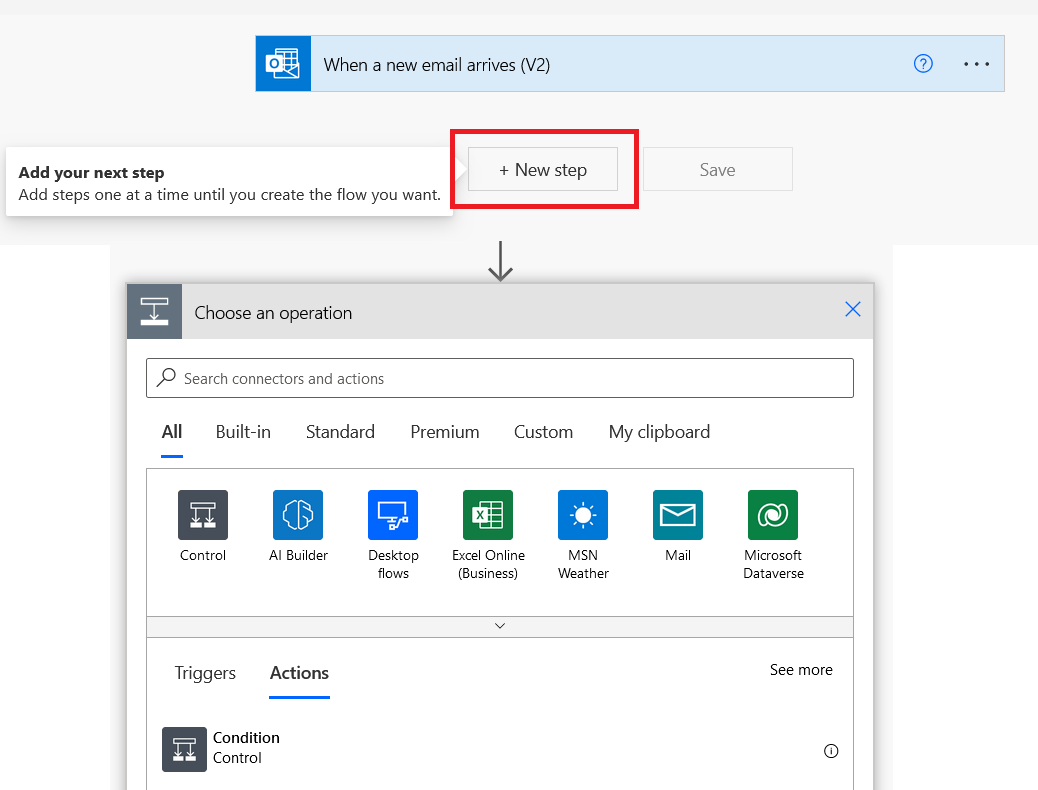
5. Set an action and save your flow: Once you’ve set up your trigger, click “+New step” to choose an operation for when the trigger condition is triggered.
Hit “Save” and voila! Your flow run is ready! But make sure you test it first to confirm it works as expected before. There’s a “Test” button at the top-right corner of the page.
Setting Up Complex Power Automate Trigger Conditions
Complex triggers might involve multiple trigger conditions or several applications. The process for setting up a complex trigger is similar to the simple trigger setup but includes a few additional steps:
1. Start by creating a new flow and choosing your first trigger, just as you did with the simple trigger.
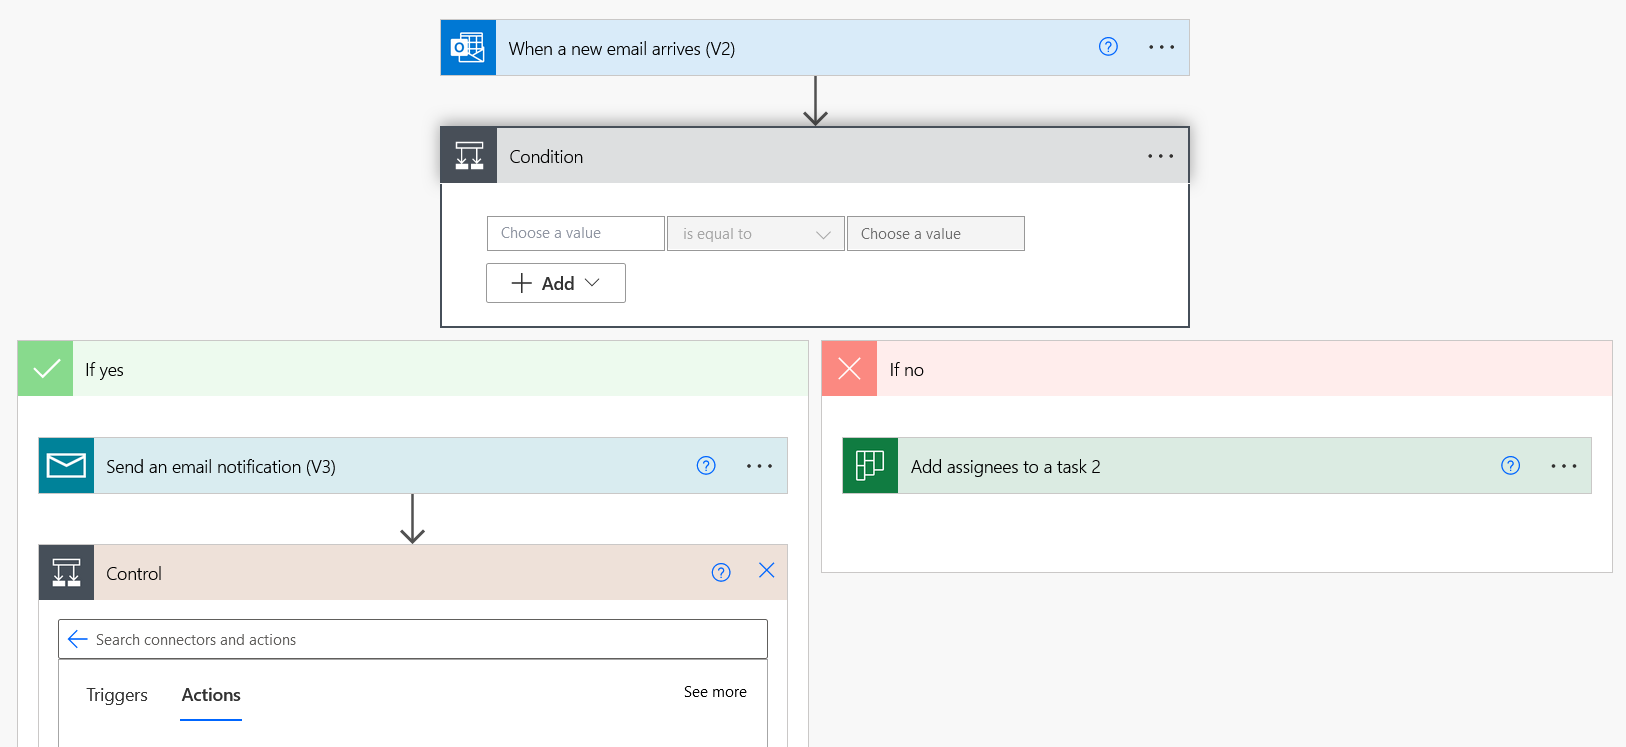
2. Add new steps: Click on “New step” and then “Add a condition”. This allows you to add multiple trigger conditions that must be met after the initial trigger.
3. Set up your condition: Choose the application and specific condition you want to use. For example, you might add a condition for a specific word or phrase in the subject line of an email, or when a new item is added to a SharePoint list.
4. Configure additional actions: If your condition is met, what should happen? Click on “If yes” and add an action. If the condition is not met, what should happen? Click on “If no” and add an action.
5. Save your flow: Once you’ve added all your conditions and actions, click “Save” to save your flow.
Remember that practice makes perfect. With time and experience, you’ll become adept at setting up triggers in Power Automate to automate your tasks effectively.
Always test your flows to ensure they’re working as expected and make any necessary adjustments along the way!

If you’d like to learn more about how Power Automate can aid your workflow, check out this video:
Types of Triggers in Power Automate
In Power Automate, triggers are categorized into different types based on their characteristics and the way they initiate the execution of a flow. Understanding these trigger types can help you build more efficient and effective workflows.
Let’s delve into the three main types of triggers available in Power Automate: Scheduled, Automated, and Instant Triggers.
1. Scheduled Triggers
Scheduled triggers are set to initiate a flow at specific times. You can customize these to run your flows at regular intervals — such as hourly, daily, weekly, or monthly — or at a specific time on a certain day.
This type of trigger is particularly useful for routine tasks or business processes that need to occur at predetermined times and need an infinite trigger loop.
For example, you might set up a scheduled trigger to run every Monday morning to compile and send a report, or run every first day of the month to archive old data in an infinite loop.
2. Automated Triggers
Automated triggers are designed to initiate a flow in response to an event or a change in the system or an application. These triggers continuously monitor for a specific event and, once that event occurs, they trigger the flow.
For instance, an automated trigger could be set to initiate a flow whenever a new file is uploaded to OneDrive, a new row is added to an Excel spreadsheet, or when a new email arrives in a specific Outlook folder.
Automated triggers are great for setting up reactive processes that depend on changes or updates in your applications. For example, you could set up automated trigger conditions protect against unexpected changes to your SharePoint document library.
3. Manual Triggers
Manual triggers or instant triggers are initiated by a manual action. These triggers allow a flow to be started on-demand when a user performs a specific action.
For example, you could create a flow manually to send a formatted email to a designated recipient when it is manually triggered by you. The flow won’t run until you click a button in Power Automate’s mobile app or from the Power Automate website. Instant triggers provide the flexibility to control precisely when you want your flow to run.
Alright, we’ve covered a lot of ground so far. For our final section, we’ll go over best practices for setting trigger conditions in Power Automate.
Best Practices for Setting Trigger Conditions in Power Automate

One of the critical aspects of mastering Power Automate is understanding how to effectively set trigger conditions. These conditions determine when a flow should run, making them a pivotal part of your automation. To maximize your efficiency and avoid common pitfalls, consider these best practices for setting trigger conditions.
1. Be Specific with Triggers
Avoid setting triggers that are too broad or generic, as this can lead to unnecessary flow runs. For instance, if you’re monitoring an email inbox, setting the trigger to ‘When a new email arrives’ might cause the flow to run more often than necessary.
Instead, consider adding conditions to check for specific senders or subject lines to ensure your flow only runs for relevant emails.
2. Use Expressions for Advanced Conditions
Power Automate allows you to use expressions to create more complex conditions. Expressions can perform functions, manipulate strings, and carry out mathematical operations. They are an excellent tool for creating sophisticated and precise trigger conditions.
Ensure you familiarize yourself with the syntax and capabilities of expressions to leverage their power effectively.
3. Optimize Flow Performance with Conditions
Trigger conditions can greatly affect the performance of your flow. Unnecessary flow runs not only consume resources but can also slow down the execution of other tasks. Use conditions to filter out irrelevant trigger events and reduce the load on your flow.
4. Test Your Trigger Conditions Thoroughly
Always test your trigger conditions before deploying the flow. This will help identify any errors or inefficiencies in the conditions.
Power Automate provides options to test your flow with past data or by performing the trigger action manually. Use these options to validate your conditions and ensure they work as expected.

5. Use Comments and Descriptive Names
Good documentation practices are as important in Power Automate as in any other coding or scripting environment. Use descriptive names for your flows and steps to make it easier to understand what they do.
Use comments to explain complex conditions, especially when using expressions. This not only helps others understand your flows but also makes it easier for you to manage and update them.
6. Stay Within Plan Limits
Each Power Automate plan has its own limits, including the number of runs per month and the frequency of checks for certain triggers. Be aware of these limits when designing your flows and setting your trigger conditions to avoid exceeding them.
Setting trigger conditions is a delicate balance between specificity and flexibility. By following these best practices, you can create efficient, effective, and reliable flows that will automate your tasks and improve your productivity.
Final Thoughts

Power Automate, when used effectively, can automate repetitive tasks, streamline complex workflows, and unlock efficiencies within your organization. Mastering trigger conditions is a fundamental part of this process, allowing you to create intelligent, responsive flows that adapt to your unique needs.
While Power Automate offers a vast array of pre-built connectors and intuitive design tools, the real power of the platform lies in its flexibility. By understanding and effectively utilizing trigger conditions, you can tailor your automation to a granular level, allowing your flows to react to specific circumstances and deliver highly customized results.
It might take some time and experimentation to fully grasp the intricacies of triggers and conditions, but the rewards in terms of time saved and efficiency gained are significant. Embrace the power of automation, and let it drive your productivity to new heights!
Frequently Asked Questions

How do you write trigger conditions in Power Automate?
In Power Automate, you write a trigger condition by first selecting a trigger for your flow, then defining the condition under the settings of the trigger. This condition is written in the Workflow Definition Language, where you specify a property of the trigger to check, a comparison operator, and the value to compare it to.
For example, you could add a condition to the ‘When a new email arrives’ trigger to only activate when the email is from a specific sender. This would be written as:
@equals(triggerOutputs()?['body/from'], 'example@example.com')triggerOutputs()?[‘body/from’] is the property (the email sender), @equals is the comparison operator, and example@example.com is the value. To learn more, try following power automate tutorials.
How do you add trigger conditions to a flow?
In Power Automate, to add a trigger condition to a flow, you start by creating or editing a flow and selecting a trigger. After that, you go to the settings of the selected trigger and configure trigger conditions in the “Trigger Conditions” field.
In this field, you write an expression in the Workflow Definition Language that defines your condition. This expression typically checks a property of the trigger output using a comparison operator and a comparison value.
Once you’ve written your condition, save the settings and the flow. Now, the flow will only run when the trigger event occurs and the condition is met.
How do you test trigger conditions in Power Automate?
In Power Automate, testing a trigger condition involves using the “Test” function built into the platform. After you’ve created your flow and defined your trigger condition, save the flow, and then click on the “Test” button in the top right corner of the flow editor.
You’ll be given the option to manually perform the trigger action or use data from previous runs. If you choose to manually perform the trigger action, the flow will run when you carry out the action that triggers it, allowing you to test whether the trigger condition is working as expected.
If you choose to use data from previous runs, the flow will run using the data and conditions from a past instance, which can be useful for testing without needing to manually trigger the flow.