Adding bullet points to your Excel spreadsheet can greatly enhance its readability and help organize your data effectively.
While Excel might not seem like the obvious choice for creating bulleted lists, it does indeed have this capability.
You can easily add bullet points in Excel using keyboard shortcuts, the symbol menu, and even copying and pasting from other programs such as Microsoft Word. Each method has its advantages, depending on your specific needs.
In this article, we will run you through the six best and quickest methods for adding bullet points to Excel.
Let’s dive in!
Understanding Bullets and Lists in Excel

Bullet points are typically associated with word processors like Microsoft Word. However, in Excel, they take on a unique significance.
Despite being a tool primarily designed for numerical data and mathematical calculations, Excel also caters to qualitative data. And that’s where bullet points come in.
Excel’s primary strength lies in its ability to organize vast amounts of data, whether that be numbers, dates, or text.
But, organizing doesn’t just mean placing data in rows and columns. It also means making that data easily digestible and clear to anyone who might be reading or using the spreadsheet.
Let’s dive in by exploring the 6 methods for adding bullet points in Excel that this tutorial covers.
1. Copy-Pasting Bullet Points
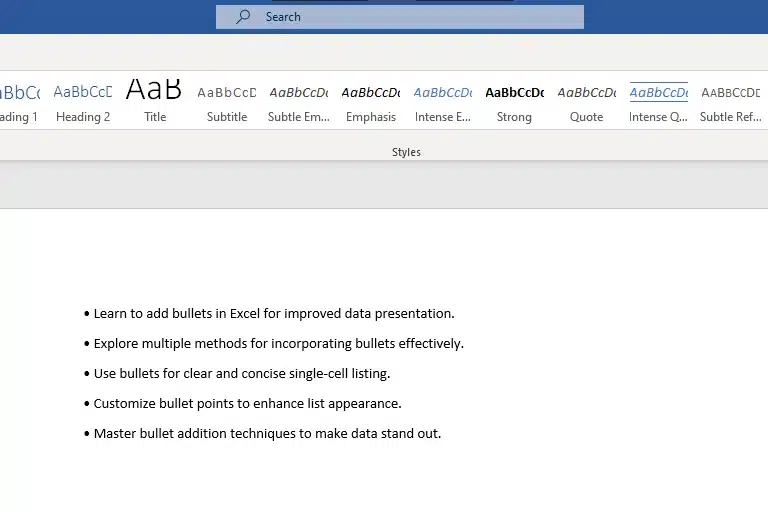
When working with Excel, you might want to include bullet points to make your content more organized and easier to read.
One of the simplest methods to add bullet points in Excel is by copy-pasting them from another Source like Microsoft Word or PowerPoint.
To copy-paste bullets into Excel, you can do the following:
First, create or find the bulleted list you want to copy from MS Word or PowerPoint. Select the text with the bullet points and press Ctrl+C to copy the bullet points.
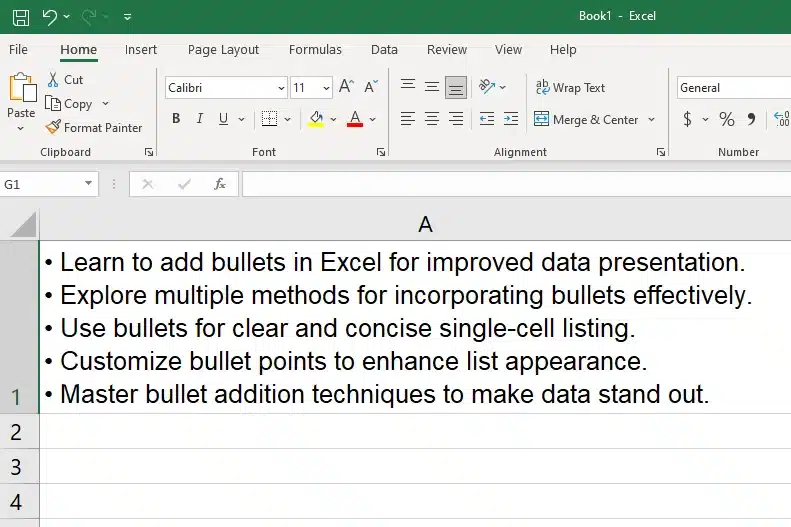
Next, open your Excel workbook and double-click on the cell where you’d like your bullet points to appear. Press Ctrl+V to paste the copied content. Excel will automatically paste the bulleted list into the selected cell, maintaining the original formatting where each bullet point is on a new line.
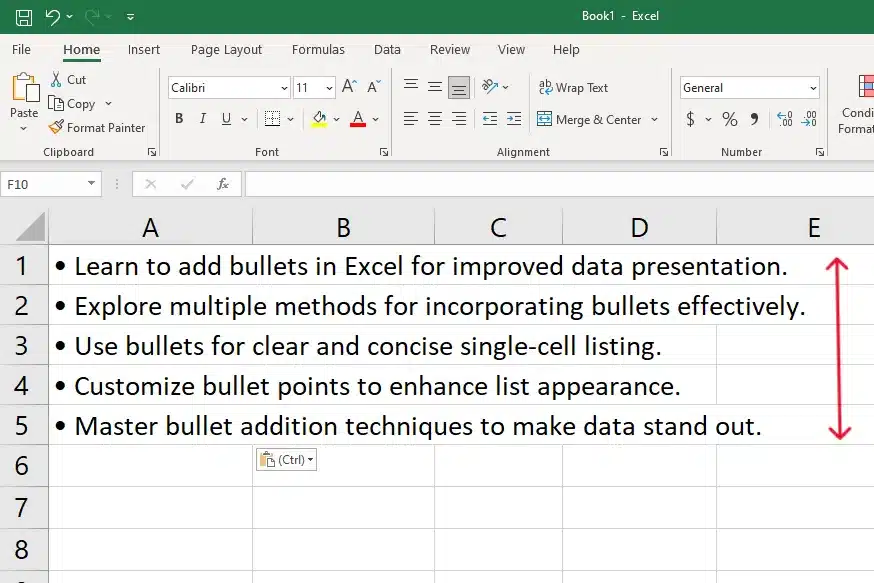
If you want to copy the bullet points from another destination into multiple cells within Excel.
To do this, copy the bullet points.
Then, click on the destination cell once, and paste. This will paste the bullet points, along with any other text from the source content, into their cells.
Remember, while copying and pasting bullet points between different programs or within Excel is simple, be aware that the formatting might vary depending on the source and destination applications.
Now let’s check out the Symbol Menu.
2. Add Bullet Points in Excel Using the Symbol Menu
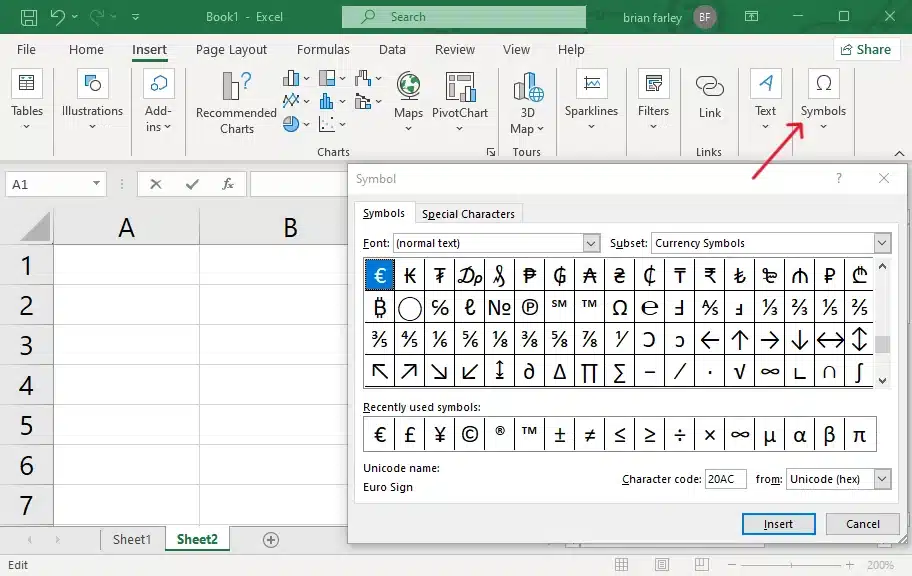
Adding bullet points in Excel can also be done through the Symbol menu.
We’ll walk you through the process of accessing the Symbol menu and using it to insert bullet points in your Excel spreadsheet:
Open your Excel workbook and navigate to the cell in which you want to insert a bullet point. Click on the Insert tab at the top of your screen, which will reveal a series of tools and options for you to use in your workbook.
Look for the Symbols group within the Insert tab, where you’ll find the Symbol button. Clicking this button will open the Symbol menu, a powerful tool that contains a vast array of symbols and special characters that you can insert into your spreadsheet.
In the Symbol menu, you have the option to select different fonts, navigate through the available symbols, and preview the ones you’re interested in. You can either scroll down the list to find the appropriate symbol or type the character code “2022” in the Character code box.
When you’ve found the bullet option you want, click the Insert button to add it to your selected cell.
Remember, if you need to add more bullet points under the original one, simply press ALT+Enter on your keyboard to create a new line within the cell, then repeat the above steps.
Enjoying these Excel insights?
Take a look at this great article on inserting degree symbols to explore the subject further.
Let’s continue onto the next section, where we examine how to easily insert bullets using character codes.
3. Using Character Codes to Insert Bullet Points
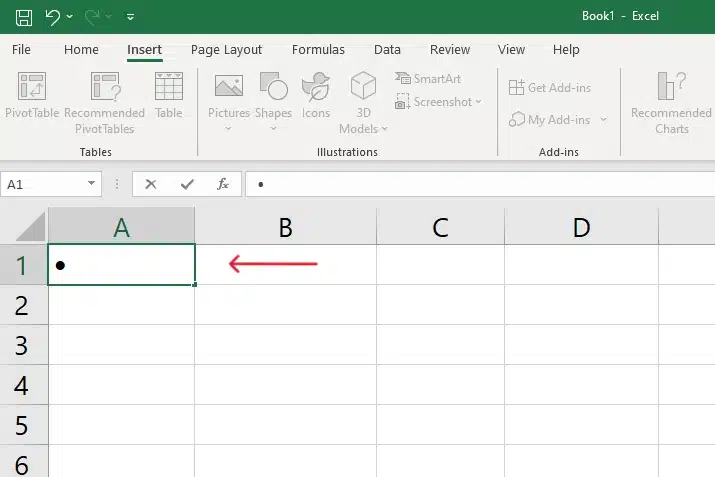
In Excel, you can also very easily insert bullet points by using the character code method. This involves using the keyboard shortcut “Alt” plus a specific numeric code.
In this case, that code is 7. So, to create a bullet point, simply press Alt+7 on your keyboard’s numpad.
Here’s a quick summary of the steps:
Click on the cell where you want to insert the bullet point
Enter “Edit Mode” by double-clicking the cell or pressing F2
Hold the Press Alt key
Type 7 on your numeric keypad
Release the Alt ke
y
It’s important to note that this method works with most common fonts, such as Arial, Calibri, or Times New Roman.
If you’re using a different font and the bullet point does not appear, you may need to use a font that supports it, like Wingdings.
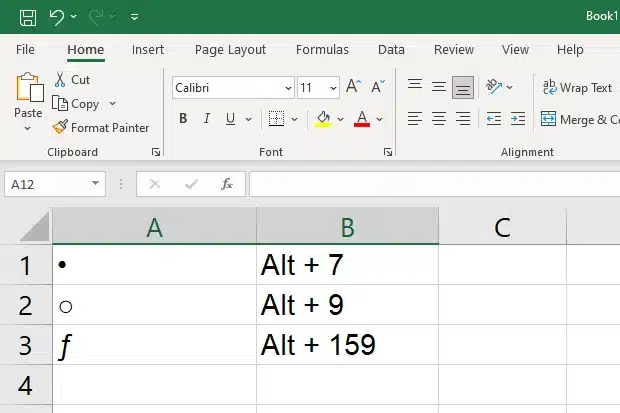
Here’s a quick reference for using keyboard shortcuts + the numeric keypad in Excel to insert bullet points:
Standard bullet: Alt + 7
Hollow bullet: Alt + 9
Alternative bullet (Wingdings): 159
The character code method for adding bullets is a quick and convenient approach especially when you only require basic functionality. I
Also, if you don’t have a numeric keypad on your keyboard, you can still insert a bullet point by using one of the methods we’ve covered for creating bullet points in Excel.
Eager to harness the power of Excel functions? Let’s delve into how we can employ them to insert bullet points in our spreadsheets up next!
4. Utilizing Excel Functions to Insert Bullet Points
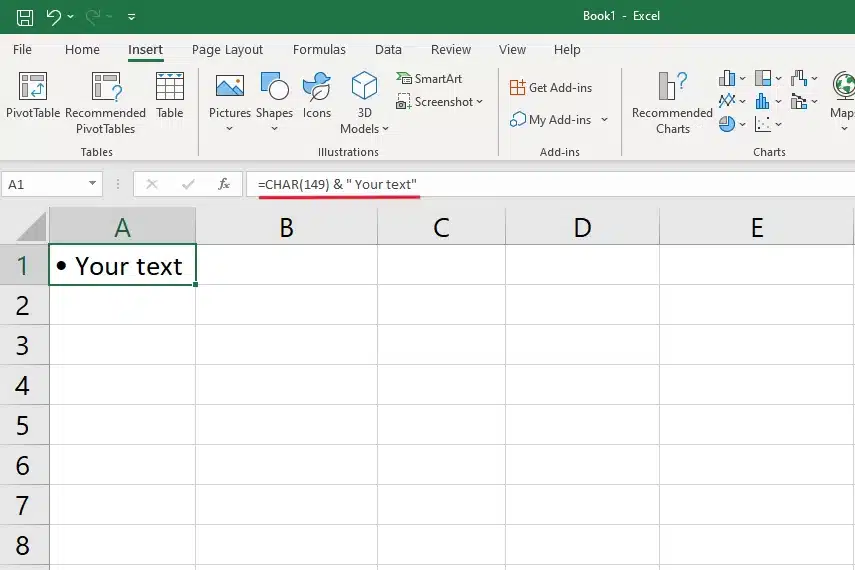
To insert bullets in Excel, you can utilize some functions and formatting features available within the software.
One common method is using the CHAR function to add bullet points as a part of cell content.
Here’s an example formula:
=CHAR(149) & " Your text"This formula utilizes the numeric code 149, which corresponds to the bullet point symbol in the ANSI character set.
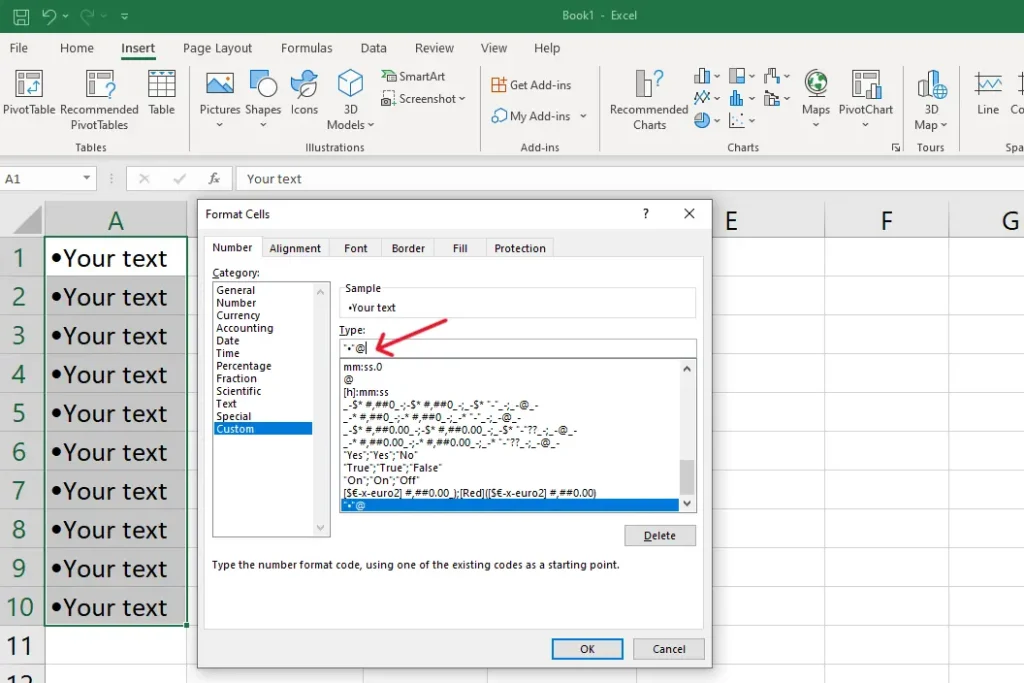
Another approach is to apply custom number formatting for the cells that require bullet points.
Follow the below step-by-step:
- First, select the cells and right-click to open the context menu.
- Choose ‘Format Cells’ and switch to the ‘Number’ tab.
- Select ‘Custom’ from the ‘Category’ list.
- Then, in the ‘Type’ field, enter this formatting code: “•”@ Click ‘OK’ to apply the bullet-point format to your selected cells for multiple.
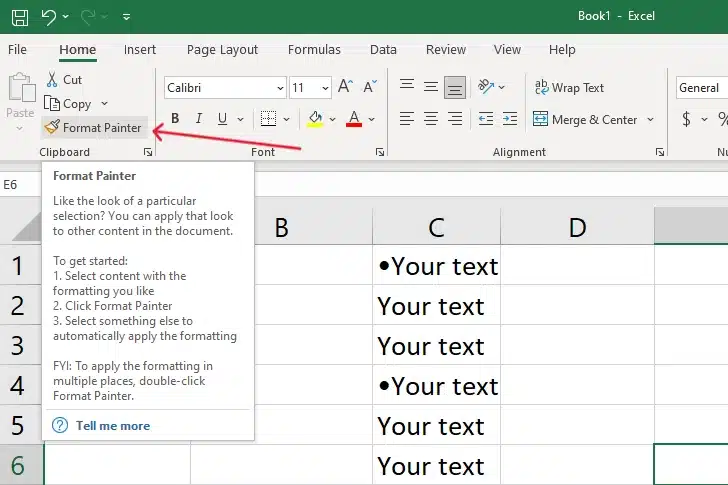
Format Painter can come in handy when you want to replicate the bullet formatting from one cell to multiple cells.
Click on the cell with the desired bullet format, find the Format Painter button on the ‘Home’ tab, and click it.
Your cursor will change to a paintbrush, allowing you to click on another cell to apply the same formatting.
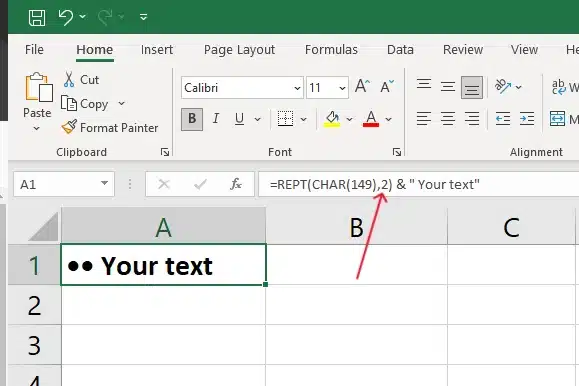
If you need to apply the same bullet formatting to a range of cells, Excel functions such as REPT (repeat) can be used alongside the CHAR function for bullet points. For example:
=REPT(CHAR(149),1) & " Your text"This formula repeats the bullet point character based on the number specified in the REPT function. Adjust this value according to your requirements.
Also, check out this article about using formula bots to speed up your workflow!
Next up we’re gonna take a look at creating bulleted lists using special fonts in Excel.
5. Creating Bulleted Lists Using Special Fonts
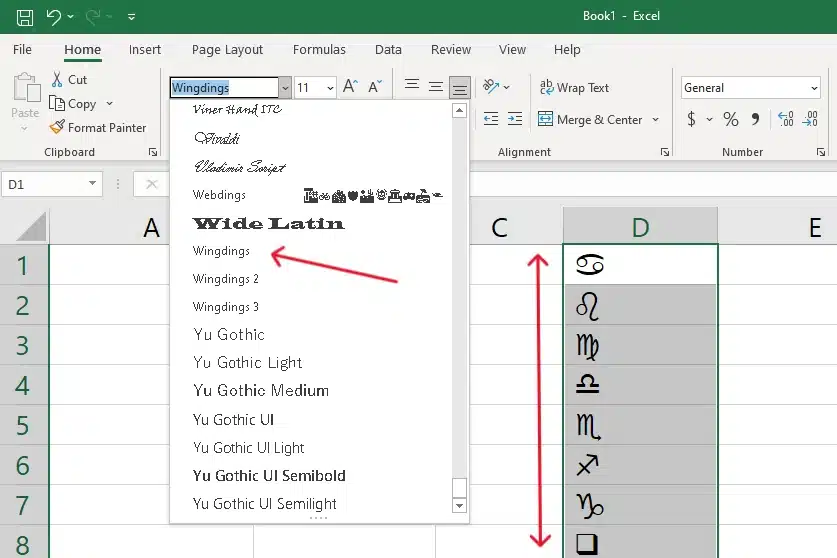
Using special fonts in Excel can help you create visually appealing and easy-to-read bulleted lists.
In this section, we’ll focus on using Wingdings and Webdings, which are readily available in Excel, to create creative bullet points.
To start, you need to change the font of the cells you wish to add bullet points to.
Here’s how to change the font of the cells:
Select the cell(s) where you want to add the bullet points.
On the toolbar, navigate to the “Home” tab.
In the “Font” group, click on the drop-down arrow next to the font name.
Scroll down and choose either “Wingdings” or “Webdings”.
Now that the desired font is selected, you can create bullet points using specific characters in these fonts.
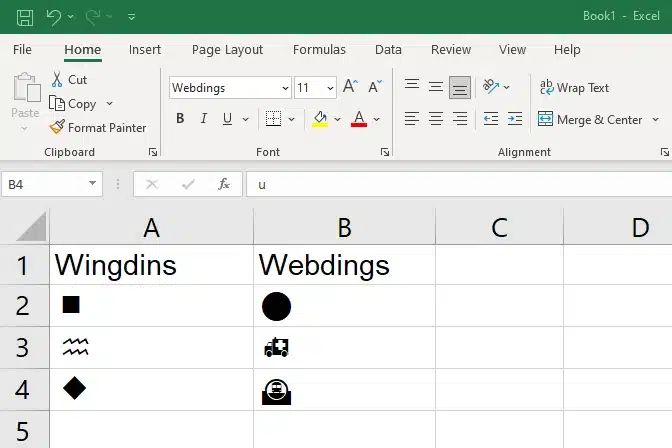
For example, if you have chosen the Wingdings font, you can use the following keyboard shortcuts to create different bullet points:
Filled circle (n): Press “n” on your keyboard and the cell will display a filled square.
Empty circle (h): Press “h” on your keyboard to a zig-zag symbol.
Square (u): Type “u” to create a diamond symbol.
For Webdings, you can use the following keys to create different bullet points:
Filled circle (n): Press “n” on your keyboard and the cell will display a filled circle.
Empty circle (h): Press “h” on your keyboard to get an ambulance symbol.
Square (u): Type “u” to create a train in a tunnel symbol.
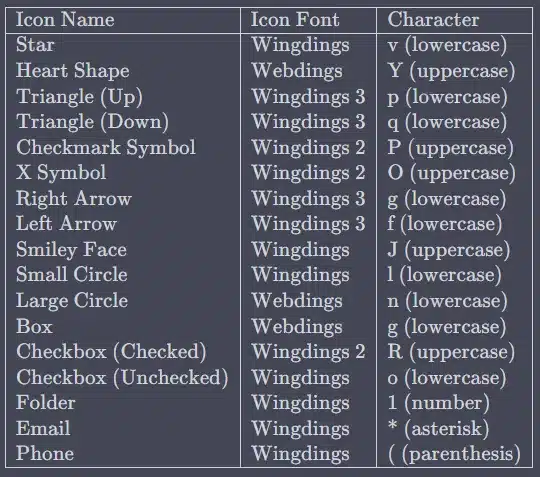
Feel free to explore other characters in these special fonts to find the perfect bullet points for your needs.
Remember that you can easily adjust the font size of your selected cells using the font size drop-down menu in the toolbar on the “Home” tab, making your bullets as prominent or subtle as you wish.
When you are finished adding bullet points, you might want to switch back to a regular font like Arial or Calibri for entering your list text.
To do so, simply repeat the steps above, but select the appropriate font instead.
If you’re aiming to create visually captivating presentations continue reading as we explore using SmartArt to create fancy bullet points that breathe life into your content.
Yes, we are getting a little fancy here!
6. Using SmartArt for Bullet Points
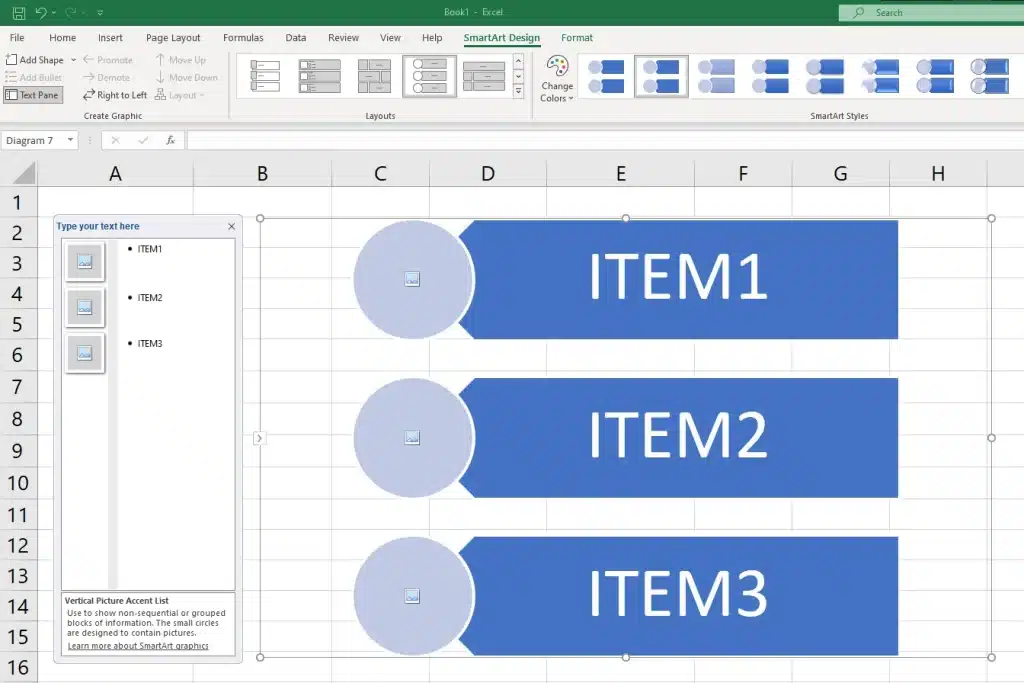
To create an engaging and visually appealing way to display bullet points in Excel, you can use SmartArt.
This versatile feature provides you with a variety of graphic options that can help transform plain text into more attractive and organized visuals.
How to use SmartArt for bullet points in Excel:
First, you should go to the Insert tab in Excel and click on SmartArt within the Illustrations group. A dialogue box will appear, where you can choose the type and layout that best suits your needs.
After selecting the desired SmartArt graphic, enter your text by clicking on [Text] in the Text pane, and then typing or pasting your text.
To enhance the appearance of your SmartArt bullet points, you can also change the color scheme. Select your SmartArt graphic, and then click on the Change Colors option located within the SmartArt Tools Design tab.
The SmartArt will adapt your content to the chosen layout. As you add or remove bullet points, the SmartArt graphic will adjust itself to accommodate the changes.
Using SmartArt for bullet points in Excel is an effective way to display information in a visually appealing and organized manner.
So go ahead and experiment with different types of SmartArt graphics to find the one that best suits your needs and enhances your Excel sheets.
Now that you’re feeling more comfortable with adding bullets in Excel, let’s explore some essential troubleshooting tips.
Tips For Adding Bullet Points in Excel

When adding bullet points in Excel, it’s essential to have a clear understanding of the various methods and tools available.
By following these tips, you can quickly create a well-organized list in your worksheet.
Adjust Alignment Bullet Points In Excel
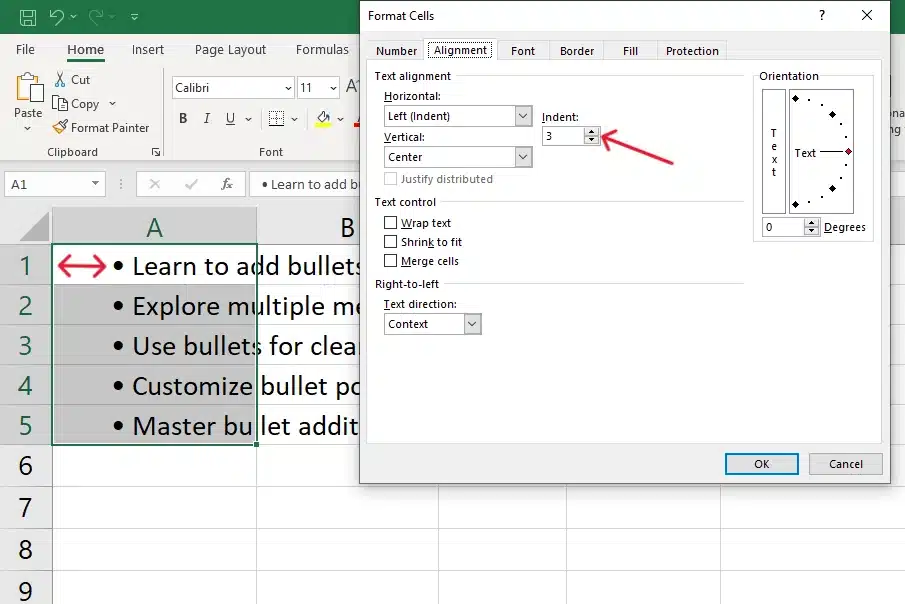
When working with a range of cells, you may need to adjust the alignment of your bullet points.
How to Adjust Bullet Point Alignment:
Select the range, then press Ctrl + 1 to open the Format Cells dialog box.
Under the Alignment tab, adjust the horizontal and vertical settings as needed.
Custom Number Formatting
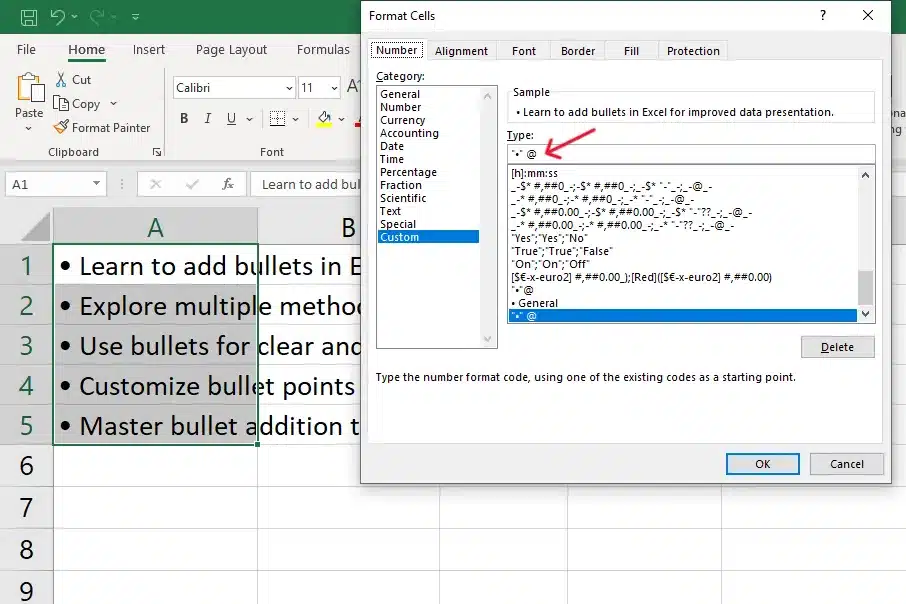
If you have a worksheet with a lot of data and you want to add bullet points only to specific cells, you can use the Custom Numbering Format.
How to use the Custom Numbering Format:
First, select the cells where you want to add bullet points, then access the Format Cells dialog box by pressing Ctrl + 1.
Under the Number tab, in the Category list, choose Custom and type the following expression in the Type box: “•” @. This will apply bullet points to the specific cells you have selected.
Notes Or Annotations Using Bullet Points
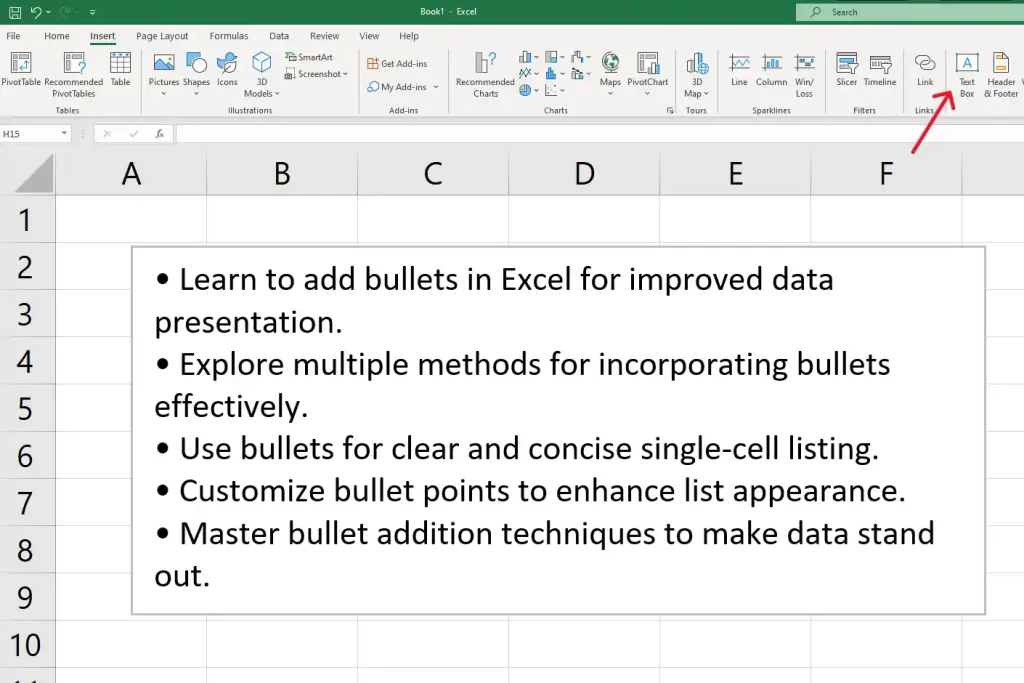
For adding notes or annotations using bullet points, consider using an Excel Text Box.
How to add bullets to Excel Textbox.
Go to the Insert tab, click on Text Box, and draw it in your desired location.
You can then type or paste your bulleted list in the text box and have more control over the formatting.
Harnessing Excel’s full potential goes beyond numbers; it’s about presenting data with clarity.
As we conclude, remember that even simple tools like bullet points can elevate your spreadsheet’s effectiveness.
For more great tips and tricks for beginners take a look at this Excel cheat sheet brought to you by your partners in Data Mastery, EnterpriseDNA.
Final Thoughts

With this comprehensive step-by-step guide, we’ve covered the essential methods, such as adding bullets within a single cell.
Remember, there’s no one-size-fits-all solution when it comes to adding bullet points in an Excel worksheet, and you may need to experiment with different methods to achieve the desired result.
Stay confident, and keep these tips in mind to navigate your way through the Excel learning process.
Are you interested in AI and Data analysis? Checkout this Insightful Enterprise DNA video: Unleashing The Power Of OpenAI’s Code Interpreter For Data Analysis
Frequently Asked Questions
Can you add bullet points in Excel?
Yes, you can add bullet points in Excel using various methods such as the “Insert Symbol” dialog box, formula bar, or by copying from Microsoft Word.
How do I insert a single bullet point in a cell?
To insert a single bullet point in a cell, you can use the Symbol dialog box. Navigate to the “Insert” tab, click on “Symbol”, and choose the bullet symbol you prefer. Alternatively, you can use a shortcut on the numeric keypad.
How can I add multiple bullet points in the same cell?
To add multiple bullet points in the same cell, you’ll need to enter edit mode by double-clicking on the cell or pressing F2. Then, you can use the press Alt key + Enter shortcut to create a new line within the cell and insert a bullet symbol using the numeric keypad or the Symbol dialog box.
How do I create bullet point lists across separate cells?
To create bullet point lists across separate cells, you can insert bullet symbols individually in each cell or use custom number formatting to automate the process.
Is it possible to insert multiple bullet points in adjacent cells all at once?
Yes, you can insert multiple bullet points in adjacent cells all at once. First, insert a bullet point in one cell, then copy that cell and paste it into other cells. Alternatively, you can use custom number formatting for all the cells you want to format.
How do I customize the bullet style?
Customizing the bullet style can be done through the “Format Cells” dialogue box under custom number formatting. You can define your own bullet type and custom format to create a unique bullet style.
Can I import bullet points from Microsoft Word?
Yes, you can copy bullet point lists from Microsoft Word and paste them into Excel. This can be a quick way to transfer bullet points, especially for lengthy lists.
Are there shortcut keys for adding bullets quickly?
While Excel doesn’t have a direct shortcut like MS Word, you can use a combination of shortcuts like “Alt + N” to open the Symbol dialog box, and then choose the bullet character. Alternatively, setting up a custom number format with bullet points will allow for quicker insertion in the future.
How do I maintain a bullet point style across different cells?
By utilizing custom number formatting, you can maintain a consistent bullet point style across different cells. This formatting can be applied to individual or multiple cells at once.
What are some other methods to easily add bullet points in Excel?
Other methods to easily add bullet points include using the CHAR function, a text box for a bullet list, or using the formula bar to input bullet characters. Each of these methods offers different advantages depending on your specific needs.


