
In the world of Microsoft Excel, where numbers, data, and formulas reign supreme, there’s a handy feature known as Named Ranges.
This feature can be your secret weapon for making your Excel tables smarter and more manageable.
Let me explain.

A named range in Excel is a convenient and efficient way to reference a specific range of cells in your spreadsheet. Instead of constantly entering cell references like A1, you can assign a descriptive name to a specific group of cells, such as “SalesData,” which makes your formulas easier to read, write, and maintain.
In this article, we’ll dive into the world of named ranges, exploring what they are, why they matter, how to create and manage them.
Also, we’ll detail why they’re indispensable in the realm of data management and analysis in Excel.
Whether you’re a seasoned Excel user or just starting your journey with spreadsheets, understanding named ranges is a valuable skill that will enhance your Excel experience.
Let’s get started!

What is a Named Range?
A named range in Excel is a group of cells to which you assign a name, allowing for easier referencing and use in formulas and other Excel operations.
By naming a range of cells within a worksheet, you help establish a clear relationship between these cells. This makes your data more organized, understandable, and easy to manipulate.

Named Range Rules

Before diving into the practical aspects of working with named ranges, it’s important to understand some key rules:
- Names must start with a letter or underscore.
- Names cannot contain spaces, special characters, or cell references (e.g., A1, B2).
- They are not case-sensitive, so “SalesData” and “salesdata” are considered the same.
- Names can either apply throughout the entire workbook or be specific to individual worksheets.
- Names can be up to 255 characters long, though shorter, descriptive names are recommended for clarity.
- You cannot use reserved words or duplicate names for the same group of cells.
- Named ranges cannot overlap with cell addresses. Each cell in your Excel worksheet should belong to only one named range or be directly referred to by its cell address, not both.
Understanding these rules will help you create and manage named ranges effectively in Excel.
Benefits of Using Named Ranges in Excel

Named ranges in Excel offer several advantages that can simplify your work:
- Error Reduction: They help you avoid errors by reducing the chances of mis-selecting cells when creating formulas.
- Efficiency: They expedite navigation and data manipulation, saving you time and effort.
- Flexibility: You can easily adapt them to changing data without the need to update multiple formulas.
- Improved readability: They make it easier for you and others to understand the logic behind formulas and data references, which is particularly useful when sharing files.
- Dynamic Charts: They make it effortless to create charts and graphs that automatically adjust to new data.
- Interactive Dashboards: They are key to creating interactive dashboards that provide a user-friendly way to explore data.
- Data Organization: Group related cells under a single name to enhance the organization and structure of your spreadsheets.
- Easy access: Excel for Microsoft 365 and Excel 2019 both support named ranges, making this feature widely accessible to users.
- Large datasets: They can be especially helpful when working with large datasets and are easily applicable to various tasks, such as data validation, hyperlinks, and dynamic ranges.
Named ranges enhance the organization and accuracy of your Excel work while making your tasks more efficient and less error-prone.
How to Create Named Ranges
Creating named ranges in Excel is a straightforward process and there are 4 main methods you can use:
- Using the Name Box Option
- Using the Define Name Option
- Using the Creating from Selection Option
- Using the Name Manager
. Here’s a step-by-step guide for each method.
Method 1: Using the Name Box
To create a named range using the Name Box:
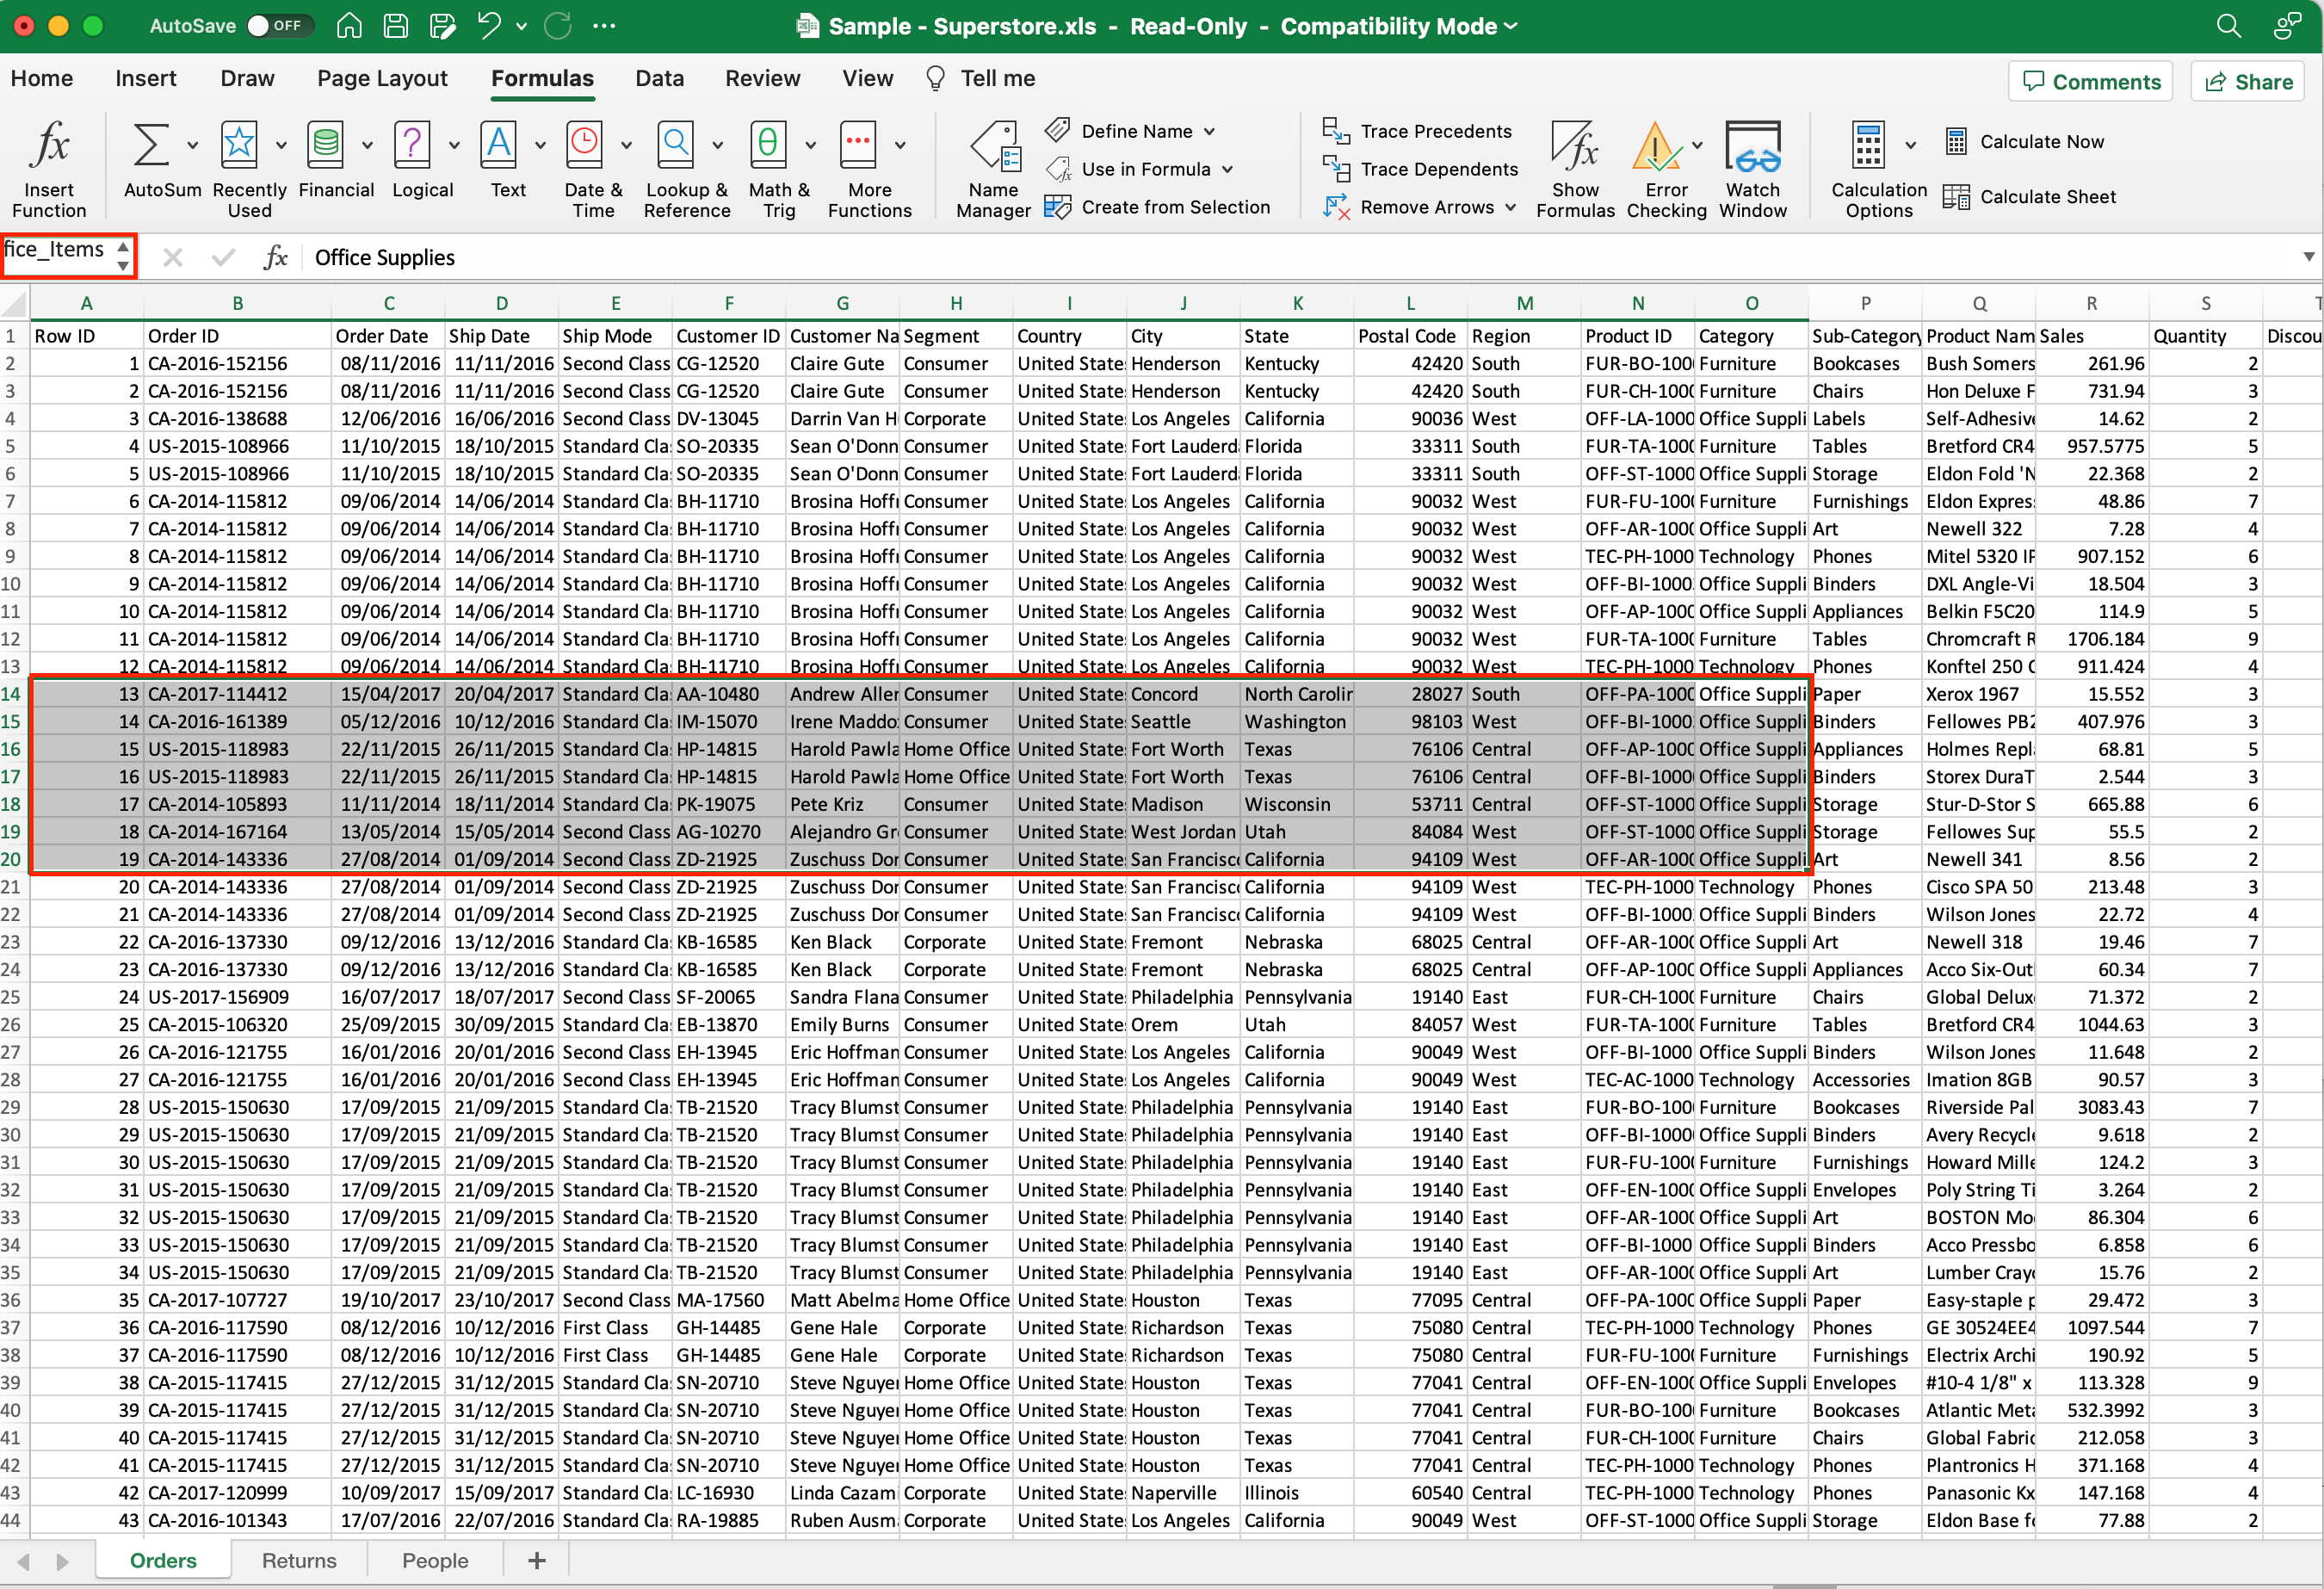
- Select the range of cells for which you want to create a name (excluding headers).
- Go to the Name Box located to the left of the Formula bar.
- Type the name you want to assign to the selected range.
- Press Enter to save the name.
Method 2: Using the Define Name Option
To create a named range in Excel using the Define Name option:
- Select the range of cells for which you want to create a name.
- Click on the Formulas tab in the ribbon.
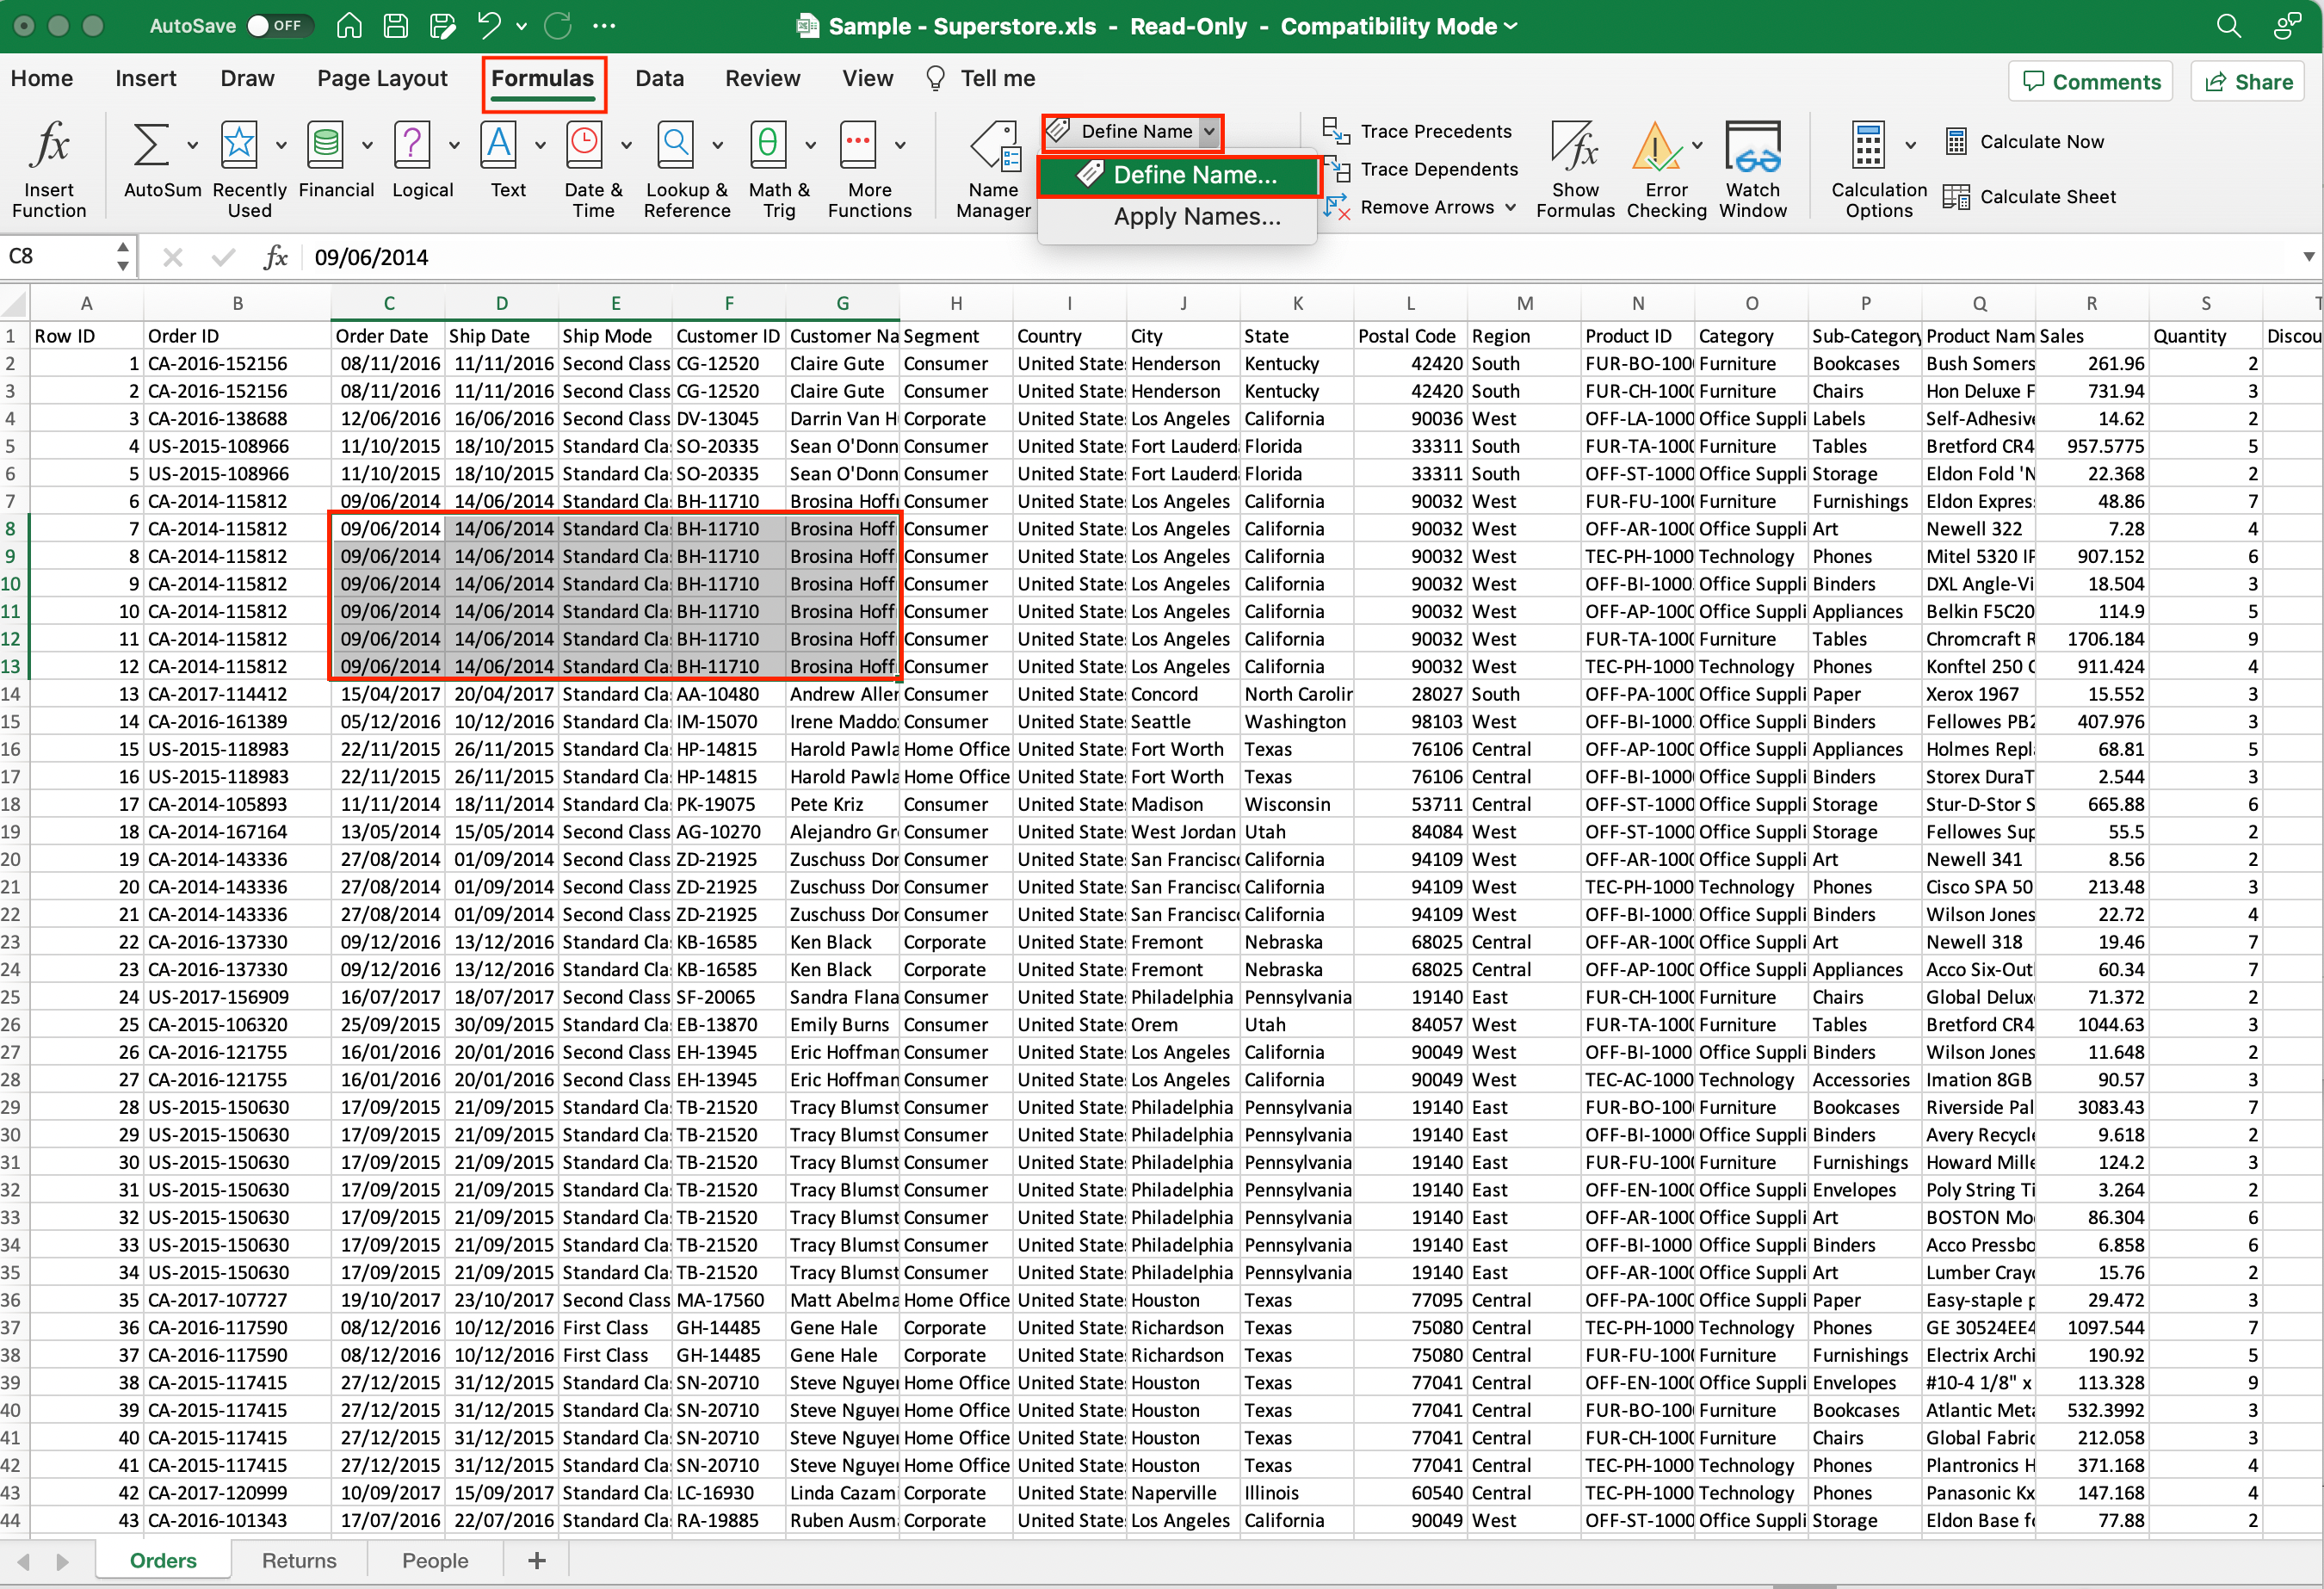
- Select Define Name from the Defined Names group.
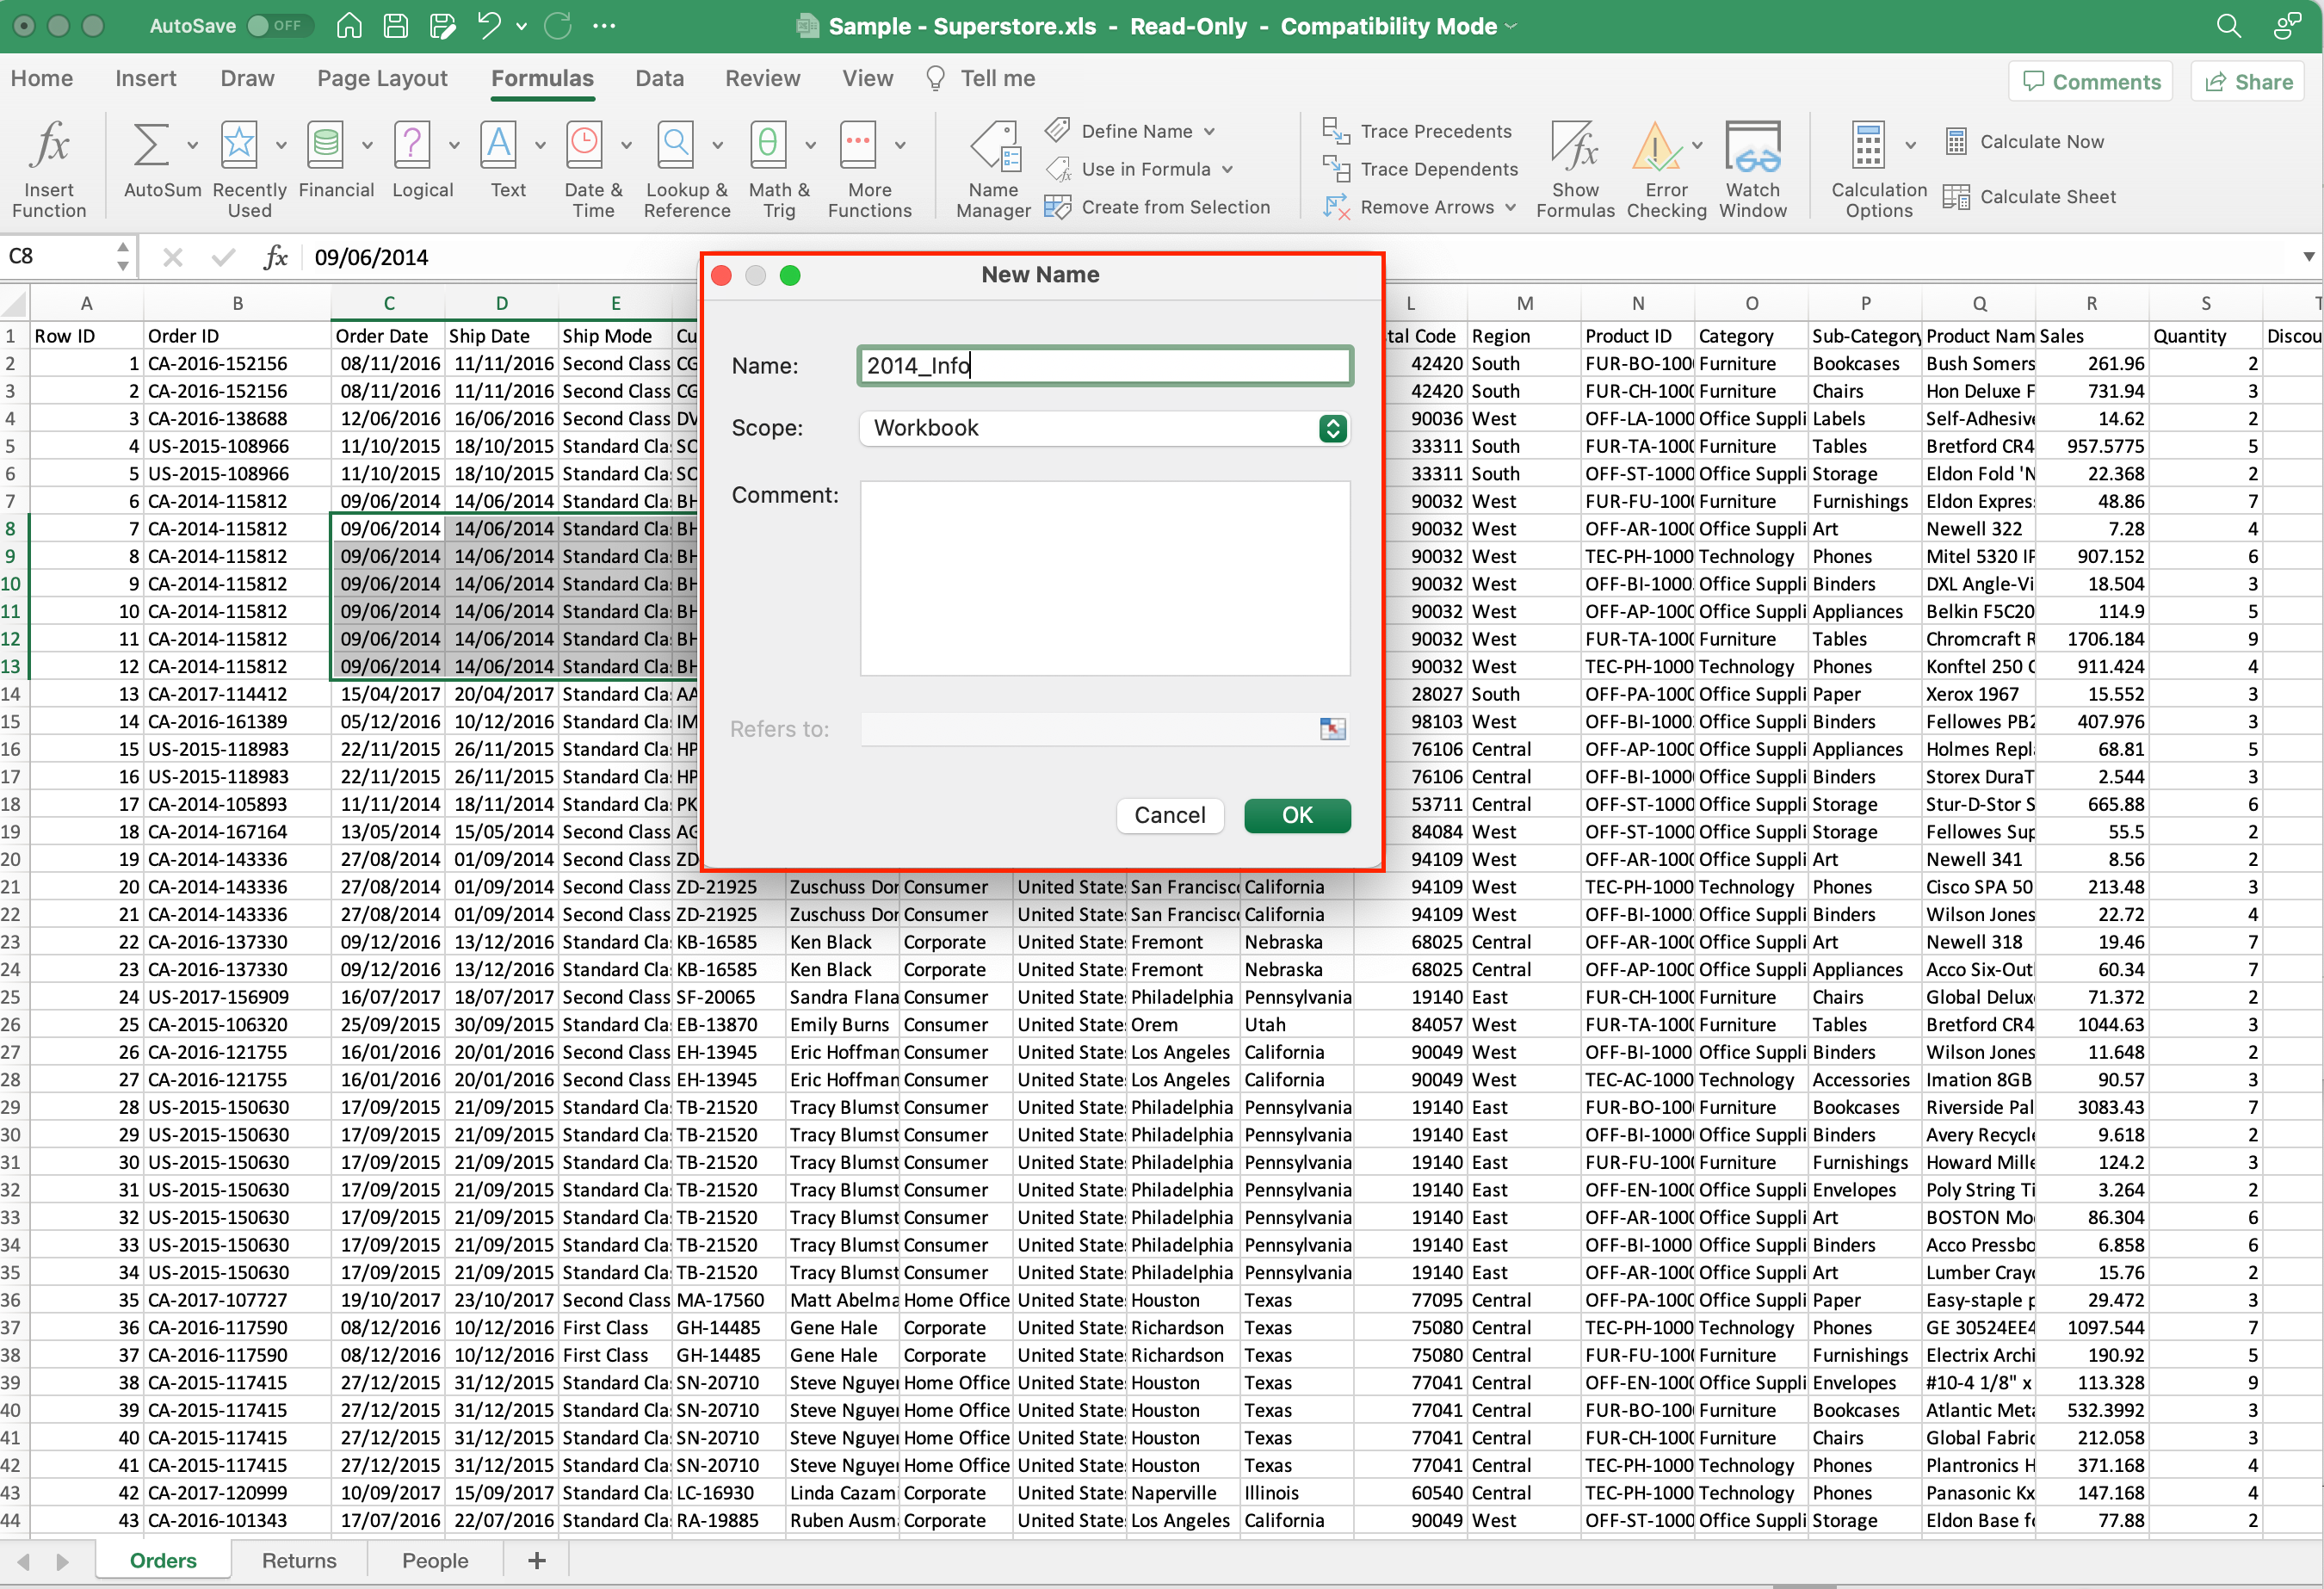
- Enter a name for the selected range in the dialog box that appears.
- Click OK to save the name.
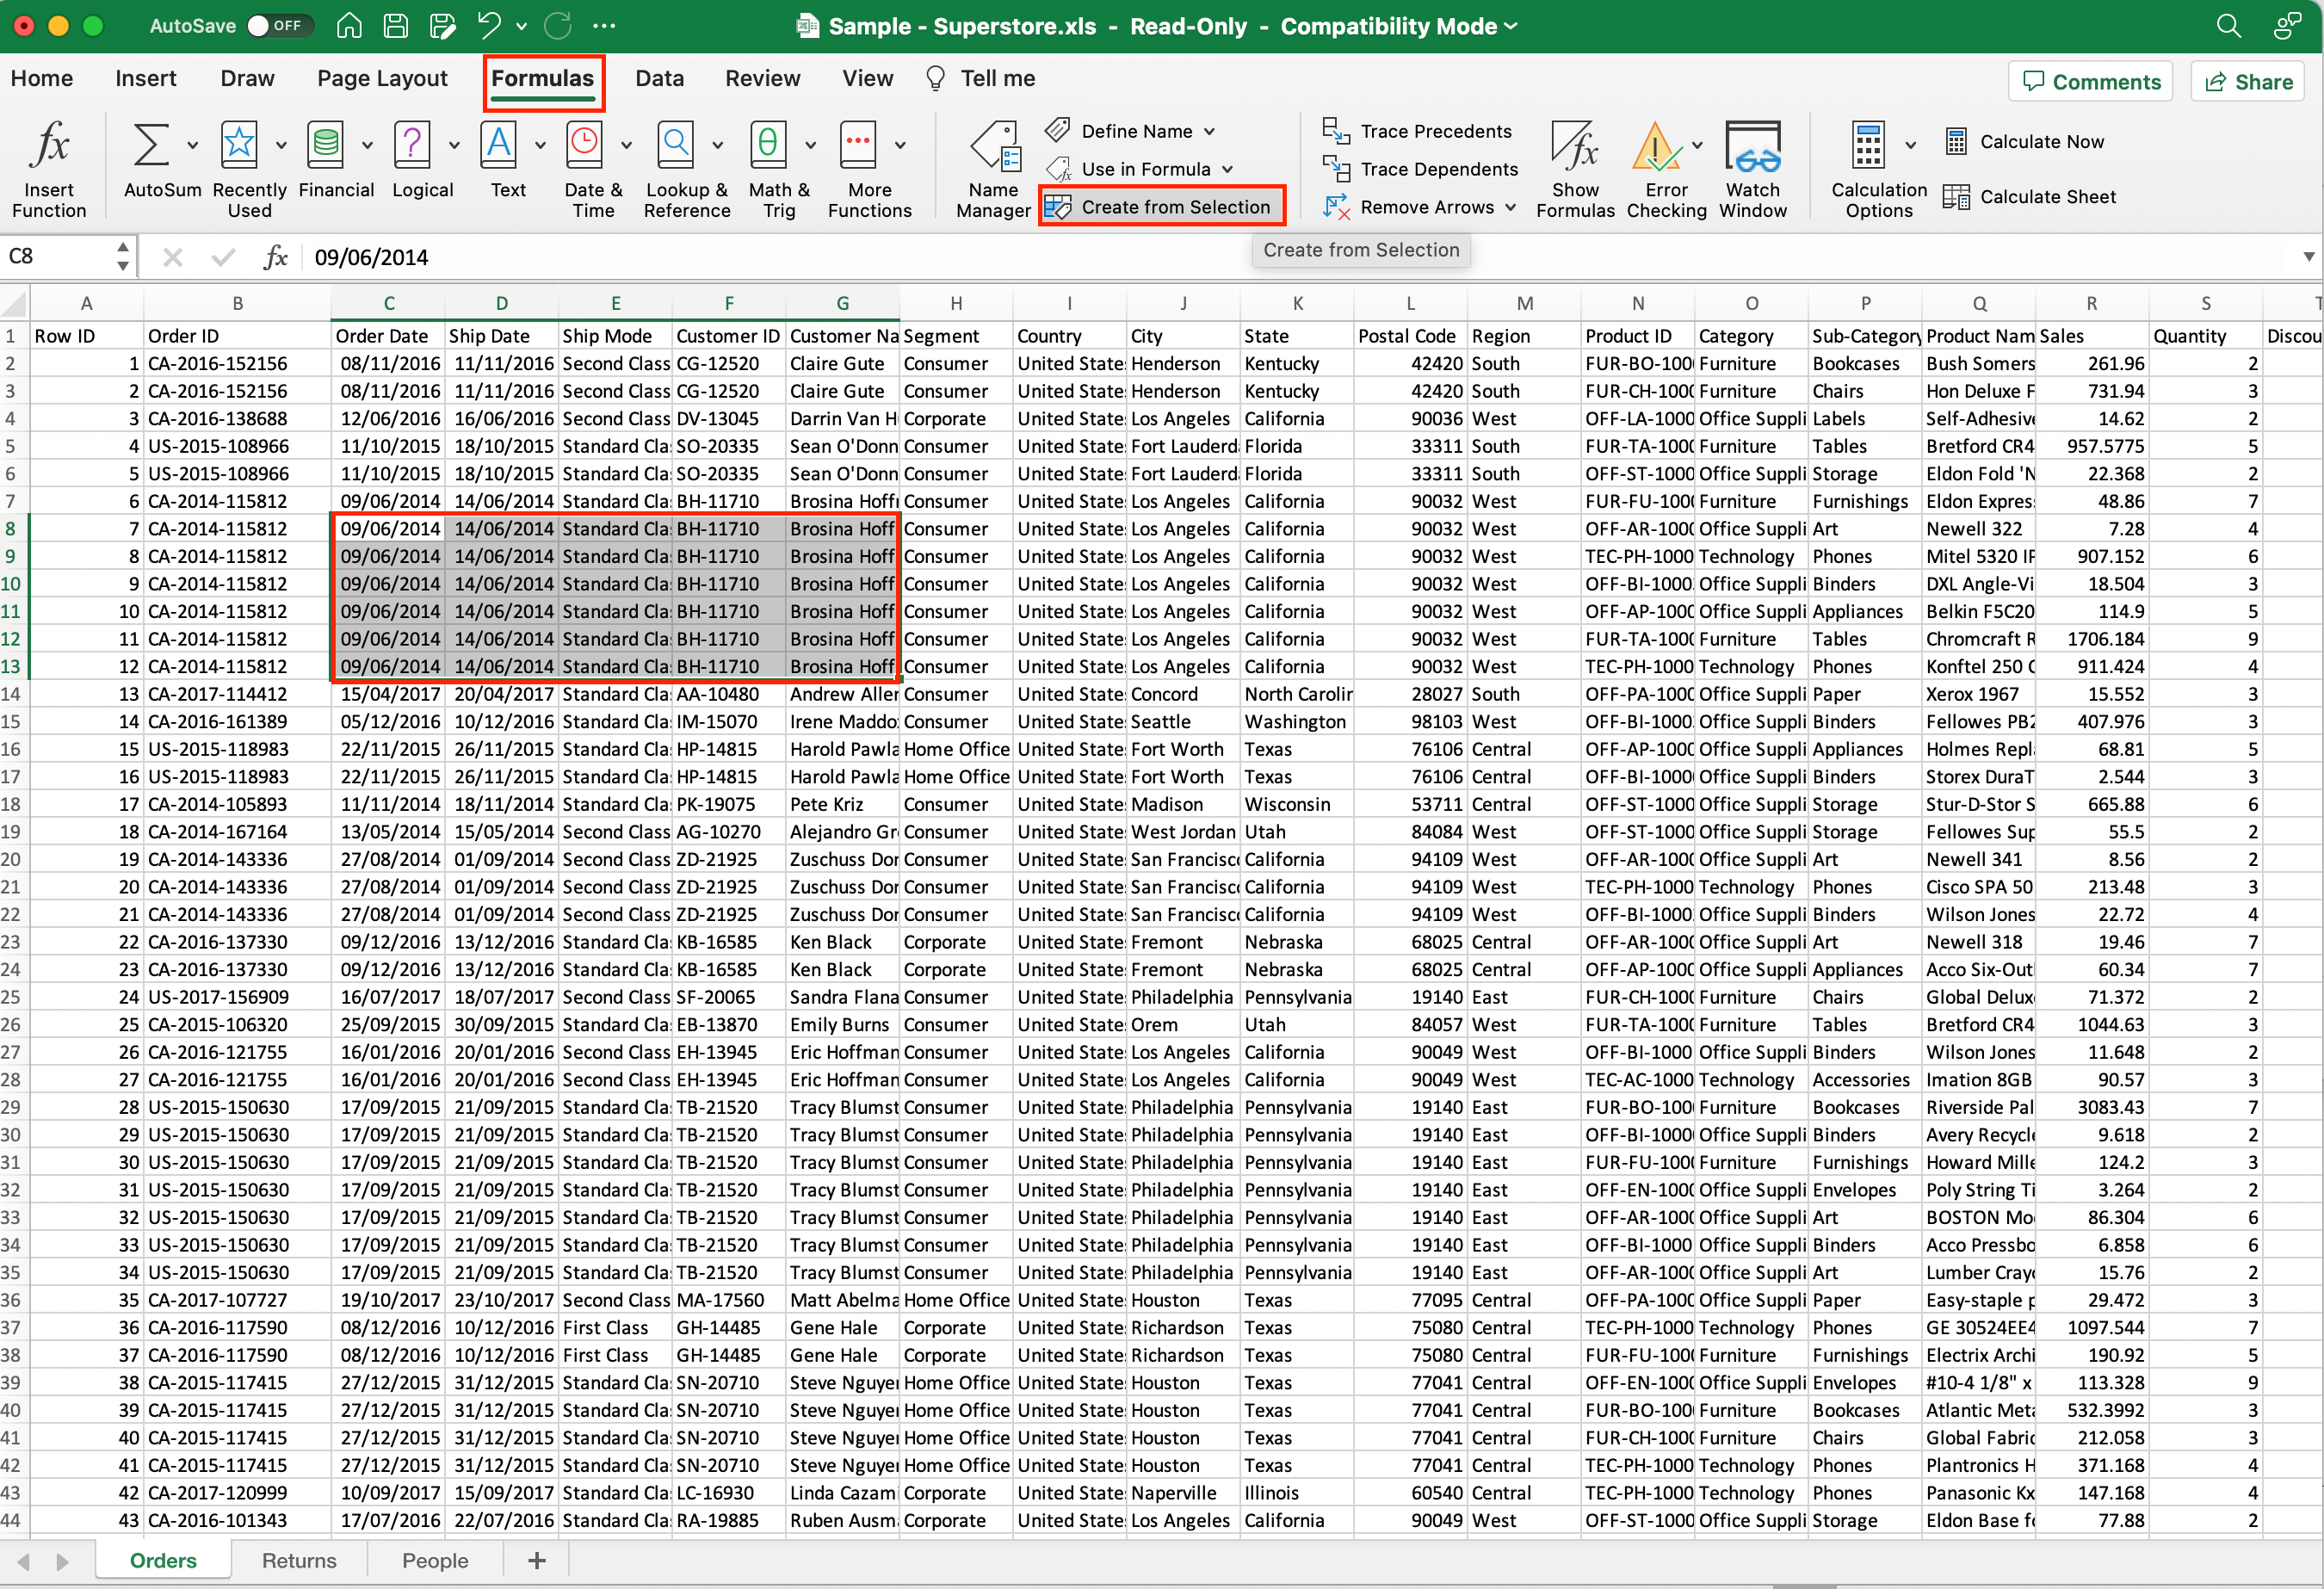
Method 3: Creating from Selection
To create a named range by using the Create from Selection feature:
- Select the range you want to name, including the row or column labels.
- Click on the Formulas tab.
- Select Create from Selection.
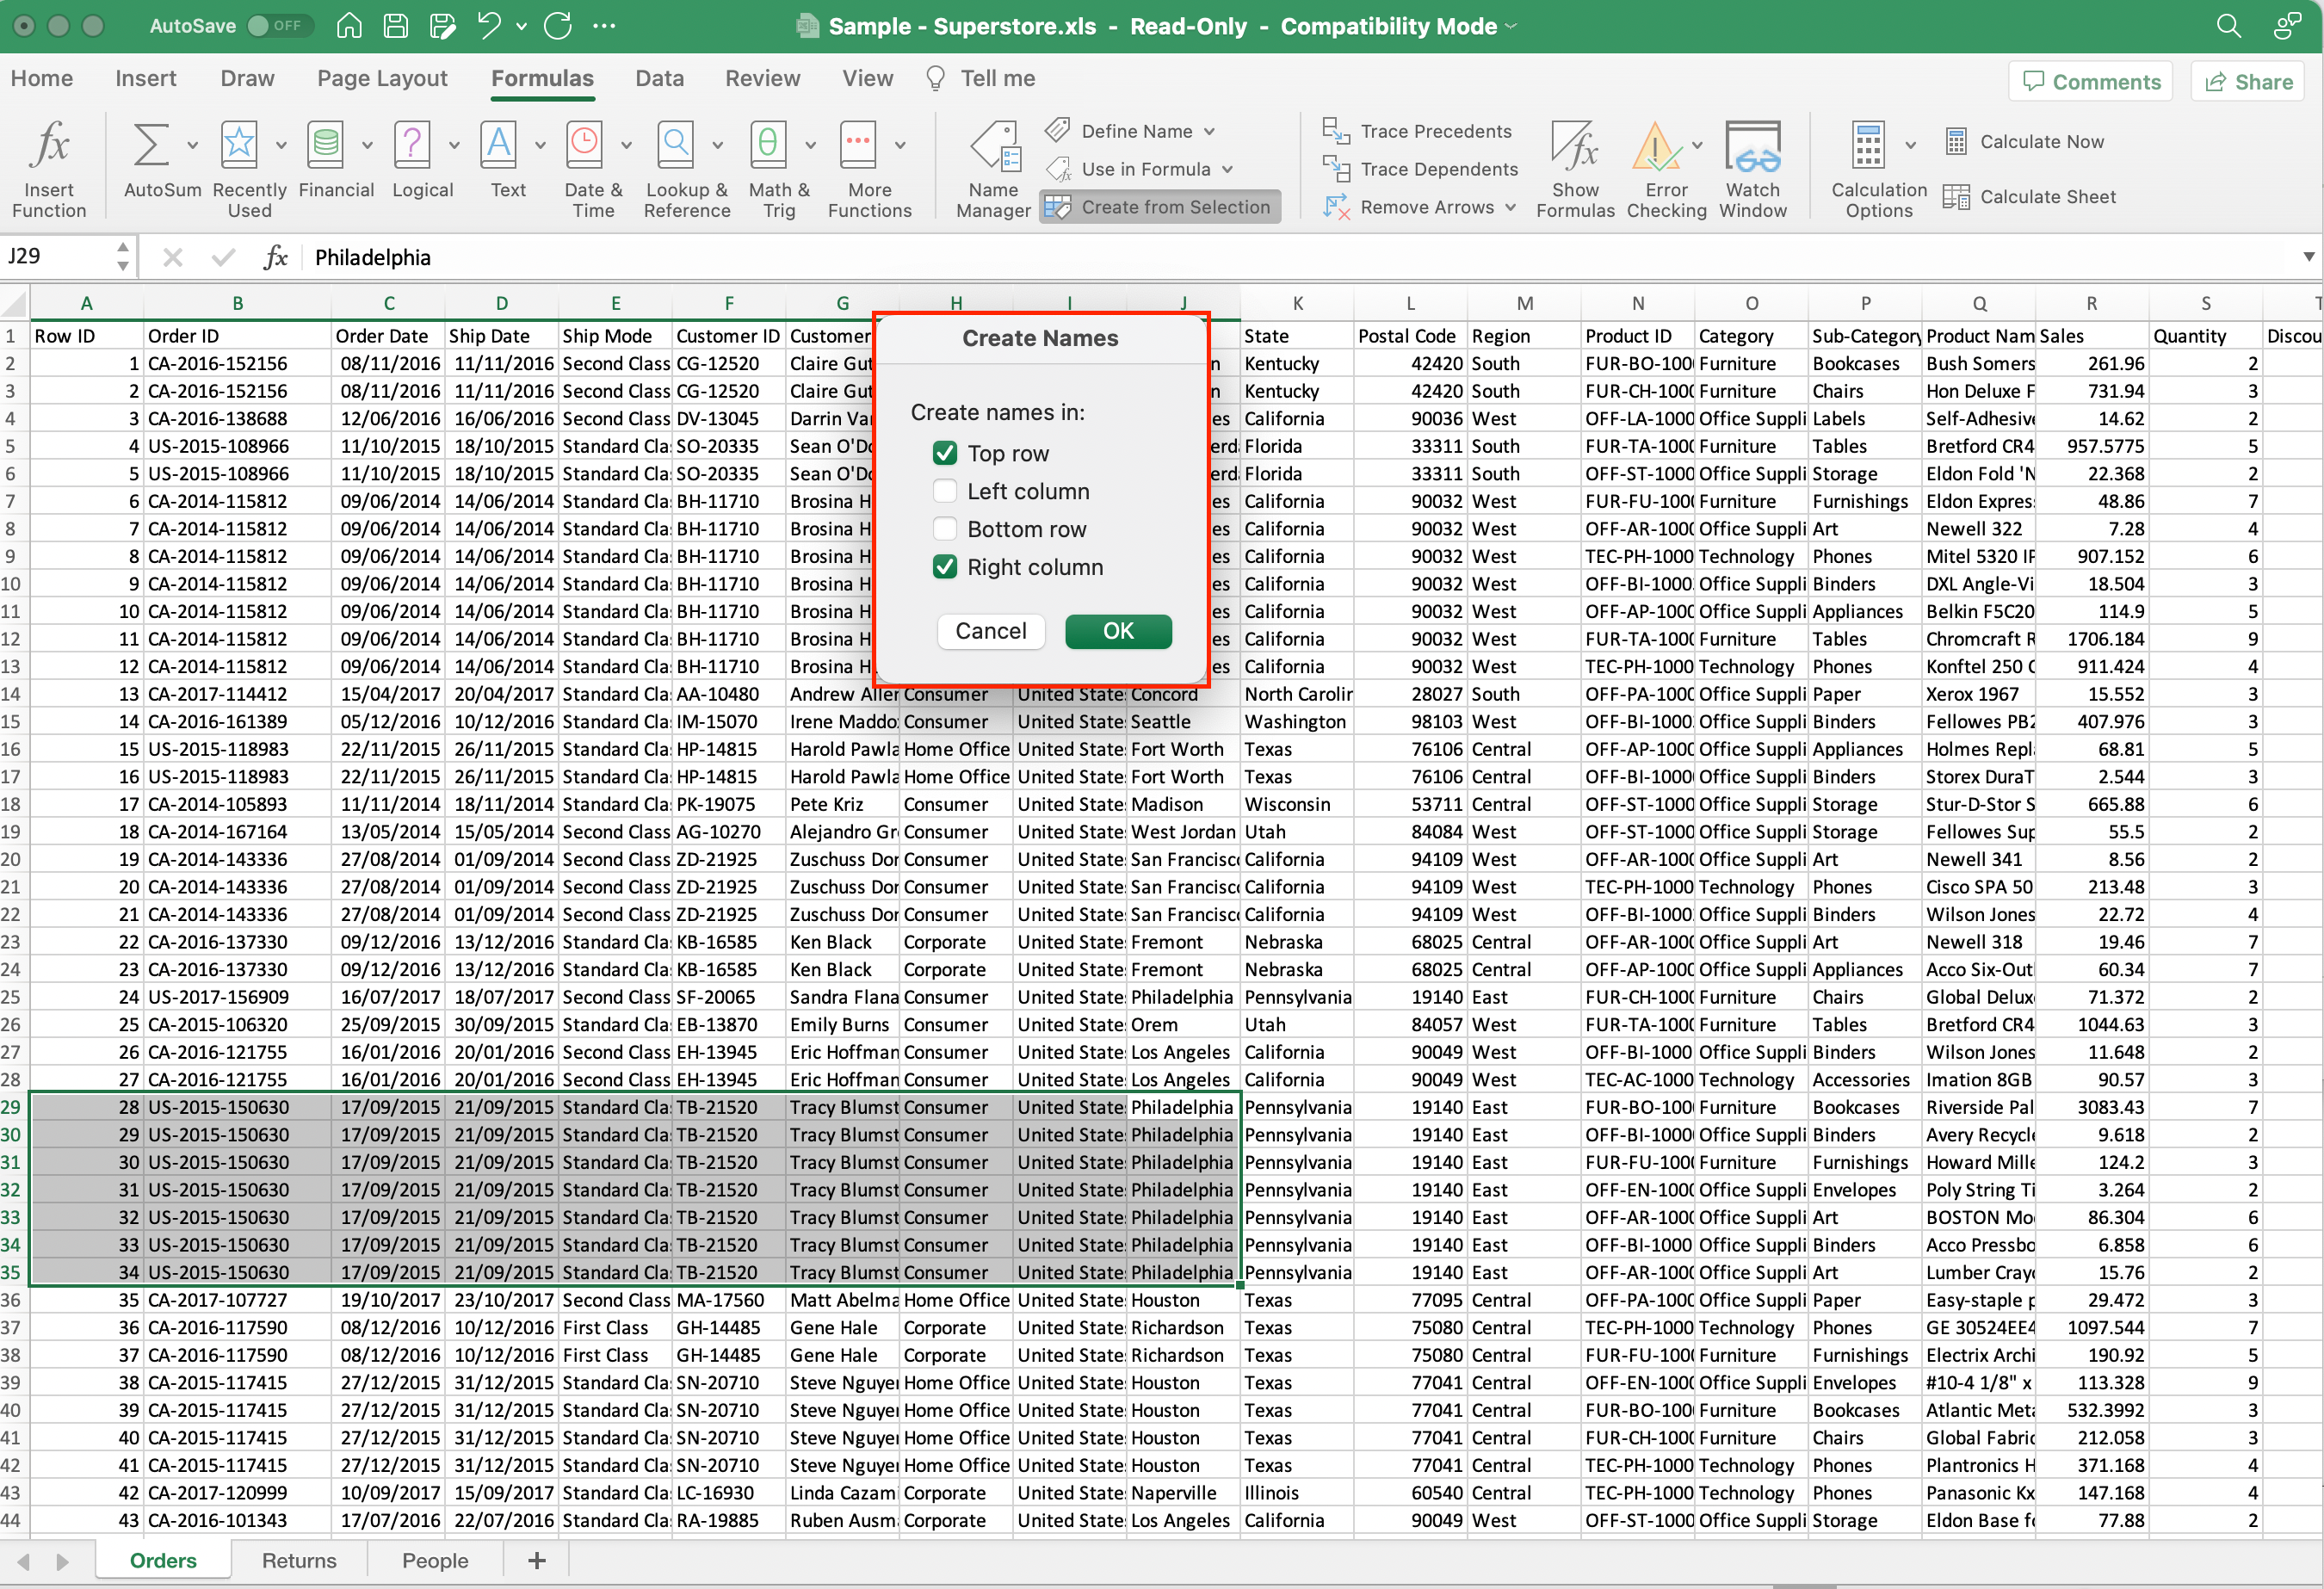
- In the Create Names from the selection dialogue box, select the appropriate checkboxes to specify which parts of the range should be used for the names. The options are:
- Left Column: If your labels or headers are in the left column.
- Top Row: If your labels or headers are in the top row.
- Bottom Row: If your labels or headers are in the bottom row.
- Right Column: If your labels or headers are in the right column.
- Click OK.
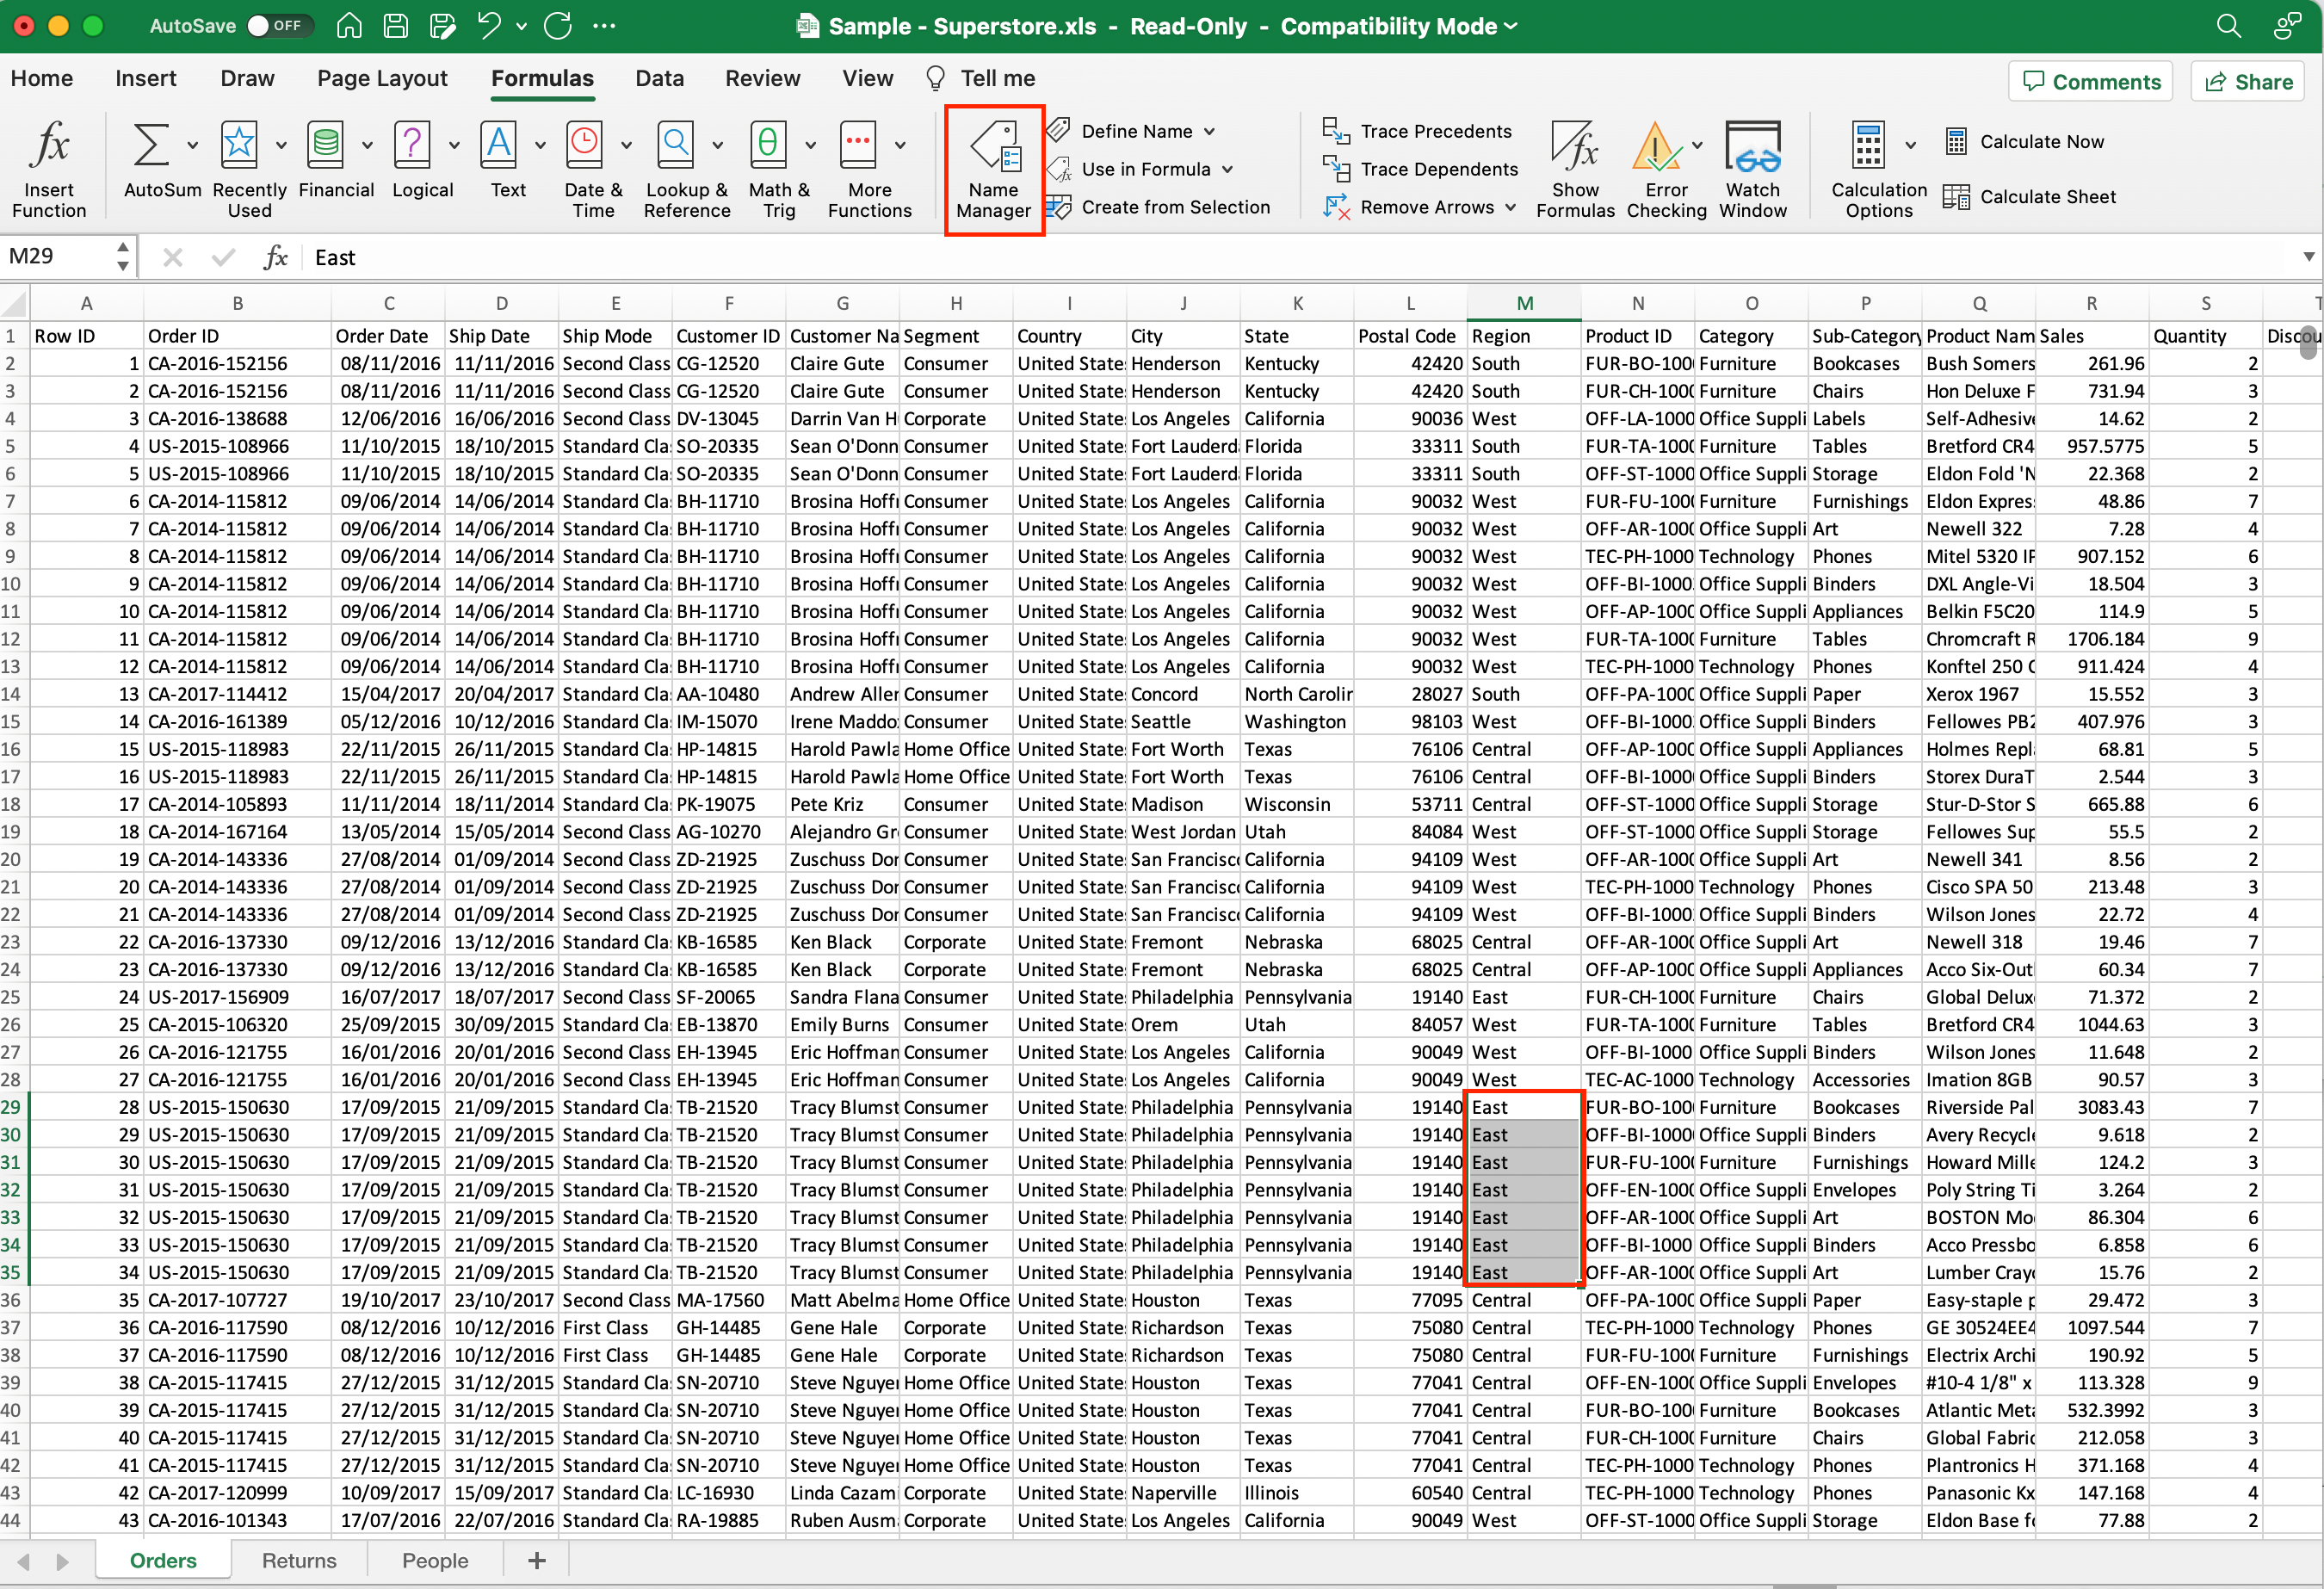
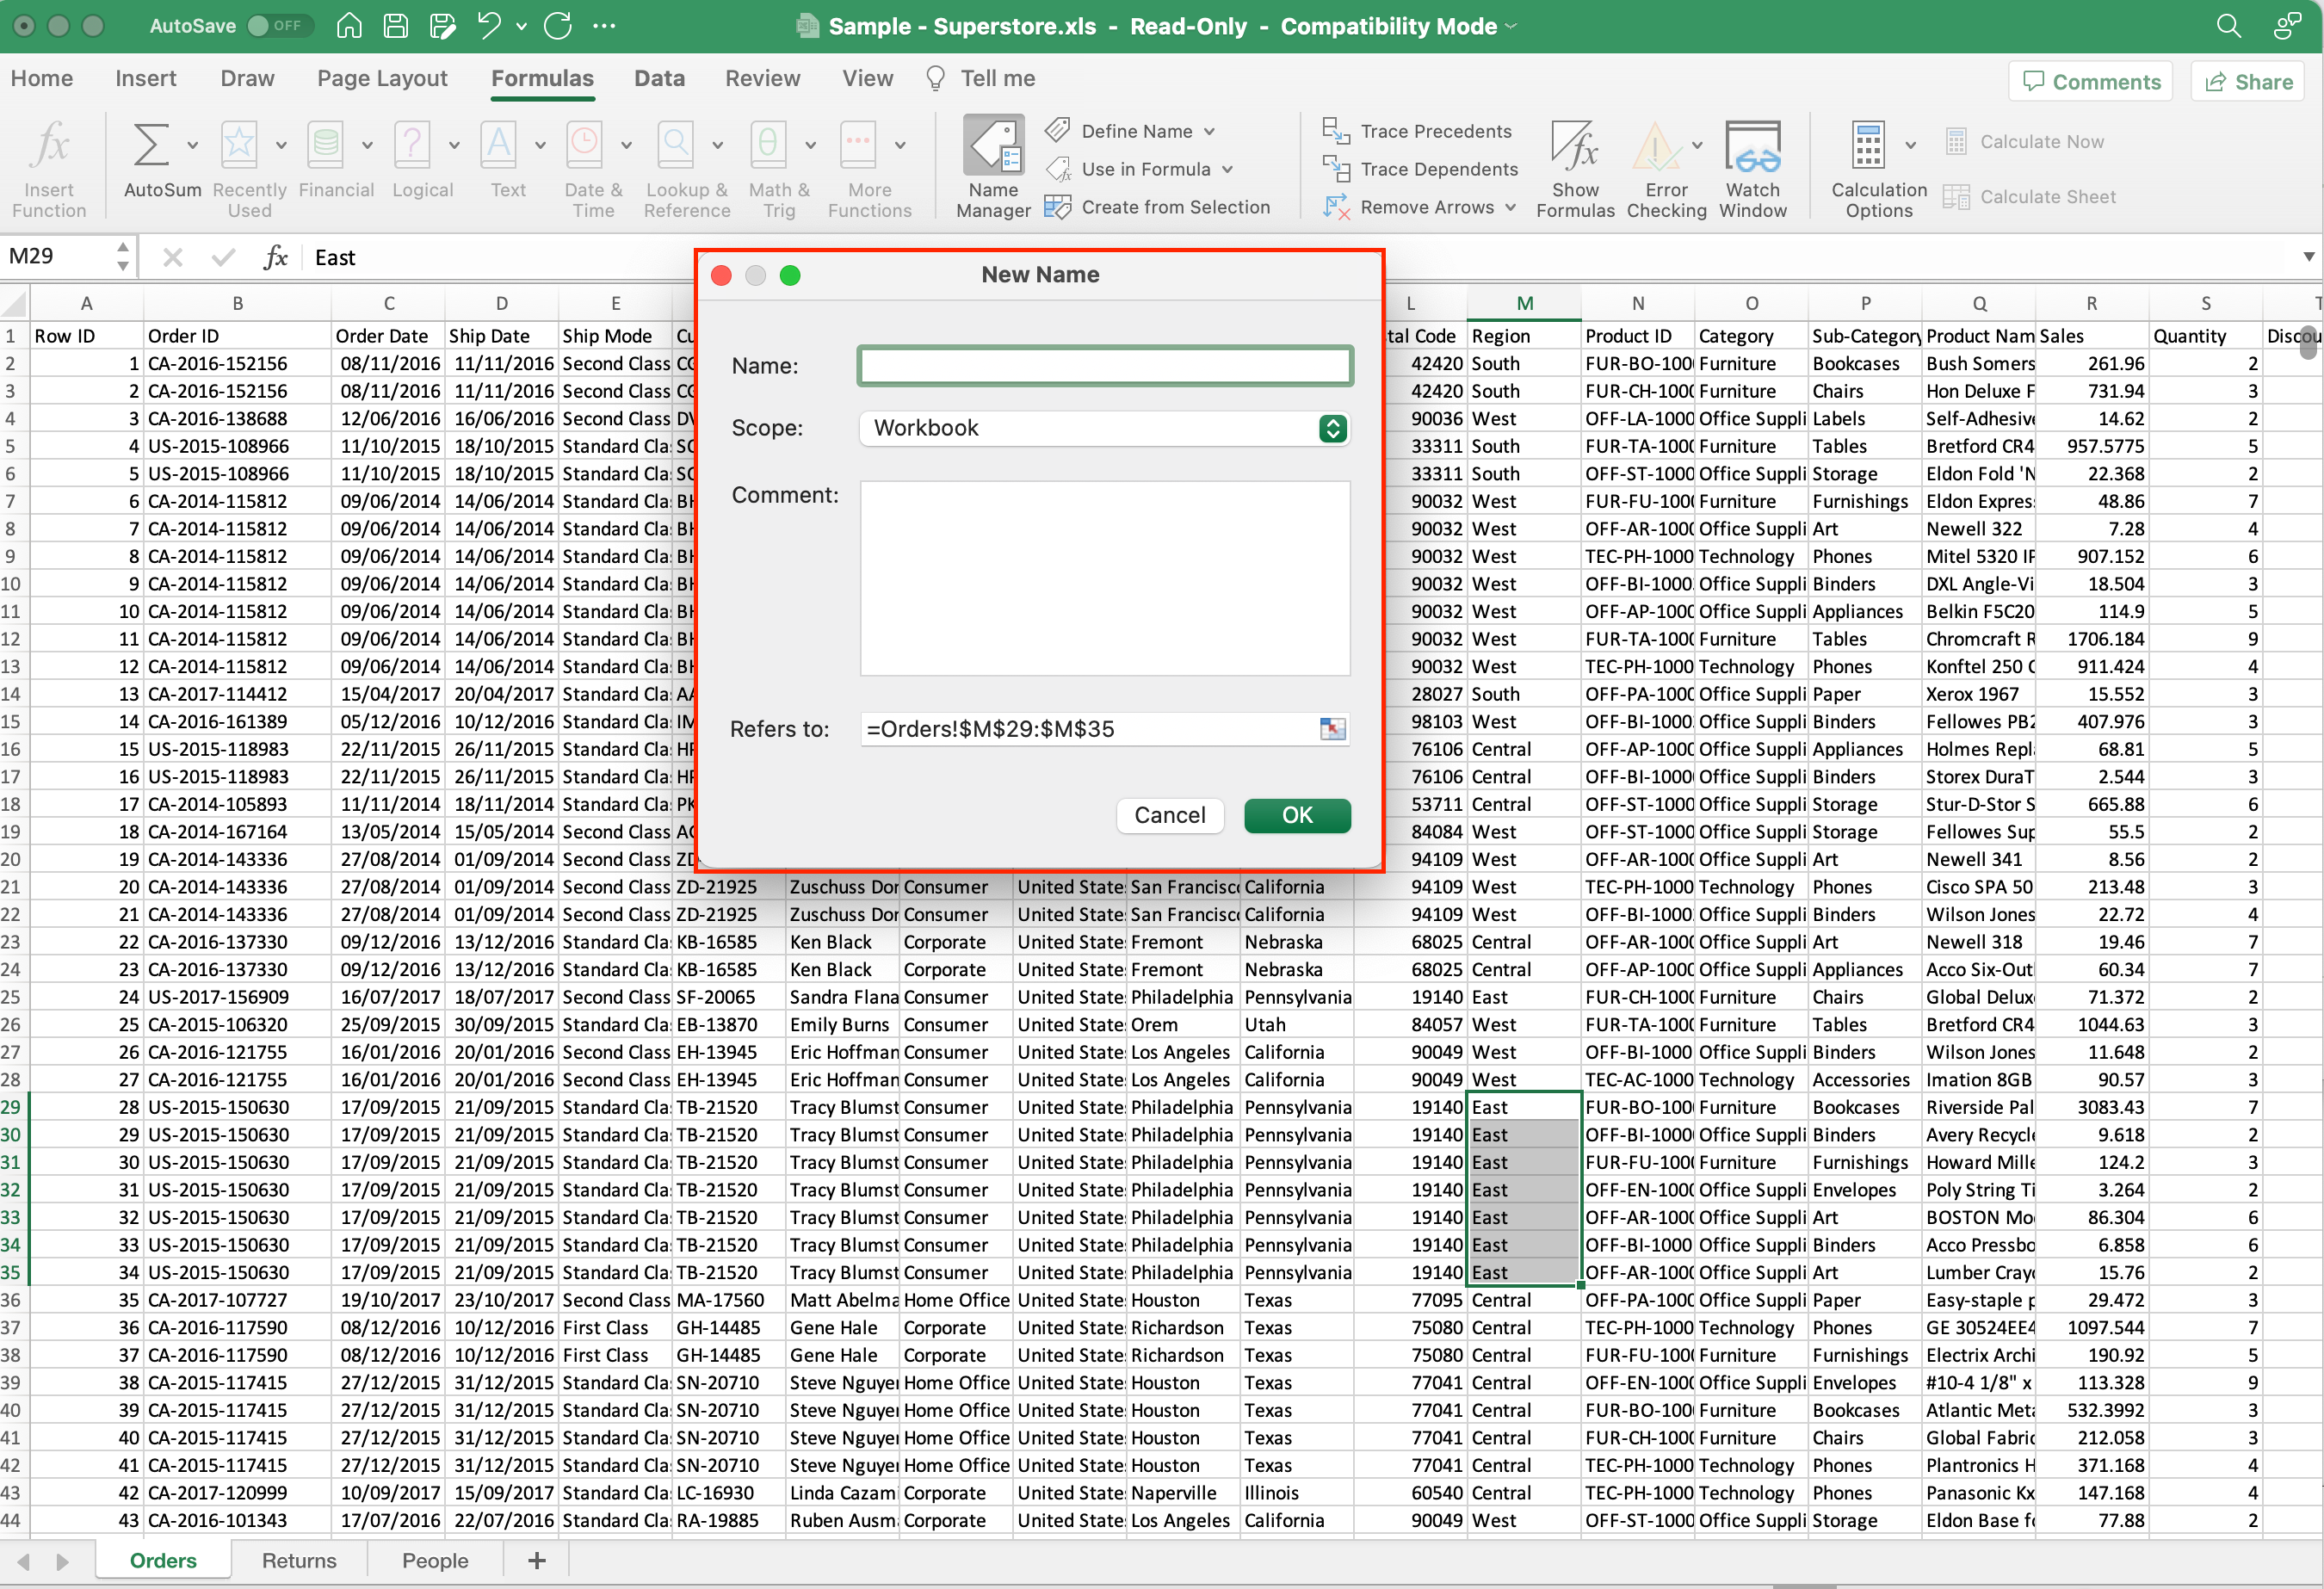
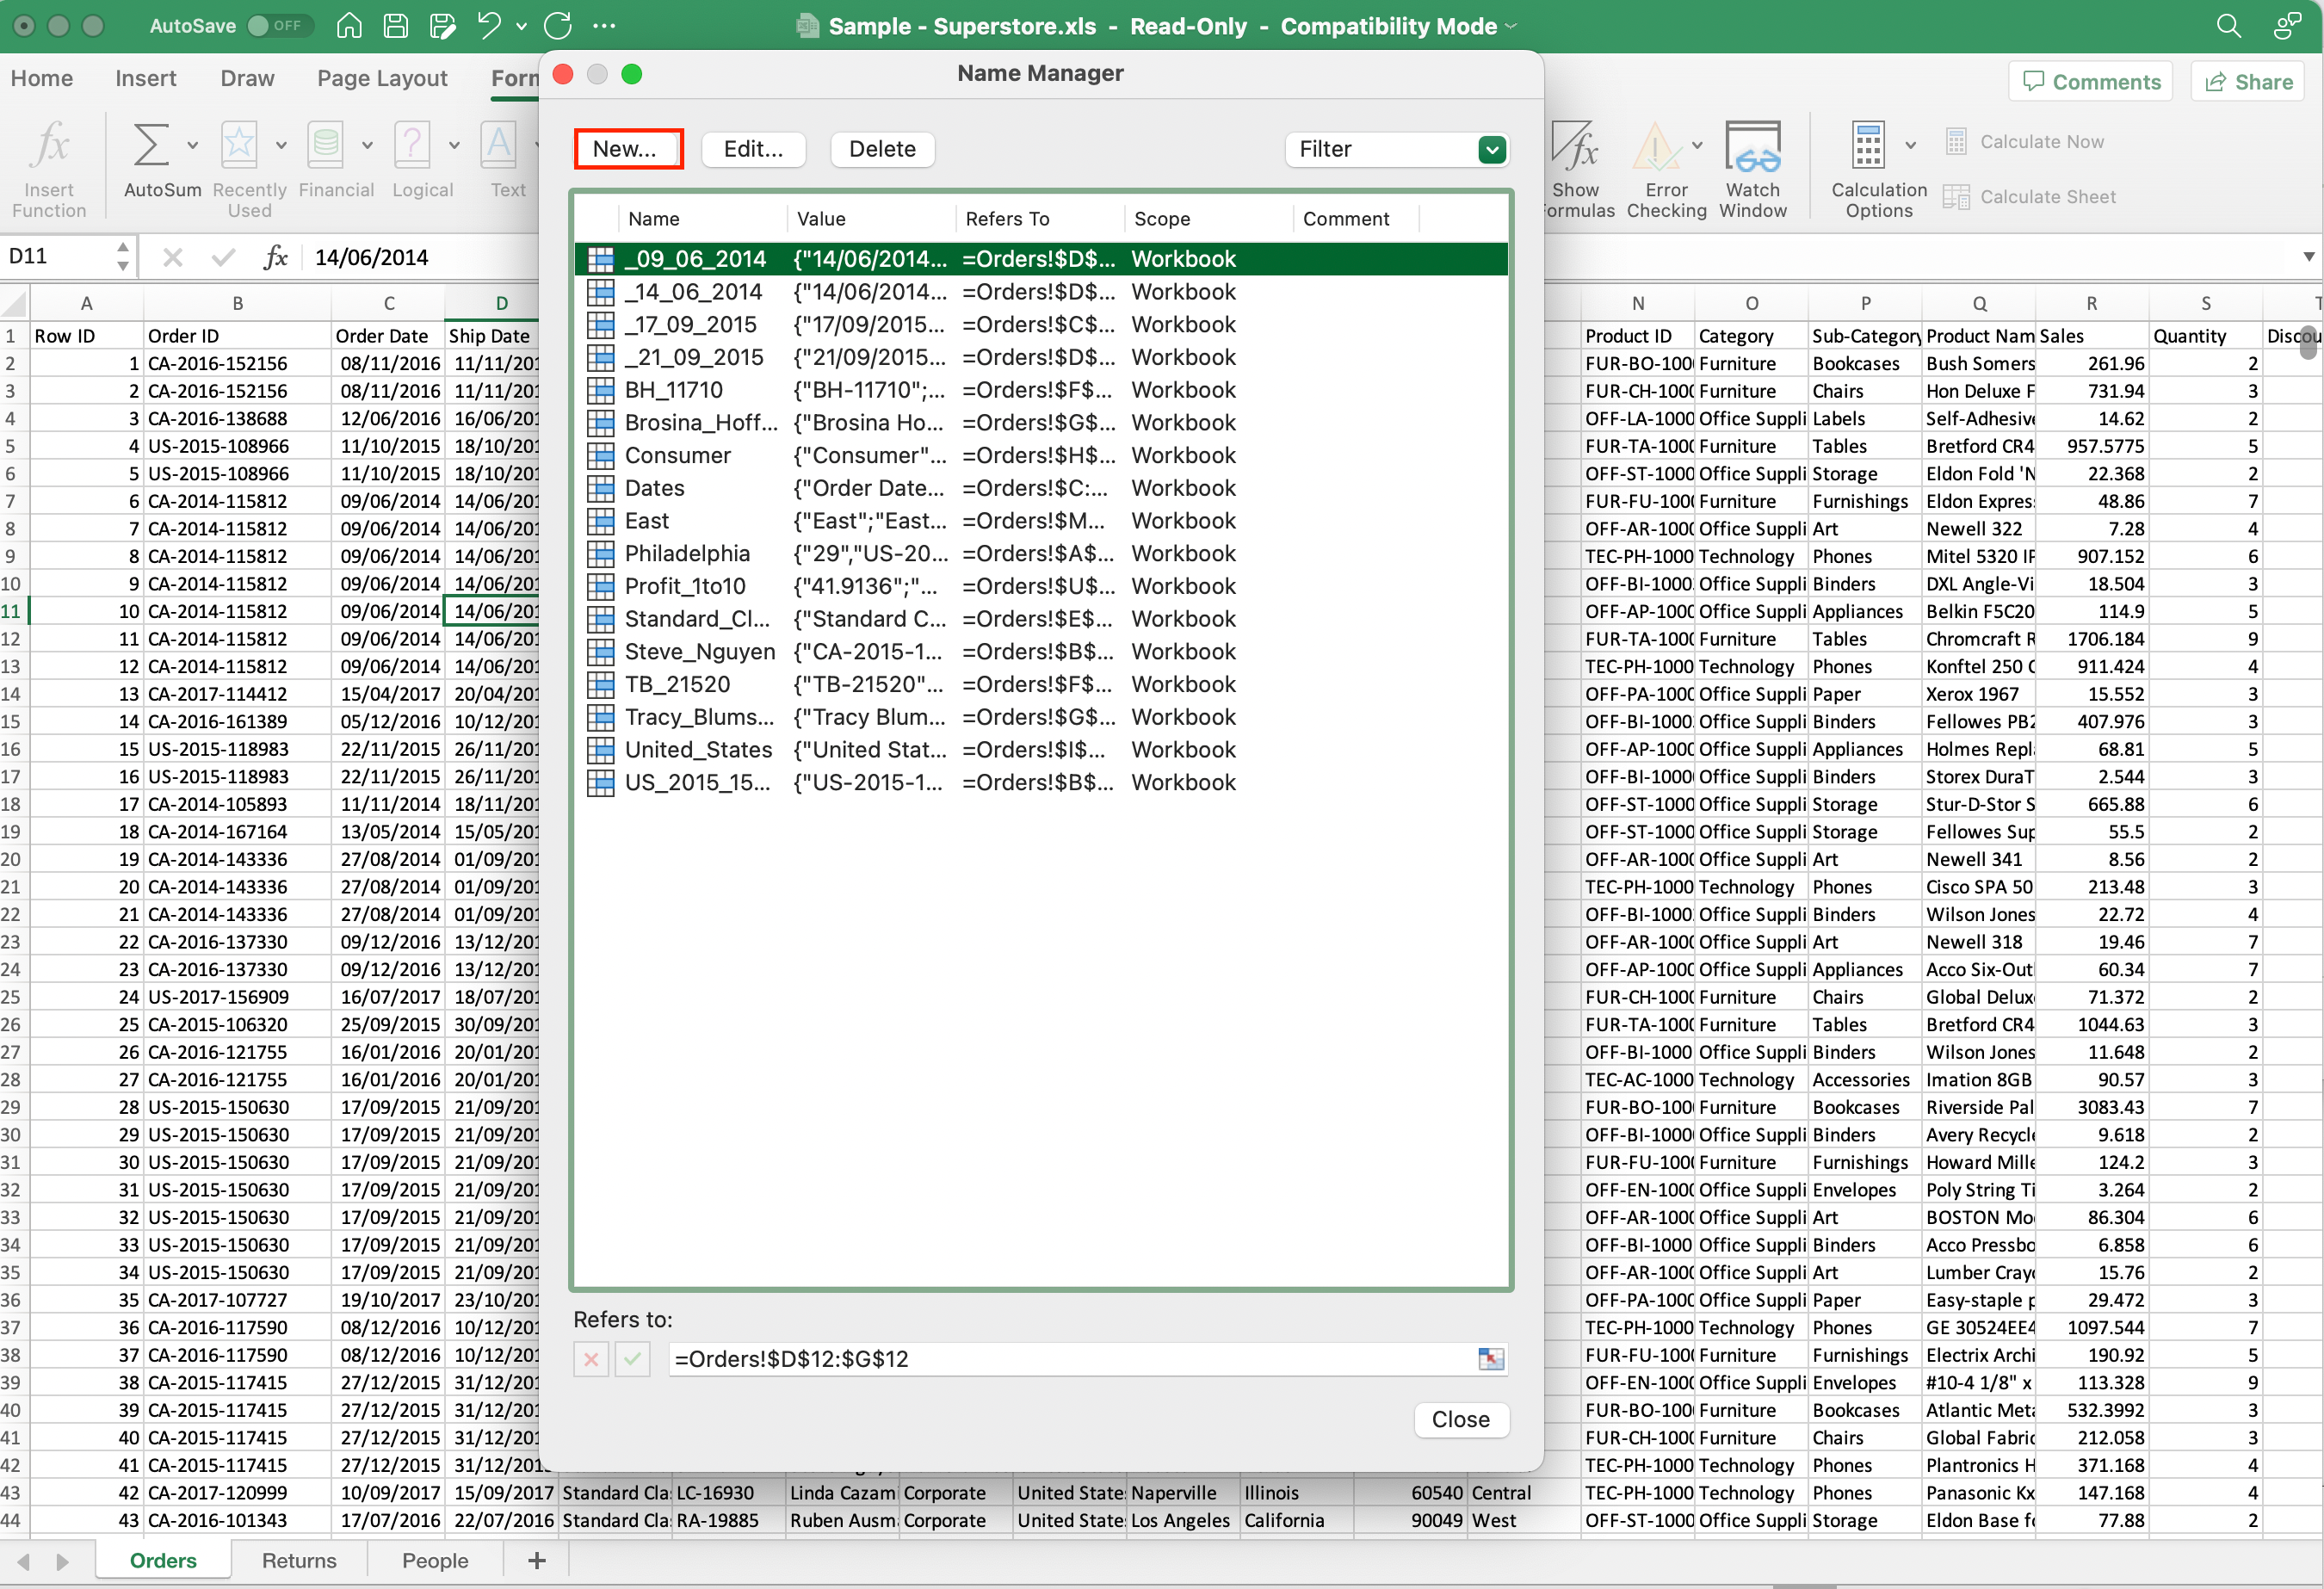
Method 4: Name Manager
To create a named range by using the Name Manager:
- Select the range of cells for which you want to create a name.
- Click on the Formulas tab.
- Click on the Name Manager icon.
- Click the New button.
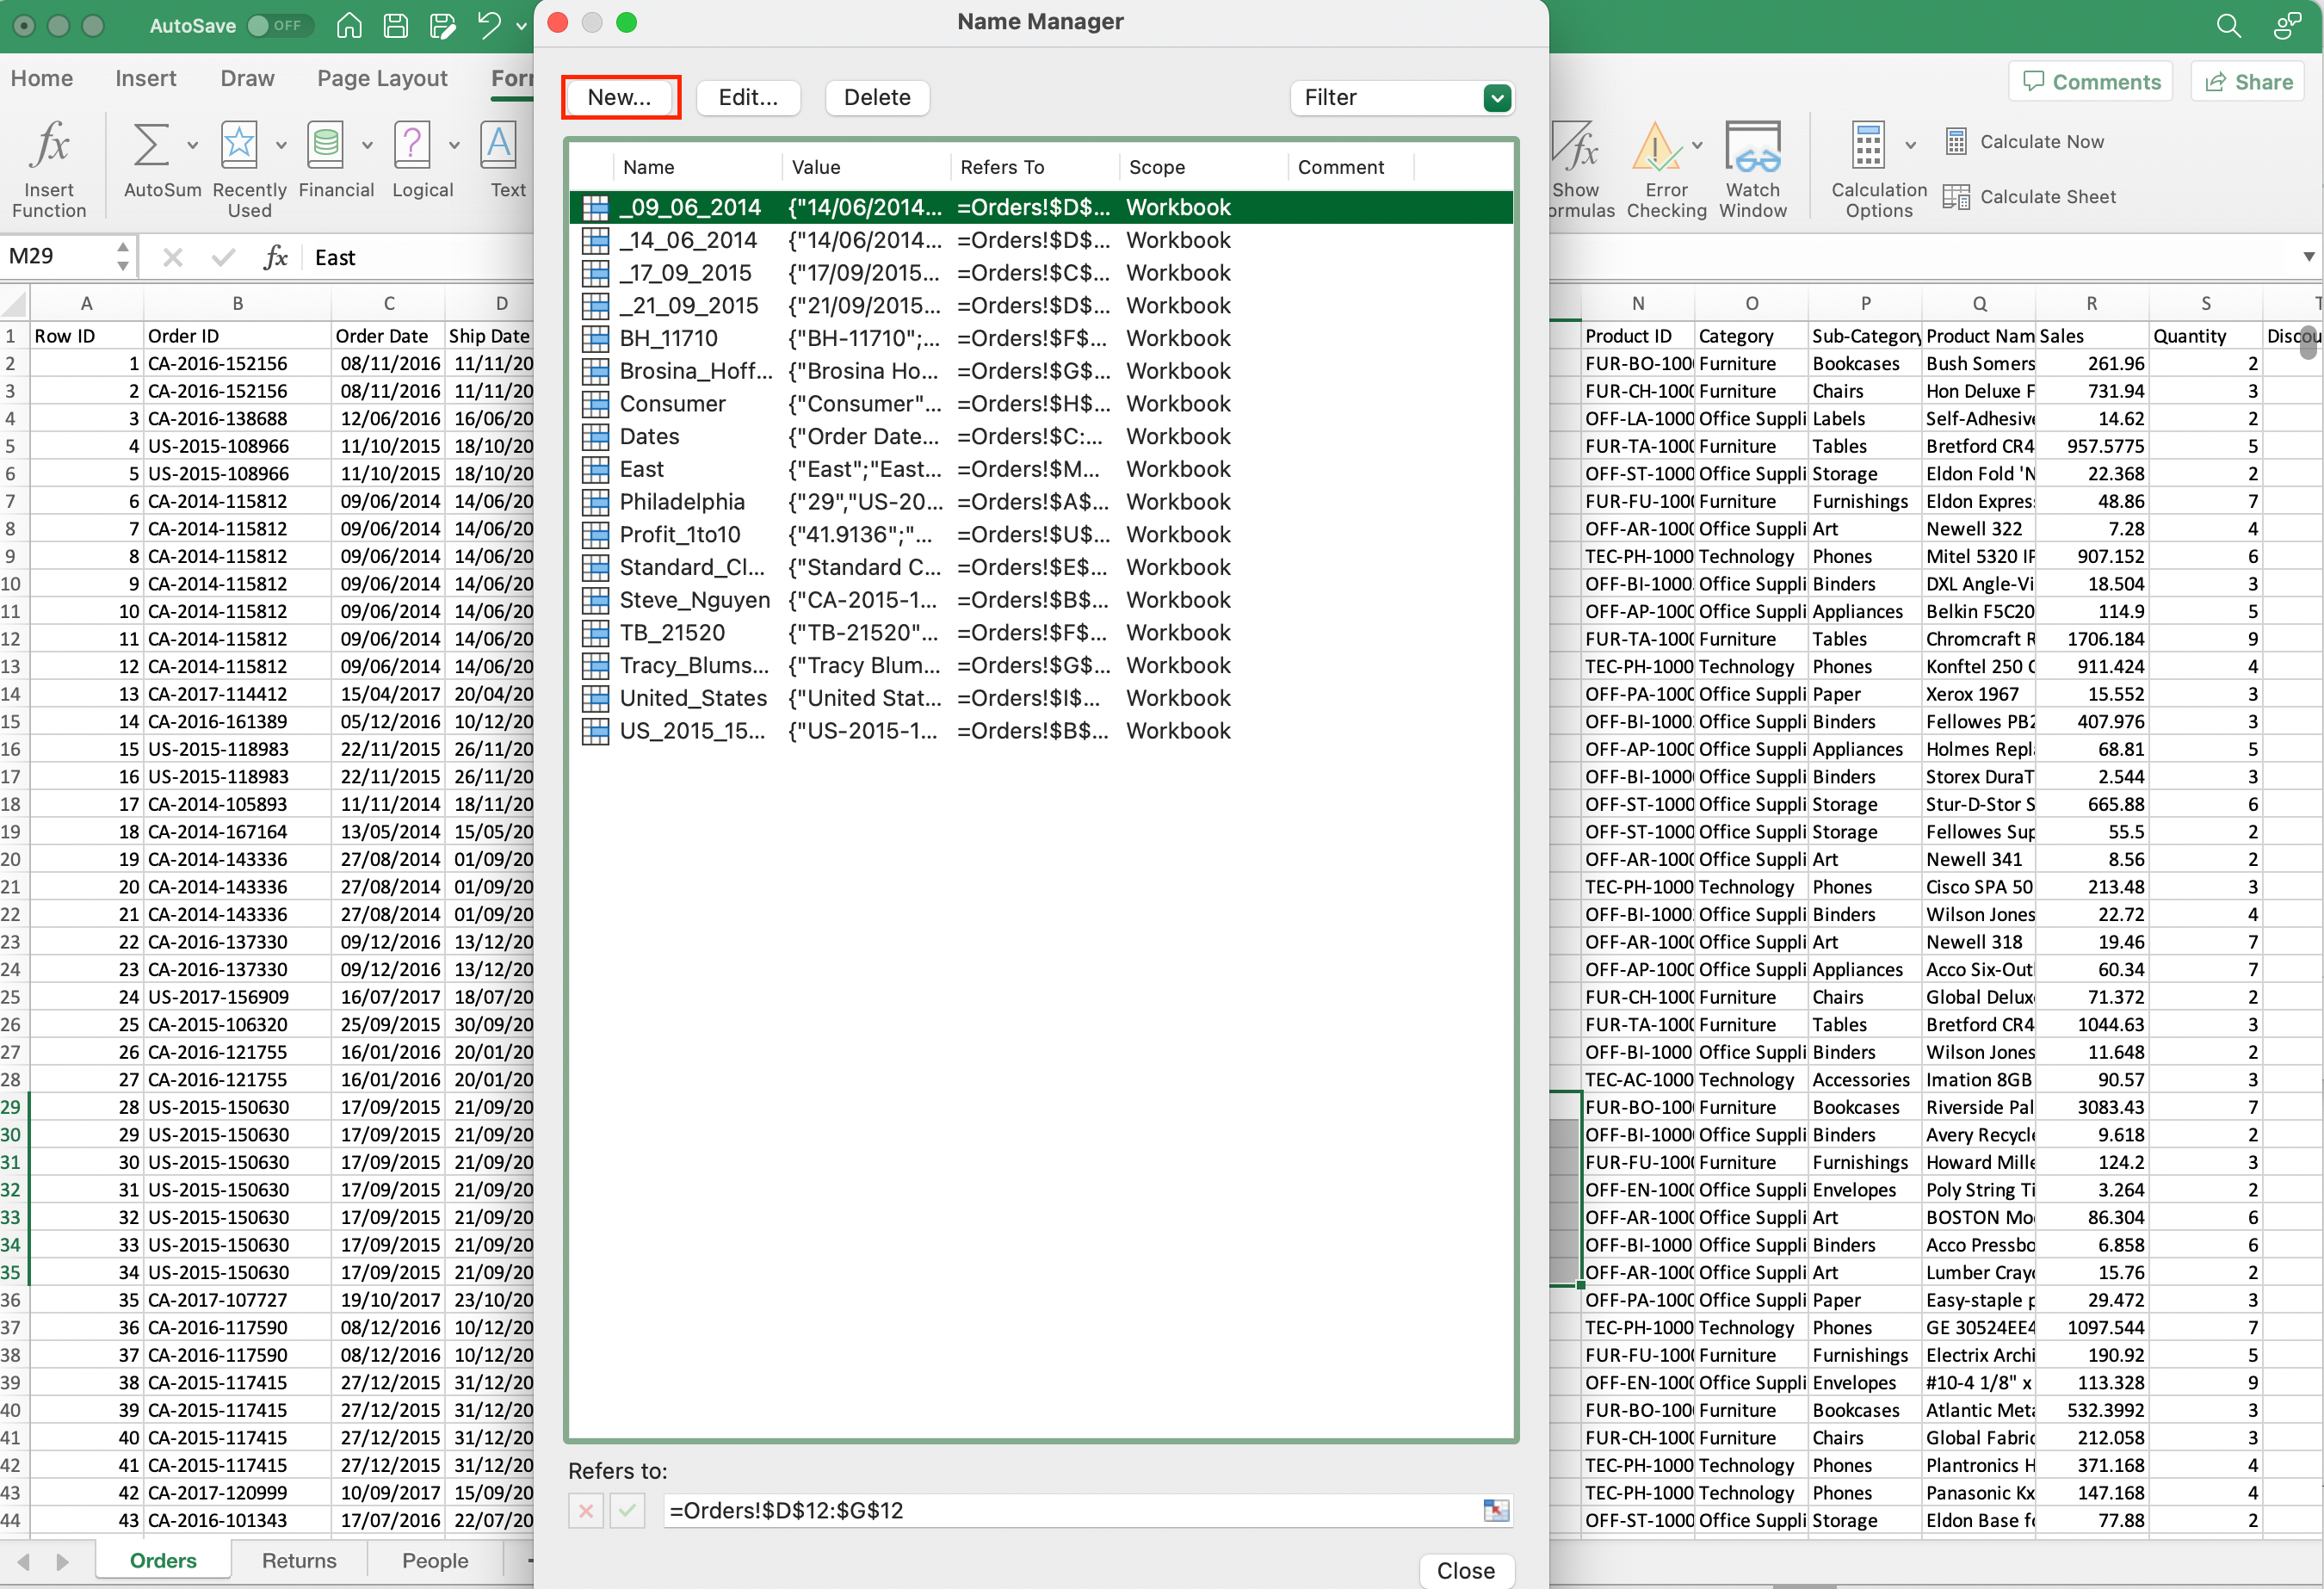
- Enter a name in the dialog box and define the scope.
- Click OK.
Remember to keep your named ranges brief and clear, avoiding exaggerated or false claims.
By creating named ranges in Excel, you can easily manage and refer to specific data in your workbook, making your tasks more efficient and organized.
Managing and Editing Named Ranges

Once you’ve created named ranges in Excel, you may need to make changes, update, or delete them. Managing named ranges efficiently is an essential part of maintaining your spreadsheets.
Here’s how to edit and manage named ranges:
1. Using the Name Manager Tool
In Excel, managing named ranges can be done efficiently through the Excel Name Manager tool.

To access this tool:
- Go to the Formulas tab.
- Click on Name Manager.
- Or use the shortcuts F3 for Windows or fn + Command + F3 for Macs.
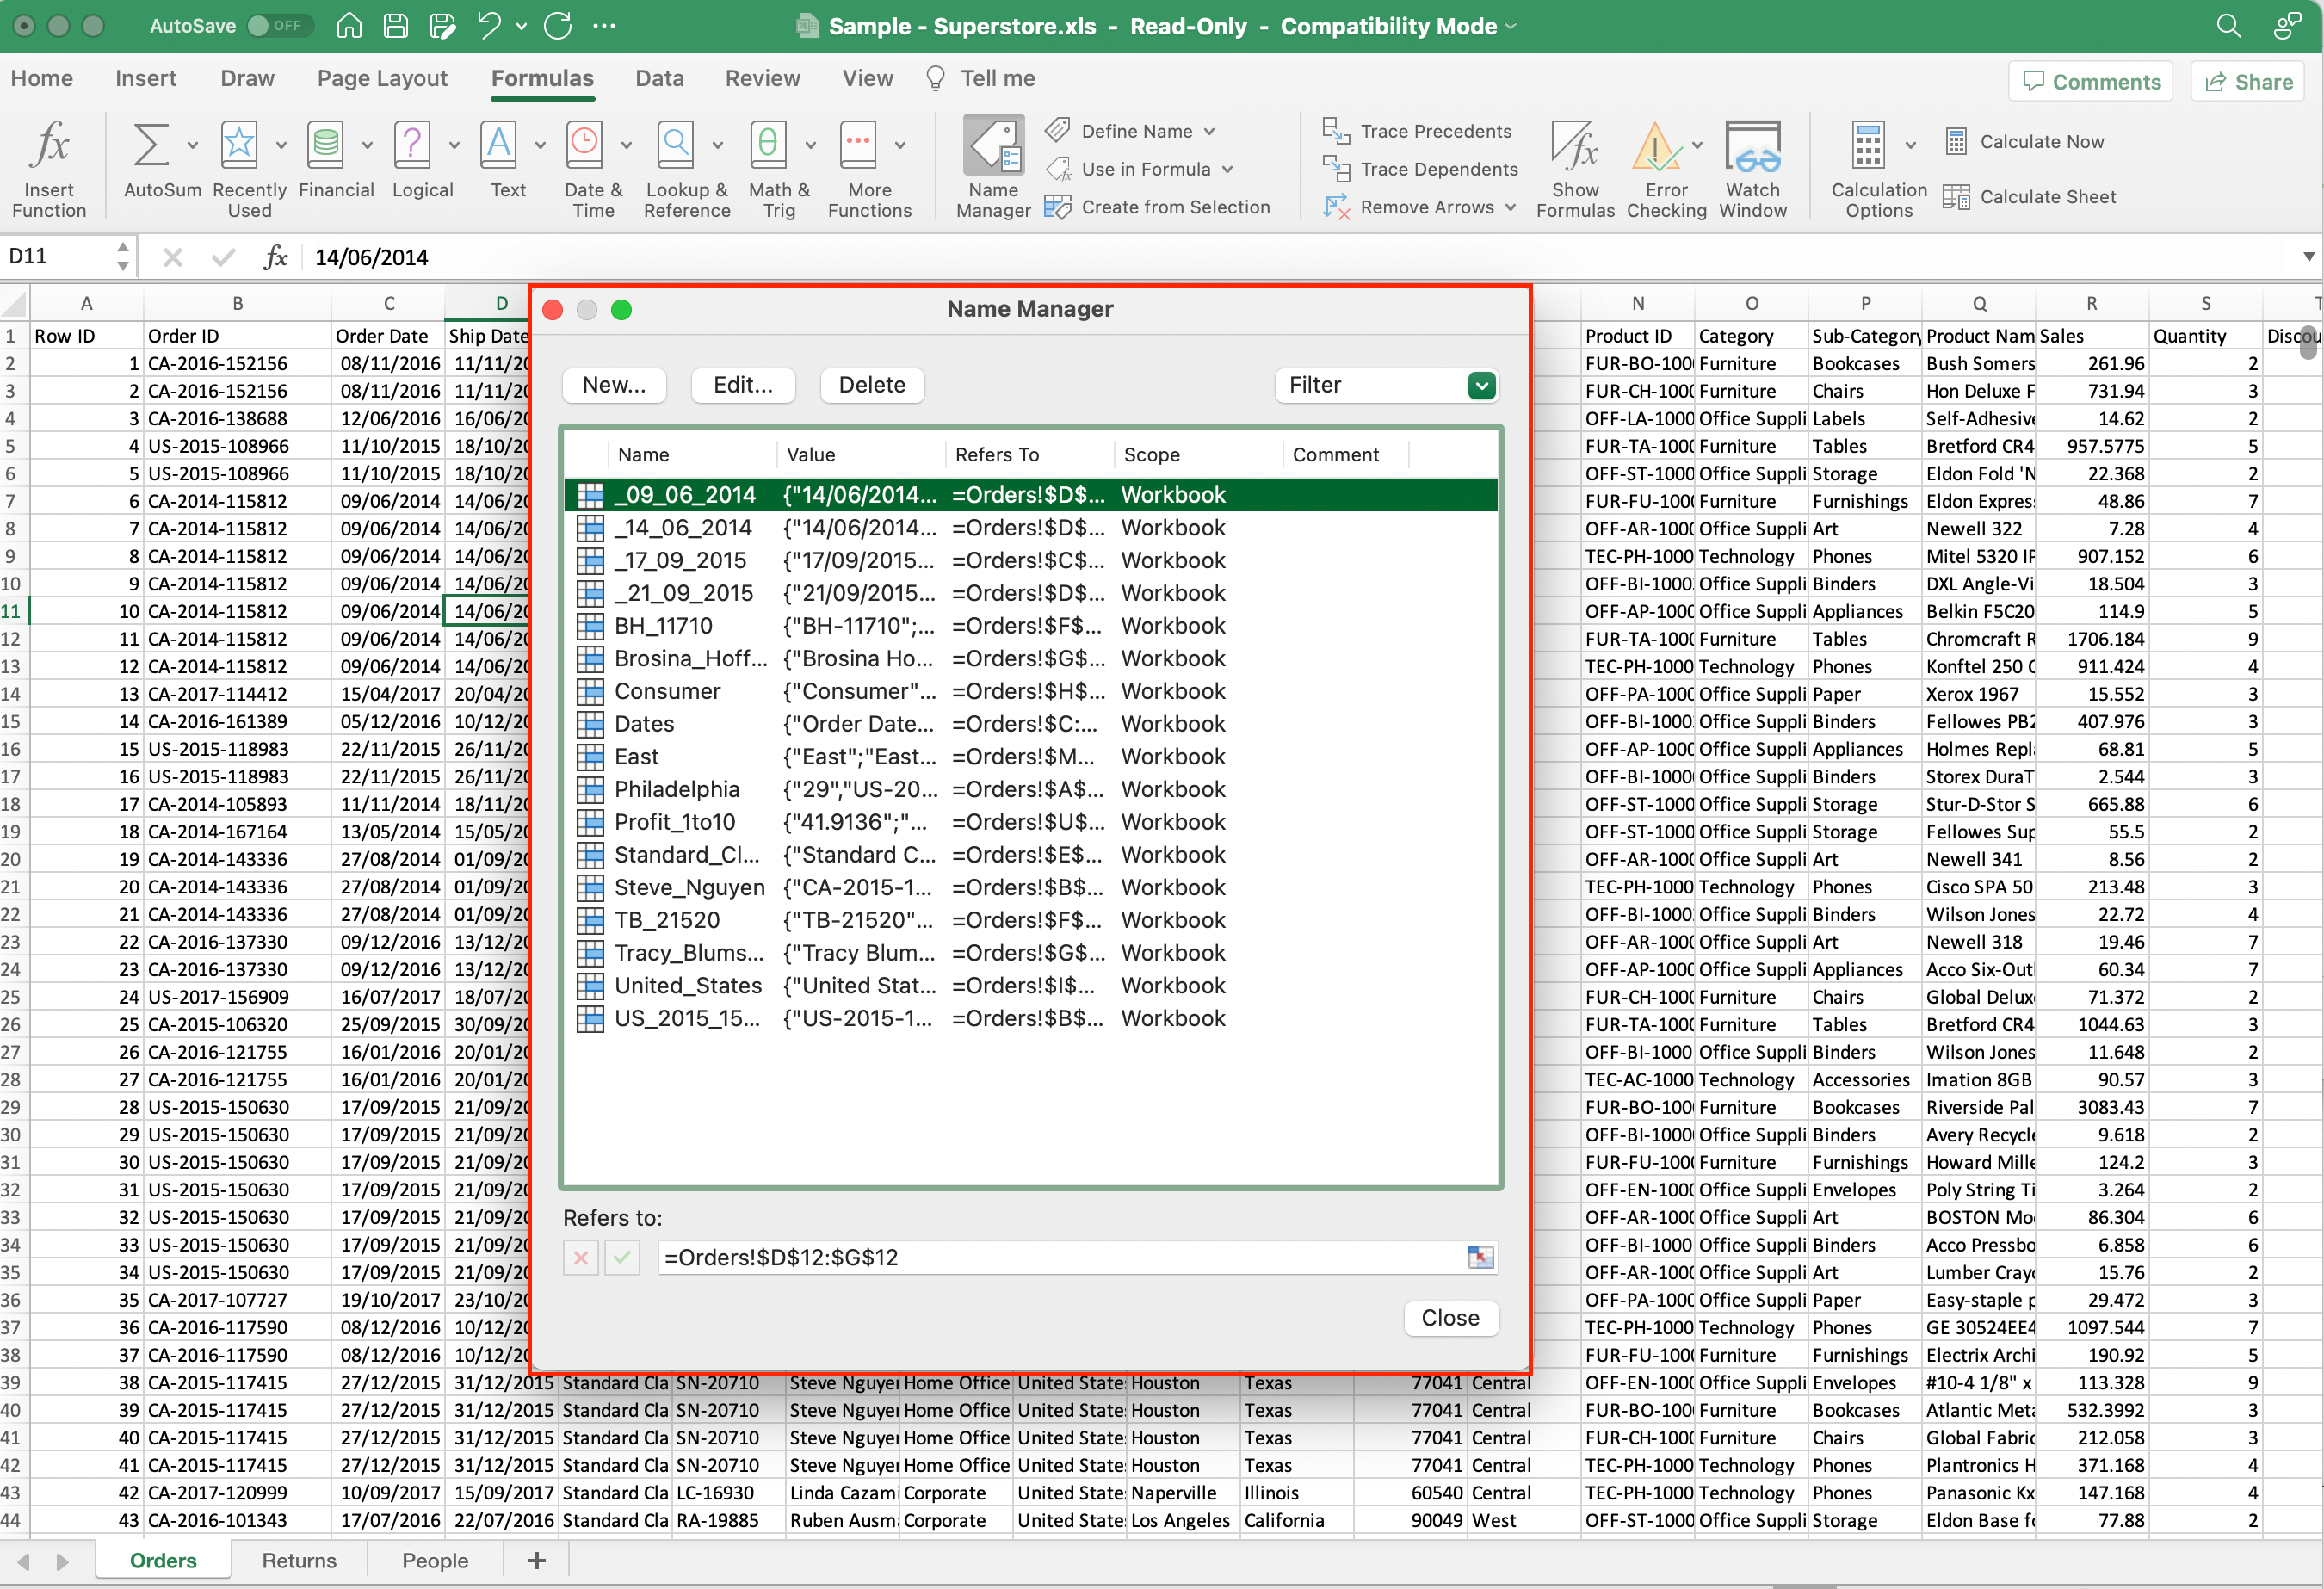
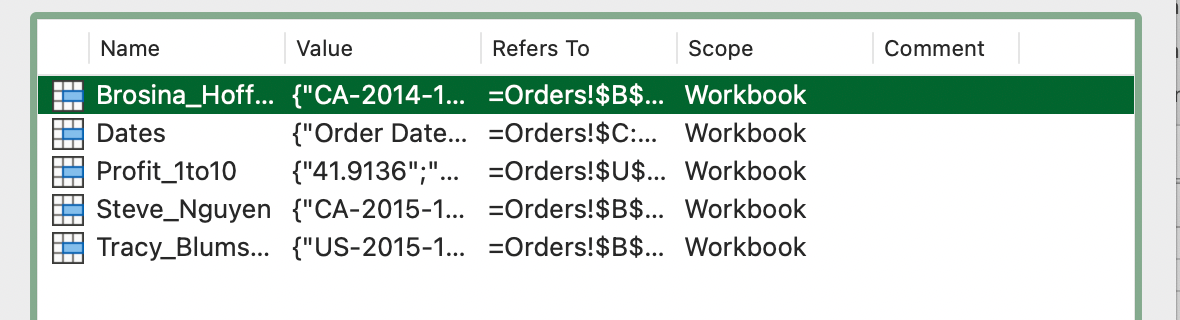
This will open the name manager dialog box where a list of all the named ranges in your workbook, along with information such as their values, references, and any comments associated with them.
2. Editing Named Ranges
If you need to update or modify named ranges:
- Open the Name Manager.
- Select the named range you want to edit from the list.
- Click Edit, which will open the Edit Name dialog box.
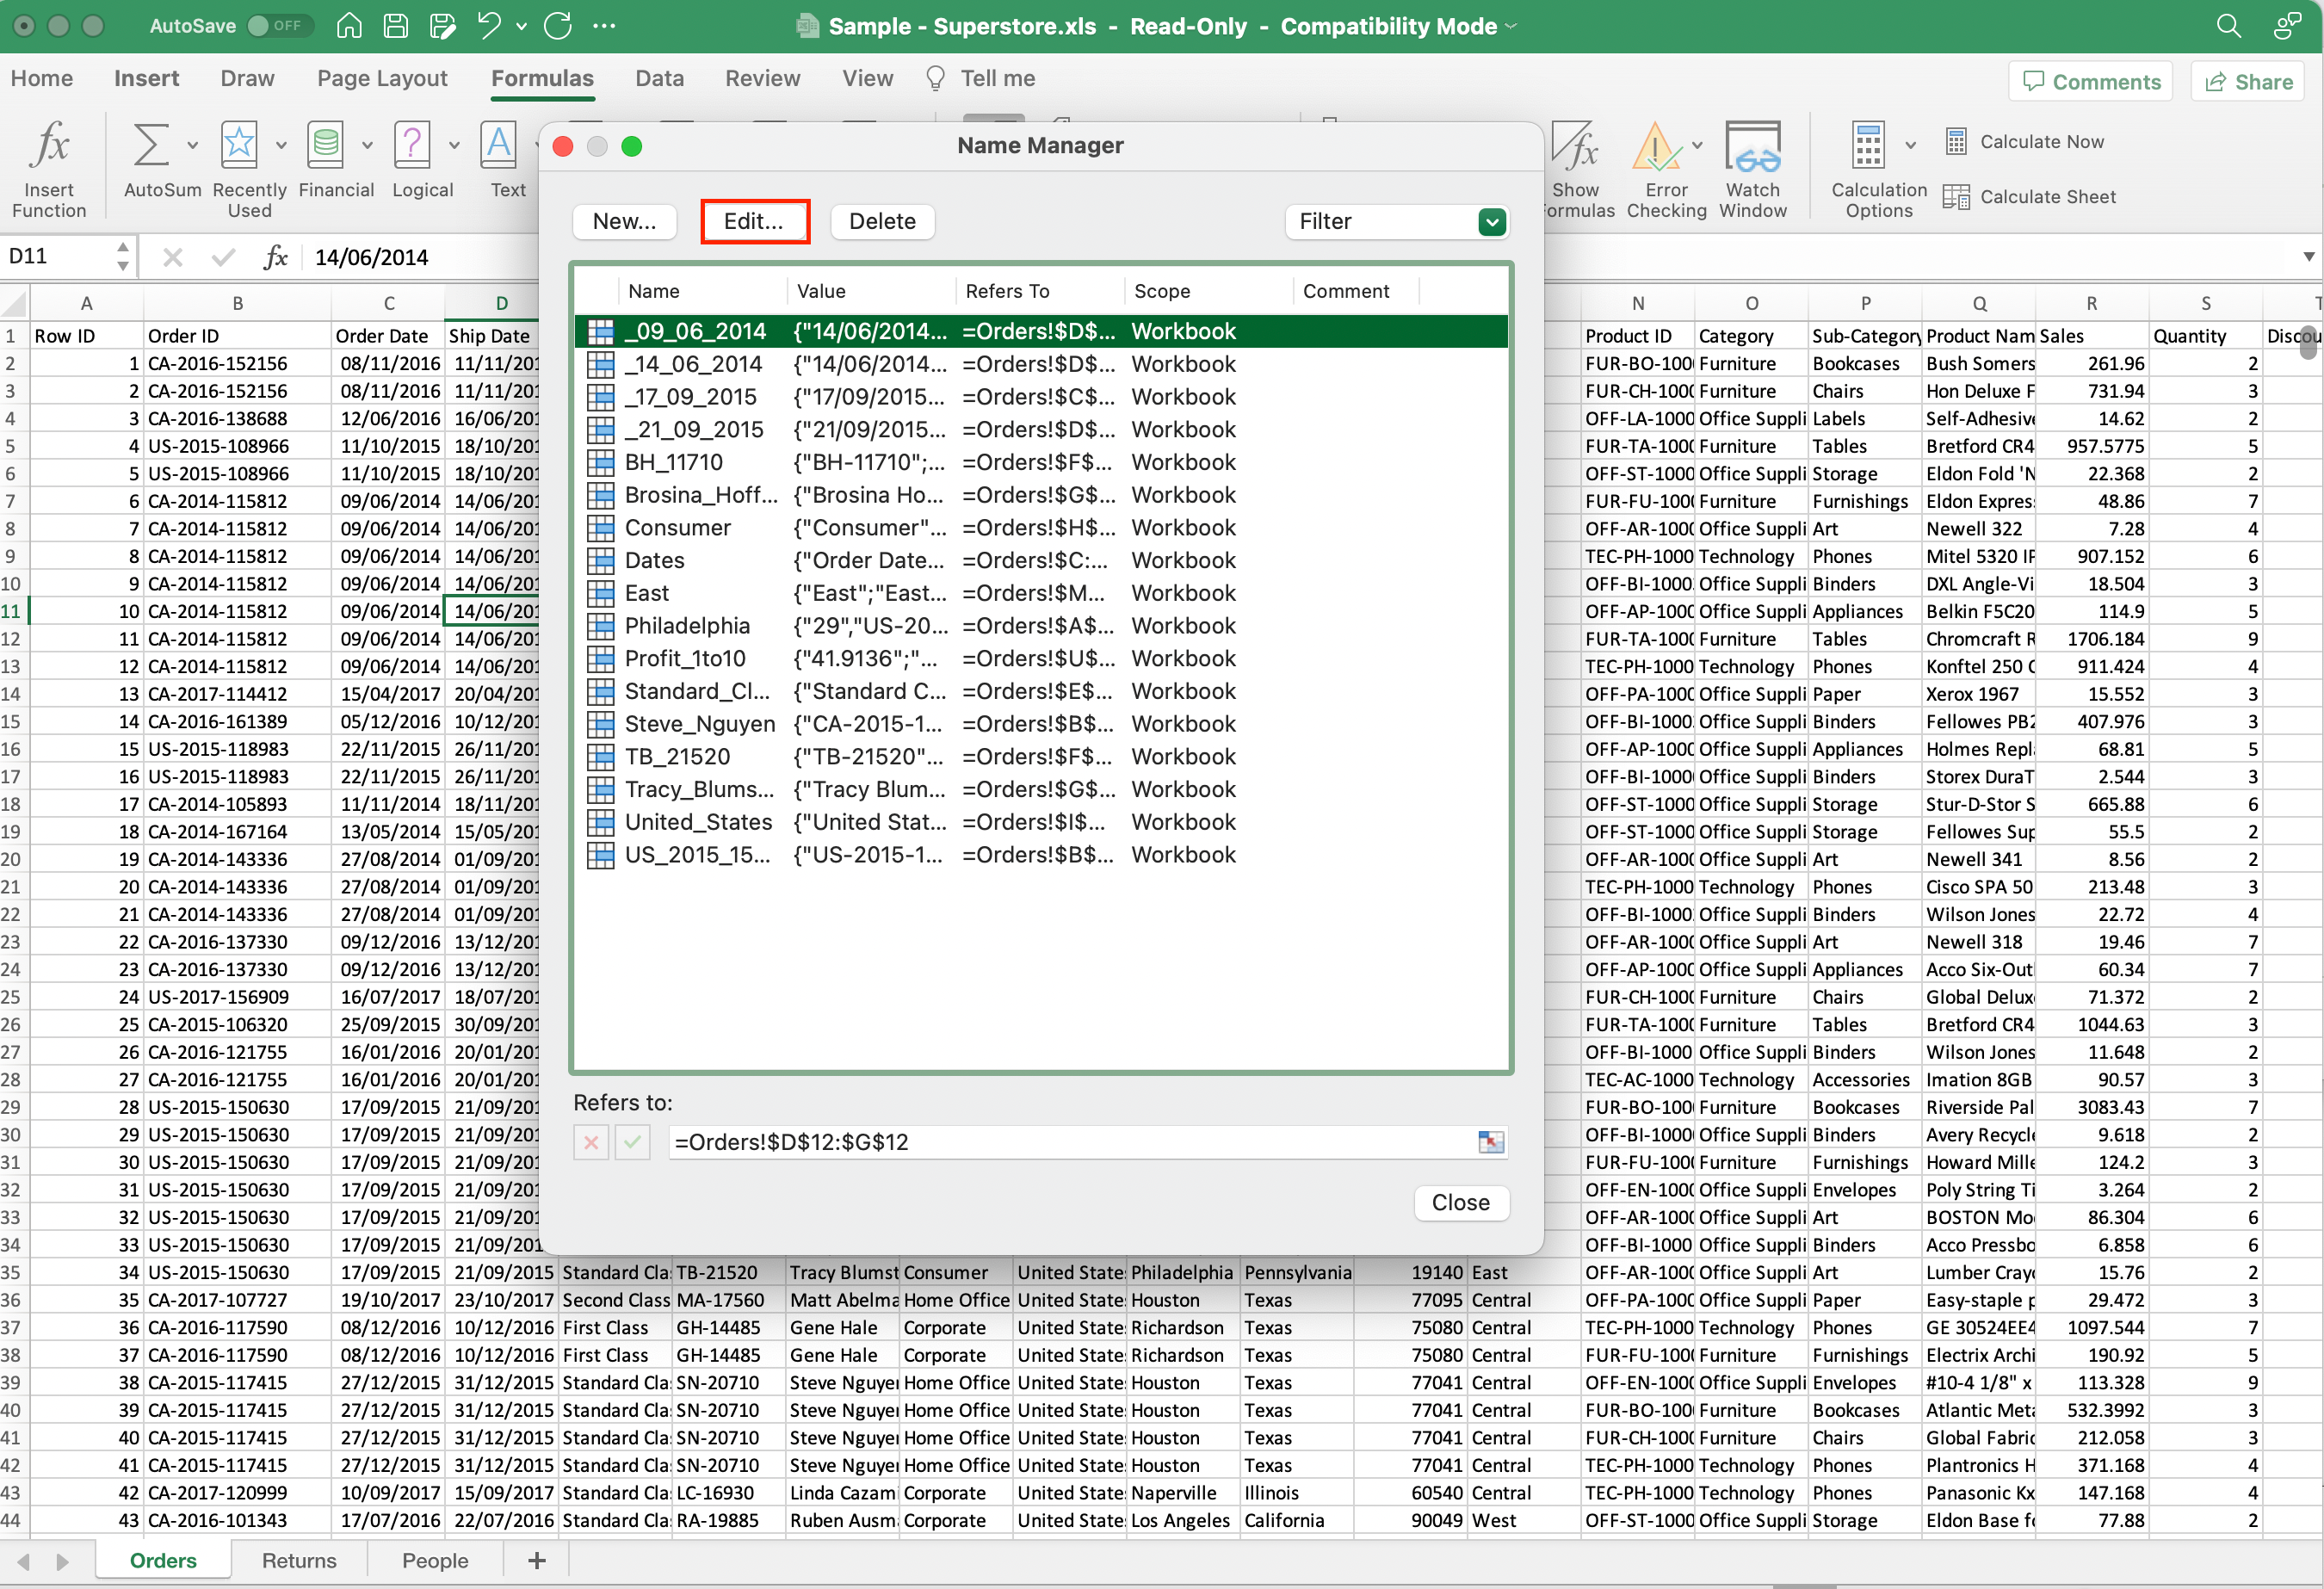
- Change the Name or Refers to field as needed. For example, you might want to update the range of cells it refers to or give it a more descriptive name.
- Click OK to save your changes.
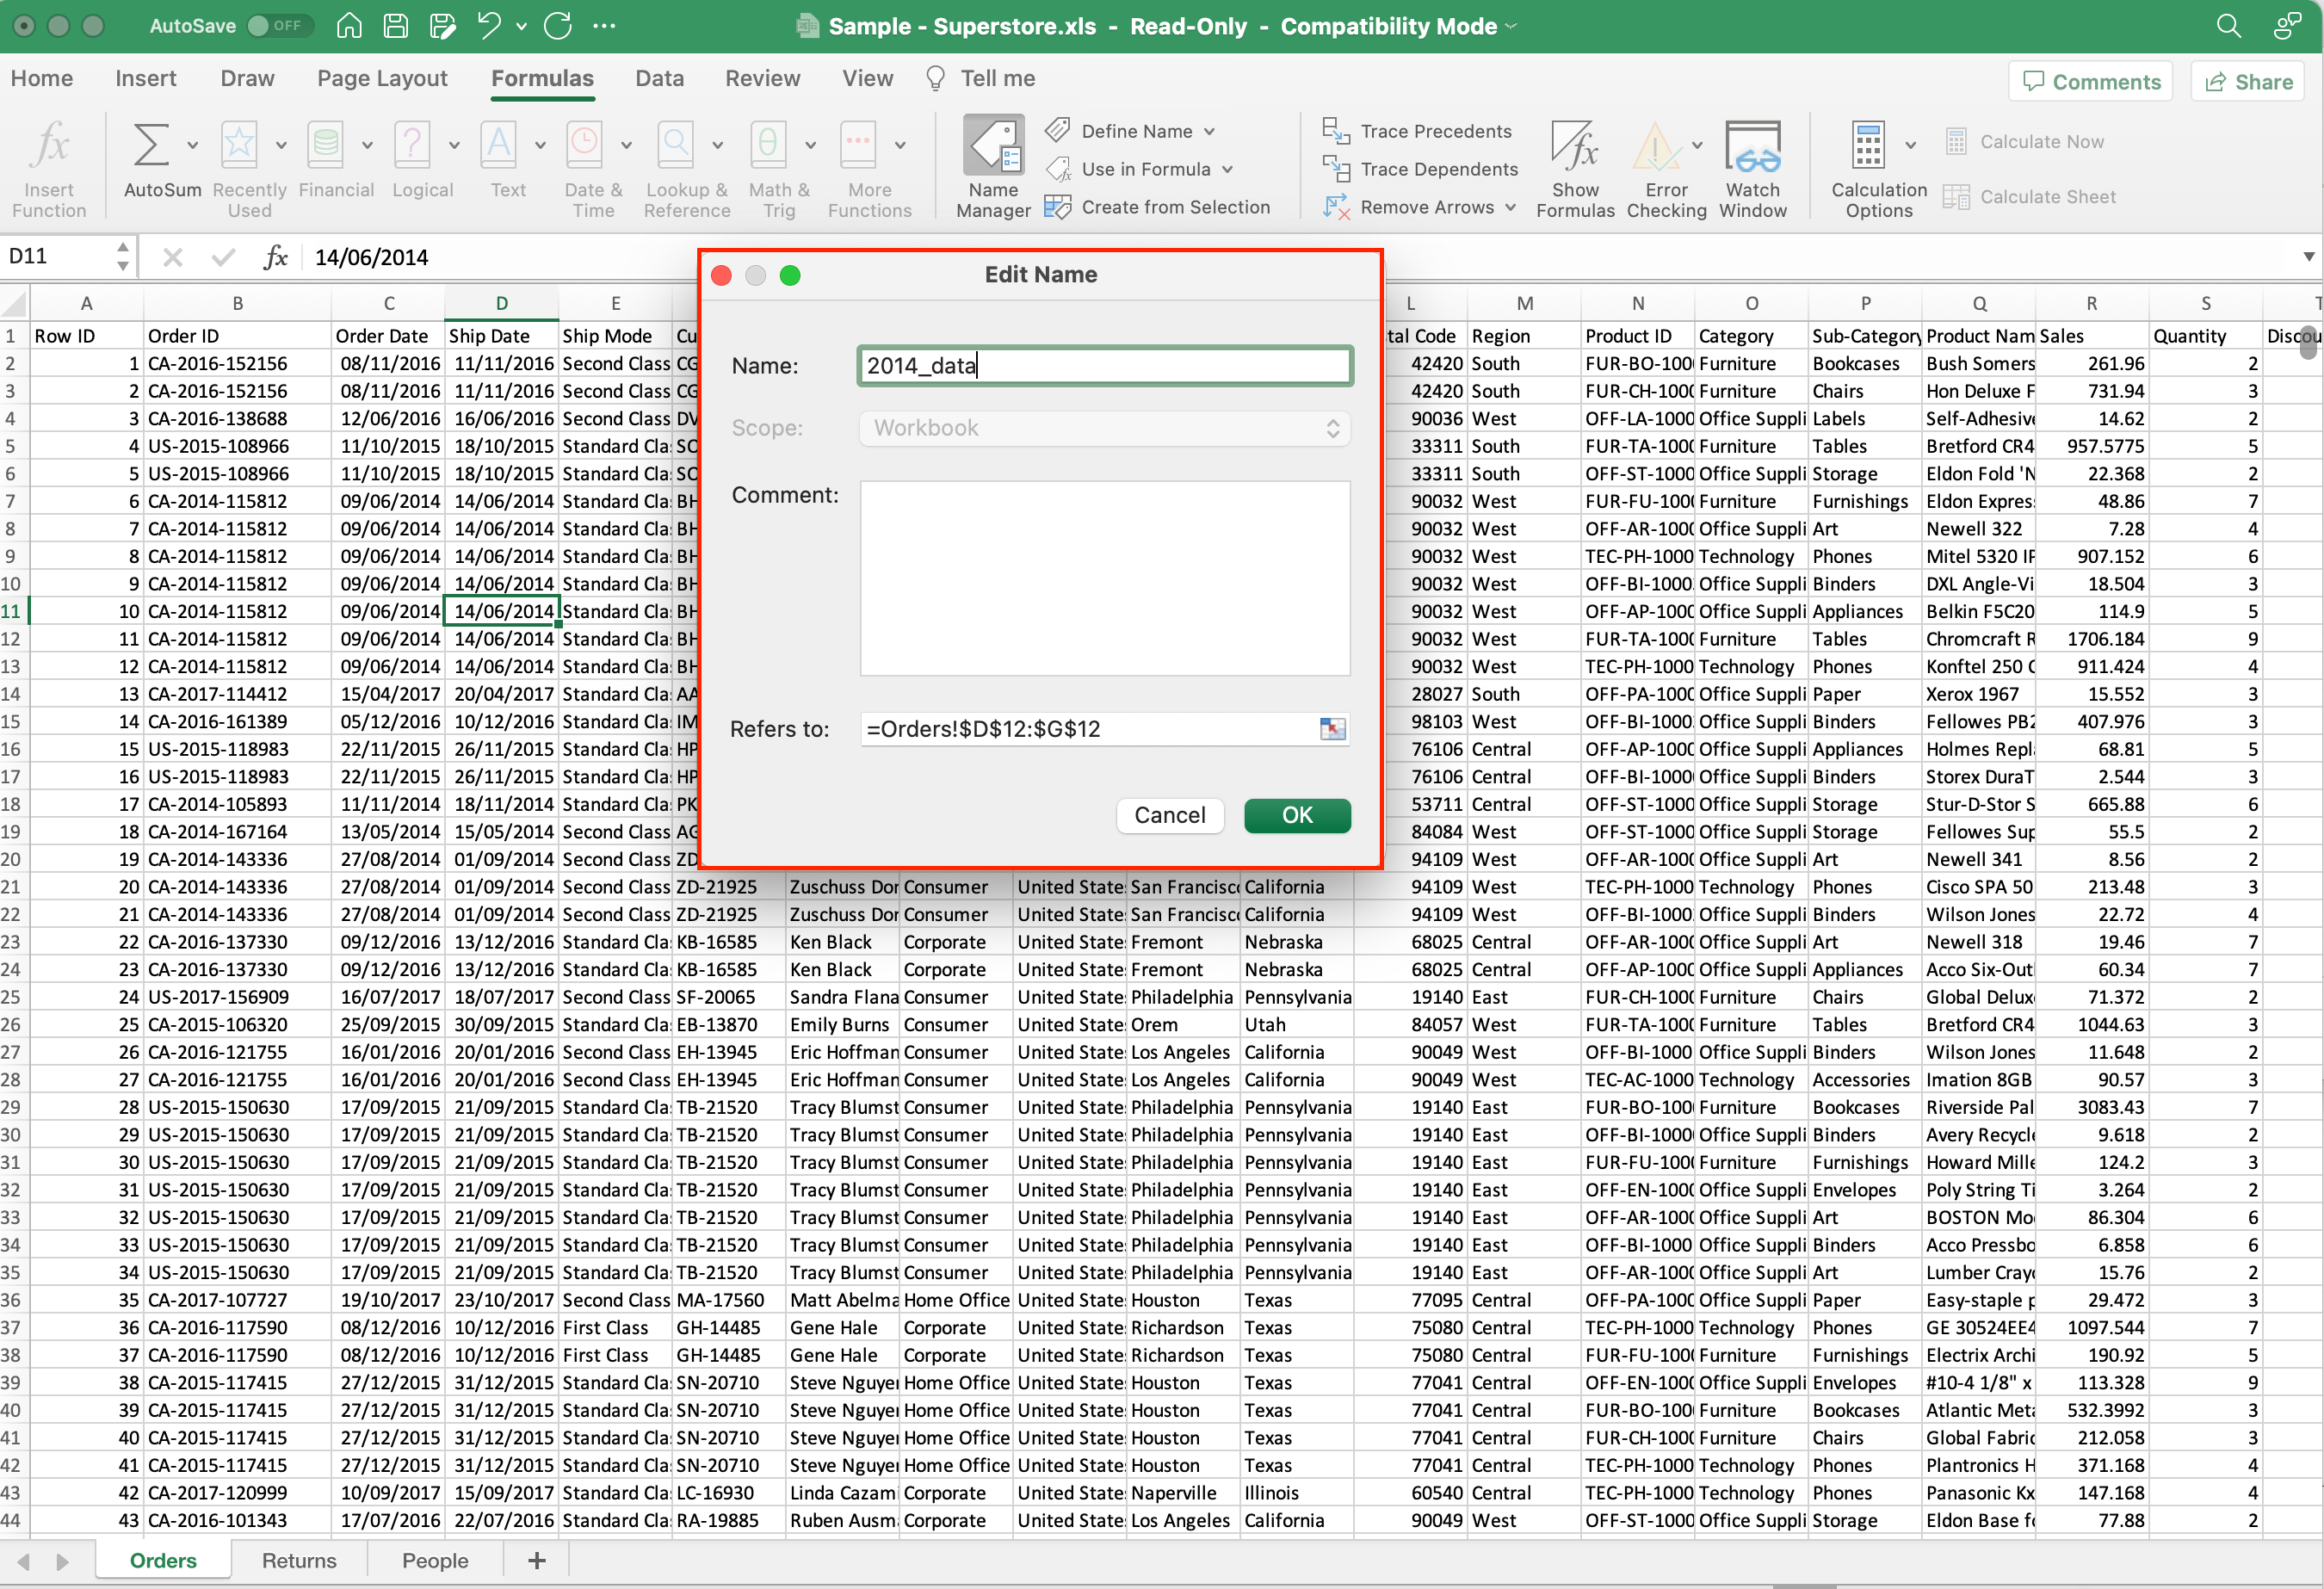
This allows you to easily edit the selected named ranges without disturbing any related formulas or charts.
3. Deleting Named Ranges
If you no longer need a named range, or if you created one by mistake, you can easily delete it:
- Open the Name Manager.
- Select the named range you want to delete.
- Click Delete.
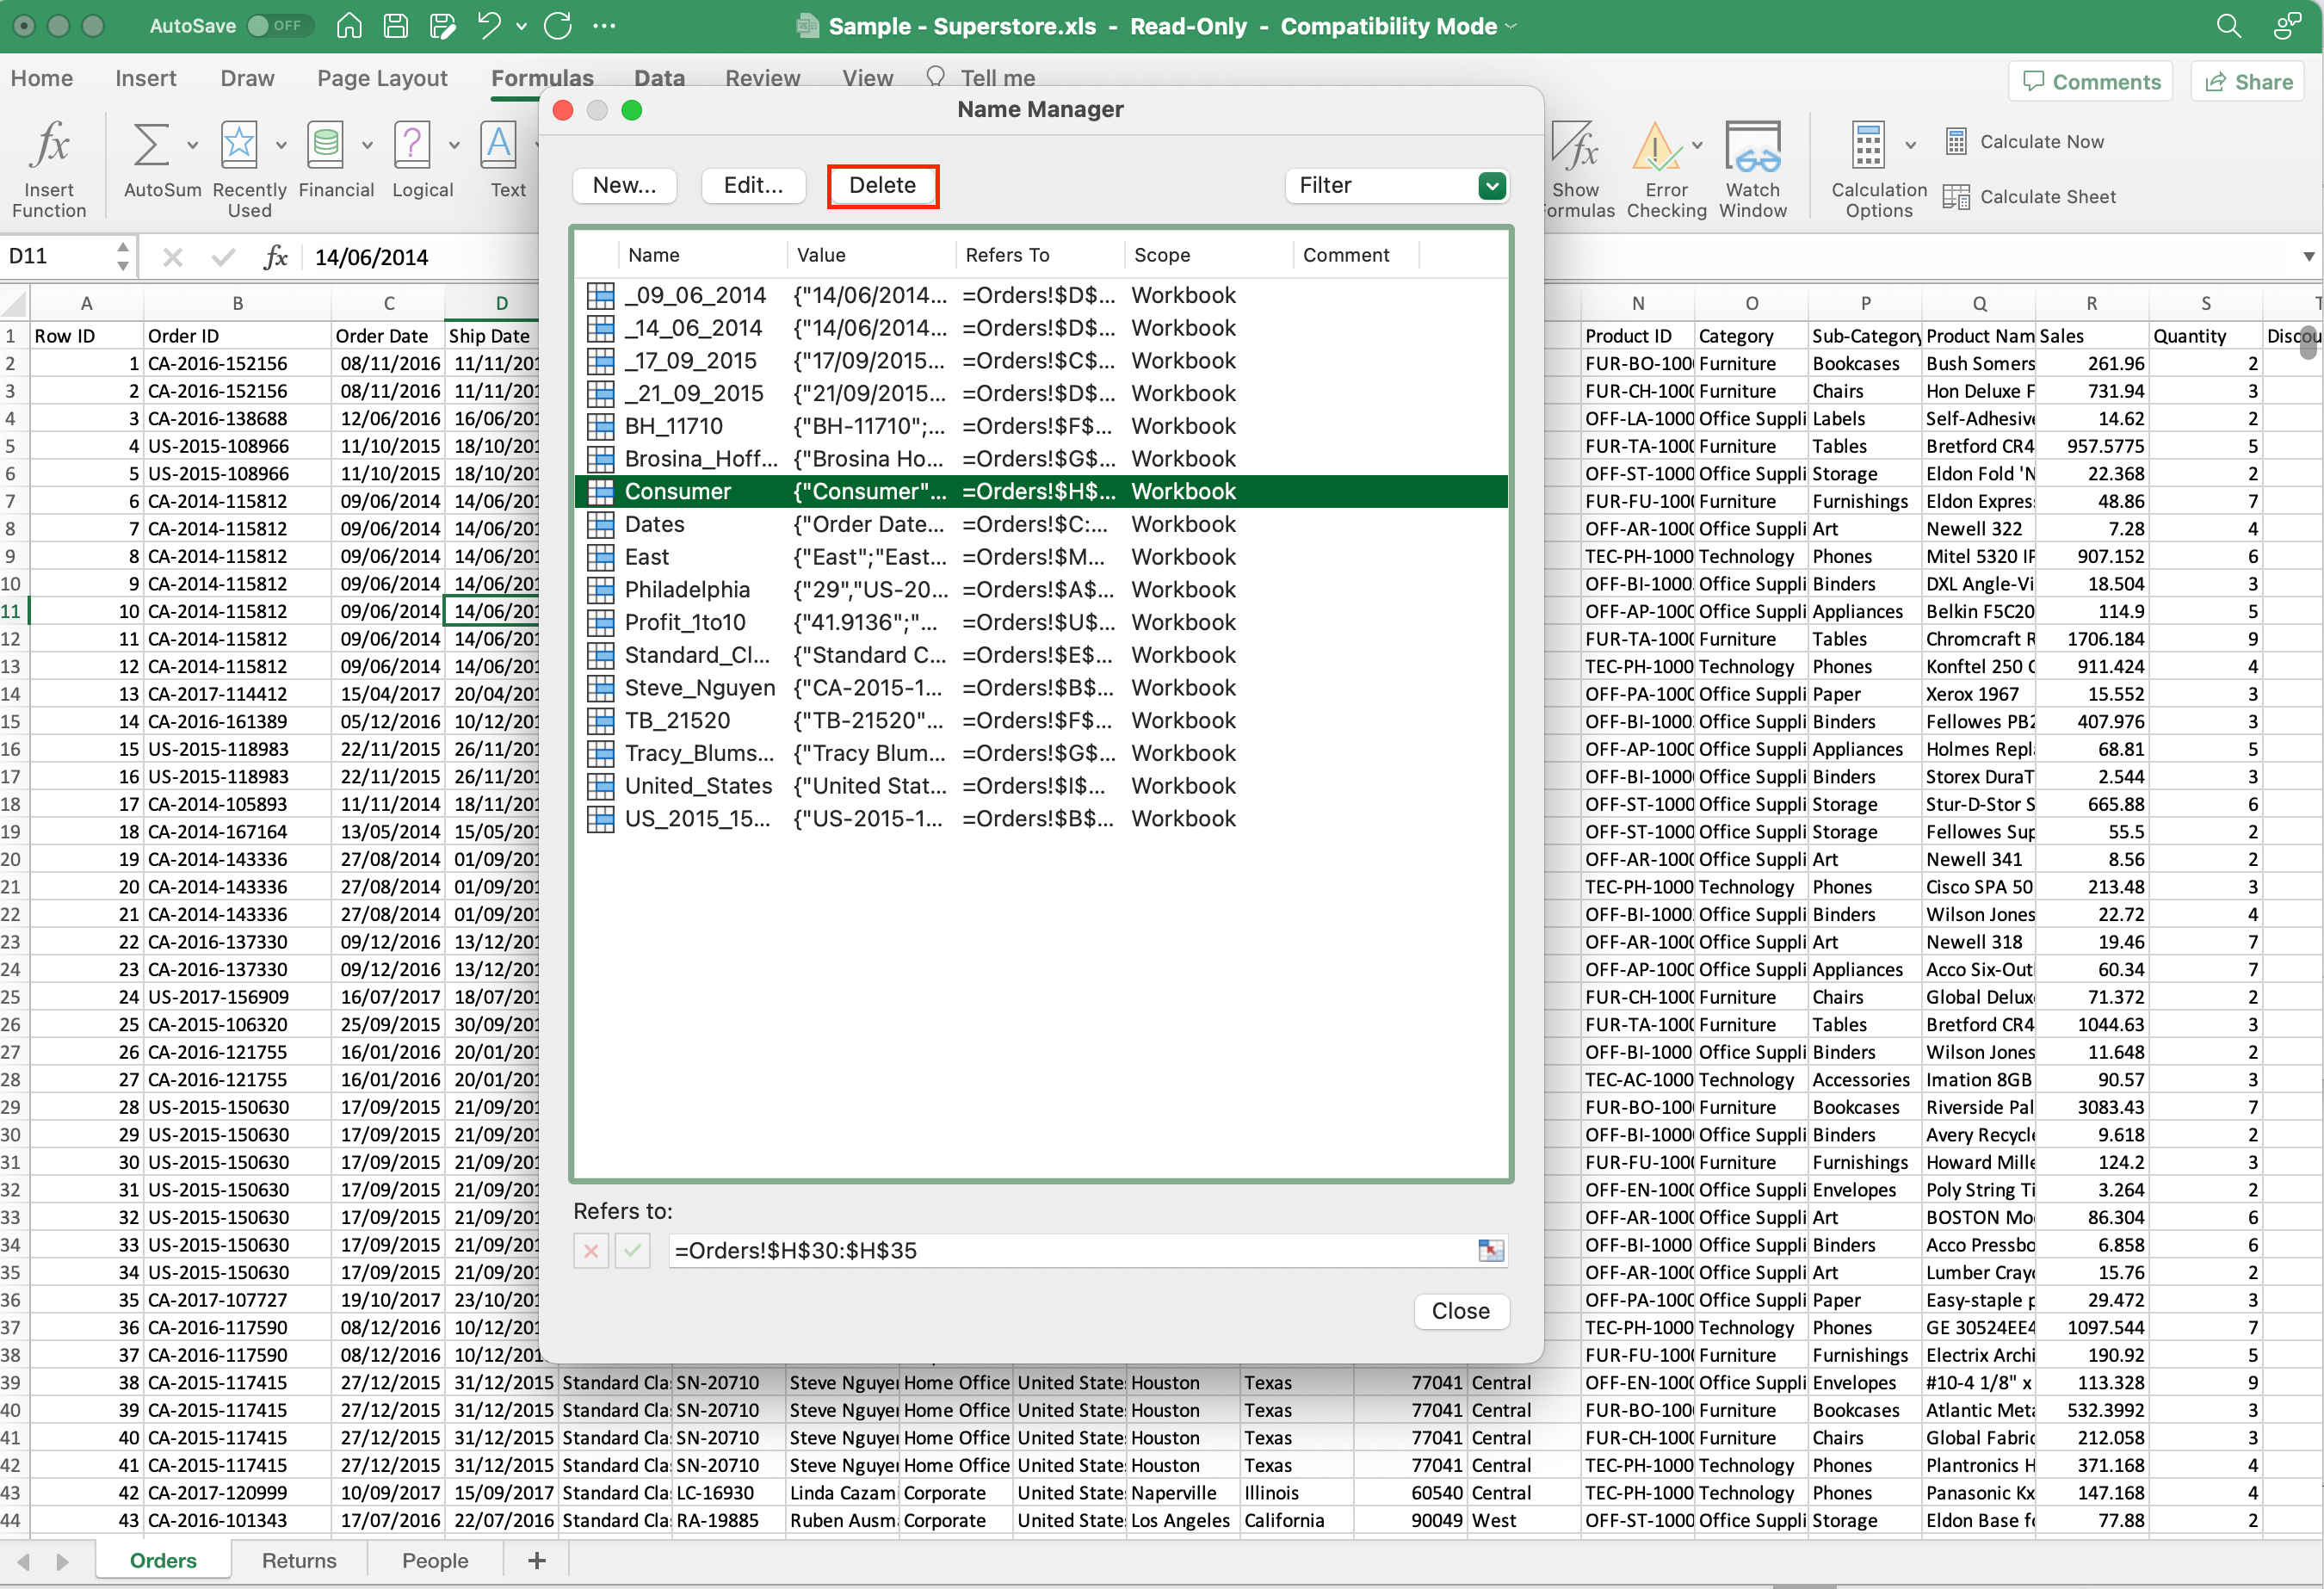
- A confirmation dialog box will appear. Click OK to confirm the deletion.
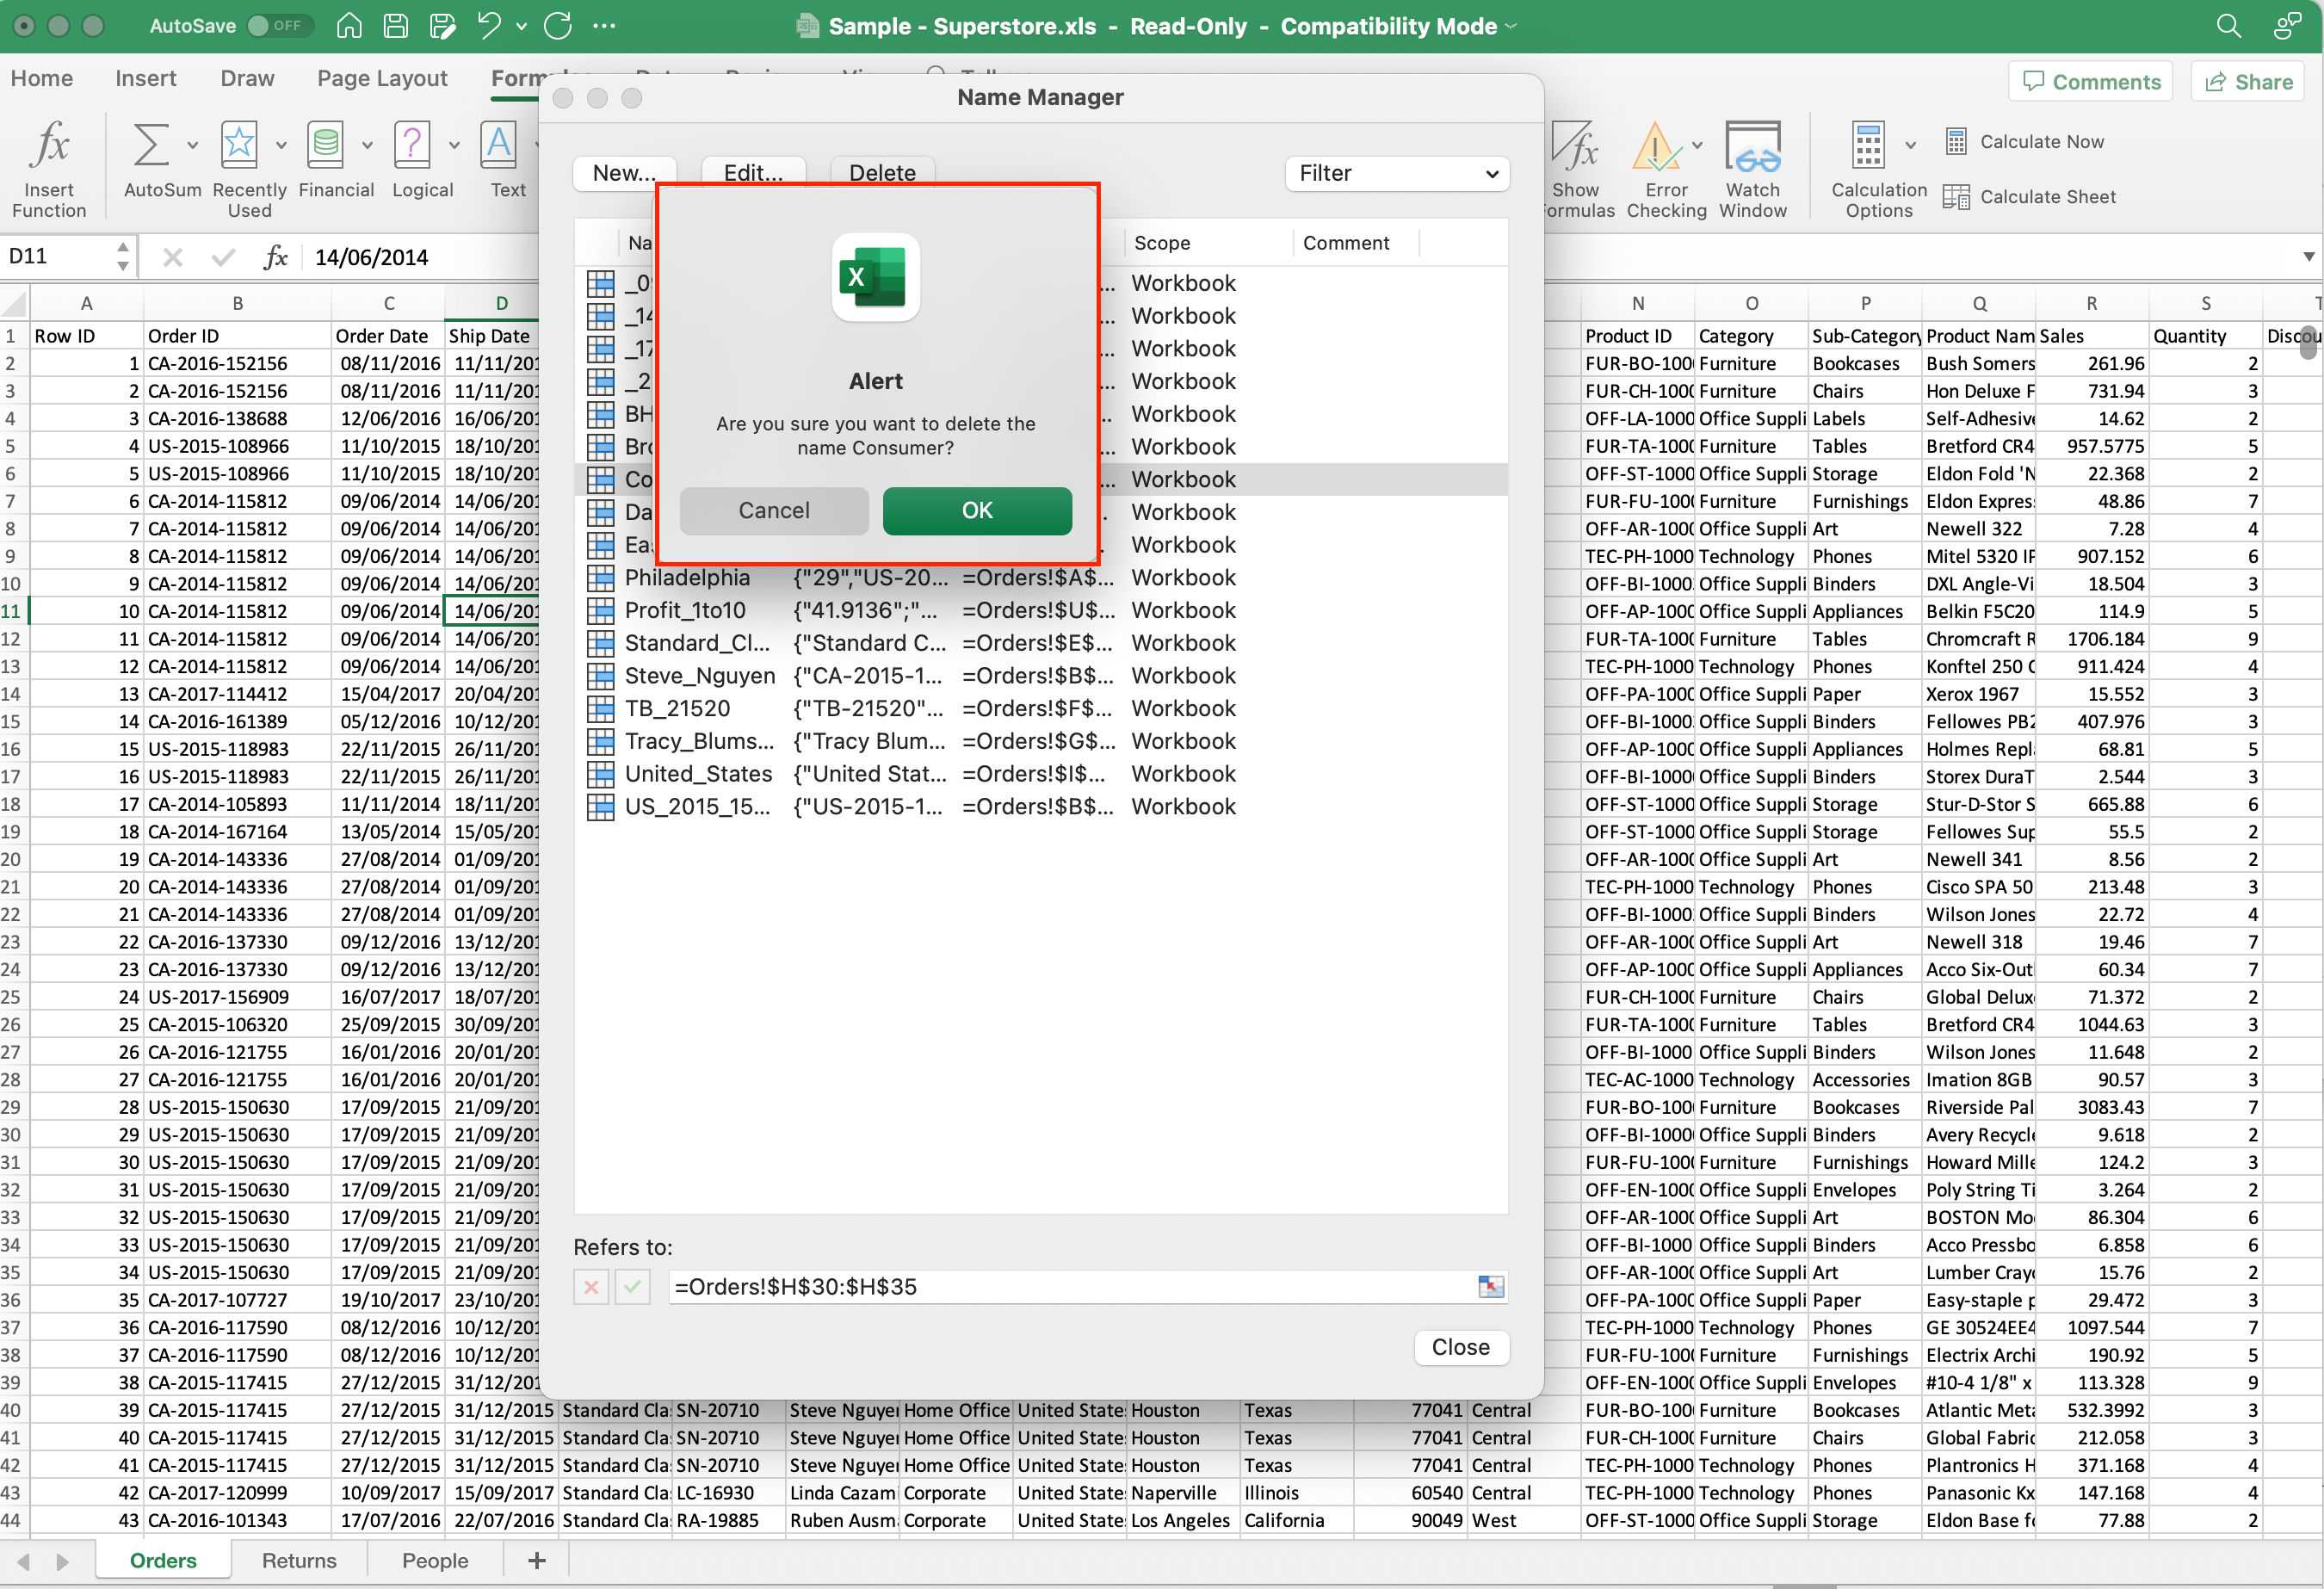
Please note that deleting a named range might cause errors in any formulas or charts that reference it.
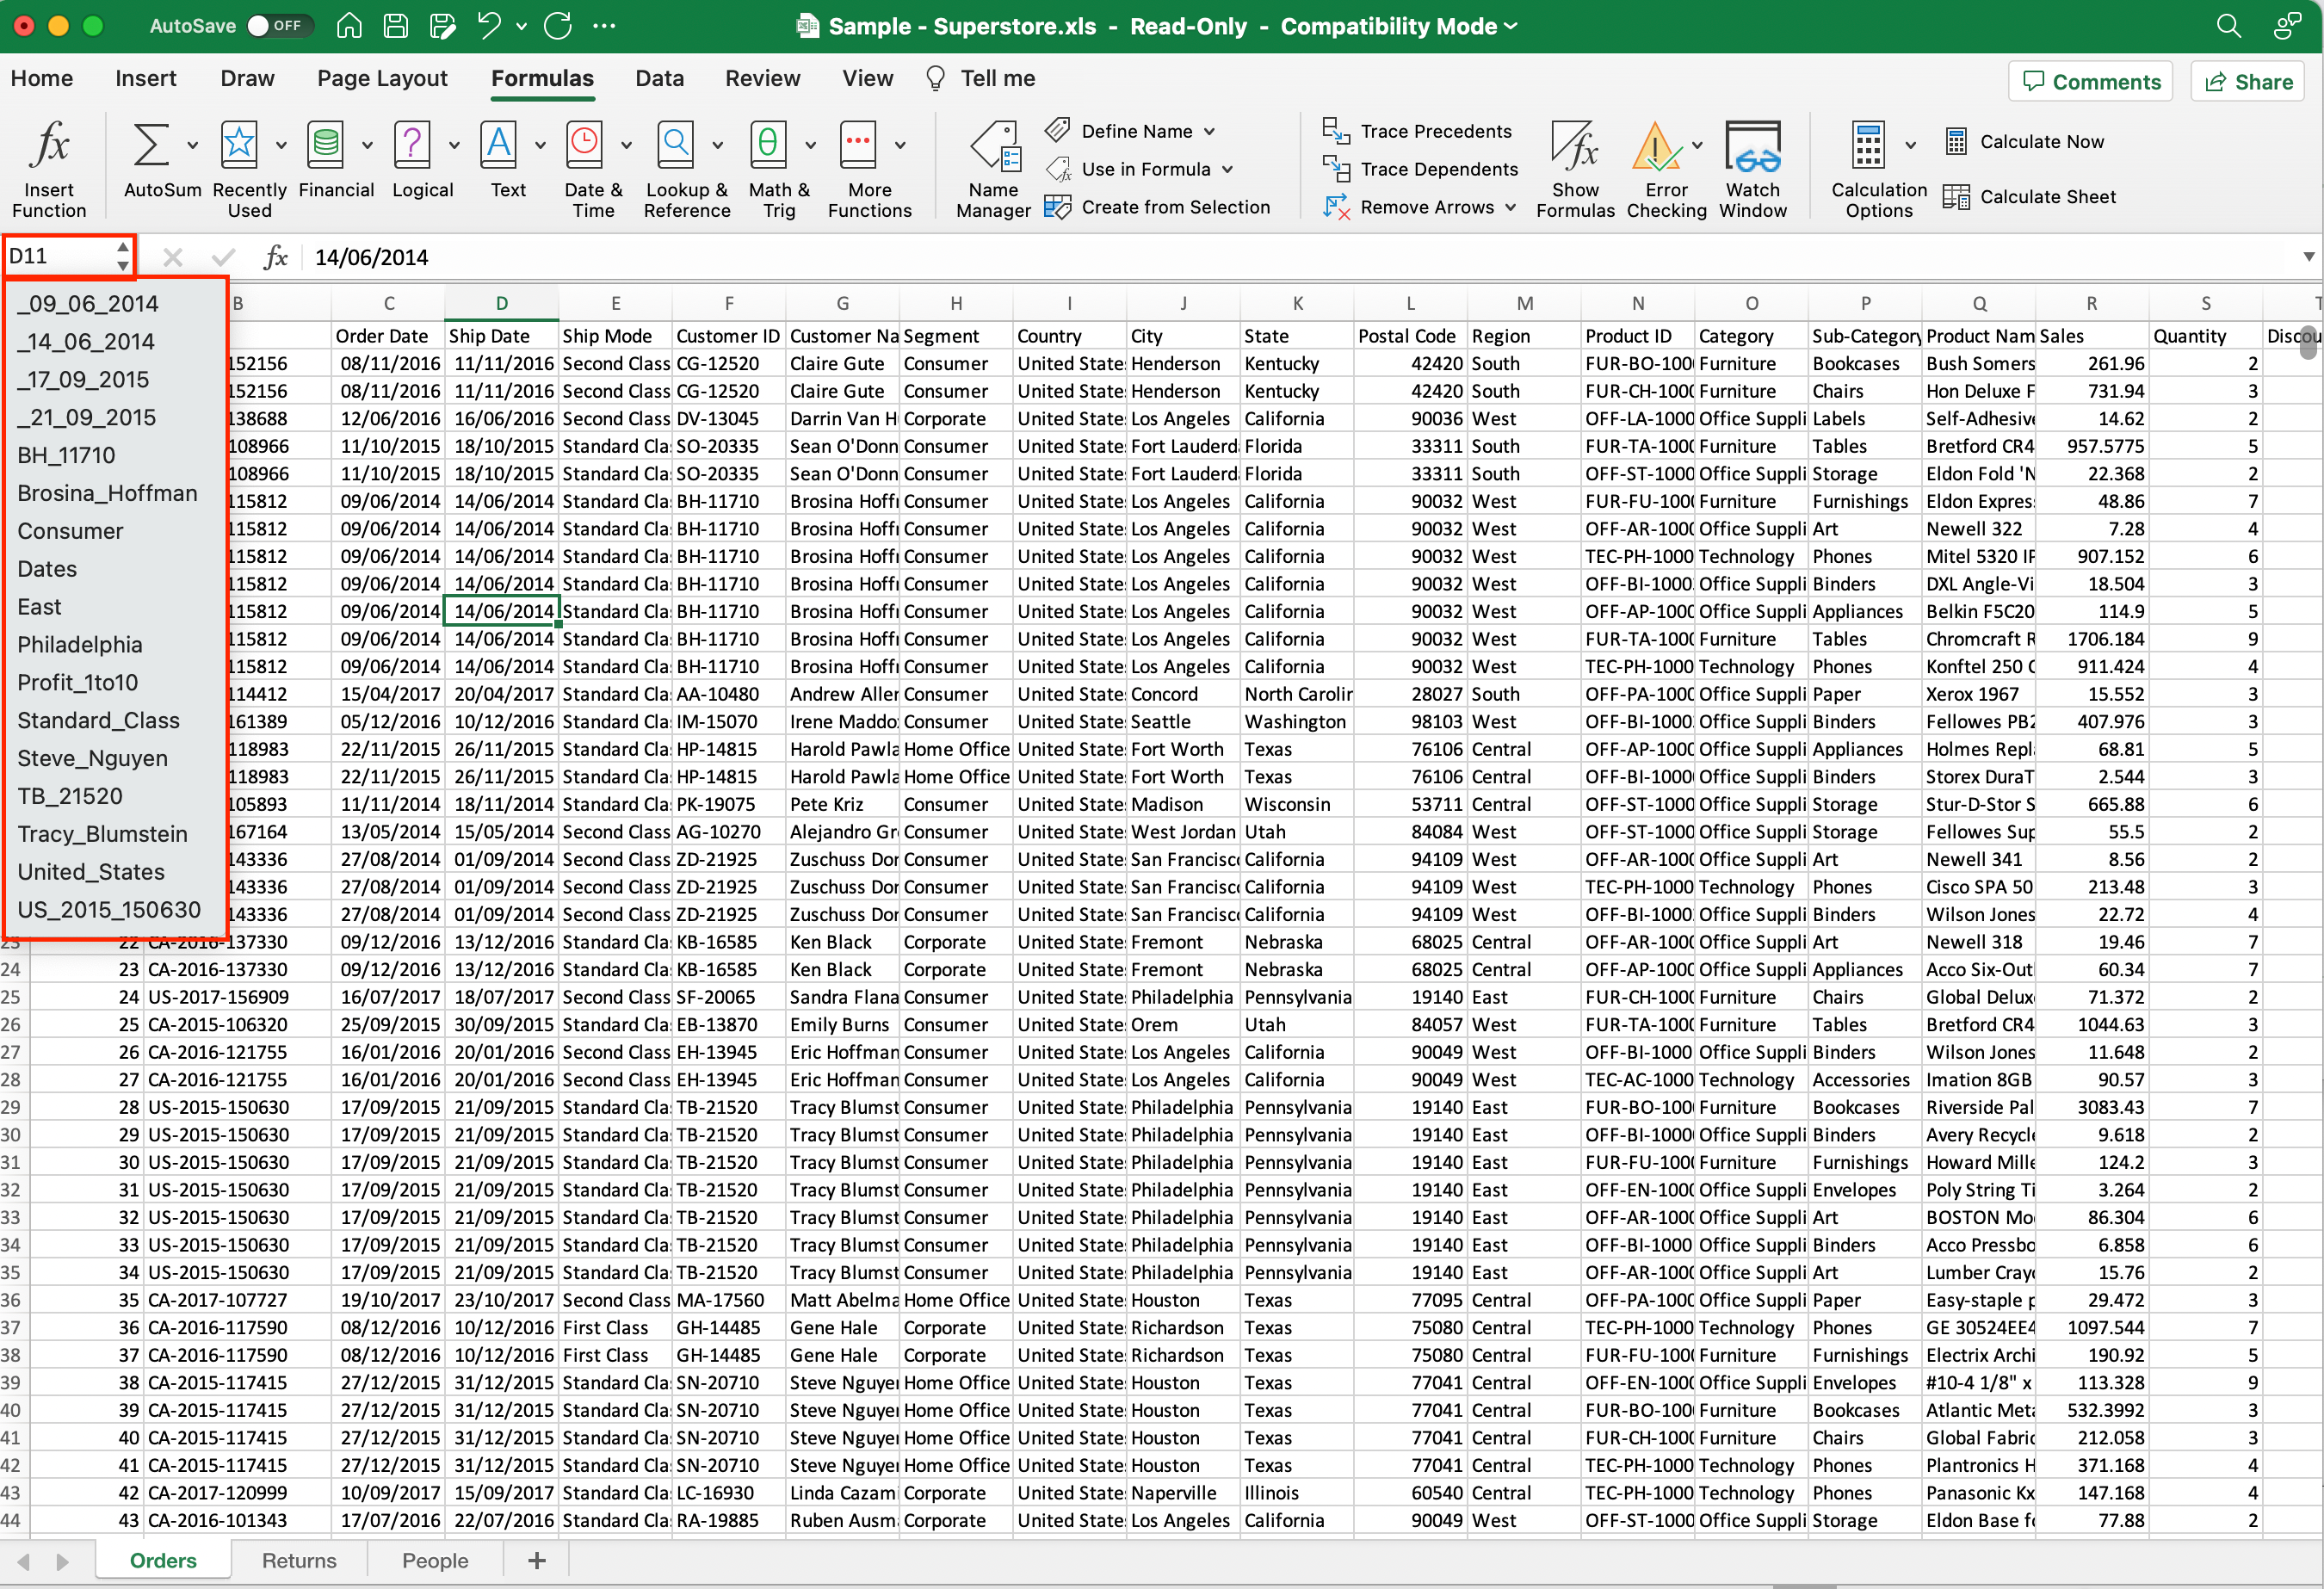
4. Finding Named Ranges using Name Box
The name box located to the left of the formula bar in Excel is more than just a place to display the currently selected cell reference.
It also serves as a quick access point for named ranges in your workbook.
To locate a named range using the name box:
- Click on the small arrow next to the cell reference in the name box to reveal a name box dropdown list containing all named ranges within the workbook.
- Navigate to a specific named range by selecting its name; Excel will automatically jump to the corresponding range in your worksheet. This is particularly useful when dealing with large datasets or multiple sheets in your workbook.
- You can also use the name box as a filter by typing any part of a named range and hitting the Enter key. Excel will display only the named ranges containing the typed characters, enabling you to find the desired range rapidly.
5. Creating Dynamic Named Ranges
Dynamic named ranges in Excel are quite powerful as they automatically expand and contract based on the data within them. With this feature, your formulas and charts will update seamlessly as you add or remove data.
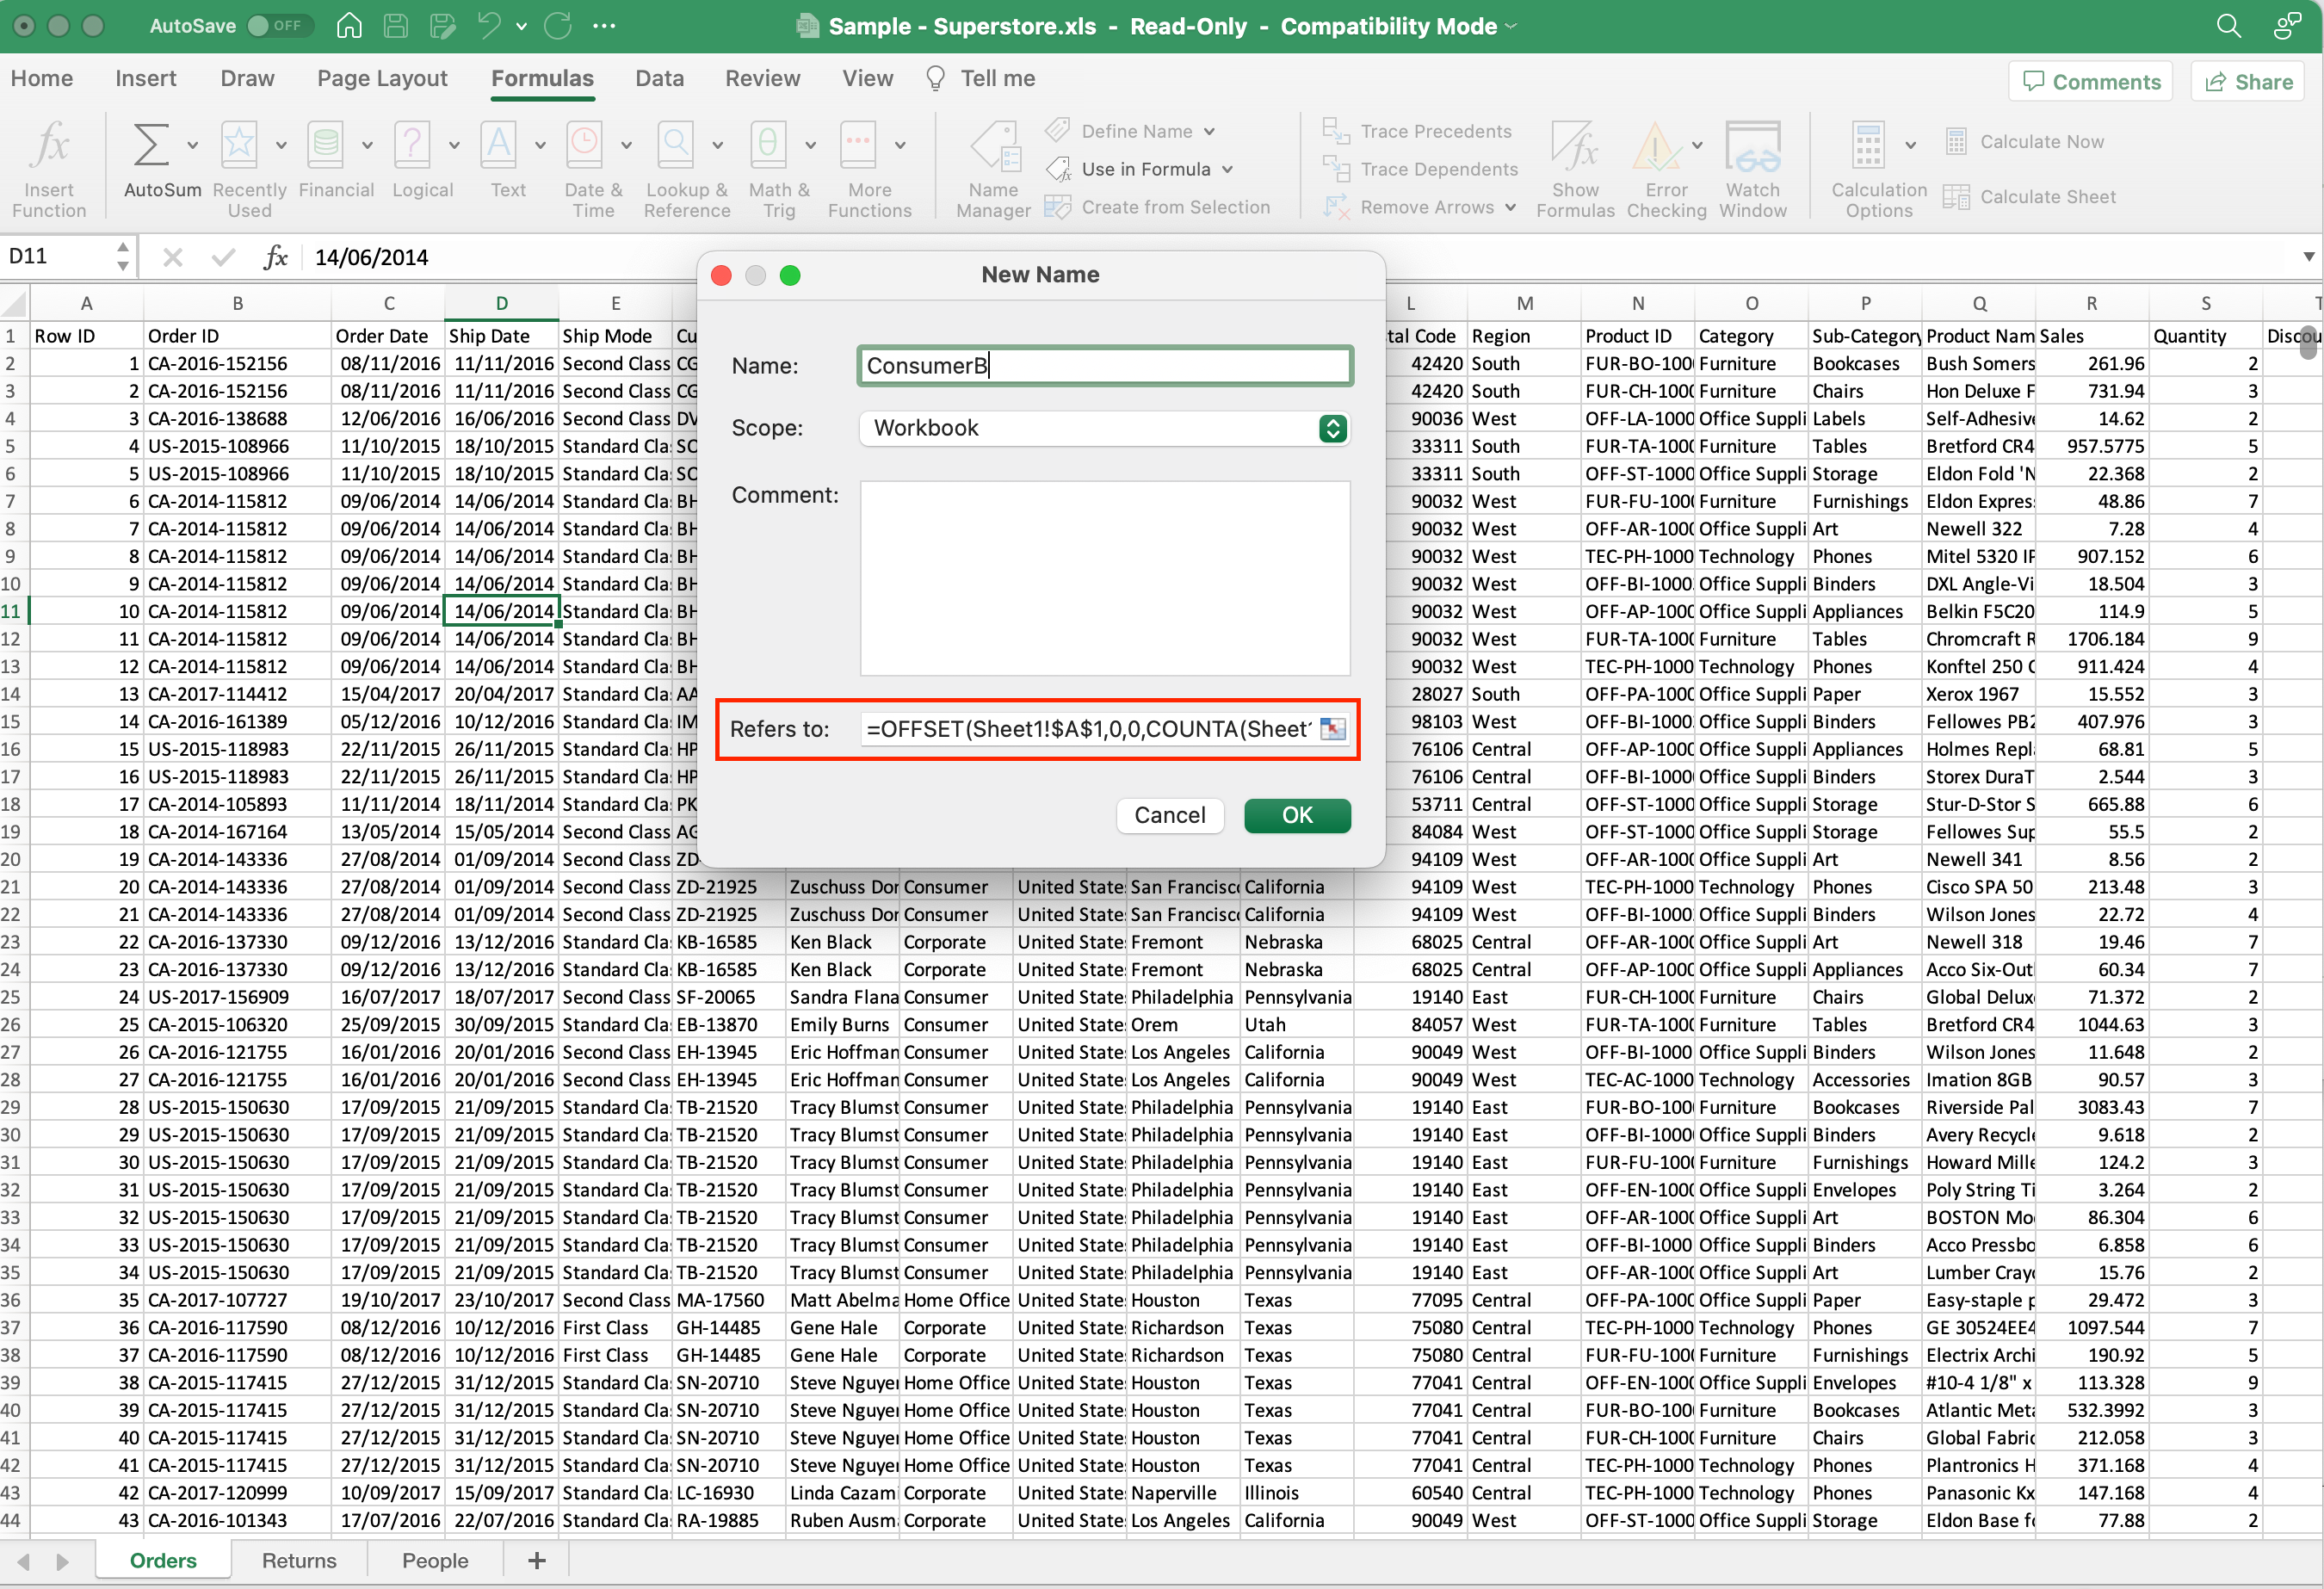
To create a dynamic named range, follow these steps:
- Open the Name Manager.
- Click on New to create a new named range.
- Enter your desired name for the range.
- In the Refers to box, input a formula using the OFFSET and COUNTA functions. For example: =OFFSET(Sheet1!$A$1,0,0,COUNTA(Sheet1!$A:$A),1). This formula creates a dynamic named range for column A in Sheet1.
- Click OK to save your new dynamic named range.
Now whenever you refer to this named range in your formulas, it will dynamically adjust to the data set’s size.
Managing named ranges is essential for maintaining the integrity of your Excel workbooks. It ensures that your data remains accurate and that your formulas and functions continue to work as intended, even as your data evolves.
Referencing and Utilization of Named Ranges
Named ranges in Excel are powerful tools that can be referenced and utilized in various aspects of your spreadsheet work. Let’s go into how you can reference and utilize the named ranges.
1. Referencing in Formulas

When using named ranges in Excel, you can easily refer to them in your formulas. To reference a named range, simply type its name instead of the usual cell references, like =SUM(named_range). Named ranges can be beneficial because they can make your formulas more readable and easier to understand.
For example, instead of =SUM(A1:A10), you could use =SUM(SalesData) if you have a named range called “SalesData”.
Explore the differences between Excel formulas and DAX:
2. Absolute vs Relative References
In Excel, references can be absolute or relative.
- Absolute references remain constant when copying and pasting formulas.
- Relative references change based on the location of the copied formula.
With named ranges, you can take advantage of both types of references, depending on your needs.
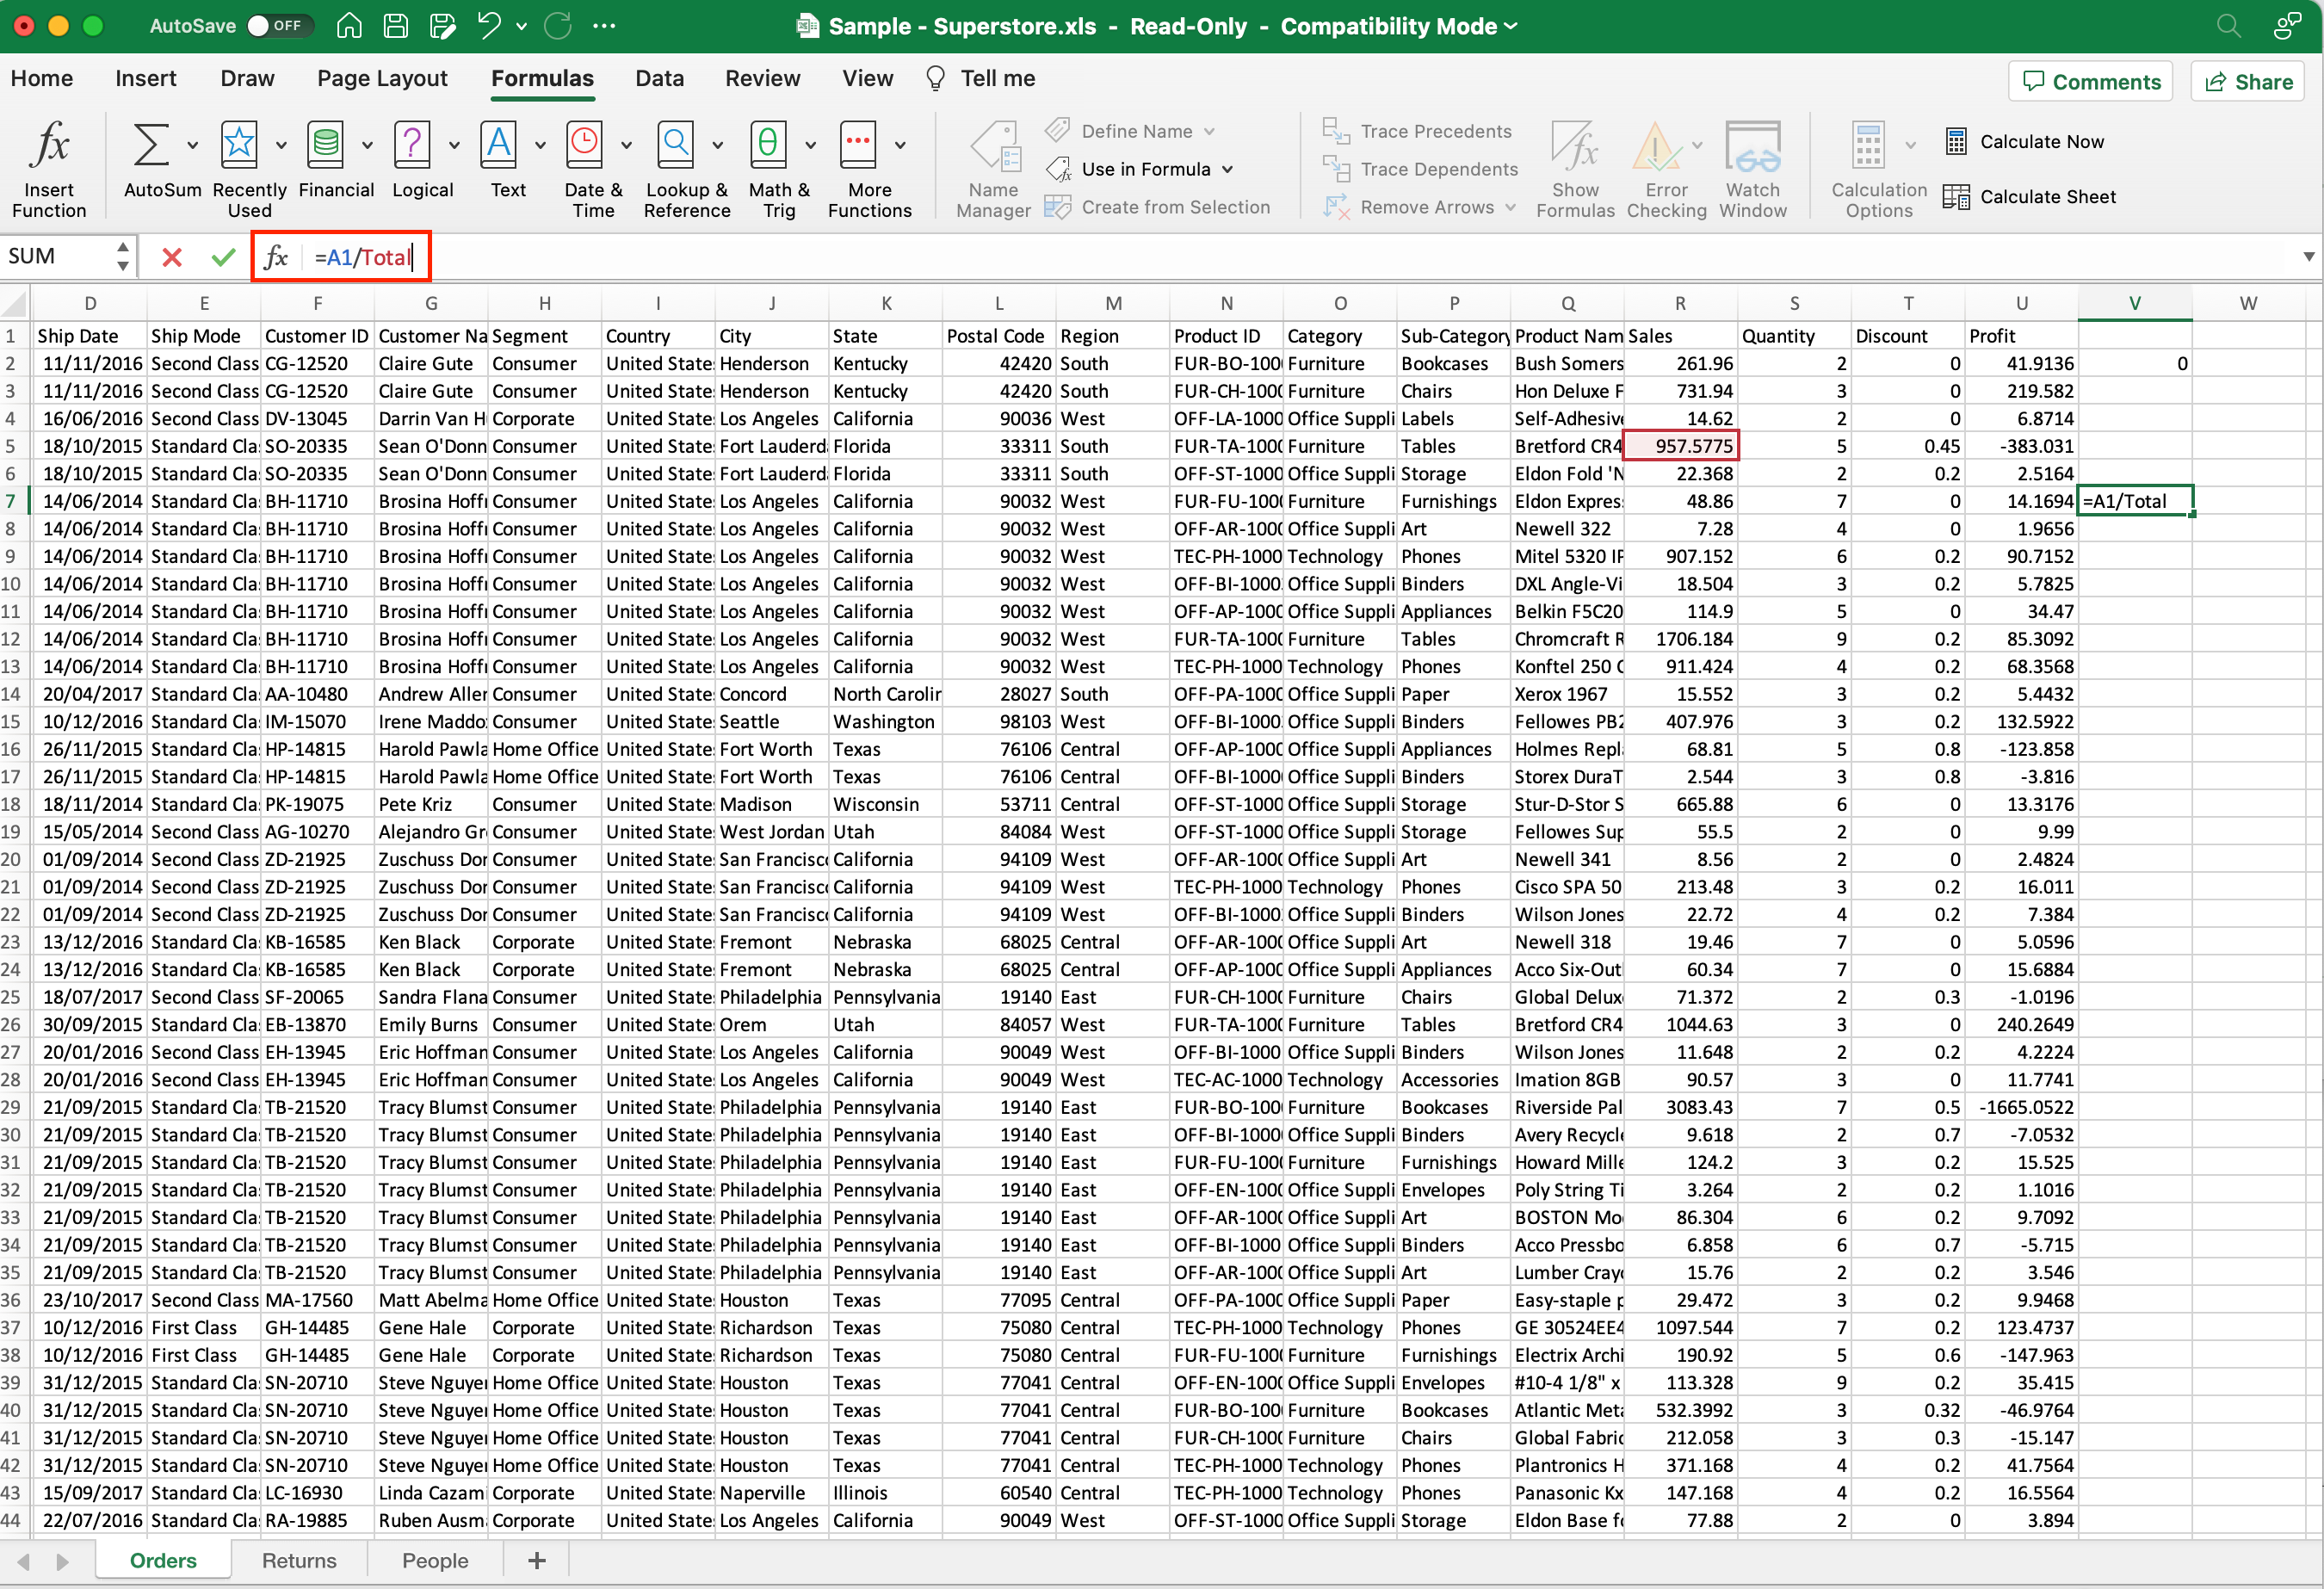
For example, if you create a named range called “Total” that refers to cell B1, you can use it in a formula, like =A1/Total. If you copy this formula down to another cell, the reference to “Total” remains absolute, and the formula will still refer to B1.

3. Using Named Range in VLOOKUP
Named ranges can also be used in conjunction with Excel’s VLOOKUP function.
The VLOOKUP function is useful for looking up a specific value from a table based on a given criteria. To utilize a named range in VLOOKUP, just replace the table array argument with the name.
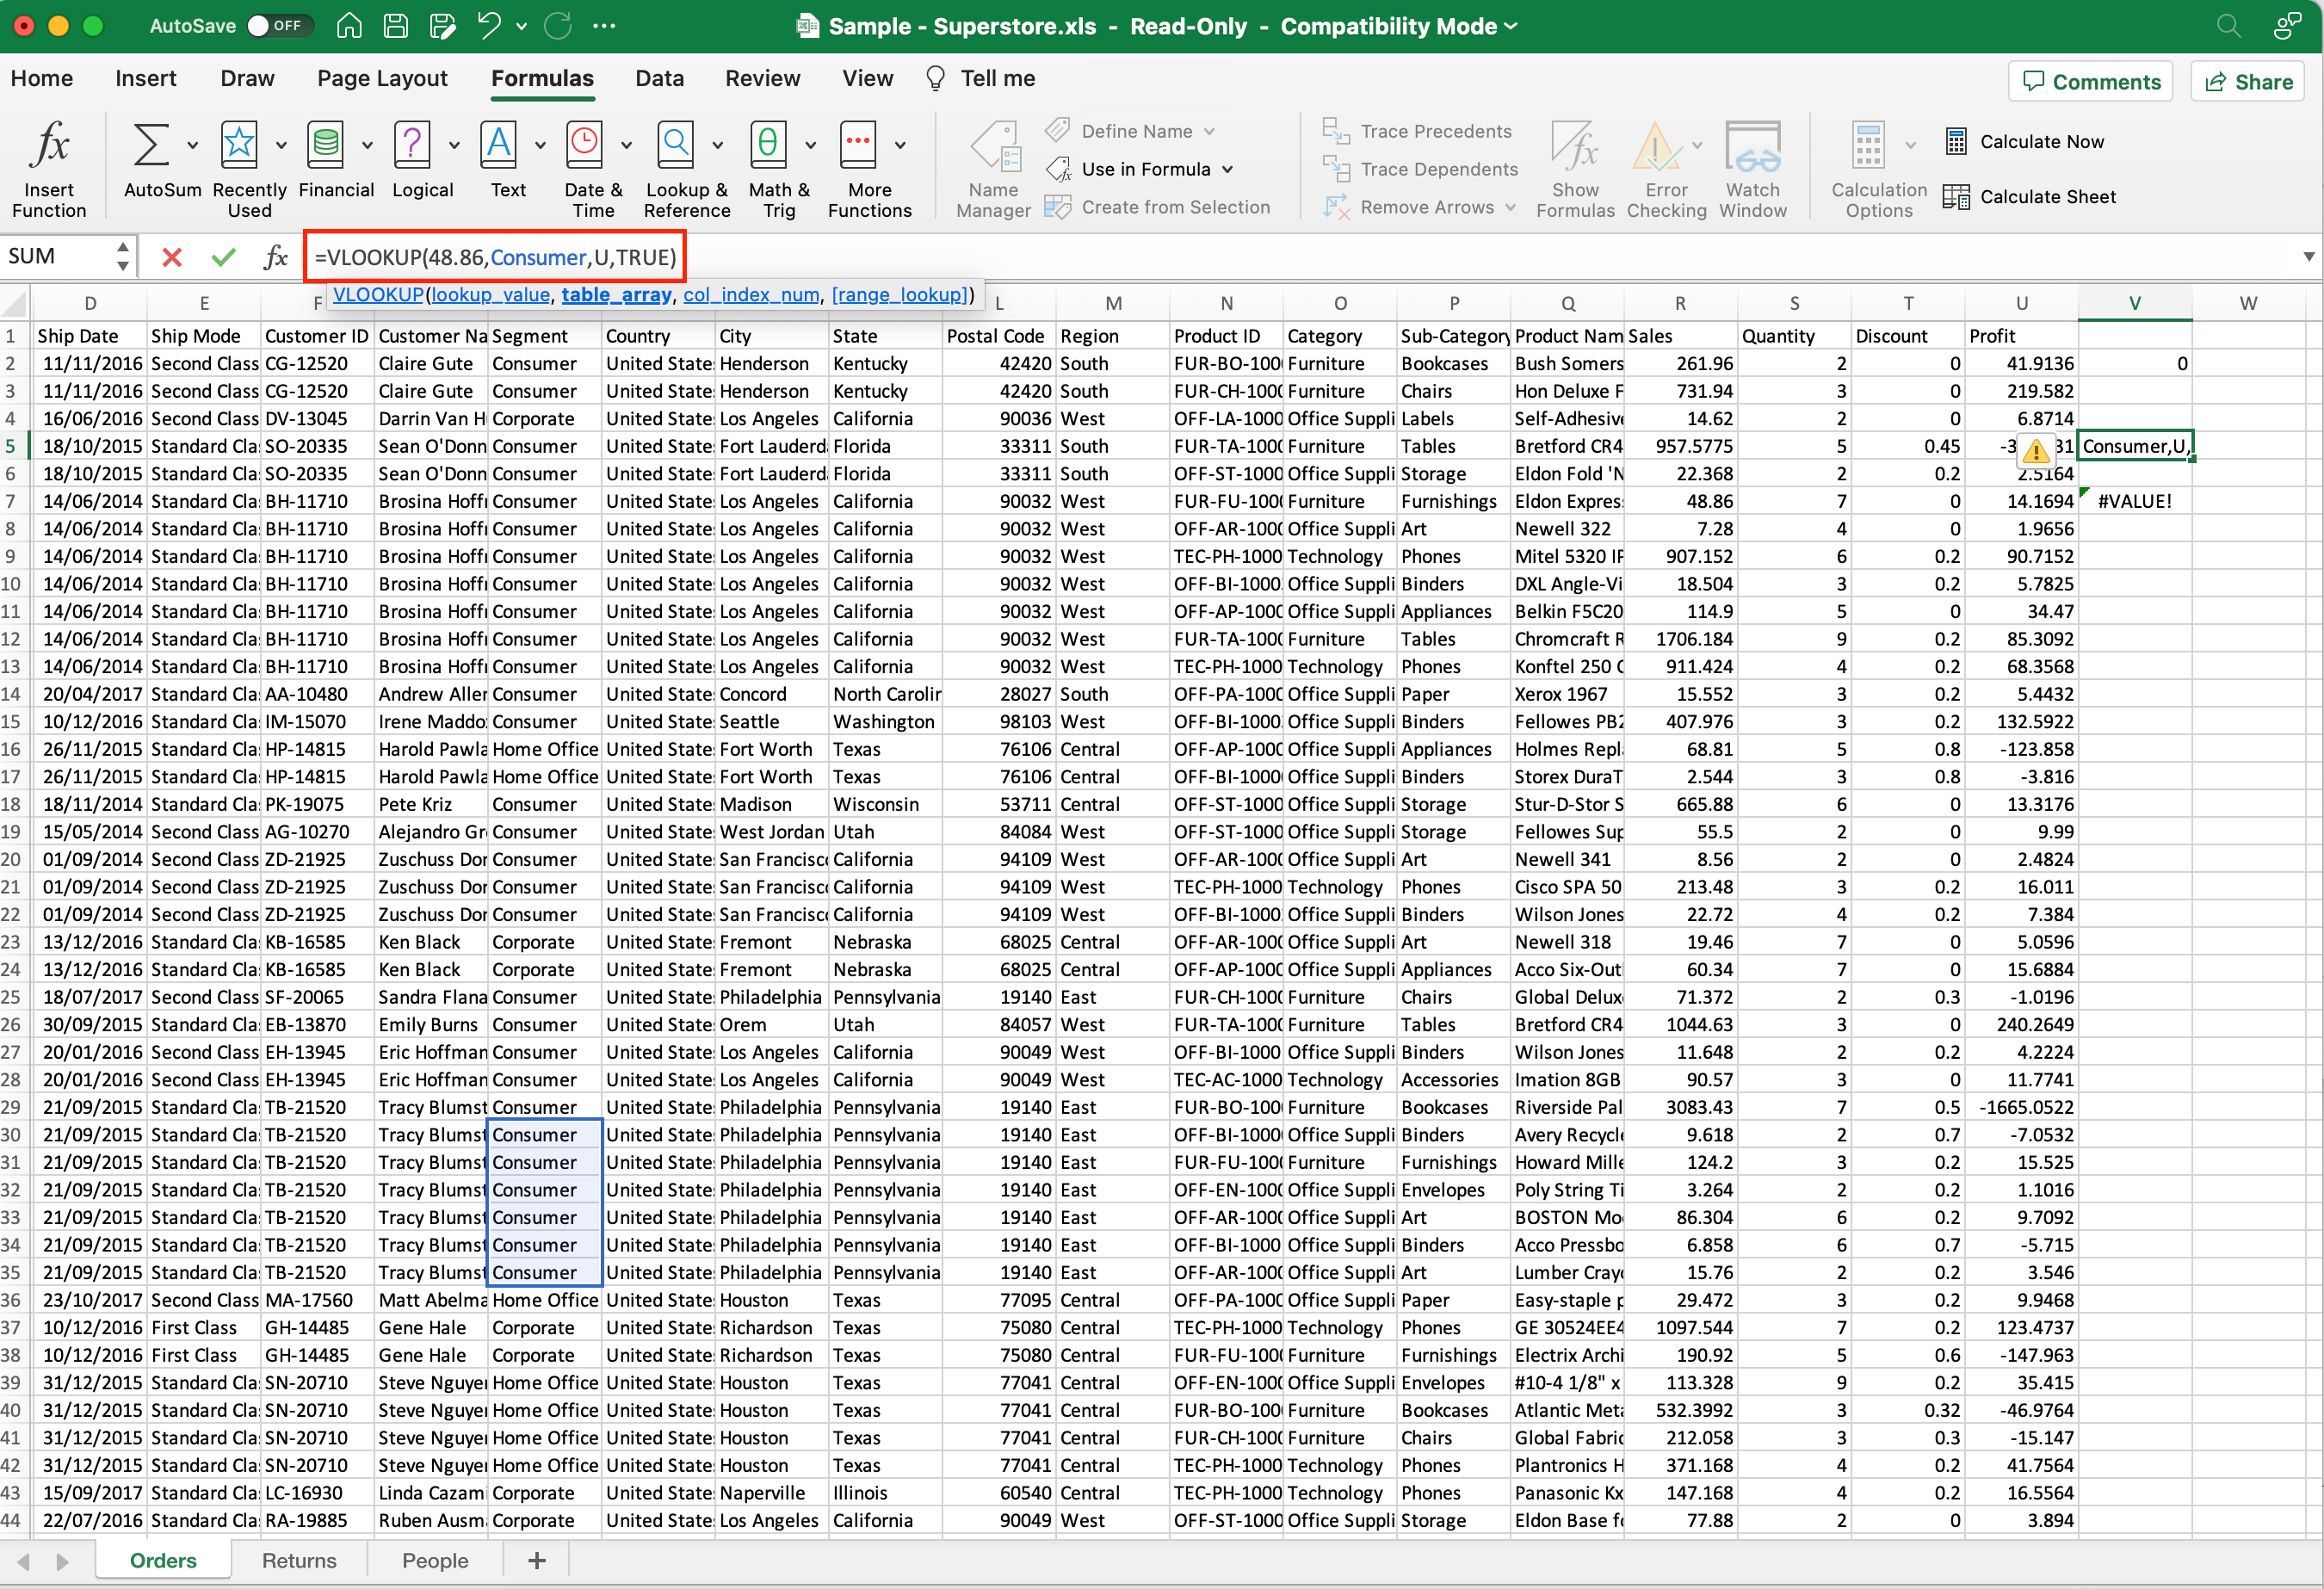
For example, if you have a named range called “ProductData” that represents a table with product information, and you want to look up the price of a specific product, you could use the following formula:
=VLOOKUP(lookup_value, ProductData, column_number, range_lookup)
Here, lookup_value is the value you want to search for, ProductData is the named range representing the table, column_number is the column index from which you want to return data, and range_lookup is a logical value (TRUE or FALSE) specifying whether you want an approximate or exact match.
Troubleshooting and Common Mistakes

While named ranges in Excel offer numerous benefits, there are common issues and mistakes that users may encounter. Understanding these potential challenges and how to troubleshoot them can help you work more effectively with named ranges:
- Name Conflicts: Duplicate named ranges with the same name in different worksheets or workbooks.Solution: Ensure that your named ranges have unique names within their respective scopes (worksheet or workbook). Check the “Name Manager” to identify and resolve conflicts.
- Scope Confusion: The scope of a named range refers to the area of the workbook where you can use the name. You may have an unclear scope selection, leading to unexpected behavior when referencing named ranges.Solution: Be deliberate when choosing between workbook-wide and worksheet-specific scope for your named ranges. Use worksheet-specific names only where needed.

- Overlapping Ranges: Creating named ranges that overlap with one another or with regular cell references.Solution: Ensure that named ranges represent distinct sets of cells that do not share any common cells with other named ranges or cell references.
- Renaming Challenges: Needing to rename a name but encountering difficulties.Solution: You can edit the name in the “Name Manager.” Be sure to adjust any references to the old name in your workbook after renaming.
- Inconsistent Updates: Named ranges not updating as expected when your data changes.Solution: Review your named ranges and ensure they encompass the correct data. Use workbook calculation options (e.g., automatic or manual) to control when updates occur.

- Data Validation Issues: Data validation rules based on named ranges not working as intended.Solution: Confirm that your named range and data validation settings align correctly. Check for hidden columns, filters, or other factors that might affect the validation rules.
- Undesired Editing: Accidental editing or deletion of named ranges.Solution: Protect critical named ranges to prevent unauthorized changes. You can use Excel’s protection features to secure them.
- Labels vs. Named Ranges: Confusing labels and named ranges. Labels are headers or descriptive names for data in cells, whereas named ranges are references to a group of cells.Solution: Ensure you use the correct method for referring to your data. For example, use =VLOOKUP(“Label”, NamedRange, 2, FALSE) instead of =VLOOKUP(“Label”, “Label”, 2, FALSE).
By being aware of these common mistakes and troubleshooting methods, you can harness the full potential of named ranges in Excel while minimizing errors and maintaining the integrity of your spreadsheets.
Final Thoughts

Named ranges in Excel are invaluable tools that can significantly enhance your spreadsheet management and data analysis. Their ability to simplify formulas, improve data validation, and streamline chart creation can save you time and reduce errors.
To make the most of named ranges, remember to follow best practices for naming, scope selection, and organization. Additionally, stay vigilant in avoiding common mistakes.
By mastering named ranges, you’ll improve your Excel proficiency and make your spreadsheets more efficient, readable, and adaptable to changes.
Frequently Asked Questions
What is the difference between a named range and a cell reference in Excel?
A cell reference in Excel refers directly to a specific cell or range of cells using its address (e.g., A1, B2:C10). In contrast, a named range is a user-defined label that represents a group of cells with a descriptive name (e.g., “SalesData”). Named ranges make formulas more readable and reduce the risk of errors.
How can I protect named ranges from accidental edits or deletions?
You can protect named ranges by checking the Hidden or Locked options when defining or editing them in the Name Manager. You can also use Excel’s worksheet or workbook protection features to control access to named ranges.
Can I use named ranges in pivot tables and data tables?
Yes, named ranges can be used as the source data for pivot tables and data tables in Excel. This simplifies the analysis and organization of data in these powerful features.
Is it possible to name an individual cell?
Yes, you can create Named Ranges for individual cells. Just select the cell you want to name and follow the same methods we have outlined in the article.
How can I create dropdown lists using named ranges for data validation?
To create a dropdown list using a named range for data validation, go to the Data tab, select Data Validation, and choose List as the validation criteria. Then, specify the named range as the source for the dropdown list.


