Have you ever needed to repeat a specific action repeatedly in a web application but found it too time-consuming to do manually?
Introducing the JS Auto Clicker – a powerful tool to automate repetitive tasks in your web browser.
A JavaScript Auto Clicker is a script or program written in JavaScript designed to automate the action of mouse clicks on a webpage. It typically simulates user interaction by generating mouse click events at specified intervals or locations on the web page.

Through this blog post, we’ll explore multiple use cases that are often used for repetitive tasks or testing purposes.
Aslo, we will examine the benefits and how you can customize and adapt it to fit your unique workflow.
Let’s maximize efficiency and simplify your life browsing!
Overview of Javascript Auto Clickers

An auto clicker is a piece of code designed to automate clicks on specific buttons or elements. It allows you to simulate user clicks at predefined rates or intervals.
What Is an Auto Clicker in JavaScript?
JavaScript auto-clickers are built using various techniques and functions. They typically employ the following methods:
Simulating User Clicks: Auto clickers simulate mouse clicks at predefined intervals, allowing you to automate actions like button clicks, form submissions, or any interaction that requires a mouse click.
Utilizing window.open(): Some JavaScript auto clickers use the window.open() method to load a specific URL or resource in a new or existing browser window. This approach can help automate tasks involving external web pages.
Benefits of Using Auto Clickers
Efficiency in Repetitive Tasks: Automates mundane and repetitive actions, saving time and reducing manual effort.
Enhanced Testing Capabilities: Useful in testing the functionality and responsiveness of websites and web applications by simulating fundamental user interactions.
Assistance in Gaming: Can handle tasks like resource gathering or enemy attacks in gaming scenarios, enhancing the gaming experience.
Accessibility and Convenience: Offers an accessible way to perform tasks for individuals who might have difficulties with manual clicking due to physical constraints.
These features and benefits highlight the versatility and practicality of JS auto clickers in both professional and casual settings.

Now, let’s explore how you can create your own JS auto clicker.
How to build a JavaScript Auto Clicker

Here’s a simple example of how to create an auto-clicker in JavaScript:
const element = document.querySelector('element');
element.click();
This code selects the element you want to click and triggers a click event on it. You can also use setInterval() to trigger the click() method on the target element or button at specified intervals.
For a more comprehensive guide on building your auto clicker, consider the following code snippet:
var button = document.createElement("button");
button.innerHTML = "Start Auto Clicker";
var body = document.getElementsByTagName("body")[0];
body.appendChild(button);
button.addEventListener("click", function() {
    if (stop === 0) {
        stop = 1;
        button.innerHTML = "Start Auto Clicker";
    } else if (stop === 1) {
        // ...customize as needed
    }
});
This code creates a button that, when clicked, initiates the auto clicker. You can adjust the delay between clicks and the target element or button according to your requirements.
Now, let’s take a quick look at this in action using the browser.
A Quick Demonstration Using a Web Page in Chrome
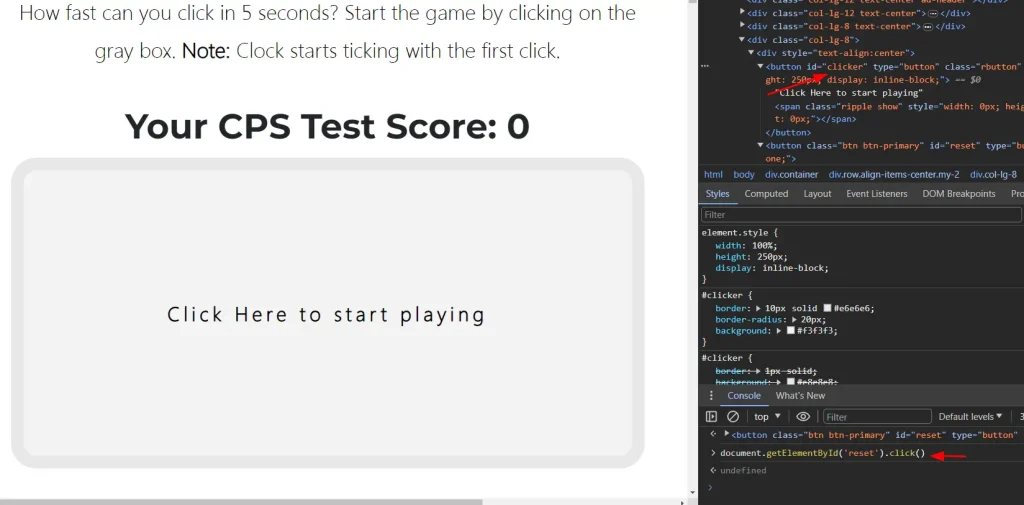
To test auto-clicking, follow these steps:
You can just open your Chrome browser and navigate to the website where you want to automate button clicks.
Right-click on the button you wish to automate and select “Inspect” to open the console, revealing the HTML code.
You can find the button’s ID in the properties section; you’ll need this ID to write the click code.
Switch to the console tab, typically located to the right of the Elements tab.
Type the following code in the console, replacing “clickMe” with the button’s ID you found earlier: document.getElementById(‘clickMe’).click().
To automate clicking, use a simple for-loop. Enter the following code in the console, replacing “clickMe” with the button’s ID: for (let i = 0; i < 1000; i++) { document.getElementById(‘clickMe’).click() }.
Finally, let’s distill the key points and practical applications.
Final Thoughts

This article has provided insights into creating an auto clicker in JavaScript.
Remember, it’s a valuable tool for automating mouse clicks on buttons or elements, ultimately saving time and enhancing task efficiency.
With JavaScript, you can craft your own auto clicker, tailoring it to your specific needs, whether that involves adjusting click intervals or selecting different elements to interact with.
Also, JavaScript auto clickers offer a practical solution for streamlining repetitive actions and boosting productivity in various contexts.
We hope this article will help you effectively harness the power of JavaScript auto-clickers.
Learn how to add thick borders to matrix visualizations in Power BI with this easy-to-follow tutorial on the enterprise DNA YouTube channel:
Frequently Asked Questions:
What Is a JS Auto Clicker?
JavaScript auto clickers are tools that automate tasks on webpages using JavaScript code. They utilize libraries like jQuery to execute actions such as mouse clicks and key presses, simplifying tasks like form filling and data submission.
How Can JavaScript Auto Clickers Benefit Web Development?
These tools streamline repetitive tasks required in web development, enhancing efficiency and productivity. They’re helpful for form submissions, link clicking, and navigating webpages, allowing you to focus on more complex tasks.

Can I Create Custom Scripts with JavaScript Auto Clickers?
Yes, JavaScript auto clickers enable the creation of custom scripts. You can access and manipulate webpages’ Document Object Model (DOM), using libraries like jQuery, automating almost any task.
How Do I Start Using a JS Auto Clicker?
Begin by downloading the latest script library from the jQuery website. Create a new script file in a text editor and open it in a web browser. Enter your code for the desired action and execute the script.
Can I Customize the Functionality of a JS Auto Clicker
Absolutely. You can adjust the number of clicks, click speed, and delay between clicks. Scripts can be set to run on specific pages or across all pages, depending on your needs.
What Should I Do If My Auto Clicker Isn’t Working Properly
Check if the code is correctly entered and if all necessary libraries are loaded. Ensure the webpage where the script is executed has stayed the same. If problems persist, try a different browser or check your settings to enable JavaScript.
Are There Examples of Auto Clickers in Action?
Yes, numerous online examples demonstrate various uses, from automating form filling to scripting complex webpage interactions. These examples showcase how auto clickers can save time and simplify tasks.
What Are the Best Practices for Using Auto Clickers?
Regularly check and update your scripts to ensure they work correctly. Use secure connections for data transfer and encryption for sensitive data storage. Test scripts in multiple browsers for compatibility and potential weak points.
How Can I Optimize My JS Automation Scripts?
Minimize command numbers and simplify them. Use methods that don’t require waiting for page elements to load. Incorporate comments in scripts for easier reading and debugging.
What Security Measures Should I Consider?
Protect sensitive data like passwords and credit card numbers. Regularly update libraries to guard against malicious attacks or exploits. Use HTTPS/SSL certification to enhance security.