In the world of web development, combining HTML and JavaScript is essential for creating interactive and dynamic websites. When working on a web project, it’s important to know how to link a JavaScript file to an HTML document properly, ensuring seamless integration and enhancing the overall user experience.
To link JavaScript to an HTML file, you can place the code directly within the ‘script’ tag in the HTML document itself. You can also link an external Javascript file to the HTML document by specifying the URL or location of the external file in the script tag’s ‘src’ attribute.
By following these steps, you can effectively incorporate the various benefits and functionalities JavaScript brings into your HTML file, leading to engaging, fully functional websites.
Let’s link some javascript!


Understanding HTML and Javascript
HTML (HyperText Markup Language) is the standard markup language for creating web pages. It is used to structure content on the web in a readable and accessible format.
HTML elements are the building blocks of web pages, and they can include text, images, links, and multimedia content.
JavaScript is a powerful, versatile scripting language that is used to add interactivity and dynamic content to web pages, enhancing the overall user experience. It is executed directly within a web browser and can manipulate HTML elements, modify styles, and react to user interactions in real-time.
By combining HTML and JavaScript, we can create websites that are both visually appealing and functionally rich. The two work together seamlessly to build powerful, accessible, and engaging websites for users.
How to Link Javascript to HTML: The Basics

The <script> tag is used to incorporate JavaScript into an HTML document, either by embedding the code directly or by referencing an external file.
JavaScript enables interactivity and enhances the user experience on your webpage.

There are two primary ways to use the <script> tag:
- Inline Scripting
- External Scripting
In this section, we will cover the basics of linking JavaScript to HTML using inline scripting and external scripting methods.
Inline Scripting
Internal scripting involves placing the JavaScript code within the <script> tag. This tag is typically placed at the end of the <body> tag to ensure the entire webpage is loaded before running the script.
It follows this syntax:
<body>
  <!-- Page content goes here -->

  <script>
    // Your JavaScript code goes here
  </script>
</body>
This method is straightforward and allows you to directly add the JavaScript code inside yourHTML file.
Here’s an example:
<!DOCTYPE html>
<html>
<head>
<title>My Web Page</title>
</head>
<body>
<h1>Hello World!</h1>
<p id="demo"></p>
<script>
document.getElementById("demo").innerHTML = "Welcome to my website!";
</script>
</body>
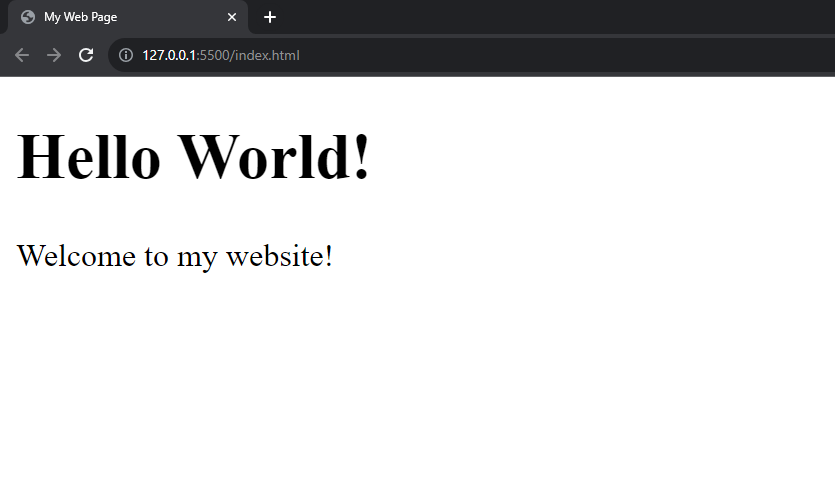
</html>Output:
While inline scripting is convenient, it can quickly become cumbersome when dealing with larger projects. It also makes maintenance and scaling more challenging, which is why we recommend using external scripting instead.
External Scripting
External scripting involves creating a separate JavaScript file and linking it to your HTML document using the src attribute within the <script> tag.
External Scripting helps to keep your codebase organized, making maintenance easier, and improving page load times when JavaScript files are cached.
The external file should have a .js extension and can be placed anywhere in the <head> or <body> tag.
However, it’s recommended to place it at the end of the <body> tag for better performance.
You can link it in your file using this format:
<body>
  <!-- Page content goes here -->

  <script src="your-script.js"></script>
</body>
To create an external JavaScript file, save your JavaScript code with the .js extension, for example, myscripts.js.
In the myscripts.js file, you would include the JavaScript code, such as:

document.getElementById("demo").innerHTML = "Welcome to my website!"; 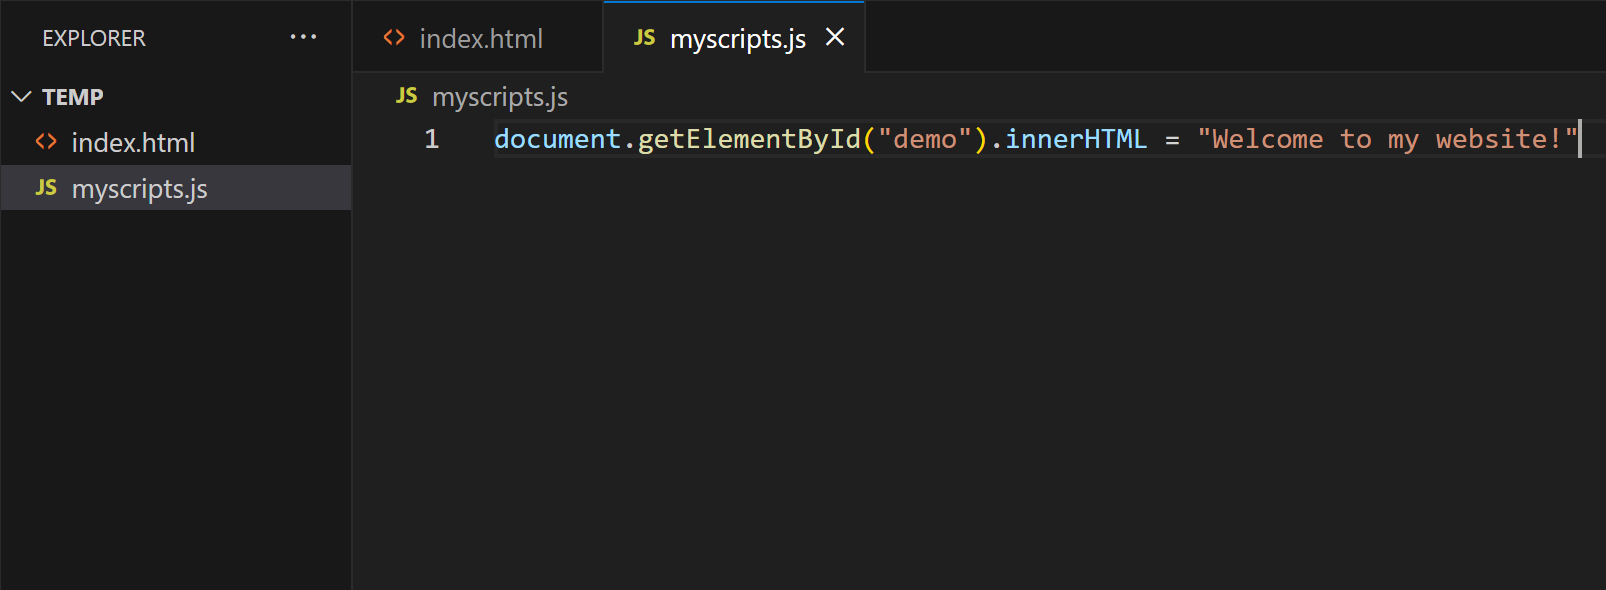
You can link this file to your HTML document as follows:
<!DOCTYPE html>
<html>
<head>
  <title>My Web Page</title>
</head>
<body>
  <h1>Hello World!</h1>
  <p id="demo"></p>
  <script src="myscripts.js"></script>
</body>
</html>
When you run the HTML file, you will get the same result as the previous section.
By mastering these two methods of linking JavaScript to HTML, you will be well-equipped to create engaging and user-friendly websites.
Remember to use inline scripting for smaller projects or quick testing, while external scripting is better suited for larger projects and better organization.
How to Use the src Attribute
When linking a JavaScript file to an HTML document, the <script> tag with the src attribute is used. The src attribute points to an external JavaScript file, which may be either an absolute URL or a relative URL.
Read on as we look at both methods below.
Absolute URL in src Attribute
An absolute URL contains the complete address of the JavaScript file, including the domain name. This can be especially useful when referencing external libraries hosted on a Content Delivery Network (CDN) such as jQuery or Bootstrap.
The absolute URL provides the full path required to locate the external JavaScript file, allowing for easy access.
Here’s an example:
<script src="https://code.jquery.com/jquery-3.6.0.min.js"></script>In the example above, the src attribute contains an absolute URL pointing to the jQuery library hosted on the jQuery CDN.
Relative URL in src Attribute
A relative URL, on the other hand, points to a JavaScript file within the same website or application. This type of URL is constructed without a domain name, using the current file path as its reference point.
Relative URLs can include subdirectories and file names without needing the full URL.
Here’s an example:
<script src="js/myscripts.js"></script>
In this example, the src attribute uses a relative URL to reference a js file called script.js, which is located inside the js directory of the website.
Here’s the file tree for this project:
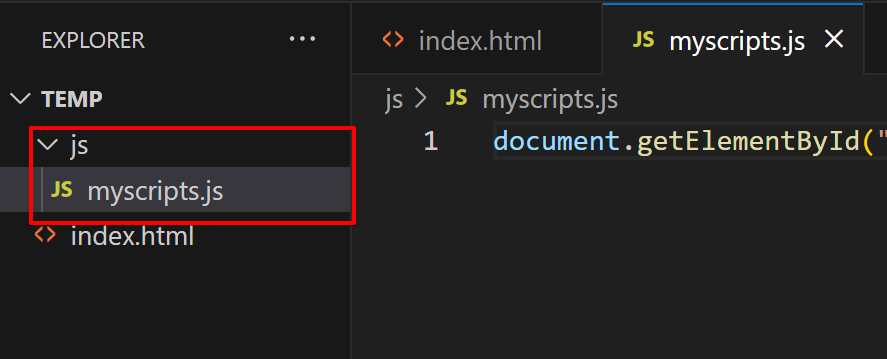
This is usually standard practice for larger applications. The Javascript files are stored in a separate folder from the html files for better organization.
Additional JavaScript <script> Tag Attributes
When linking JavaScript to an HTML page, you may want to make use of some additional attributes within the <script> tag. These attributes offer better control over script execution, loading, and encoding.
In this section, we’ll discuss a few attributes, such as type, charset, async, and more.

- type: The type attribute is used to define the MIME type of the script. It’s not necessary since modern browsers assume text/JavaScript by default.
However, for better compatibility and standards compliance, you can set it like this:<script type="text/javascript" src="myscripts.js"></script>. - charset: The charset attribute specifies the character encoding used in the external script file. While it’s not commonly used today, you may still encounter it in certain situations, especially when you’re dealing with scripts containing international or special characters.
To set the charset, use the following syntax:<script src="myscripts.js" charset="UTF-8"></script>. - async: The async attribute is particularly relevant when you want to control the loading and execution time of your script. By default, scripts are loaded sequentially, blocking other resources and content from loading until the script finishes executing.
Adding the async attribute allows the script to load asynchronously, which means the HTML parsing can continue while the script is being loaded.
Use the async attribute like this:<script async src="myscripts.js"></script> - defer: The defer attribute defers script execution until the HTML document is fully parsed. This attribute is useful when you have scripts that depend on the complete DOM structure.
To use the defer attribute, include it in the <script> tag like this:<script defer src="myscripts.js"></script>.
Make sure to choose the most appropriate attributes and their combinations depending on your specific use case.
This will help you manage your scripts better, optimize page loading, and ensure compatibility across different browsers.

Real-World Application: Client-Side Scripting
JavaScript adds interactivity and responsiveness to websites by acting as a client-side script, running directly in the browser.
This enables the development of features such as form validation, checking dates, animations, and interactive experiences that do not rely on server-side processing.
Below are a few examples of interactive features that can be implemented using JavaScript:
- Event handling: JavaScript can listen for and react to user interactions such as clicks, typing, or mouse movements, allowing developers to create custom effects and behaviors.
- DOM manipulation: JavaScript can read and modify the structure and content of a web page, providing the ability to create dynamic content and alter the appearance of elements on the page.
- Animations and transitions: With JavaScript, smooth animations and transitions can be created by altering CSS properties, providing a more engaging user experience.
Let’s combine these three features in the example below:
document.getElementById('button').addEventListener('click', () => {

    const elem = document.getElementById('h1');
    elem.textContent = 'Bye World!';


    elem.style.transition = 'transform 5s';
    setTimeout(() => {
        elem.style.transform = 'translateX(1000px)';
        }, 1000);
  });
Output:

When we click on the button, it retrieves the Hello World! message, changes it to Bye World!, and fades it out with a simple animation.
This is a simple example, but by leveraging JavaScript’s interactivity capabilities, developers can create richer, more responsive, and more engaging web applications. These applications enhance the client-side functionality and improve the overall user experience.
Best Practices for Linking JavaScript to HTML
When linking JavaScript to HTML pages, it’s important to optimize performance for a smoother user experience. Here are some guidelines for improving performance:
- Minification: Minify your JavaScript files to reduce their size and, in turn, speed up loading times. This process removes all unnecessary characters, whitespace, and comments from your code to make it load faster.
- Async loading: Use the async attribute to load your JavaScript files asynchronously, which can prevent render blocking and help improve the overall page load time.
- Defer parsing: Make use of the defer attribute when linking your JavaScript files to allow the browser to parse the files after the HTML has finished loading.
Final Thoughts
In conclusion, linking JavaScript to HTML is an essential skill for any web developer. By following the straightforward steps outlined in this article, you can seamlessly integrate dynamic functionality into your web pages.
Remember to keep your code organized and practice good coding habits for a more efficient and maintainable project.
Want to see how AI is changing the data landscape? Check out the below:
Frequently Asked Questions
What is the best location for script tags in HTML?
The best location for script tags depends on your specific use case. Generally, placing script tags at the end of the <body> ensures that the HTML content loads before the JavaScript, improving the loading speed of your website.
However, if your script relies on the DOM being fully loaded, you should place the script tag in the <head> section and use the defer attribute.
<script src="your_script.js" defer></script>Can I link JavaScript using the link tag like CSS?
No, you cannot link JavaScript using the <link> tag like CSS. The <link> tag is specifically for linking stylesheets, while the <script> tag is designed for linking JavaScript files.
Is it possible to add multiple external scripts to HTML?
Yes, you can add multiple external scripts to your HTML document.
To do this, simply include multiple <script> tags with the appropriate src attribute:
<script src="script_one.js"></script>
<script src="script_two.js"></script>
<script src="script_three.js"></script>
Make sure to consider the order of the scripts, as they will be executed in the order they are listed.