Excel is the Swiss army knife of software that’s not just about numbers and charts — it’s also great for performing time-based calculations! One common calculation is figuring out how many days have passed since a specific date or how to subtract a certain date from ‘today.’
To subtract a date from today in Excel, you can use the TODAY() function and subtraction. First, you input the earlier date in a cell (let’s say A1 for example) and write the formula “=TODAY() – A1” in the next cell, then press Enter.
This formula subtracts the date in cell A1 from the current date and gives you the number of days that have passed since the earlier date. However, the TODAY() function isn’t your only option!
This article will teach you all about dates in Excel, including a basic date subtraction formula with examples, how to use the DATE function, some advanced functions for subtracting dates, and how to handle errors and inconsistencies.
So, let’s dive into the world of Excel date calculations enabling you to harness the full potential of your spreadsheets!
How to Use the TODAY Function to Subtract Dates in Excel

One of the key functions working with dates in Excel is the TODAY() function. The TODAY() function is a built-in function that returns the current date in the format of “month/day/year”. It’s a handy tool when you need up-to-date information.
When you use the TODAY() function, Excel will automatically update to the latest date every time you open the spreadsheet, ensuring you always have the current date.
The TODAY() function is a simple formula that doesn’t require any arguments — you simply type “=TODAY()” into one cell and press Enter. Excel will then replace the function with the current date.
For example, if today’s date is May 15, 2023, when you type =TODAY() in a cell and press Enter, it will display 5/15/2023. Tomorrow, when you open the same Excel sheet, it will automatically display 5/16/2023.
Here’s a step-by-step guide on how to use =TODAY():
1. Enter the past due date in cell A1.
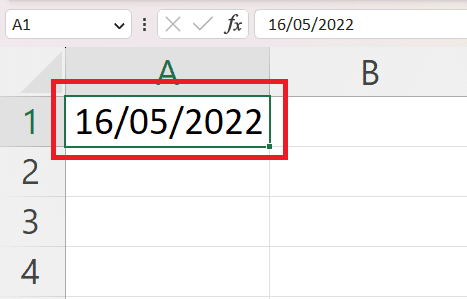
2. Enter the formula =TODAY() – A1 in another formula cell.
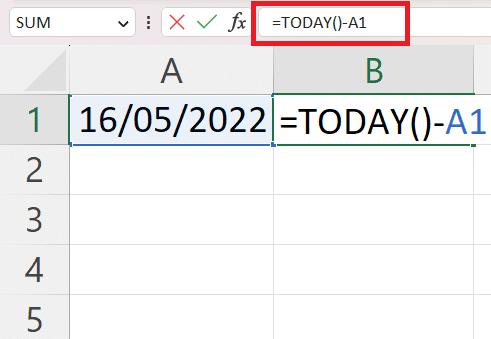
3. Press Enter to display the result, which represents the number of days between the past date and today.
In the next section, we will learn how to subtract one date from another.
How to Use a Basic Date Subtraction Formula in Excel
Performing basic date subtraction in Excel is as easy as doing simple arithmetic. It’s based on the idea that Excel represents dates as sequential day numbers.
Let’s go through the steps for basic date subtraction:
Input the two dates: Start by entering the two dates you want to subtract in two cells. For instance, let’s say we have the date “1/1/2022” in cell A1 and “5/15/2023” in cell B1.
Perform the subtraction: In the next cell, write the substract dates formula that subtracts the earlier date from the later date. In our example, you’d write “=B1 – A1” in cell C1.
Press Enter: After writing the formula, press Enter. Excel will calculate the difference between the two dates. In our example, Excel will show the number “500” in cell C1, which means 500 days have passed from “1/1/2022” to “5/15/2023”.
Below is an example illustrating how the formula works to calculate the number of days from 16/05/2022 to 21/04/2023:
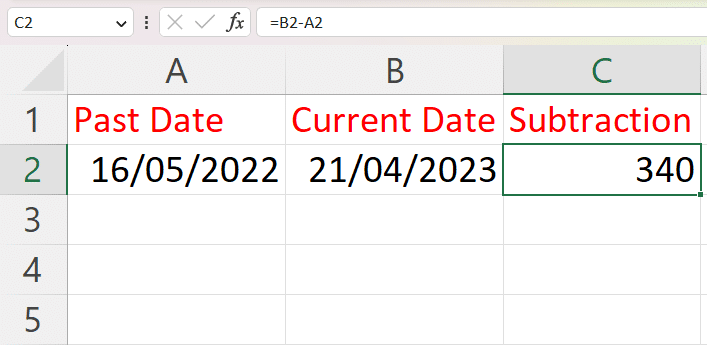
Remember, Excel will always return the result in days when subtracting one date from another. If you need the result in weeks, months, or years, you’ll need to adjust the result accordingly.
That means:
For weeks, divide by 7 (since there are 7 days in a week)
For months, divide the difference in days by 30.44 (the average number of days in a month)
For years, divide by 365.25 (considering leap years)
That’s it! You’ve successfully performed a basic date subtraction in Excel and seen how the formula works.
In the next section, we will take a look at how to use the DATE function to subtract two dates in Excel.
How to Use the DATE Function to Subtract Dates in Excel
In this section, you will learn how to subtract a day, week, or month from a date using the DATE function in Excel.
Let’s explore the basic syntax. The DATE function has three arguments: YEAR, MONTH, and DAY.
The YEAR looks for the year in the date.
The MONTH finds for the month in the date.
The DAY looks for the day in the date.
1. Subtracting Days
Let’s say you want to subtract X number of days from two dates.
1. Insert the specific date.
2. To subtract the number of days, enter the following formula =DATE( YEAR(A1), MONTH(A1), DAY(A1) -15 ).
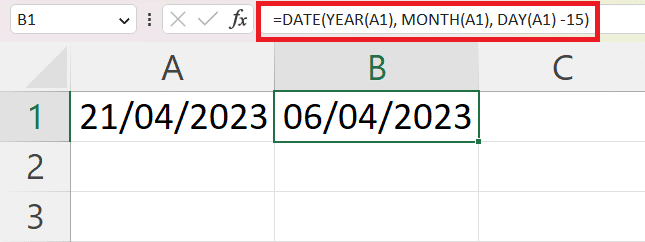
2. Subtracting Months
If you want to subtract the months, enter the months you want to minus after the MONTH(X) argument with the – sign. =DATE( YEAR(A1), MONTH(A1) – 5, DAY(A1) ).
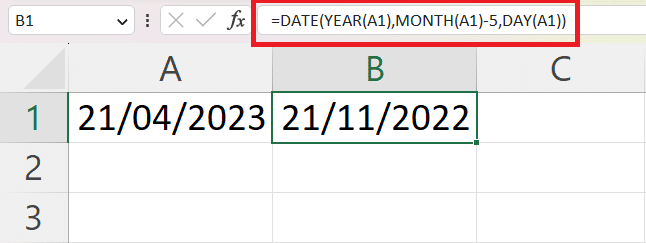
3. Subtracting Years
Finally, you might want to subtract the years. Enter the years you want to take off after the YEAR(X) argument with the – sign. =DATE( YEAR(A1) – 10, MONTH(A1), DAY(A1) ).
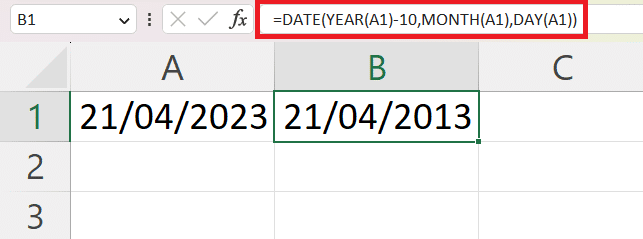
With this knowledge, you can easily subtract date differences using the DATE function in Excel.
Next, let’s take things up a notch and look at some advanced techniques you can use to subtract dates in Excel.
Advanced Date Subtraction Techniques
While subtracting a specific date from today’s date can be straightforward, there are situations where you might need more advanced date calculations. Excel has got you covered with functions like DATEDIF() and EDATE() for these scenarios.
1. Using DATEDIF() to Subtract Dates
The DATEDIF() function calculates the difference between two dates in years, months, or days.
The syntax for this function is =DATEDIF(start_date, end_date, unit), where start_date and end_date are the two dates you want to compare, and unit is the unit of time you want the result in (“Y” for years, “M” for months, “D” for days).
To find out how many months have passed since a specific date until today’s date, you can use the DATEDIF() function with the TODAY() function.
For example, to calculate the number of months since New Year’s Day, 2023, to today’s date, you would use the formula =DATEDIF(A1, TODAY(), “M”). Excel will return the number of complete months between the two dates.
Here’s how it works:

The result:

2. Using EDATE() to Subtract Dates
Another useful function for more specific date calculations is EDATE(), which returns the same date a specified number of months in the past, or a future date.
For example, to find the date that is three months after New Year’s Day, 2023, you would use the formula =EDATE(A1, 3). The first argument is the cell reference and the second argument is the number of months.

The result:

These advanced techniques add flexibility and precision to your date calculations in Excel.
In the next section, we will cover examples of some common issues you might face when performing date subtraction and provide tips for troubleshooting them.
How to Handle Errors and Inconsistencies
When working with Excel formulas to subtract dates, you might encounter errors and inconsistencies. Knowing how to handle these situations is essential to ensure accurate calculations and a smooth workflow.
1. #NUM! error message
One common error is the #NUM! error. This error occurs when the start date is greater than the end date.
To prevent this error, you can use the IF function to check the relationship between dates. Only proceed with the subtraction if the start date is less than or equal to the end date.
=IF(Start_Date <= End_Date, End_Date – Start_Date, “Error: Start_Date is greater than End_Date”)
Empty cells can also cause inconsistencies in your calculations. For instance, if you subtract a date from an empty cell or a cell with an invalid date format, the result will be misleading or incorrect.
To deal with this situation, use the IF and ISBLANK functions:
=IF(ISBLANK(Date_Cell), “”, TODAY() – Date_Cell)
By following these steps, you can minimize errors and maintain the accuracy of your date subtraction calculations in Excel.
2. Incorrect Cell Formatting
Another common pitfall when subtracting two dates in Microsoft Excel is not correctly formatting the cells. If your subtraction operation isn’t working as expected, check the format of your cells.
Excel stores dates as sequential numbers by default, making it possible to perform a variety of mathematical operations on them.
In Excel, “Day 1” is January 1, 1900. Therefore, the date “January 2, 1900” is represented as 2, “January 3, 1900” as 3, and so on. This progression continues until today’s date and will continue into all possible future dates.
That means a number is the default date format you will see if the cell reference and the cell with the formula are formatted as text instead of dates.
To fix this problem, apply change the date format of the cell containing your subtraction formula. Here’s how:
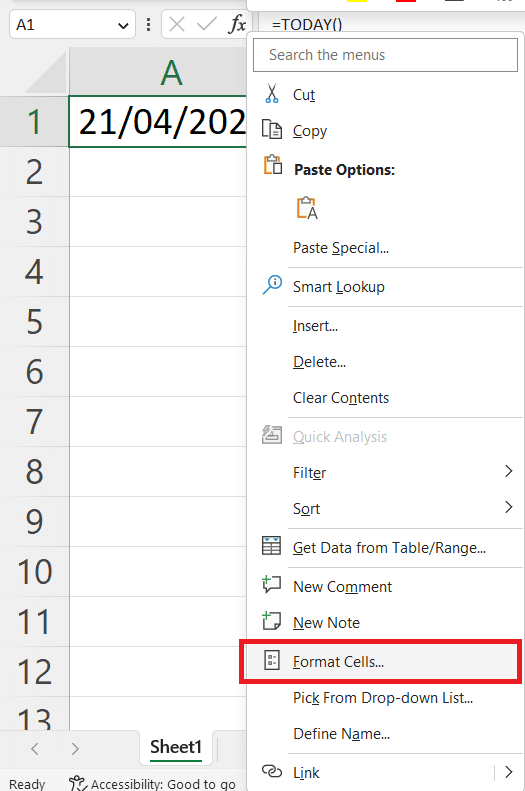
1. Select the cell with the formula result, right-click on the cell, and choose Format Cells… from the context menu.
2. Click the Number tab in the Format Cells window.
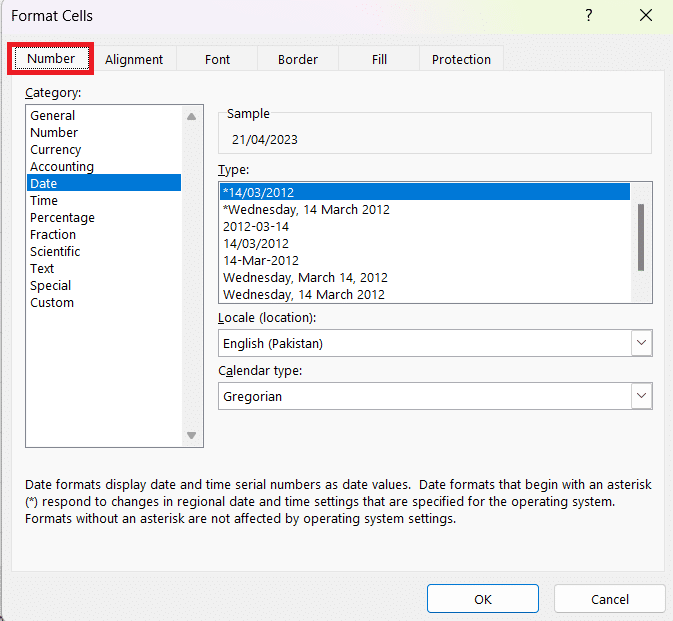
3. Select Date from the Category list and choose a format in the Type box. For example, Wednesday, March 14, 2012. Click OK to apply the format and close the window.
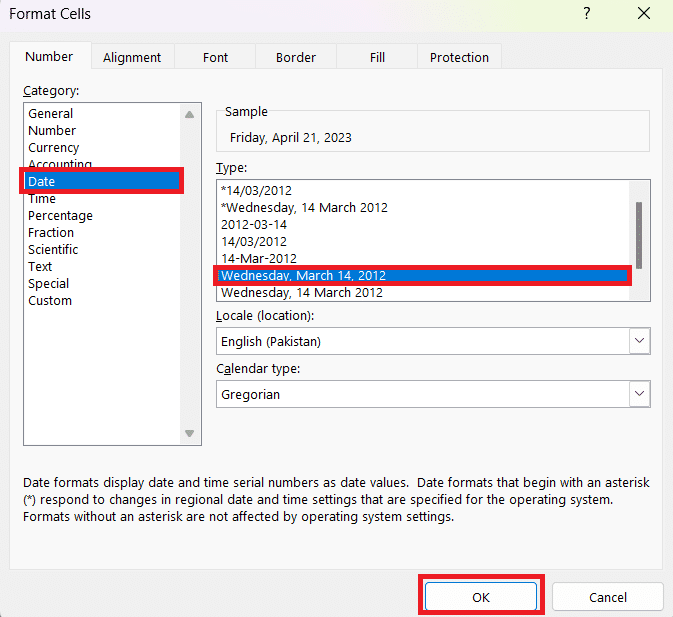
Now your result will be displayed in the chosen format, making it easier to read and understand.
3. Negative Results
If your date subtraction returns a negative number, it’s likely because the start date is later than the end date. To avoid and solve this issue, double-check your dates and their order in the subtraction formula.
4. Handling Time Values
If your dates include time values, the subtraction results may include decimals, which represent the time difference. To display only the days, you can use the INT() function to remove the decimal portion (e.g., =INT(B1 – A1)).
5. Errors with the DATEDIF() Function
When using the DATEDIF() function, ensure you provide the correct unit of time (“Y,” “M,” or “D”). Providing an incorrect or missing unit may result in an error or unexpected results.
By following these troubleshooting tips, you can resolve common issues when subtracting dates in Excel and ensure accurate results.
In the next section, we will wrap up our discussion on subtracting a date from today in Excel and highlight the importance of this skill.
Final Thoughts

Excel’s ability to manage and calculate dates is a powerful tool that can significantly enhance your data analysis and management tasks.
From basic date subtractions to using the TODAY() function and exploring advanced functions like DATEDIF(), we’ve covered a range of techniques to subtract a particular date from today’s date in Excel.
Subtracting a date from today is a common operation that has a multitude of uses, from calculating ages or tenure, tracking project timelines and due dates, to figuring out deadlines, and much more. Mastering this skill can save you considerable time and make your work more efficient.
Remember to check your cell formatting if you run into issues, and don’t forget that Excel treats dates as sequential day numbers, which makes date subtraction as straightforward as any other arithmetic operation.
By now, you should be well-equipped to handle date subtractions in Excel. Keep practicing these techniques, and soon you’ll be handling date calculations with ease and precision, adding another valuable skill to your Excel toolkit. Happy calculating!
For more examples of how you can use Excel in your workflow, check out the playlist below:


