Power Apps Filter is by far one of the most important functions in Power Apps. The filter function plays a crucial role in helping you work with large volumes of data.
It allows you to search through tables and pinpoint records that match specific criteria, making it easier for you to find the information you need quickly and efficiently.
Now, to use the Microsft PowerApps filter function is straightforward; you don’t have to be an MVP to utilize it.
Let’s get into it and start learning!

The filter function operates by examining the records in a table and checking them against one or more formulas you set. When records meet the specified criteria, they are included in the output, while those that don’t are discarded. This way, you can efficiently trim down your vast data sets, honing in on the records most relevant to your needs.
With the filter function at your disposal, your Power Apps applications can become more dynamic and user-friendly. Furthermore, by using this versatile tool, you streamline navigation through your data, enabling your users to find what they need with minimal effort and frustration.
Overview of Filter Function in Power Apps
The Filter function in Power Apps plays a critical role in refining and narrowing down the data displayed in your app.
It allows you to find records in a table that meet specific criteria, ensuring that only relevant information is shown to users. This function streamlines data management, saving you and your users valuable time and effort.
When using the Filter function, you provide a table and a formula that defines the conditions each record must meet to be displayed.
The function then evaluates each record in the table, including only those that satisfy the given criteria, while discarding the rest.

The result is a new table with filtered data, which can be used in other components, like galleries or forms, within your app.
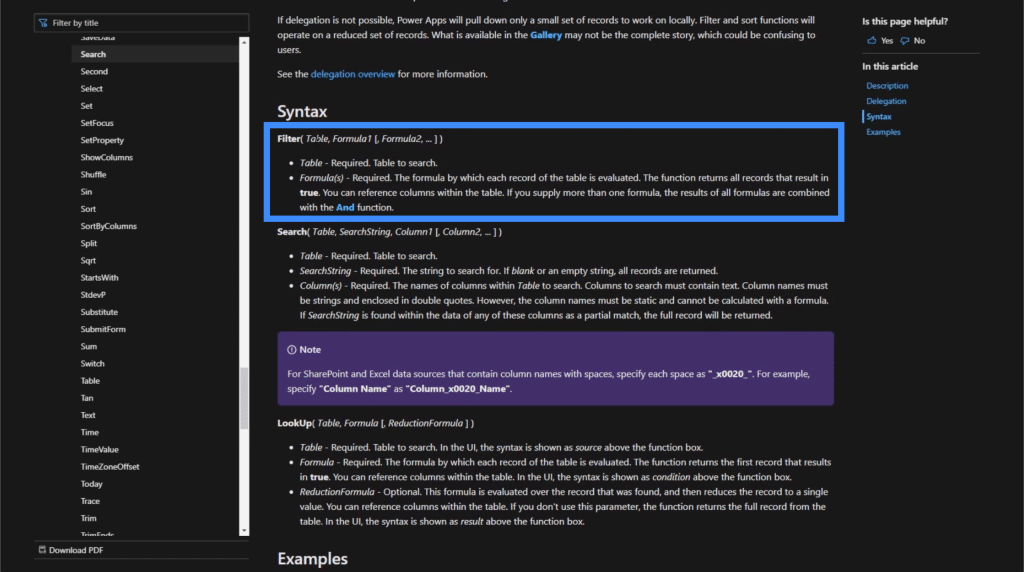
The syntax for the Filter function is as follows:
Filter(Table, Formula1 [, Formula2, ...])
In this syntax, “Table” represents the data source, and “Formula1” through “Formula2” define the conditions that must be met for a record to be included. You can use multiple formulas, separated by commas, to add complexity and specificity to your filtering criteria.
Some practical examples of Filter function usage in Power Apps include:
- Finding projects with a specific status
- Displaying meetings scheduled for the current day
- Showing employees from a certain department
To ensure the best performance and delegation support, be mindful of the size of your data sets when using the Filter function.
Delegation is crucial when working with large sets of data, as it allows the filtering to be executed on the data source rather than loading all records into the app.
Syntax and Parameters
Syntax
The Filter function in Power Apps allows you to filter records in a table based on one or more criteria specified by a formula. The general syntax for the Filter function is:
Filter(Table, Formula1 [, Formula2, ...])
This function evaluates each record in the specified table and retains only the records that meet the criteria specified in the formula(s).
Parameters
The Filter function has the following parameters:
- Table: The table you want to filter. This parameter is required.
- Formula1: The first formula to apply to the table. This expression evaluates each record in the table to determine if it meets the filter criteria. This parameter is required.
- Formula2, …: Additional optional formulas, separated by commas, to further refine and narrow down the filter result. These parameters are optional.
When using the Filter function, it’s essential to understand how the various parameters interact to produce the final filtered result. The more formulas you specify, the more specific and refined the filtered result will be.
How to Use the Filter Function
In Power Apps, the Filter function is a handy tool for searching and extracting a set of records that match certain criteria. Here, you will discover how to use the Filter function effectively based on single or multiple criteria and with logical operators.
Filtering Based on Single Criterion
When filtering data from SharePoint or other sources based on a single criterion, you simply provide the table and condition to check. For example, if you have a table of employees and want to view those with a salary greater than 10,000, you would write:
Filter(EmployeeTable, Salary > 10000)This formula will return a set of records from the EmployeeTable that meet the given condition (Salary > 10000).
Filtering Based on Multiple Criteria
Often, you will need to filter data based on multiple criteria. In such cases, you can extend the Filter function with additional conditions. For instance, to search for employees with a salary between 10,000 and 30,000, you can write:
Filter(EmployeeTable, Salary > 10000, Salary < 30000)This formula will return all records from the EmployeeTable that meet the two specified conditions.

Filtering with Logical Operators
Power Apps Filter function also allows you to utilize logical operators such as AND and OR. Here’s how to use these operators in your filter conditions:
- AND operator: Write each condition as a separate argument within the Filter function. Example:
Filter(EmployeeTable, Salary > 10000, Department = "HR")This formula will return employees with a salary greater than 10,000 and who belong to the HR department.
- OR operator: Combine conditions using the “||” (double vertical bars) symbol within a single argument. Example:
Filter(EmployeeTable, (Salary > 10000) || (Department = "HR"))This formula will return all employees with a salary greater than 10,000 or those who belong to the HR department.
With these guidelines, you can now use the Filter function effectively in Power Apps based on various criteria and logical operators.
Common Use Cases
Filtering Records in a Gallery
When working with galleries in Power Apps, you often need to display a subset of records to users. Filtering records in a gallery is a common use case where you can apply the Filter function:
Filter(dataSource, searchCriteria)
Here, dataSource refers to the data source being used, and searchCriteria specifies the conditions that records must meet to be displayed in the gallery.
For example, if you want to display only the records with a status of “Active” in a gallery, you would use:
Filter(Projects, Status = "Active")
Filtering Records in a Dropdown
Similarly, you can use the Filter function to display specific records in dropdown menus:
Filter(dataSource, searchCriteria)
For instance, if you have a dropdown with a list of employees and you want to show only employees with the “Manager” title, the filter syntax would be:
Filter(EmployeeList, Title = "Manager")
Filtering Records Based on User Input
Filtering records based on user input is a powerful way to provide tailored information to your users. When users enter their criteria in a text box, you can use the Filter function to display the relevant records:
Filter(dataSource, searchCriteria = UserInput.Text)
For example, if you have a search box that allows users to search for projects based on a keyword, the Filter function would be:
Filter(Projects, TextSearchBox1.Text in Title)
This code will display only the records containing the keyword entered by the user in the project title.
Troubleshooting and Best Practices
Common Errors
When using the filter function in Power Apps, you may encounter some common errors. These errors can often be resolved by following best practices and understanding the underlying issues.
- Delegation errors: Delegation errors occur when the filter function is combined with another function, such as an IF statement. To resolve delegation errors, move the inner function outside of the filter function, allowing the filter to apply the desired criteria without interference from other functions.
- Incorrect table references: Make sure that you are using the correct table reference when applying the filter function. Double-check your table names and ensure that the table you are working with meets the criteria specified by the filter.
Performance Tips
To enhance the performance of your Power Apps using the filter function, consider the following tips:
- Optimize client-side operations: When using the filter function, consider the impact on client-side resources. Operations like Group By, Filter By, and JOIN can increase the JavaScript heap size on the client side, resulting in slower performance. Modify your app structure to reduce the impact of these operations on client device resources.
- Refine your formulas: Use precise formulas when defining your filter functions. The more specific you are in your criteria, the easier it will be for Power Apps to process the records and display accurate results.
- Logical text: Utilize logical text in conjunction with the filter function to provide users with an easy way to navigate through large amounts of data. The logical text allows multiple conditions to be applied, ensuring that the displayed records meet the desired criteria.
Conclusion
In summary, using the Filter function in Power Apps allows you to refine and narrow down data presented to users within your applications, enhancing their experience and efficiency. By applying specific formulas and criteria, you can display only the necessary information or records relevant to your user’s needs.
Remember, this function works by comparing each row of a data source against a given condition. If a record meets the set criteria, it is included in the output, while those that don’t are discarded. The syntax for the Filter function is as follows:
	Filter (Table, Formula1 [, Formula2, ... ] )

Now, let's dive into a real world example..
The filter function is one of the most useful functions in the platform, especially if you have a lot of data to deal with. It’s very similar to the search function, which we discussed in a previous tutorial. But we get the best results if we get them to work hand in hand in our app.
How The Filter Function Works – Real-World Example
To see how the filter function works, let’s go back to how the search function works first.
The search function basically takes a table, a search string, and the columns where you want to search.

A filter function does the same thing and turns it up to the next level.
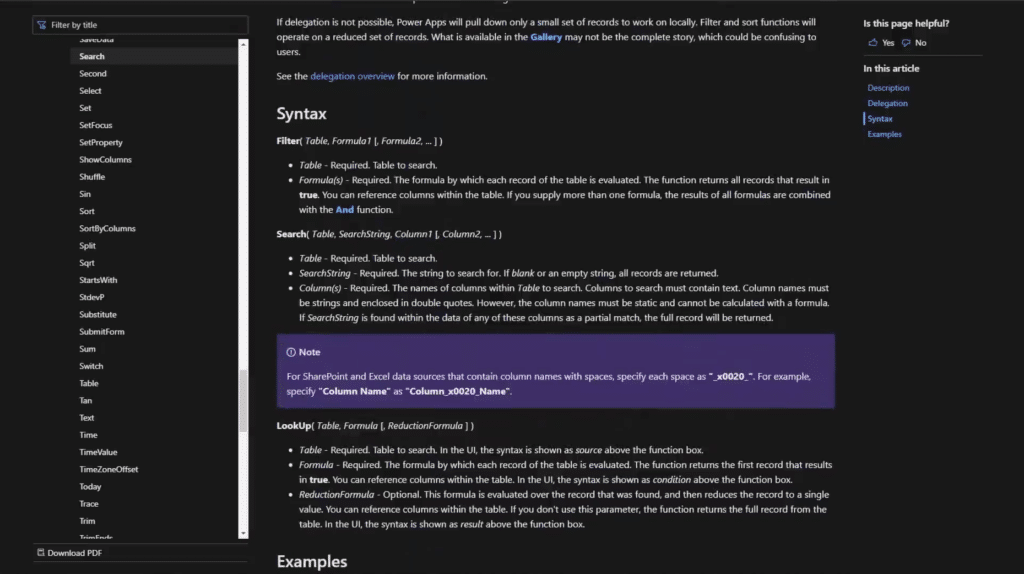
In the Microsoft document that details what the filter function is all about, it says that Filter takes a table where it will conduct a search and also takes formulas that evaluate each record within that table.
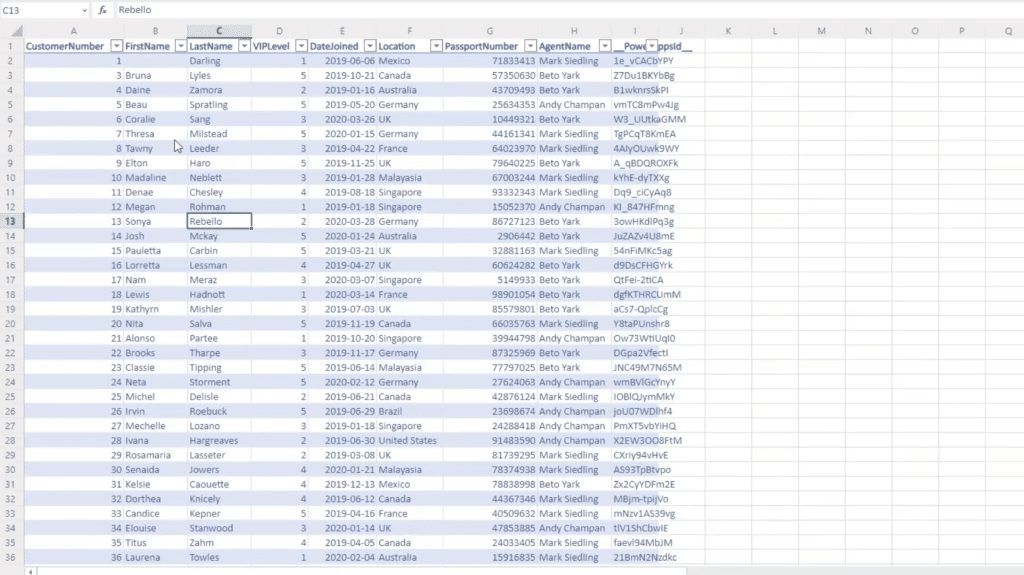
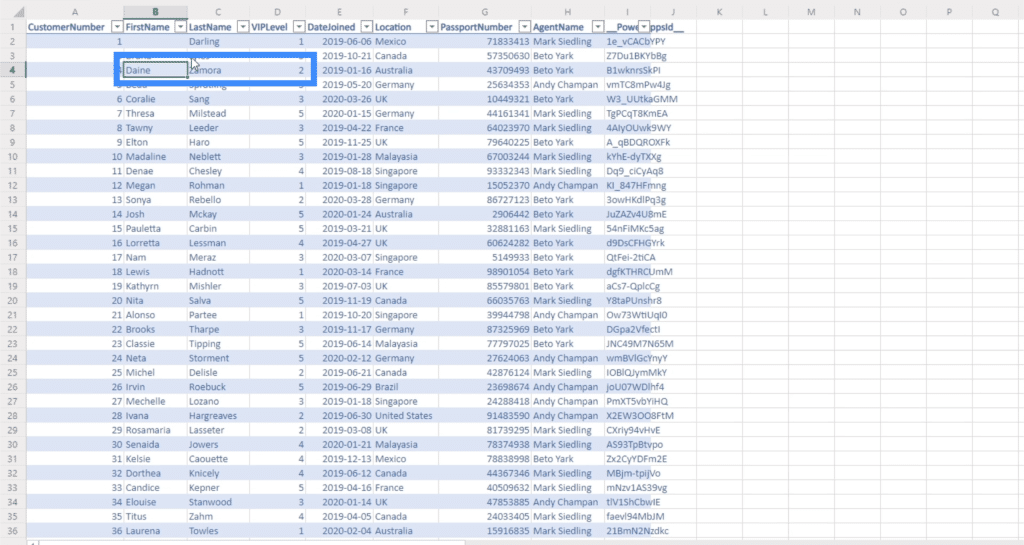
To understand what that means, let’s take a look at our data source.

So if you use the search function, all that it does is it takes that specific search term and checks the given columns in this table if there’s a match. So if you look for Sonya, it finds an exact match and displays that in the gallery. In this case, it will return this record.
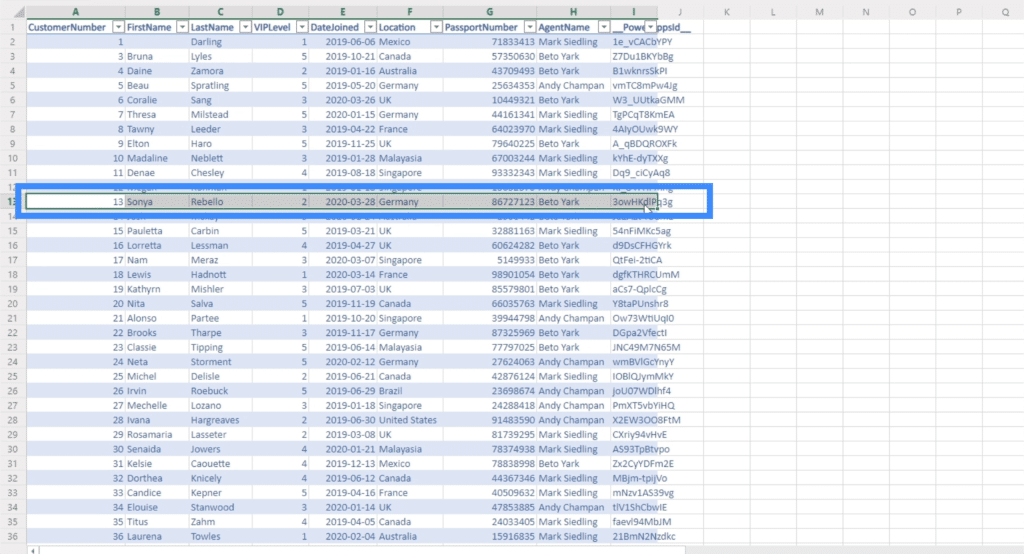
When it comes to the filter function, it takes conditional logic and checks it against each row in the table. If it finds a record that meets the conditions given, it returns that record.
One of the best ways to use the filter function is by setting conditions where it’s possible to have several matches across the data source. To do that, we have to create a dropdown (where the column name is) that allows us to do that.
Adding A Dropdown Filter
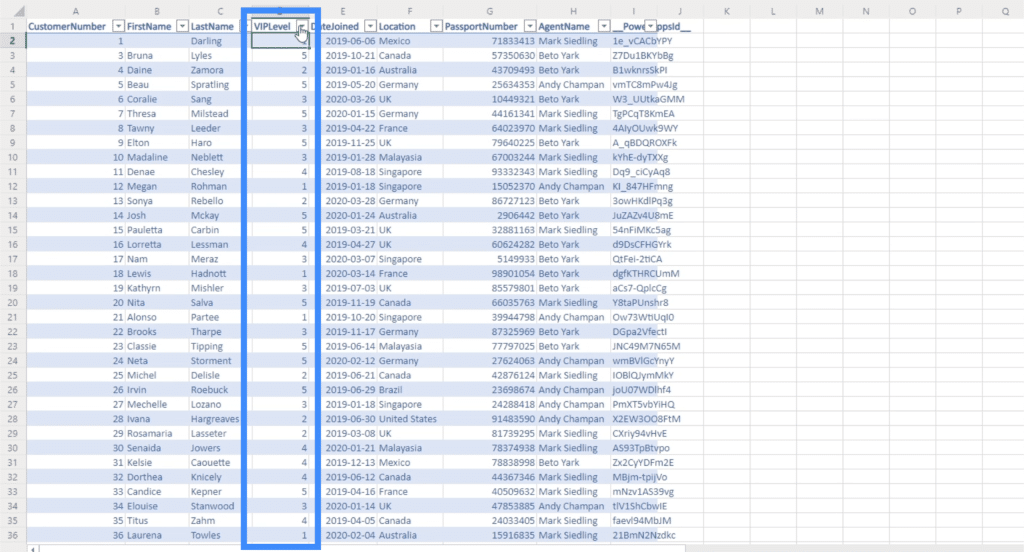
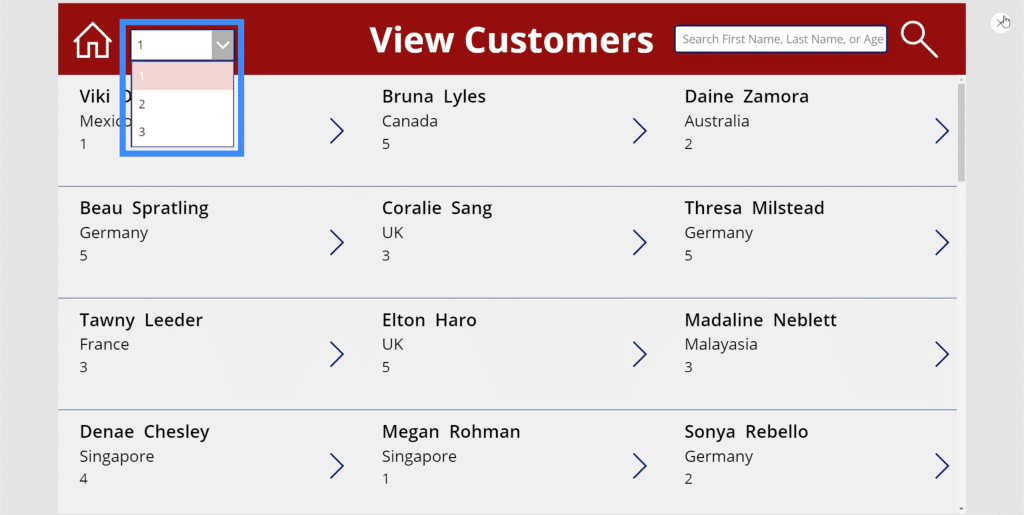
For this example, let’s allow users of the app to filter records based on the VIP level. The VIP levels we have are 1, 2, 3, 4, and 5.
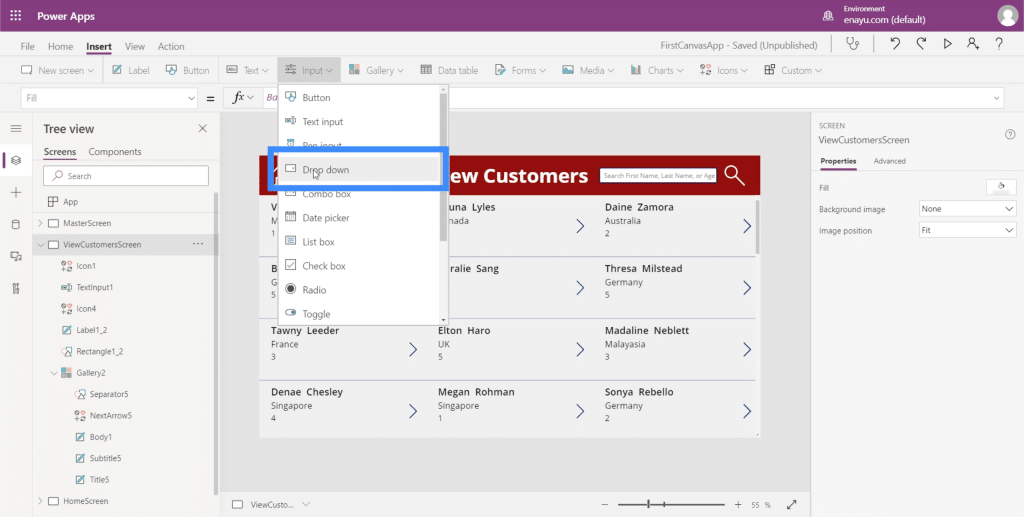
We can add a dropdown by clicking on Input under the Insert ribbon.
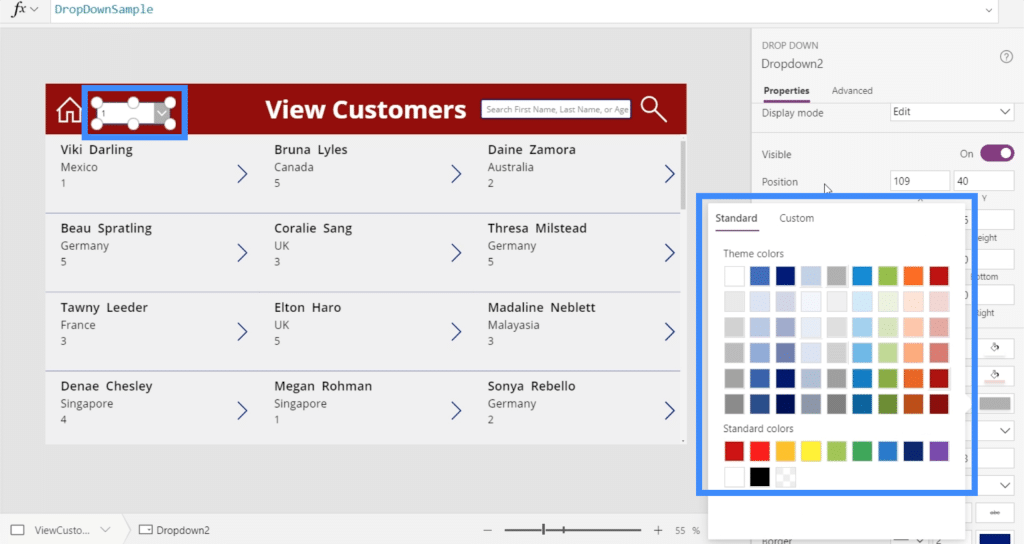
The default dropdown seems to be too big for the space we have. The good news is as with any other Microsoft platform, elements like this can be easily resized by clicking on the dots on the corners.
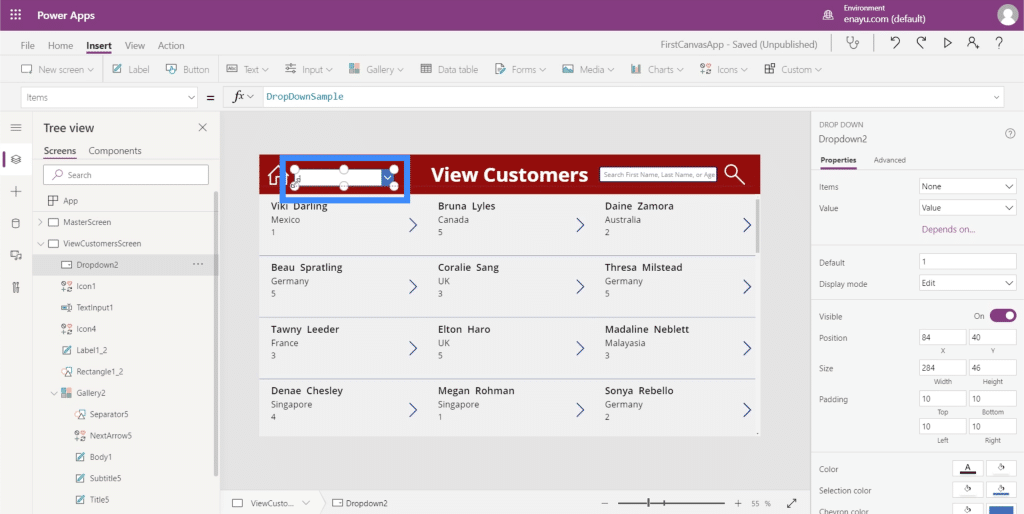
We can also change the colors so that it corresponds to the theme that we’re using.
Now, every dropdown has a list of items in it.
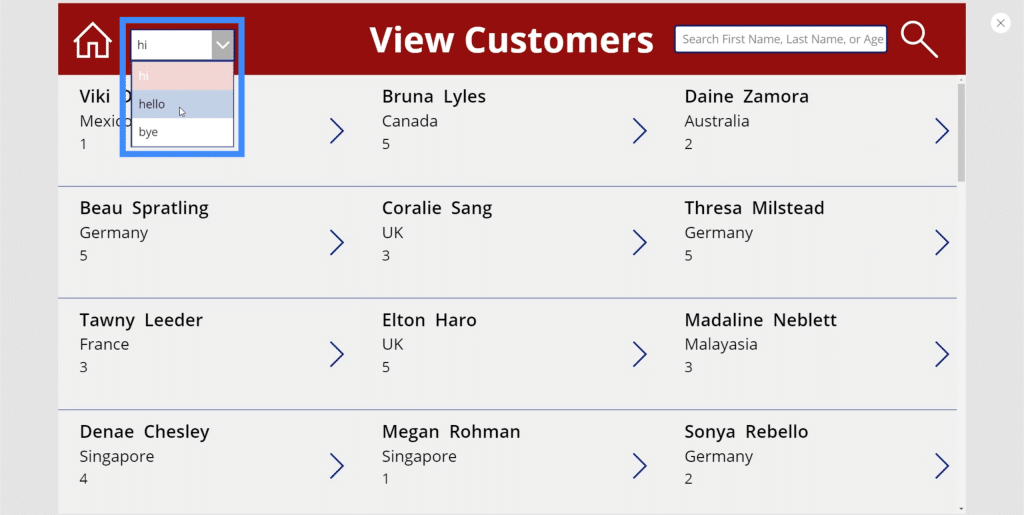
To change the items in the dropdown, all you need to do is go to the Items property and type in all the items inside square brackets. For example, you can use the words hi, hello, and bye.
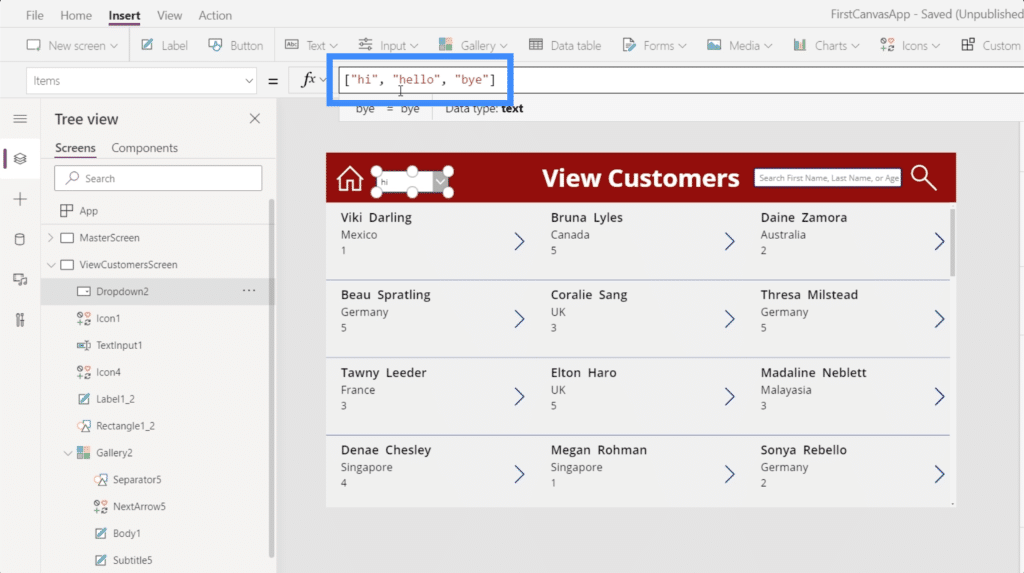
Once you click Enter, you’ll see those words in the dropdown list.
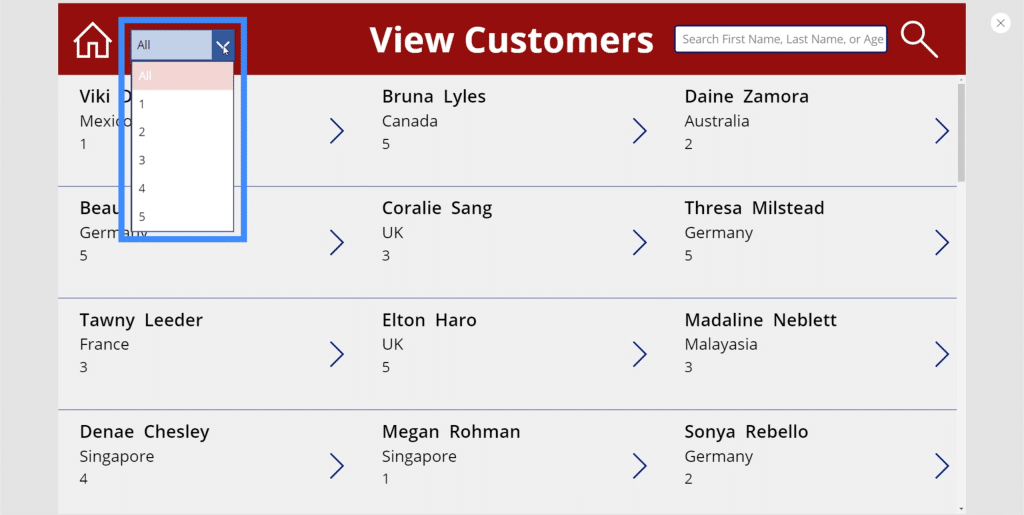
This time let’s go for the actual items that we want to appear in our app. Aside from levels 1, 2, 3, 4, and 5, we also want an option to choose all of the items. So let’s start with All and put the VIP levels after that.
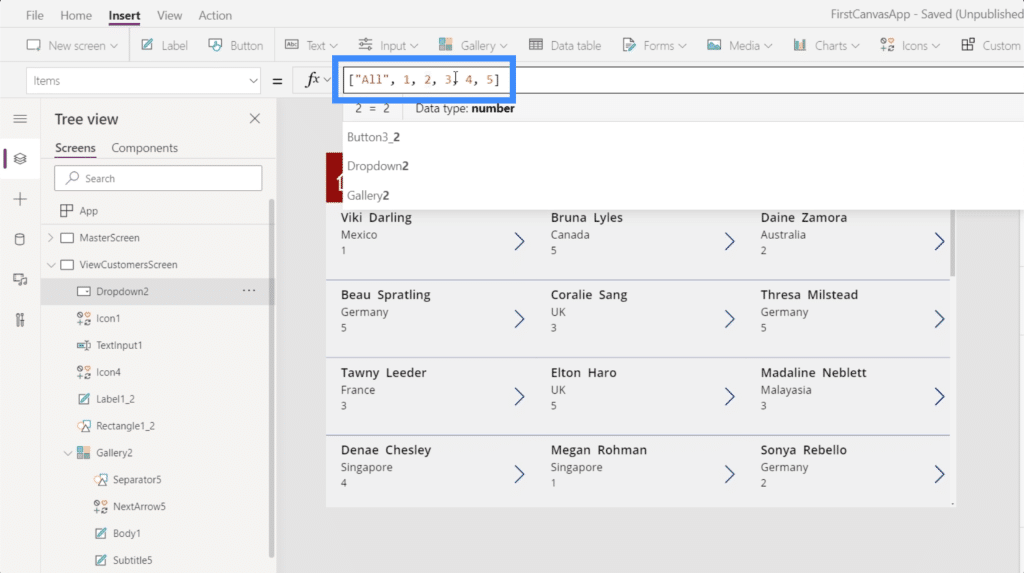
Once we hit Enter, the items in the dropdown menu will now show the items we added.
Using The Filter Function
If we choose an entry in our dropdown, you’ll see that it doesn’t do anything just yet.
That’s because we haven’t applied the Filter function to our app yet.
So if we choose 1 from the dropdown, we want the items in our gallery to only show items that are under VIP level 1. This means that we need to change this formula so that it performs that action.
The cool thing about Microsoft Power Apps is that you can layer functions on top of functions. This means that we don’t have to get rid of the existing Search formula here. Instead, we can incorporate our filter function to this existing formula.
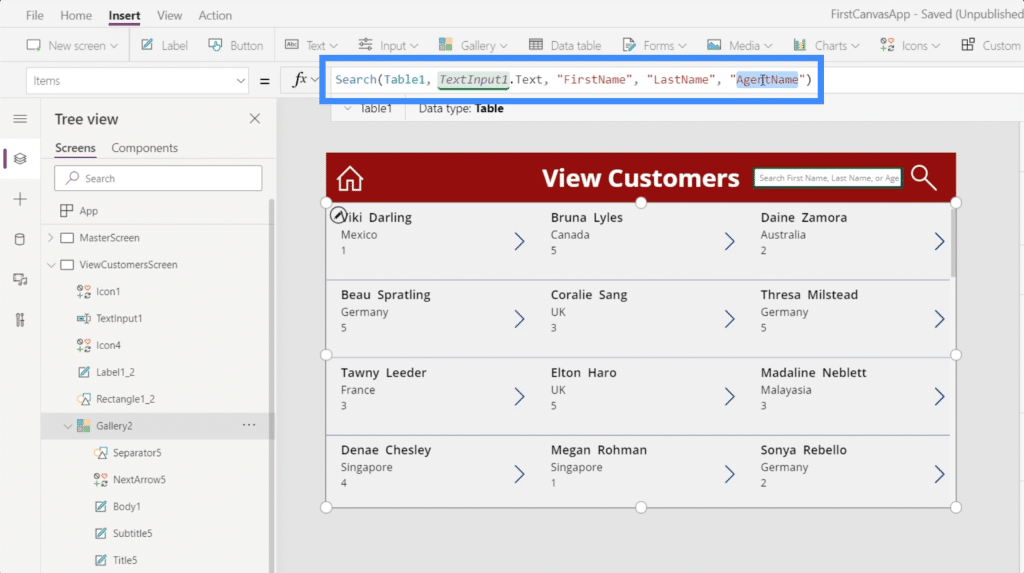
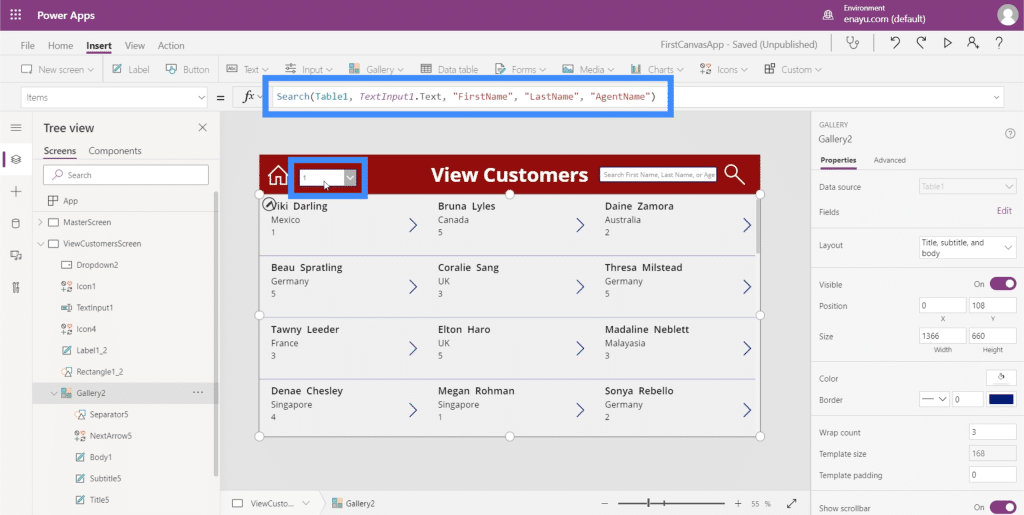
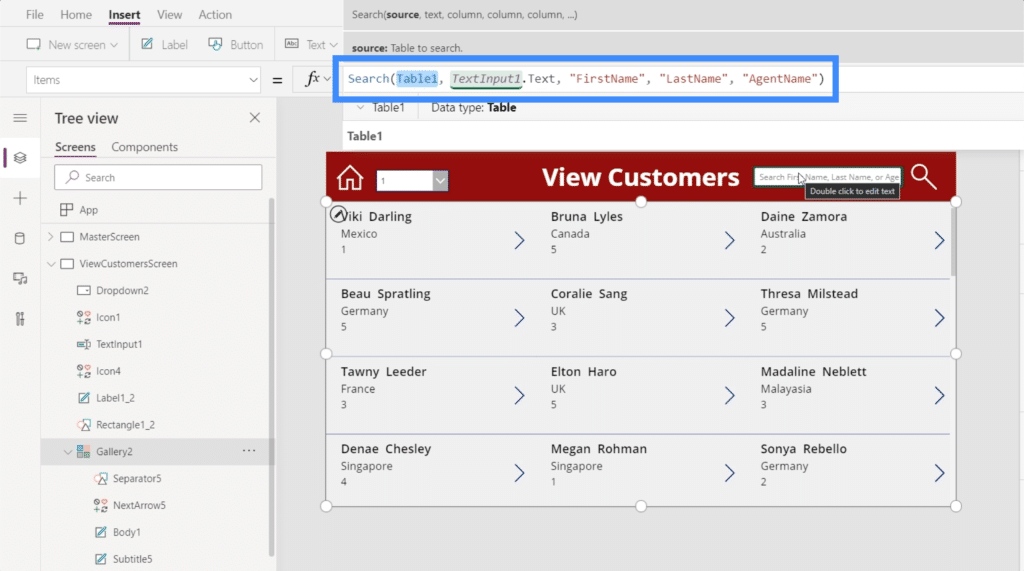
Our search function already runs through Table1 as it looks for the search term typed in the search field. That’s represented by TextInput1.Text. Then, it looks for that search term in the columns FirstName, LastName and AgentName.
If you’ve worked with Excel before, you’ll notice that using Filter on Power Apps is done the same way.
We add Filter at the start of the formula, then we’ll use the Search formula as the first argument.
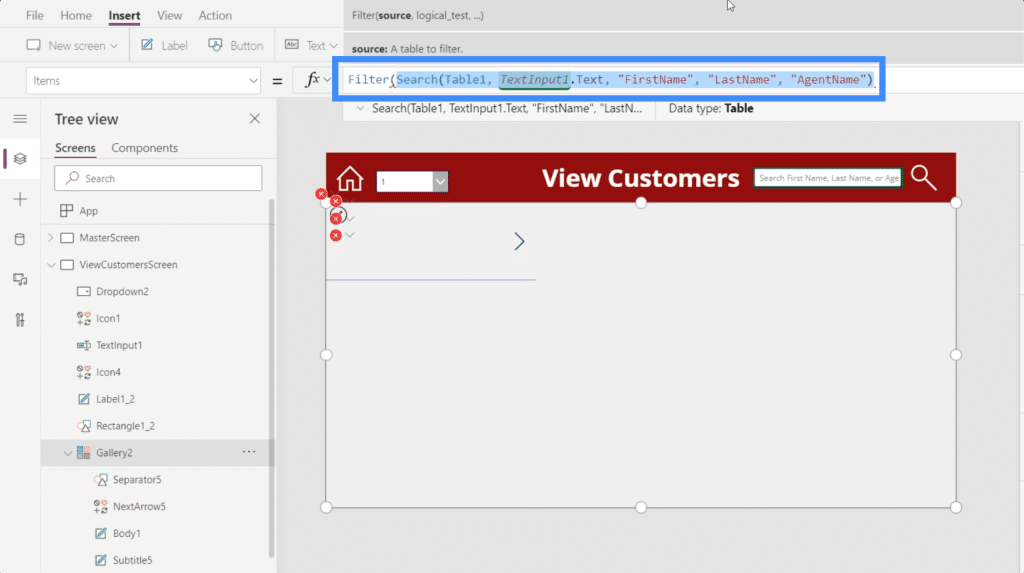
The first argument that Filter normally looks for is a source or a table, which makes sense in this case because it will filter the same table we’re using for our search filter after it’s done looking for the specific search term.
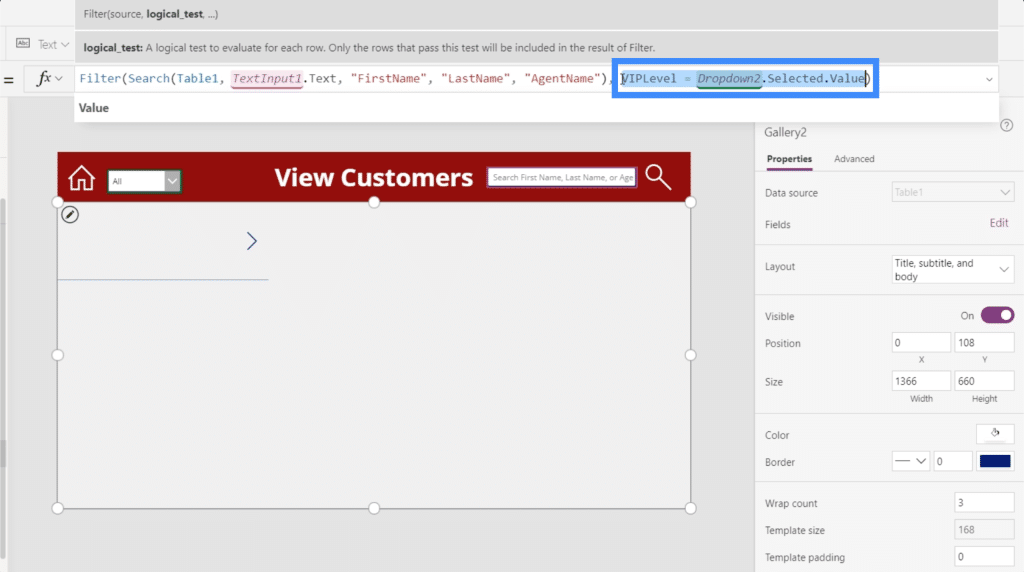
Once we have the source, it’s time to add the conditional logic or the formula. As a condition, we want the VIP level that matched whatever is selected from the dropdown menu. If we check on the elements on the left pane, it shows that we’re using Dropdown2.
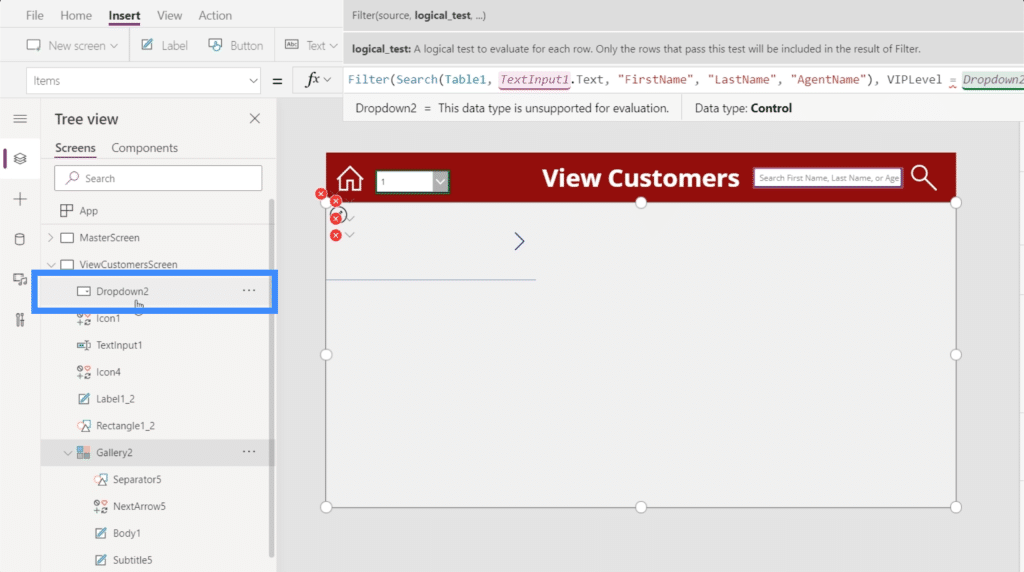
So we’ll use VIPLevel = Dropdown2.Selected.Value. Basically, this formula looks at the search output and filters it based on the selected value under the VIP Level dropdown.
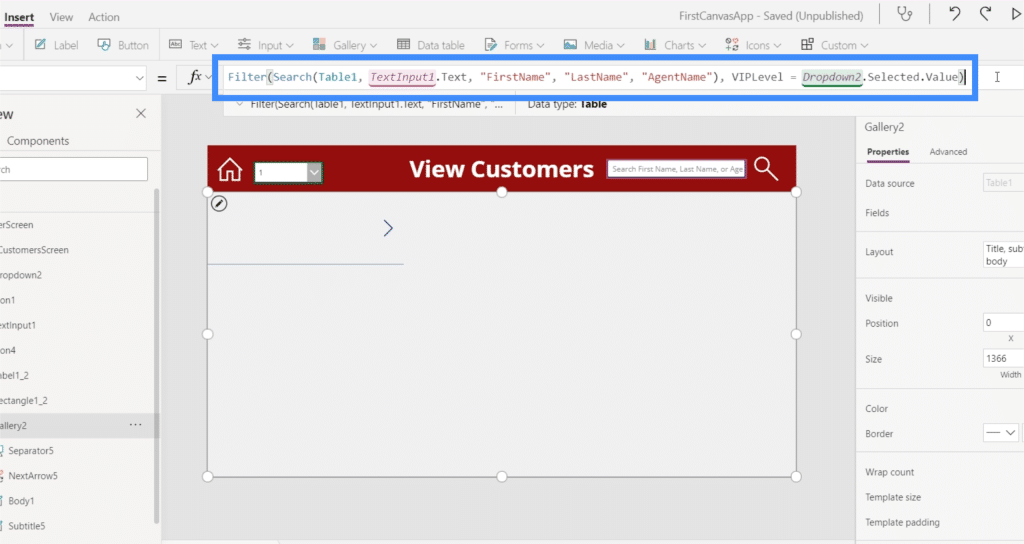
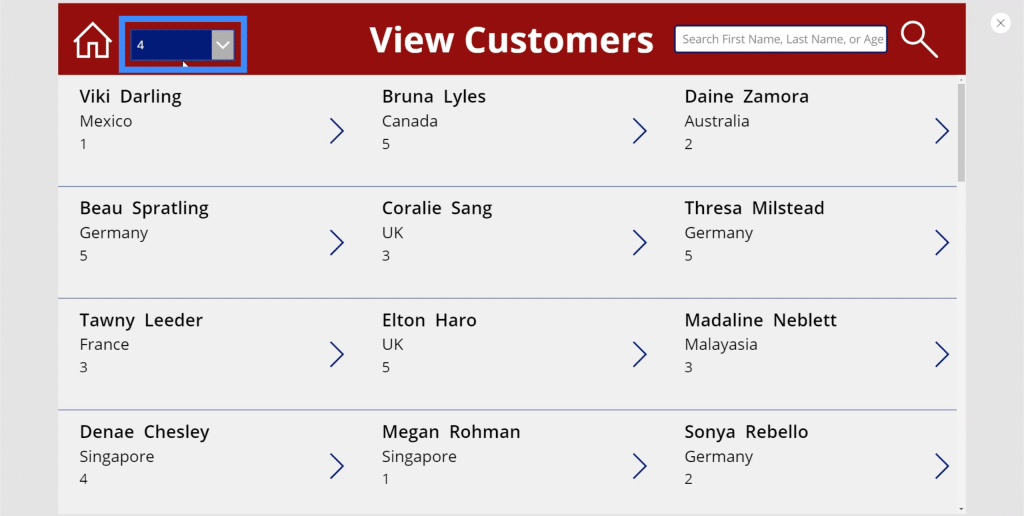
So if we choose 2 on the dropdown, it filters the entire gallery and only shows entries under VIP level 2.
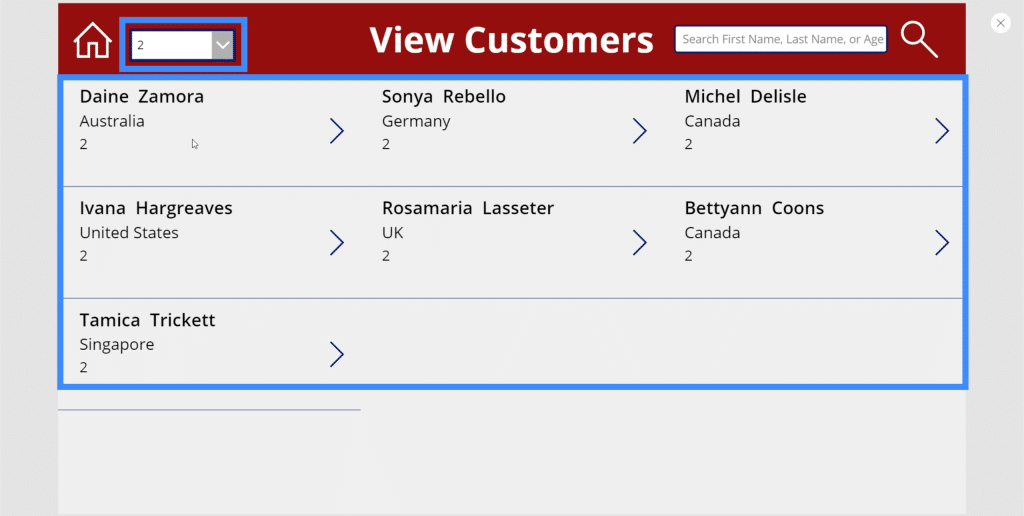
Let’s see if it actually works by checking on our data source. The first name in our gallery is Daine Zamora. If we check that against the table, we’ll see that Daine Zamora really is part of VIP level 2.
Adding All To The Filter Function
Although our dropdown works for VIP levels 1 through 5, if we choose All, it doesn’t return any result at all.
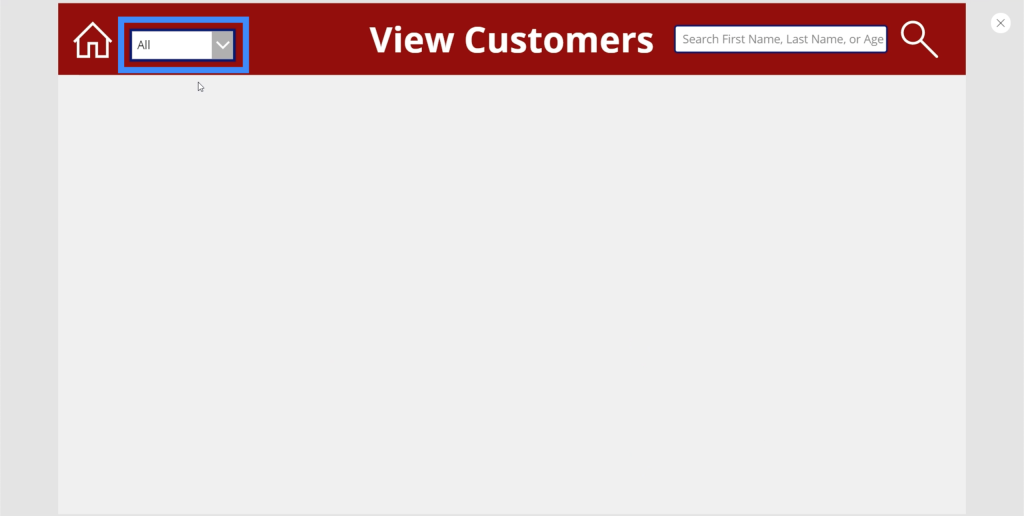
That’s because based on the logic we created, it’s only looking for VIP levels 1 to 5. There’s no VIP level under this column that says All.
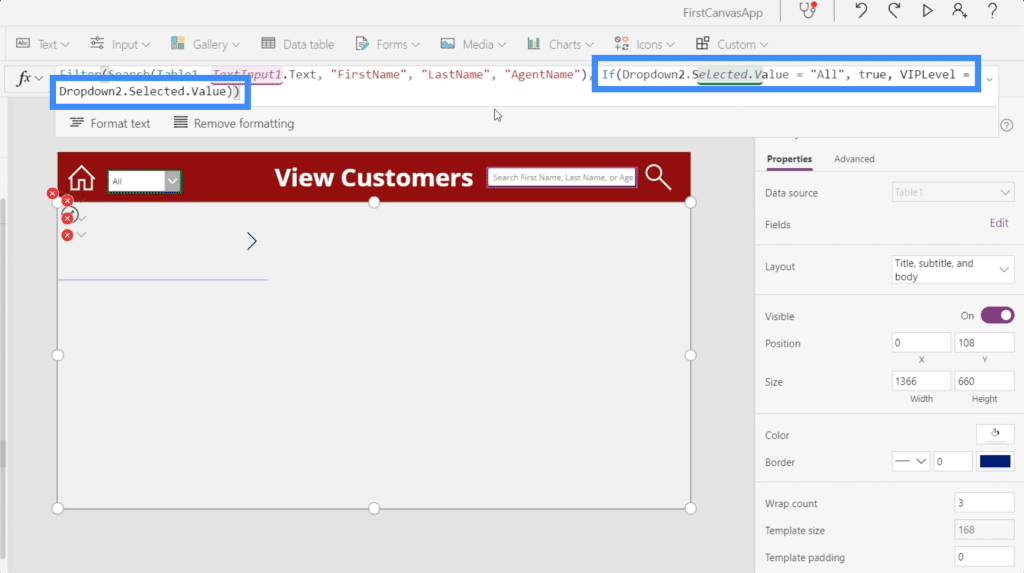
To fix this problem, we’re going to add an IF statement that says if the user selects All from the dropdown, then there’s no need to apply this logic. If the user selects anything else other than All, then this logic will still apply.
So our IF statement will go If(Dropdown2.Selected.Value – “All”, true. This means that we want the conditional logic to return true if All is selected. Then, we’ll add VIPLevel = Dropdown2.Selected.The value so that it goes through the usual filtering process if anything other than All is selected.
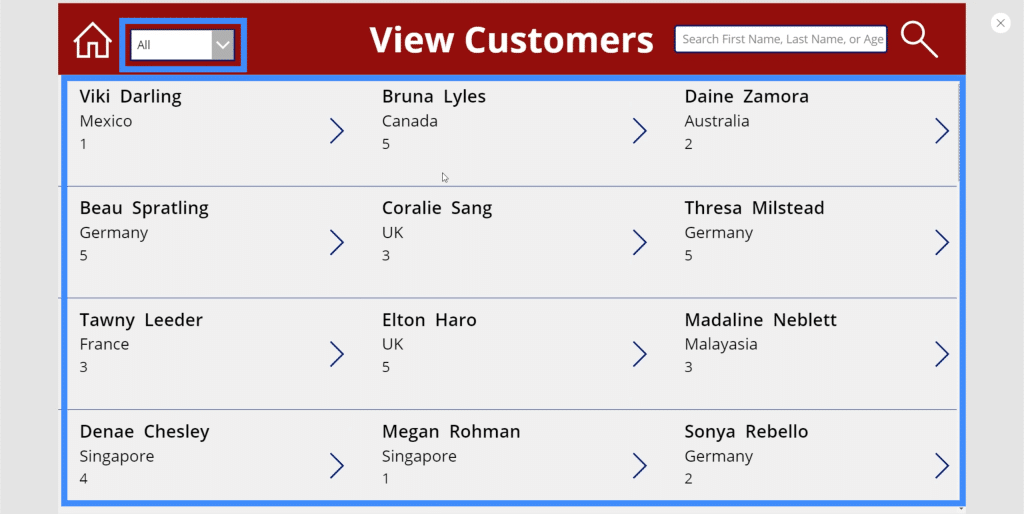
If we try that out and choose All on our dropdown, you’ll see that it displays all items in our gallery.
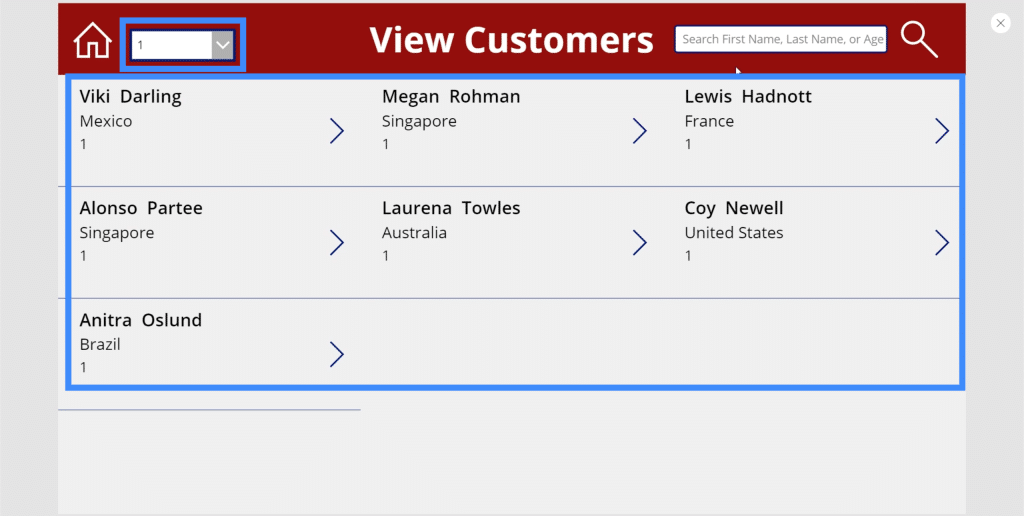
But if we choose 1 from the dropdown, it automatically filters the whole gallery and now only shows the entries under VIP level 1.
Now, let’s check if both the search and filter functions will work at the same time.
With 1 chosen from the dropdown, let’s type Zamora in the search bar. As you can see, it doesn’t return any results.

That’s because we’re not even sure if Zamora falls under VIP level 1. So let’s try that same search term under All.
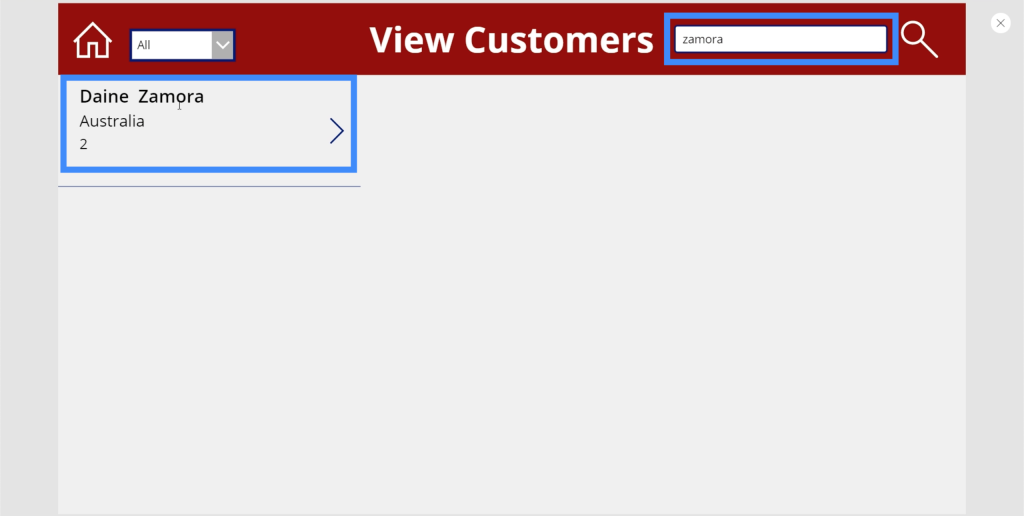
Now, it’s showing Daine Zamora, which means that both the filter and the search functions are working perfectly.
***** Related Links *****
Power Apps Introduction: Definition, Features, Functions And Importance
Power Apps Environments: Setting Up The App Elements Properly
Power Apps Canvas: How To Create An App From Scratch
Conclusion
The filter function definitely takes our app to a whole new level, especially in terms of ease of use. Now, users won’t have to scroll through all the names in our gallery. All they need to do is type in a search term and filter it accordingly.
What we saw here is just the beginning. It’s possible to have multiple filters on a single screen, as well as multiple search bars. It all depends on the amount of data you have and the ways that you can group records together.
All the best,
Henry
FAQs
What is the Lookup Function?
The lookup function is very similar to vlookup or hlookup in Excel, it is basically used to lookup information from other data sources.
What is Power Platform?
Power platform is a collection of low-code or no-code tools from Microsoft. The three main tools include Power BI, Power Apps & Power Automate. Collectively they offer a powerhouse for users to transform their data.
What is Canvas Apps?
Canvas apps is a low code-code platform from Microsoft that allows users to create apps in a drag-and-drop interface. Sure, there are advanced settings, but overall it is straightforward and intuitive to use.
What is the ClearCollect function in Power Apps?
The ClearCollect function deletes all of the records from a collection; it’s that simple. It then adds a different set of records back to the same collection. In one function, it can Clear and then Collect, hence the name, and is very handy when dealing with both small and large datasets.
What are PowerApps Galleries?
You can learn more about them from a current user in this article.
What is a Delegation Warning?
A delegation warning is basically a warning that comes up when you create a formula that cannot be delegated.
What is the StartsWith Function?
The StartsWith function will test whether a single text string begins with another. For both of the functions, the tests are case insensitive. You can read more about it here.