
One of the most powerful and useful functions in Power Query M language is List.Max. It can be extremely useful when working with numerical data sets and filtering results based on particular criteria.
In Power Query, List.Max is a function used to find the maximum value in a given list. The function takes a list as an argument, which can contain numbers, dates, or times, and returns the largest number, most recent date, or latest time. List.Max also offers added flexibility with its optional parameters and default value settings that allow you to define custom comparisons.

List.Max is an essential function for Power Query users who need to quickly identify the maximum item in a list based on specific conditions or criteria. Its optional parameters increase its practicality, making it an indispensable tool for various data extraction and transformation scenarios.

So, let’s delve deeper into the List.Max function in Power Query!
What is List.Max in Power Query?
Power Query is a business intelligence tool used by Excel and other Microsoft products to perform a variety of data manipulation tasks. One of these tasks is finding the maximum value in a list of numbers, dates, or times. This is where the List.Max function comes into play.
The List.Max function in Power Query follows a simple syntax:
List.Max(list, optional default)
The List.Max function typically has two parameters:
- list: This represents the list of values from which you want to find the maximum. This list can contain numbers, dates, or times. The function will return the maximum value found in the list.
- optional default: This is an optional parameter that indicates the default value to be returned in case the list is empty. If the list is empty or if it only contains null values and you didn’t include the optional default, then the function will return null.
Let’s take a look at how you can use List.Max in the next section.
4 Steps to Use List.Max Function
The List.Max function is used to find the maximum value in a list. This can be particularly useful when dealing with large datasets, as it allows you to quickly identify the largest number, the most recent date, or the latest time in your data.

In this section, we’ll look at a basic example of how to use the List.Max function in an Excel file.
Step 1: Load Data into Power Query
Before we can use the List.Max function, we first need to load our data into Power Query. Here’s how:
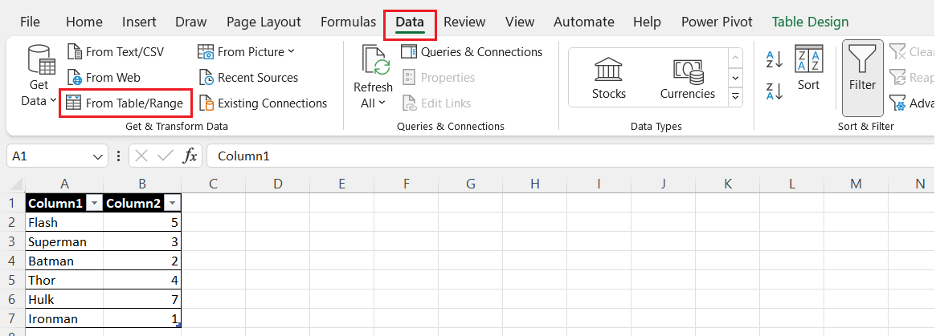
- Open Excel and navigate to the “Data” tab.
- Click on “Get Data” in the toolbar.
- Select “From File” if you’re importing data from a file, or select one of the other options if your data source is different.
- Follow the prompts to import your data. Once the data is loaded, the Power Query Editor will open.
After you launch your Power Query Editor, select the cell you want to use List.Max on. Click on the Data tab and then click From Table/Range.

Step 2: Create a List
For this example, let’s assume we have a table of sales data, and we want to find the maximum sales value in the table. First, we need to create a list of sales values. Here’s how:
- In the Power Query Editor, select the column containing the sales data.
- Right-click the column and select “Drill Down”. This will create a list of values from the column.
Let’s use List.Max on a list of numbers {1, 4, 7, 3, -2, 5} to find the highest value from the list.
Step 3: Apply the List.Max Function
With our list ready, we can now apply the List.Max function:
- Go to the formula bar at the top of the Power Query Editor.
- Type = List.Max. Notice that Power Query will auto-suggest functions as you type.
- The Power Query Editor will automatically populate the name of your list as a parameter. If not, manually insert the name of your list. Then close the parentheses and hit enter.
The formula should look like this: = List.Max(your_list_name)
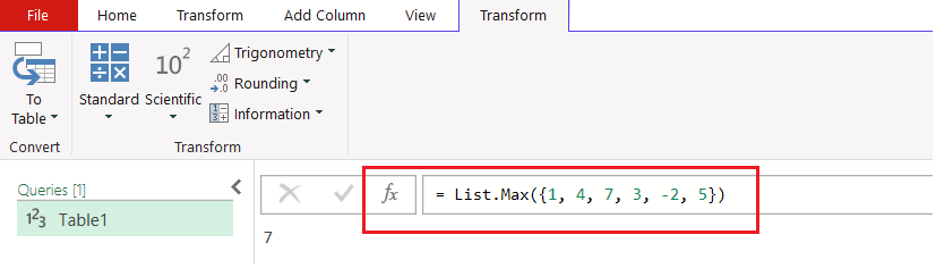
As you can see in the example above, the output would be 7, which is the highest value in our list.
Step 4: Interpret the Results
After hitting enter, Power Query will calculate the maximum value in your list and display it, which was 7 in our case. This is the highest sales value in your data.
By following these steps, you should be able to use the List.Max function in Power Query to find the maximum value in any list. Whether you’re dealing with sales data, dates, or other numerical data, the List.Max function can be a powerful tool for data analysis.
In the next section, we’ll take a look at some advanced use cases of the List.Max function.
7 Advanced Tips for List.Max
So far, we’ve explored the basic use of the List.Max function in Power Query, understanding its syntax and purpose and learning how to apply it in a step-by-step manner. But Power Query is a powerful tool that can handle more than just simple lists of numbers.
In this section, we’ll delve into some advanced usages of the List.Max function, including handling complex data types and combining List.Max with other functions for more nuanced analysis.
1. How to Use comparisonCriteria
In Power Query, the List.Max function is used to find the maximum value in a list. One useful feature of List.Max is the ability to specify a custom comparison criteria using the comparisonCriteria parameter.
This allows for more flexibility when determining the maximum value based on specific conditions. In this section, we’ll delve into implementing custom comparison criteria with the List.Max function.

When working with more complex data types, you can also provide an optional argument using comparisonCriteria to dictate how the items in the list are compared.
comparisonCriteria is an optional parameter that defines the custom comparison function used to determine the maximum item in the list. If this value is null, the default comparer is used.
The syntax including the comparisonCriteria parameter is as follows:
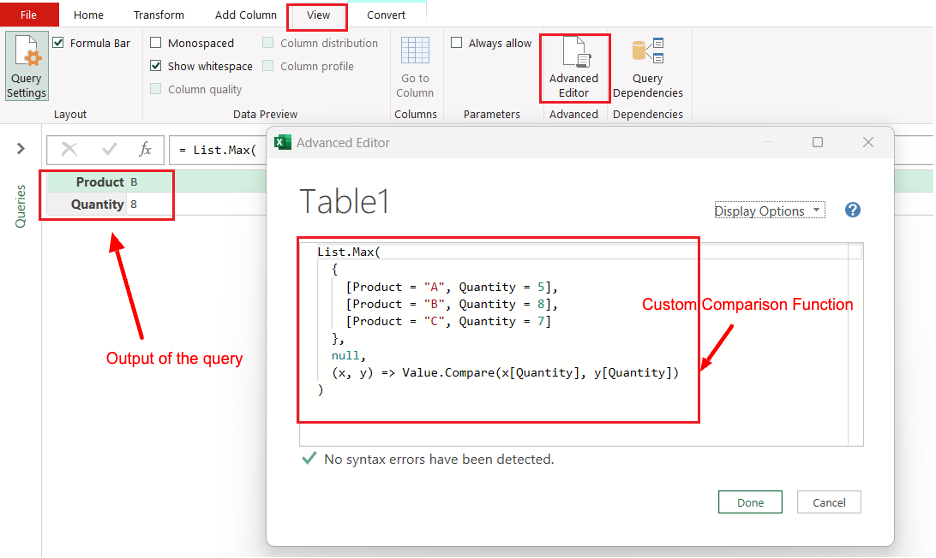
List.Max(list as list, optional default as any, optional comparisonCriteria as any)For instance, let’s say you have a list of records and you want to find the maximum value based on a specific field, say Quantity. You can accomplish this by providing a custom comparison function as the comparisonCriteria:
List.Max(
  {
    [Product = "A", Quantity = 5],
    [Product = "B", Quantity = 8],
    [Product = "C", Quantity = 7]
  },
  null,
  (x, y) => Value.Compare(x[Quantity], y[Quantity])
)
In this case, (x, y) => Value.Compare(x[Quantity], y[Quantity])is the comparisonCritiera. The output will be [Product = “B”, Quantity = 8], as this record has the highest quantity value.
In sum, List.Max is a powerful and flexible function that enables you to find the maximum item in a list, while its syntax allows for optional default values and customizable comparison criteria.
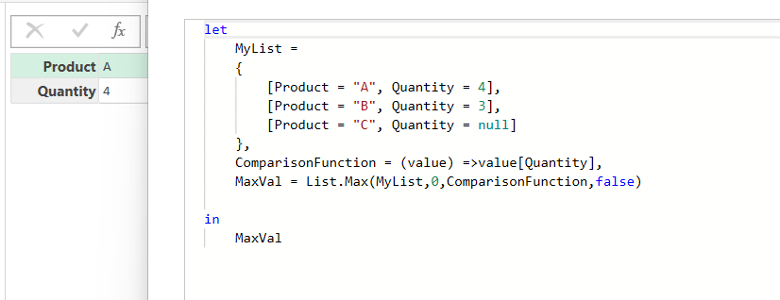
2. How to Use Custom Comparer Method
The comparisonCriteria parameter can be supplied with a function to compare the items in the list. By doing so, it offers more customization in finding the maximum value based on certain conditions or rules.
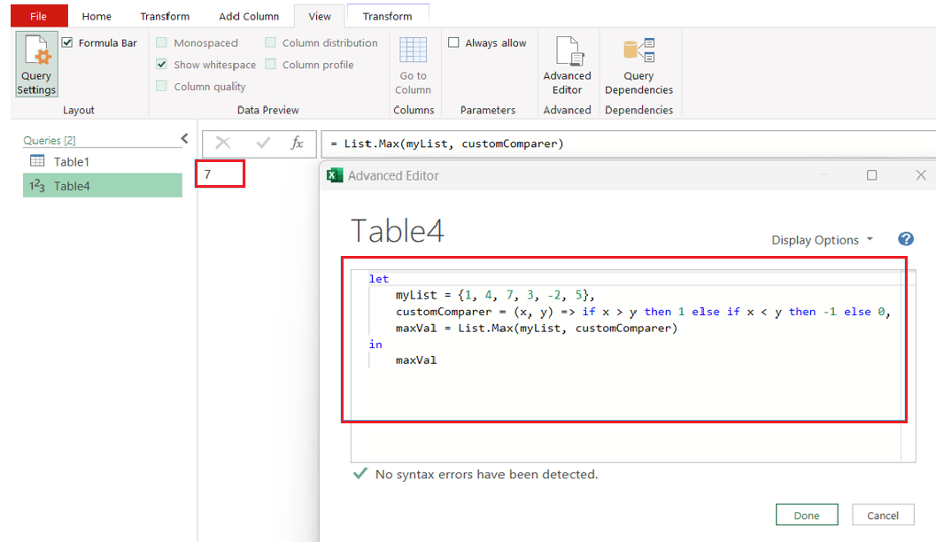
Here’s an example to illustrate this concept:
let
    myList = {1, 4, 7, 3, -2, 5},
    customComparer = (x, y) => if x > y then 1 else if x < y then -1 else 0,
    maxVal = List.Max(myList, customComparer)
in
    maxVal

In this example, customComparer is a user-defined function that compares two values (x and y) and returns 1 if x is greater than y, -1 if x is lesser than y, or 0 if both are equal.
By passing this function to the List.Max comparisonCriteria parameter, we ensure that the maximum value is retrieved based on our custom comparison rules.
It’s important to note that the default comparer is used when the comparisonCriteria parameter is set to null or not specified. For instance, the following code results in the same output as the previous example since the default comparer compares numeric values:
let
    myList = {1, 4, 7, 3, -2, 5},
    maxVal = List.Max(myList)
in
    maxVal
When using the custom comparer method, ensure the function you provide adheres to the comparison rules you’d like to apply. This gives you the flexibility to customize the comparison logic and make it suitable for various scenarios.
3. Working with Dates
When working with a list in Power Query, you may encounter columns containing dates. To extract the maximum date value from a column, you can use the List.Max function. First, transform the column type to a date type.
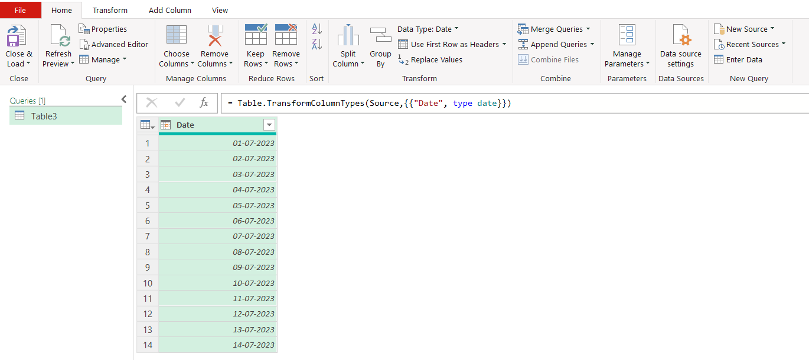
Then create a custom column using the below formula:
Date Max= Date.From(List.Max(NameOfPreviousStep[Date_Column]))
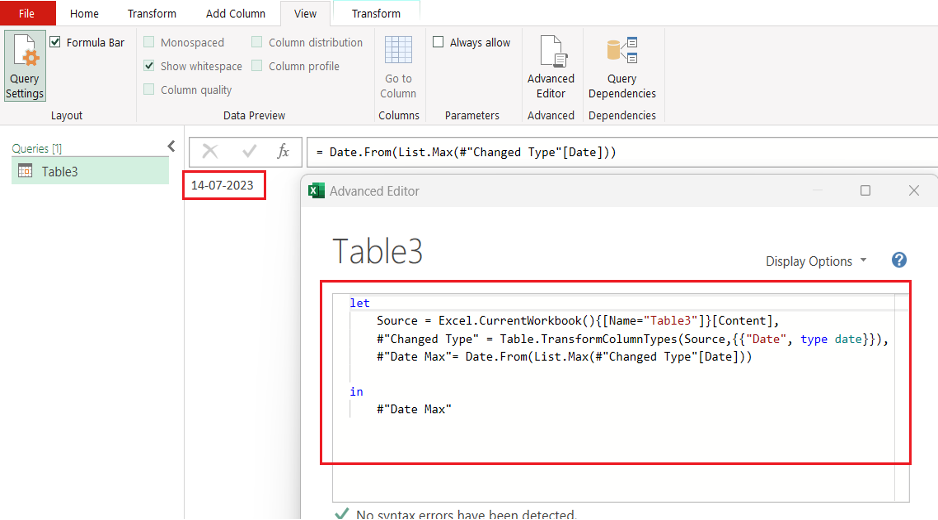
Replace NameOfPreviousStep with the name of the previous query step (e.g., #”Changed Type” or Source) and Date_Column with the name of the column containing dates. This command will return the most recent date from the specified column in the list.
4. Handling Nulls
When working with a list in Power Query, there might be situations where you encounter null values within the data.
The List.Max function provides an optional parameter called includeNulls which allows you to control if the function should consider null values or not. By default, the includeNulls is set to nullable logical, which means that null values are considered.
To exclude null values in your calculations, set includeNulls to false. For example:
List.Max(list, default, comparisonCriteria, false)
Where list is the source list, default is the optional default value to return if the list is empty, and comparisonCriteria is the optional criteria for comparing list items.
By setting the optional includeNulls parameter, you can ensure that you receive accurate results when working with columns that may contain null values. This will help you maintain clean data and reliable calculations in your Power Query workflows.

5. Content Transformation with List.Max
List.Max is particularly useful for data transformations because it’s capable of handling various scenarios and data types.
In many cases, you may want to transform a list of values or a column within a table. Combining List.Max with List.Transform can make these tasks more efficient.
To do so, it’s crucial to understand how the -1 value works in this context: if no item is greater than or equal to the specified value, -1 will be returned. This can be useful for ensuring no unwanted results when dealing with edge cases.
Consider a scenario where you have a list or column of numbers and need to add a new column with the maximum value in the existing column.
The Changed Type step is often necessary to ensure the original column data is in the correct type for the operation. The Table.TransformColumnTypes function can help with that, by applying the relevant type change to the initial data.
Here’s an example to illustrate these concepts:
let
    Source = {1, 2, 3, 4, 5},
    NewMaxColumn = Table.FromList(Source, Splitter.SplitByNothing(), null, null, ExtraValues.Error),
    ChangedType = Table.TransformColumnTypes(NewMaxColumn, {{"Column1", Int64.Type}}),
    MaxValue = List.Max(ChangedType[Column1]),
    FinalTable = Table.AddColumn(ChangedType, "MaxValue", each MaxValue)
in
    FinalTable
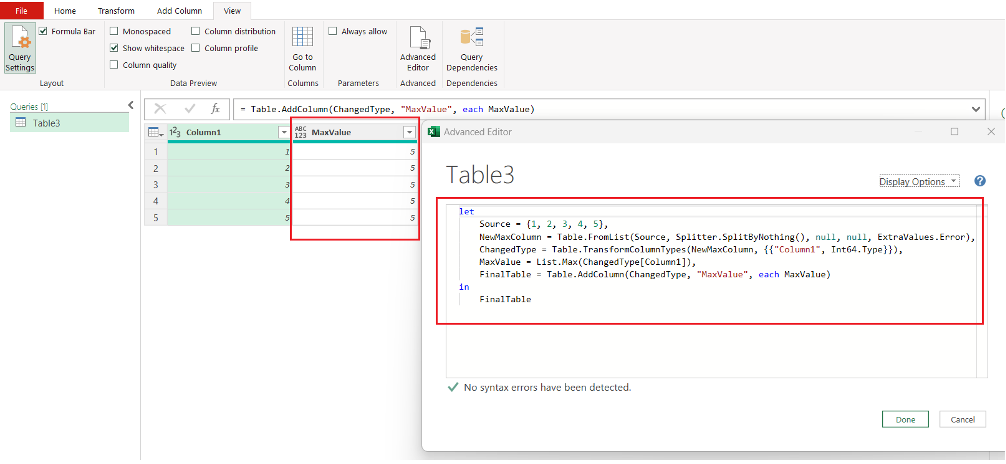
In this example, after transforming the source list into a table and changing the column type, we can easily add a new column with the maximum value using Table.AddColumn and List.Max functions.
By understanding how different elements like default values, comparison criteria, and data transformation functions like List.Transform and Table.TransformColumnTypes work together, you can achieve powerful and efficient data transformations in your projects.
6. Filtering and Returning Maximum Value
The List.Max function is particularly useful when working with datasets containing numerical data, dates, or any other comparable data types. To use the List.Max function, you simply need to pass the list you want to filter as the first argument, even if there is more than one list.
Consider an example where you have a table with two columns: Column1, which contains text, and Column2, which contains numerical values. To find the maximum value in Column2, you can make use of Power Query’s List.Max function as shown below:
let
    Source = Excel.CurrentWorkbook(){[Name="Table1"]}[Content],
    Changed_Type = Table.TransformColumnTypes(Source, {{"Column1", type text}, {"Column2", Int64.Type}}),
    Added_Custom = Table.AddColumn(Changed_Type, "Custom", each List.Max(Changed_Type[Column2]))
in
    Added_Custom
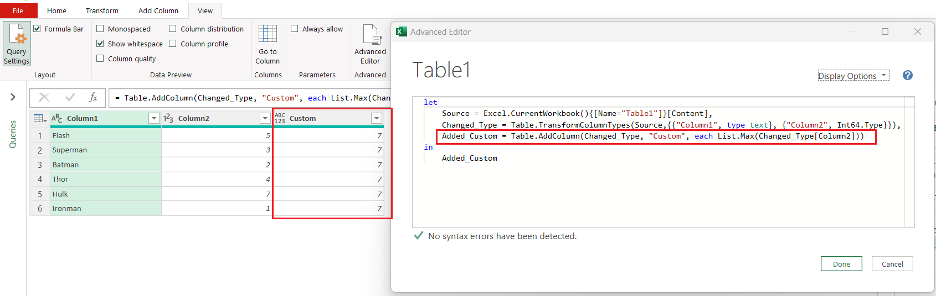
In this example, the List.Max function is applied to the Column2, returning the maximum value found in that column. The resulting table will have a new column called “Custom” containing the maximum value repeated across all rows.
If you wish to apply a filter based on the maximum value, you can modify the query as follows:
let
    Source = Excel.CurrentWorkbook(){[Name="Table1"]}[Content],
    Changed_Type = Table.TransformColumnTypes(Source, {{"Column1", type text}, {"Column2", Int64.Type}}),
    Filtered_Max = Table.SelectRows(Changed_Type, each ([Column2] = List.Max(Changed_Type[Column2])))
in
    Filtered_Max
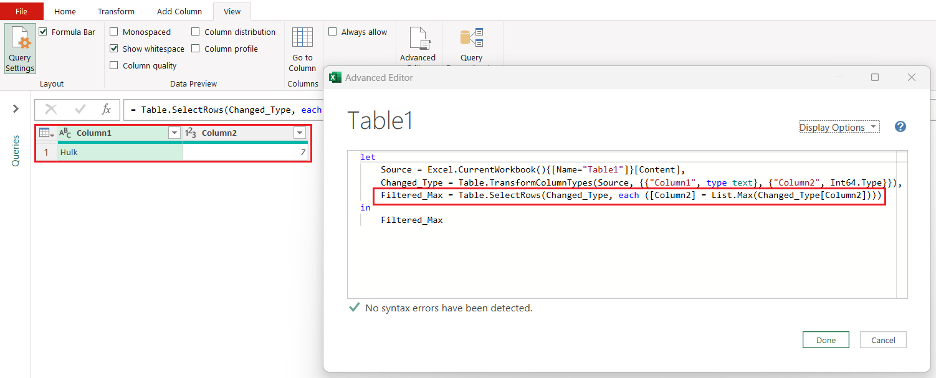
This query filters the table to display only the rows where the value in Column2 is equal to the maximum value found in that column.
7. Working with Custom Columns
In Power Query, custom columns allow you to extend your dataset by adding new columns based on existing data. One common use for custom columns is to find the maximum value (max value) of a specific column. This can be achieved using the List.Max function.
To create a custom column to return the max value of a specific column, follow the steps below:
1. Go to the Power Query editor and select the table in which you want to add the custom column.
2. Navigate to the “Add Column” tab, and click on “Custom Column.”
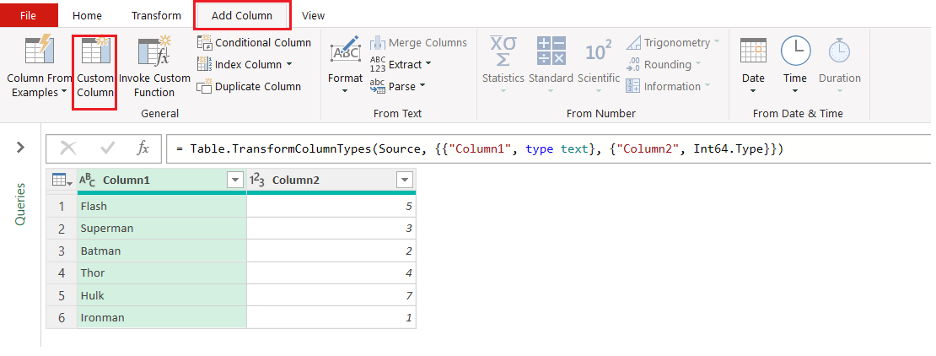
3. In the “Custom Column” dialog box, enter a name for your new column and use the following formula to return the max value of the desired column: List.Max ( #”Previous Step”[Column Name] )
4. Replace #”Previous Step” with the name of the previous step in your query, and replace Column Name with the name of the column from which you want to get the max value.
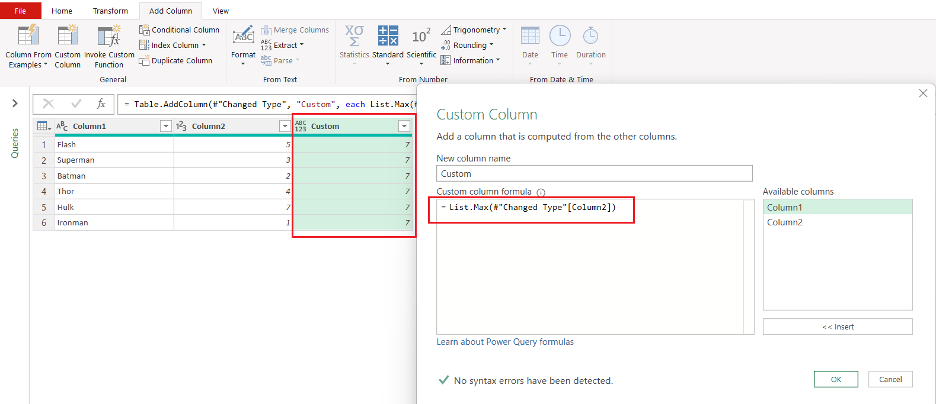
5. Click “OK” to add your custom column to the table.
The newly added custom column will display the maximum value of the specified column for each row in the table.
Final Thoughts
Power Query’s List.Max function is versatile and can be used in various scenarios, such as for creating custom columns, filtering data, or comparing values across columns. When working with custom columns in Power Query, remember to use proper syntax and keep your formulas concise.
By leveraging the List.Max function, you can effectively and efficiently return the maximum value from a given column and enhance your data analysis capabilities.
If you’d like to learn more tips and tricks for Power Query functions, check out our beginner’s guide to Power BI:
Frequently Asked Questions
How do you use a list query in Power Query?
To use a list query in Power Query, you can follow these steps:
- Open Power Query Editor in Power BI by clicking on “Transform Data” in the Home tab.
- Select the column containing the list values that you want to query.
- Use the list functions available in Power Query, such as List.Max, List.Min, List.Sum, etc., to perform operations on the list and derive desired results for your data analysis. For example, to find the maximum value in a list, you can use the below formula:
=List.Max([Column1]).
How do you find the maximum value of a row in Power Query?
To find the maximum value of a row in Power Query, you can use the Table.Max function. Follow the below steps:
- In Power Query Editor, select the table containing the row you want to find the maximum value of.
- Click on “Add Column” in the Home tab and select “Custom Column.”
- In the Custom Column dialog box, use the Table.Max function to find the maximum value for the specific row, like:
=Table.Max({[Column1], [Column2], [Column3]}) - Replace Column1, Column2, and Column3 with the actual column names from your table. This will create a new custom column with the maximum value of each row across the specified columns.
How do you expand a list in Power Query?
To expand a list in Power Query, you can use the “Expand” option when working with columns containing nested lists. Here’s how:
- In Power Query Editor, select the column with the nested lists that you want to expand.
- Click on the double-arrow icon next to the column header to expand the list.
- Power Query will create new rows for each item in the list, and the values from the nested list will be unfolded into separate columns in the expanded table.
What is list count in Power Query?
In Power Query, List.Count is a function used to determine the number of items in a list. It returns an integer that represents the count of elements in the specified list.
For example, if you have a list with five elements, using List.Count on that list will return the value “5.” This function is handy for performing calculations or filtering operations based on the number of items in a list within Power Query transformations.


