
Power Query is a game changer in the world of data analysis that enables you to connect, extract, transform, and load data from various sources. One of the essential tools at your disposal when working in Power Query is the IF statement.
IF statements in Power Query serve as a conditional expression that returns one value if its logical test is true and another value if false. Learning and understanding the syntax, along with the use of comparison and logical operators, can enable you to build powerful conditional logic in your queries.
Over the course of this article, you’ll explore the fundamental aspects of the Power Query IF statement, including basic examples, nested IFs, and how to create IF Statements with multiple conditions.

Let’s dive in!
Understanding Power Query IF Statements
Power Query IF statements enable you to perform conditional logic using M code, the programming language used by Power Query.
They offer a flexible way to apply conditional logic to your data transformation process, helping you to perform detailed analysis and making your data insights more accurate.

The syntax of Power Query IF statements may seem different from Excel, but it’s easy to understand. The basic structure is:
if [condition] then [true_expression] else [false_expression]
- Condition: This is the logical test you want to check. It can involve comparison operators like =, <, >, <=, >=, and <>.
- True_expression: This expression will be executed if your logical test returns TRUE.
- False_expression: This expression will be executed if your logical test returns FALSE.
For example, you can use IF statement to check if a number is positive or negative:
if [Number] > 0 then "Positive" else "Negative"
Note: The formulas for IF functions in Power Query are case sensitive. Write the formula in lower case only.

With Power Query, you can also use logical operators like AND, OR, and NOT to combine or modify conditions.
You can apply these operators to build complex conditions, such as checking if a number is within a certain range:
if [Number] >= 10 and [Number] <= 20 then "Within Range" else "Outside Range"
You can also nest IF statements, which means putting one IF statement inside another to handle multiple conditions. For instance, you can check for positive, negative, and zero values like this:
if [Number] > 0 then "Positive" else (if [Number] < 0 then "Negative" else "Zero")
Remember to use parentheses to ensure that the nested IF statement is properly evaluated.
Steps to Create an IF Statement Using Conditional Column
You can import data from the source into your Power BI and define If-else conditions to transform your data into a new customized column using the Conditional Column option provided in the Power Query Editor.
Creating a Power BI IF statement using the Conditional Column option is super easy with its intuitive GUI, helpful tooltips, and dropdown menus to allow for quick selection of values for Column and operator.
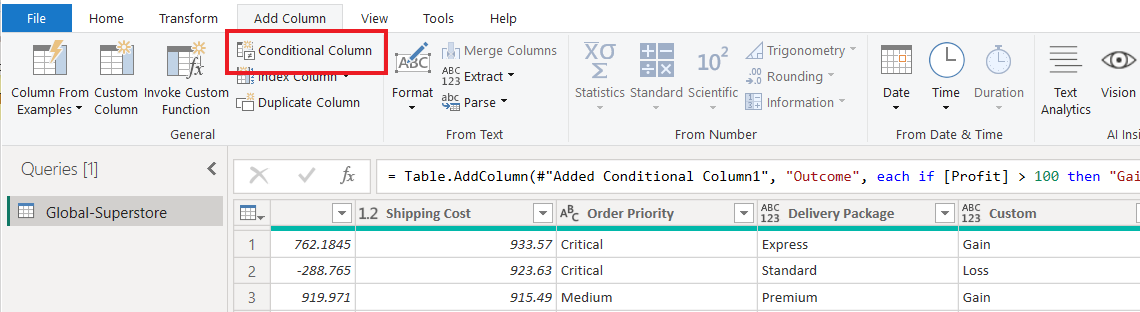
Consider this example, “Add a conditional column to capture the profit and loss outcome of a global sales data set based on the profit generated.”
You can use an IF statement in the Power Query editor window to create a new column with appropriate categories by making necessary changes to the below formula for any use case:
if [Profit] > 100 then "Gain" else "Loss"

if [Column] {Operator} {Value} then "Output for If=True" else "Output for If=False"
Go to the Add Column tab in the top menu of your Power BI Desktop, and click on the Conditional Column feature.
In the Power Query editor window, you can define the required IF statement(s) to generate a conditional column by selecting the columns, defining conditions, and specifying values to compute transformed entries for the new column for your data tables.
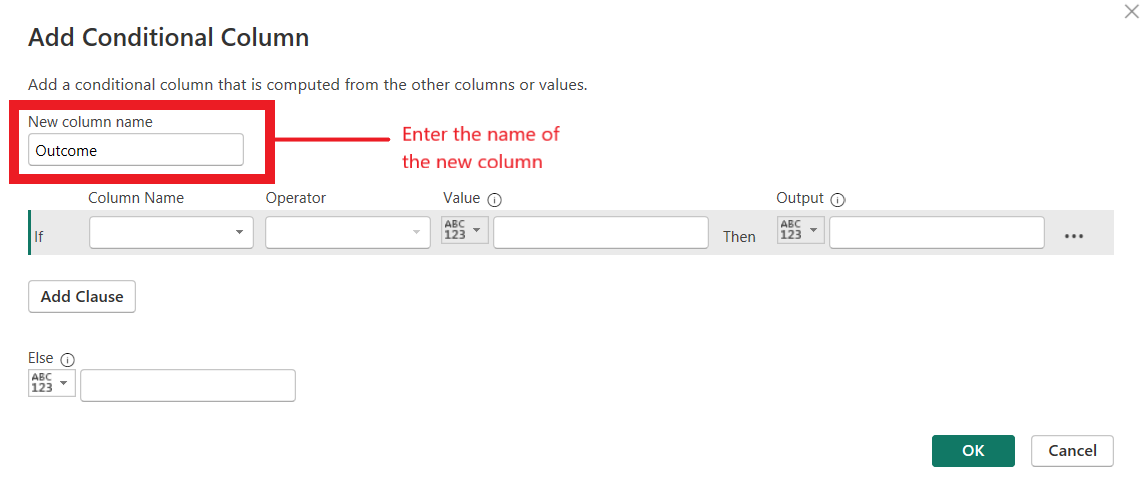
Enter the name of the new conditional column in the New Column Name field in the Add Conditional Column dialog box.
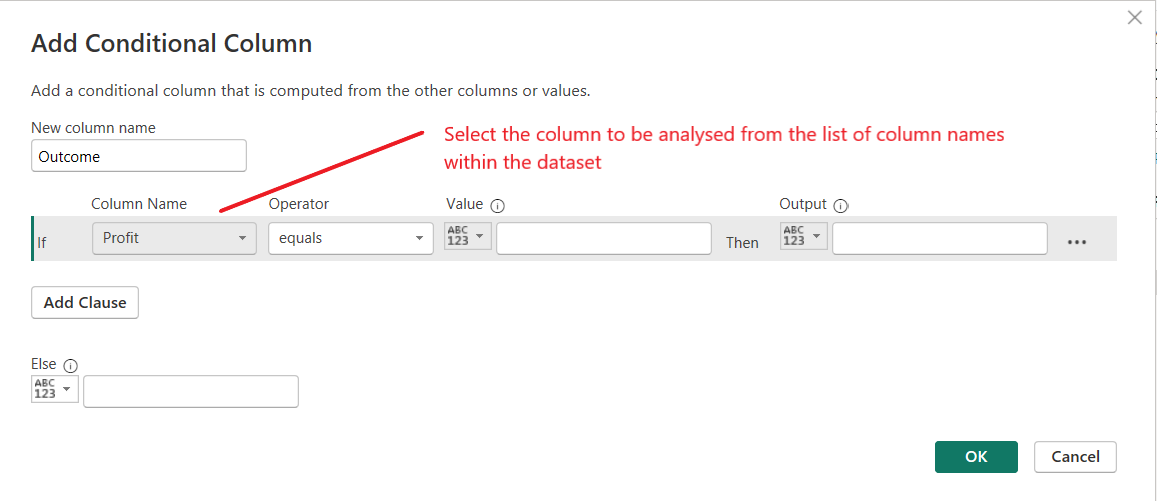
Select the column name on which the IF statement will be applied from the list of columns within the data set.
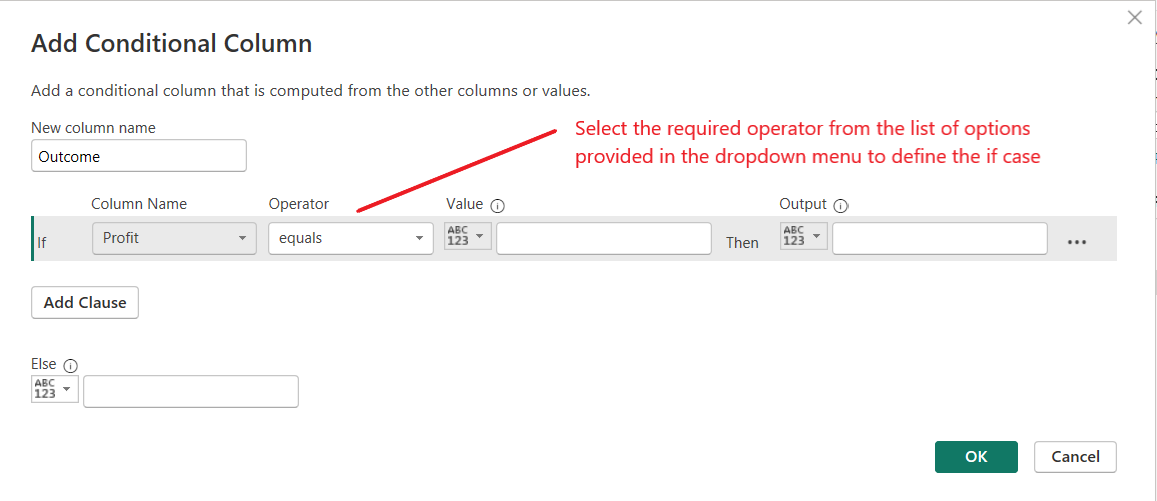
Select the required logical operator from the list of options provided in the Operator dropdown menu. In this example, we are defining the value of minimum profit required to consider the revenue generated from the sale as profitable.
Note: Operators displayed for different columns vary based on the data type of the column. This is because different logical tests are required to compare values for different types of column entries.
For example, in string formats, you want to check if a particular string is present or not. While in columns with number formats, the intent can be to perform a host of mathematical logical tests.

Define the test value under the Value field and specify the output for IF condition=true, in the new conditional column.

Specify the output for IF condition=false under the output field provided under the Else condition in the Add Conditional column window.

Click OK to execute the Power Query If Statement.
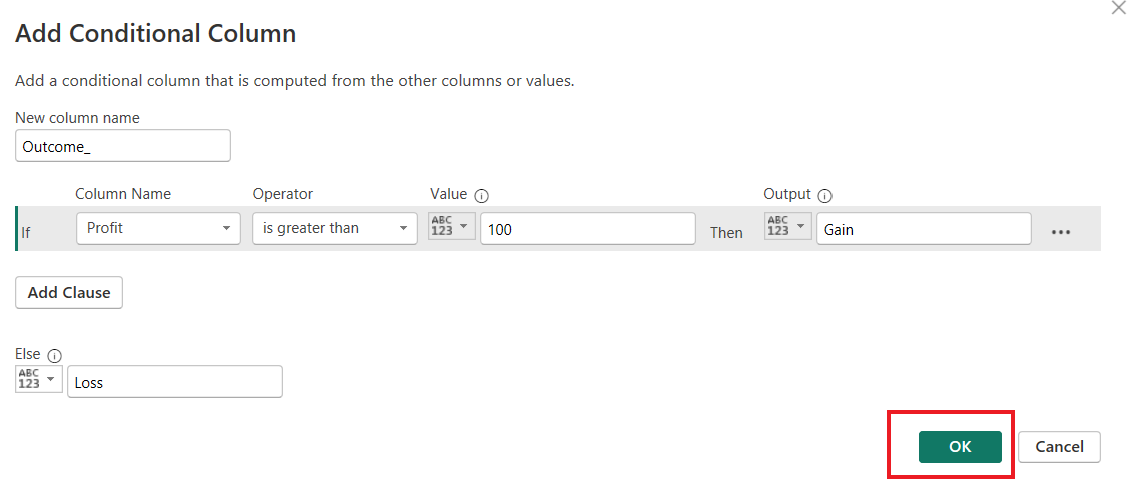
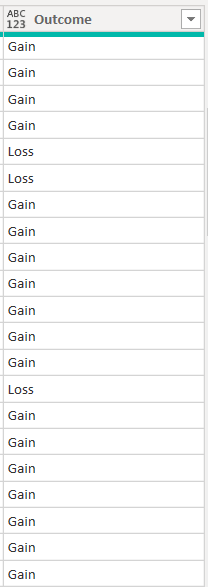
This statement will return “Gain” for all rows with profit above 100 and “Loss” for the others in a new Conditional Column titled “Outcome.”
A simple test to check if your Power BI IF statement is logical is to ensure it reads coherently in plain English. In the above example, the Power Query IF Statement reads: If “Profit” is greater than “100” then the output in the conditional column is “Gain”, else the output is “Loss”.
Steps to Create Nested IF Statement Using Conditional Column
Nested IF statements allow you to evaluate multiple conditions concurrently. Instead of using an IF statement with several conditions, you can nest them to create more specific conditions.
Consider this example: “Add a conditional column to categorize sales revenue for different row entries within a global sales data set as High, Medium, or Low.”
Go to the Add Column tab in the top menu of your Power BI Desktop, and click on the Conditional Column feature.
The Power Query editor allows you to develop Nested IF statements by adding multiple logical tests to transform data based on multiple conditions.
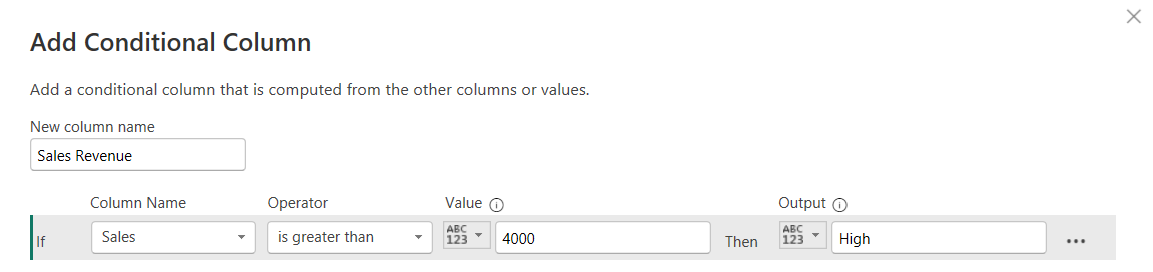
Enter the name of the new conditional column in the New Column Name field in the Add Conditional Column dialog box and build the first IF statement to determine the sales entries that generated High revenue ({If Sales > 4000}=True then “High”).
The next IF statement will determine the sales entries that generated Medium revenue. Click on the Add Clause button to develop the second condition.

Select the same column with the Sales revenue, assign the operator, and specify the value and output for the case.
Define the test value under the Value field and specify the output for If condition=true, in the new conditional column.
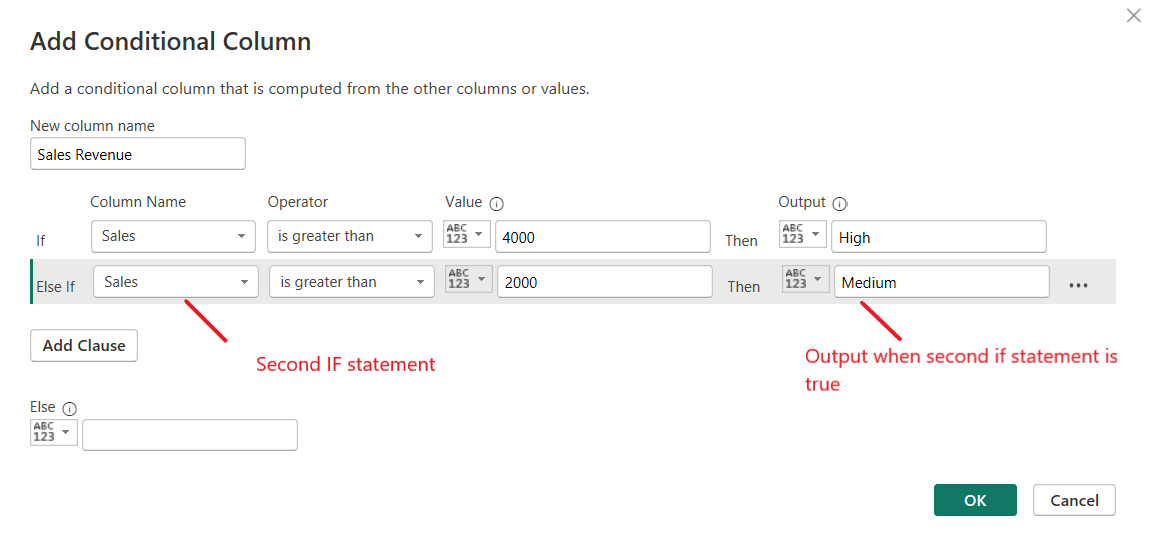
Specify the output for the case, If both conditions=false, under the output field provided under the Else condition in the Add Conditional column window.
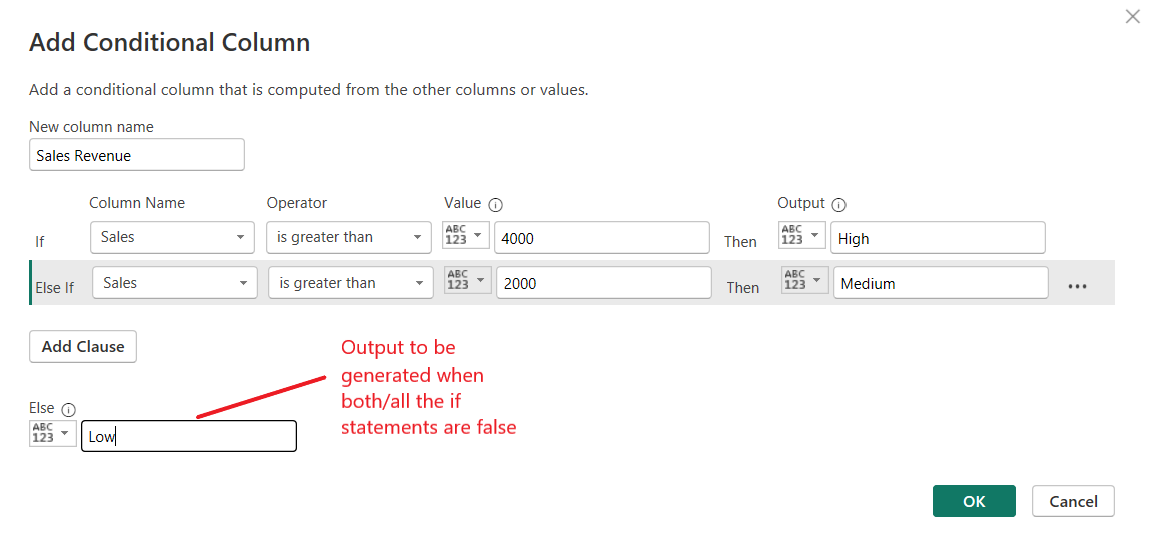
Click OK to execute the Power Query If Statement.
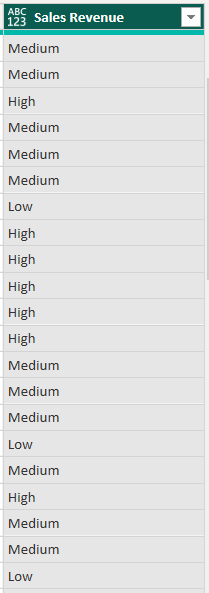
These Nested IF statement will return “High” for all rows with sales revenue above 4,000, “Medium” for all the rows with sales revenue between 2,000 to 4,000 and “Low” for all the remaining rows in a new Conditional Column titled “Sales Revenue.”
You can modify the below formula for any number of use case by adding else-if clauses and defining the output for each use case.
if [Sales] > 4000 then "High" else (if [Sales] > 2000 then "Medium" else "Low")

if [Column] {Operator} {Value} then "Output for If=True" else
if [Column] {Operator} {Value} then "Output for Else If=True"
Power Query IF Statement with Logical Operators
You can also use logical operators such as AND, OR, and NOT in your Power Query IF statement, the only catch is that the Custom Column must be defined manually.
Developing the logic is simple enough, using the following operators you can create more complex conditions.
- AND: both conditions A and B must be met
- OR: either condition A or B must be met
- NOT: negates the condition A
The examples discussed in this article for simple IF and nested IF statements transform data to provide information about profit or loss and categorize the revenue generated to serve simple use cases.

However, there could be some entries in the data set with varying selling prices based on the commodity type that don’t meet the Nested IF conditions but are profitable and still tagged to the low revenue category.
While some of the sales events generated measurable profits, the revenue gets categorized based on simple functions and does not account for other profitable sales events. You can use an OR operator to find rows with high revenue, low cost, and high profits in your dataset.
How to Make IF Statements with Logical Operators
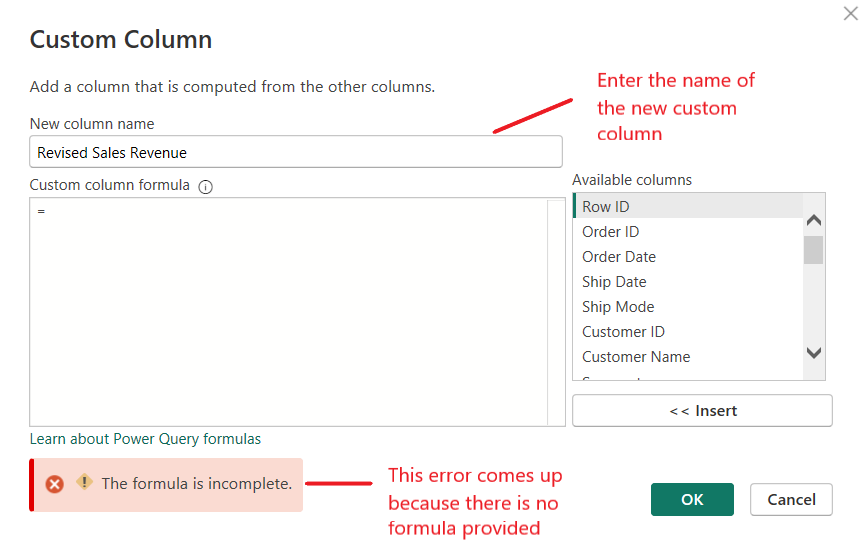
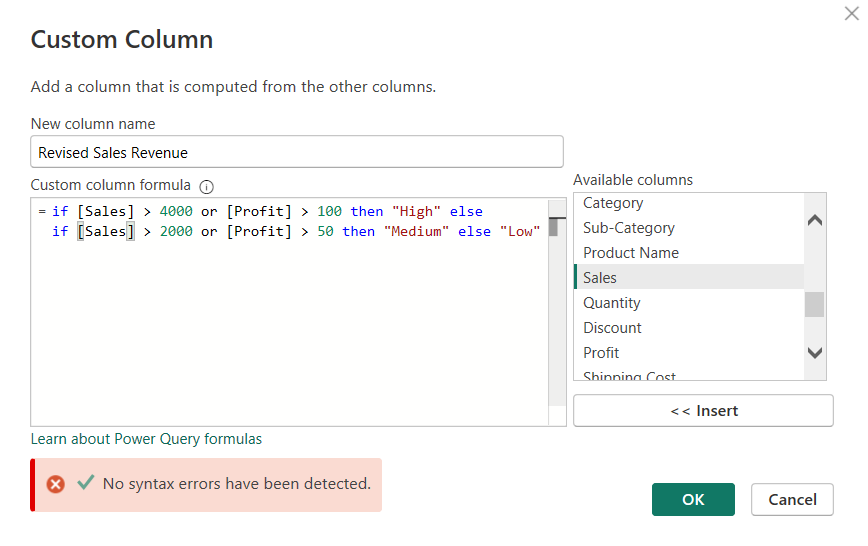
To use operators in your Power Query, go to the Add Column menu at the top of your Power BI Desktop and click on the Custom Column option.

A Custom Column dialog box is displayed in a pop-up window. The necessary conditions can be specified within the Custom Column dialog box by writing the formula using M code with the appropriate syntax, operators, and values.
The Custom Column dialog box, similar to the Conditional Column dialog box, allows you to enter the new name for your custom column and also provides a list of all the columns within the data set to simplify the development of the Custom Column Formula.
Enter the name for the new custom column.
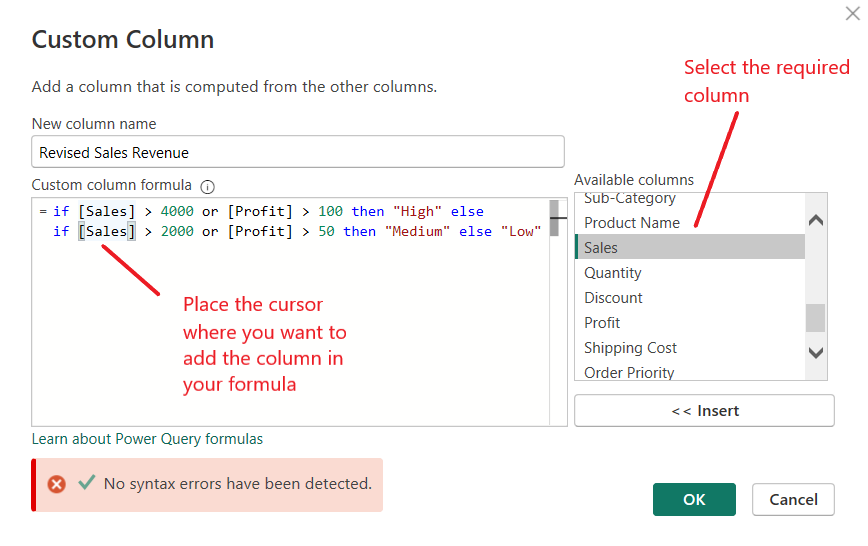
Enter the query in the Custom column formula bar after the equal to sign. The below formula has been used in this example.
if [Sales] > 4000 or [Profit] > 100 then "High" else
if [Sales] > 2000 or [Profit] > 50 then "Medium" else "Low"
Select and insert the required columns from the list of available columns. To add a column to the formula, move your editor to the place in the formula where you want to add the column. Select the column and click Insert.
Custom Columns dialog box also prompts the user if there are any errors in the Custom Column Formula.
Once a valid query has been defined, click OK to execute the query.
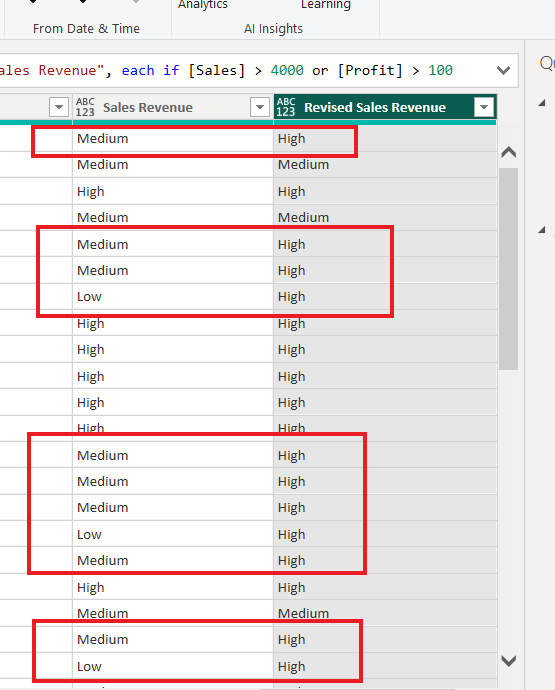
The revised sales revenue for several rows has been updated based on the defined custom formula in the above example.
Power BI’s Custom Column option allows you to remove redundancies and improve the accuracy of the transformed data.
Using IF Statements with Conditional Operators
In Power Query, conditional operators are used to evaluate expressions and support various comparisons. They play a significant role in forming IF statements, which are essential for handling different scenarios in your data transformations.
Here are examples and formulas for conditional operators.
1. Equal Operator
The equal operator (=) is used to compare two values for equality. It returns true if the values are the same and false if they are different. Here’s an example of using the equal operator in an IF statement:
if [Column1] = "some value" then "True result" else "False result"In the above formula, the conditional expression checks if the value in Column1 is equal to “some value” and returns the corresponding result.
2. Not Equal Operator
The not equal operator (<>) is the opposite of the equal operator. It returns true if the values being compared are different and false if they are the same. An example of using the not equal operator in an IF statement:
if [Column1] <> "some value" then "True result" else "False result"The above expression evaluates if the value in Column1 is different from “some value” and returns the appropriate result.
3. Greater Than and Less Than
The greater than (>) and less than (<) operators are used to compare two values. The greater than operator returns true if the first value is greater than the second, while the less than operator returns true if the first value is smaller than the second.
Here’s an example using both operators:
if [Column1] > 10 then "Greater than 10"
else if [Column1] < 10 then "Less than 10"
else "Equal to 10"
This nested IF statement checks if the value in Column1 is greater than, less than, or equal to 10.
4. Greater Than or Equal to and Less Than or Equal to
The greater than or equal to (>=) and less than or equal to (<=) operators are similar to the previous operators but include the possibility of equality. They return true if the values being compared are either equal or follow the same inequality relationship.
An example using these operators:
if [Column1] >= 10 then "Greater than or equal to 10"
else if [Column1] <= 10 then "Less than or equal to 10"
In this example, the conditional expressions check if the value in Column1 is greater than or equal to 10, or less than or equal to 10, and return the corresponding result.
Using Nested IF Statements

When working with Power Query, you may encounter situations where you need to apply multiple conditions to your data. Nested IF statements can help you achieve this with ease.
In this section, we’ll explore the syntax for Nested IF statements and provide practical examples to help you effectively use them in your own Power Query projects.
Syntax for Nested IF Statements
Nested IF statements in Power Query follow this syntax:
if [condition1] then [result1]
else if [condition2] then [result2]
else if [condition3] then [result3]
...
else [final_result]
Applying the appropriate syntax will enable you to perform deep comparisons and process the relevant results depending on your requirements.
Practical Examples
Let’s explore some practical examples to demonstrate how nested IF statements work in Power Query:
Example 1:
Suppose you have a table of student grades, and you want to categorize them into “Excellent,” “Good,” “Average,” or “Poor.” You could use the following nested IF statement to achieve this:
GradeCategory = if Grade >= 90 then "Excellent"
else if Grade >= 75 then "Good"
else if Grade >= 50 then "Average"
else "Poor"
Example 2:
Imagine you have sales data and need to determine the commission percentage for each salesperson based on their total sales. You could write a nested IF statement like this:
CommissionPercentage = if TotalSales >= 10000 then 0.10
else if TotalSales >= 5000 then 0.08
else if TotalSales >= 1000 then 0.05
else 0.02
These examples should help you understand the power and flexibility of nested IF statements in Power Query. By structuring your conditions properly, you can ensure accurate evaluations and cleaner code for any Power Query project you work on.
Final Thoughts

In this article, you’ve learned about Power Query IF statements, which are essential tools in data transformation and analysis. As you continue to work with Power Query, your ability to use these conditional statements effectively will contribute significantly to creating a more efficient and customizable data preparation process.
Remember, the IF statement in Power Query follows a different syntax than Excel, with a structure of if [condition] then [value_if_true] else [value_if_false]. As you implement these statements, be mindful of comparison and logical operators and their proper usage.
Finally, don’t be afraid to leverage other features in Power Query, such as conditional columns, to further enhance your data manipulation capabilities. Always strive to improve your understanding of these tools and apply best practices, as this will boost your proficiency and confidence in working with Power Query.
To learn more about how to supercharge your Power BI workflow and its various tools like Power Query using ChatGPT check out the video below:
Frequently Asked Questions
Can you use if statements in Power Query?
Yes, Power Query allows you to use if statements using the M formula language. The basic syntax is:
if condition then result1 else result2This allows you to perform conditional logic and create new columns based on specific conditions in your data.
How to write an IF function in Power Query?
In Power Query Editor, select the “Add Column” tab and click on “Custom Column.” In the “Custom Column” dialog, enter the if function using the M formula syntax, like:
if condition then result1 else result2Click “OK” to apply the transformation, and the new column with the computed results based on the condition will be added to your data.
What is the IF function in Power Query?
In Power Query, the IF function is a conditional function that allows you to perform logical tests and return different values based on whether the condition is true or false.
Its syntax follows the pattern:
if condition then result1 else result2 Here condition is the logical test, result1 is the value returned if the condition is true, and result2 is the value returned if the condition is false.
It enables you to create new columns, transform data, and apply conditional logic within your Power Query queries.
How do I use IF statements?
To use if statements, you need to follow this basic syntax:
if (condition, value_if_true, value_if_false) First, specify the condition you want to evaluate. If the condition is true, the function returns value_if_true; otherwise, it returns value_if_false.
You can use if statements in various programming languages, spreadsheets like Excel, and data manipulation tools like Power Query to perform conditional logic and make decisions based on specific criteria.
How do you add two conditions in an IF statement in Power Query?
In Power Query, you can add two conditions in an IF statement by using the logical operators “and” or “or.” The basic syntax for adding two conditions is:
if condition1 and condition2 then result1 else result2 Here condition1 and condition2 are the logical tests you want to evaluate.
If both conditions are true, the function returns result1; otherwise, it returns result2.
What is the IF function in Power Query M?
In Power Query M, the IF function is a built-in function that allows you to perform conditional logic within queries. The IF function is commonly used for creating new columns or applying transformations based on specific conditions in your data.
The syntax for the IF function is:
if condition then value_if_true else value_if_falseIt evaluates the specified condition, and if it is true, the function returns value_if_true; otherwise, it returns value_if_false.


