
Are you looking to delete every other row in Excel? Well, you’re in the right place.
In fact, you’re in the best place to learn how!
Here are the 4 best ways you can use to delete every other row in Excel:

Manual Deletion: This is the most straightforward method. Select the first row you want to delete, hold down the Ctrl key, and click on every other row number. Then, right-click and choose “Delete” or use the keyboard shortcut Ctrl + -. This method is best for small datasets.
Using Helper Column with Formulas: Create a helper column with a formula that marks every other row.
VBA Scripting: For those comfortable with programming, a VBA script can automate the process.
Advanced Filter for Unique Records: While not directly a method for deleting every other row, the Advanced Filter can filter unique records. This can be especially helpful when your spreadsheet is too crowded or if you want to highlight specific patterns in your data.
In this article, you’ll learn how to delete every other row on your spreadsheet, step-by-step.
Let’s dive in!
1. How to Manually Delete Every Other Row in Excel

To manually delete every other row in Excel, you don’t need to use filters or mark rows with colors. Here’s a more straightforward method:
Step 1: Select the First Row to Delete
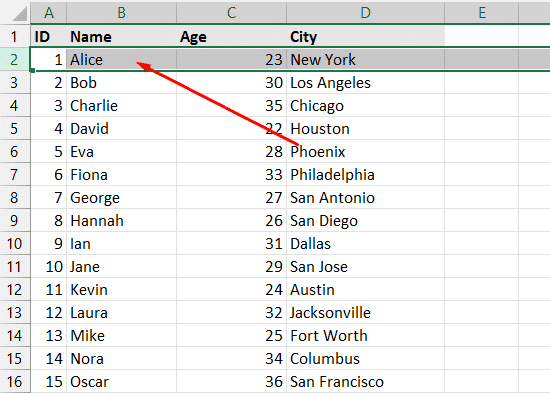
Click on the row number of the first row you want to delete. This could be row 2 if you want to delete every other row starting from the second row.
Step 2: Use the Ctrl Key to Select Additional Rows
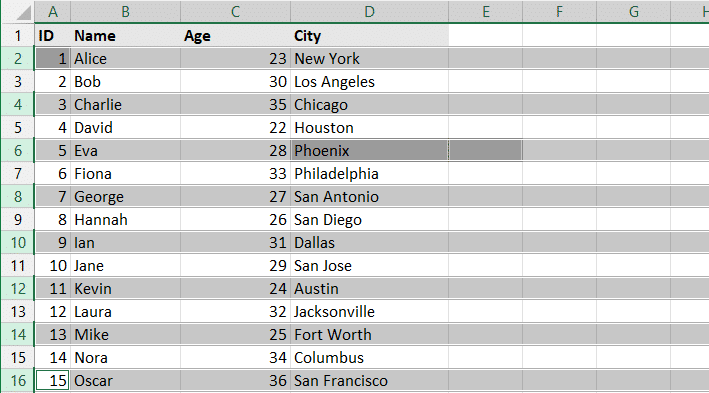
Hold down the Ctrl key on your keyboard.
While holding the Ctrl key, click on the row numbers of every other row you want to delete. For instance, click on row numbers 4, 6, 8, etc., depending on your number of rows.
Step 3: Delete the Selected Rows

With the rows still selected, right-click on one of the chosen row numbers.
Choose “Delete” from the context menu. Alternatively, you can delete the rows by using the (Ctrl+-) keyboard shortcut.
Step 4: Confirm Deletion (if prompted)
If Excel prompts you to confirm the Deletion, click “OK.”
This method will delete the selected rows, and the remaining rows will shift up to fill the gaps.
Now, let’s see how to use the advanced filter to delete every other row.
2. How to use Advanced Filter to Delete Every Other Row in Excel

Using Advanced Filter to Extract Unique Records:
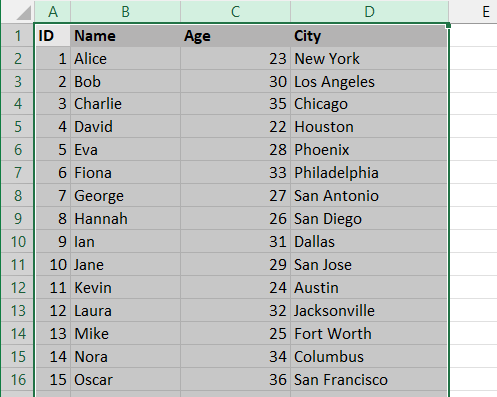
Select Your Range: Include the column headers and the data you want to filter.
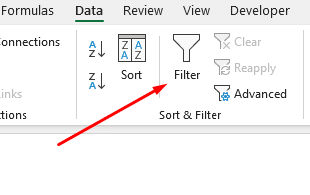
Go to the Data Tab: Click the “Advanced” button in the “Sort & Filter” group.
Set Up the Advanced Filter:
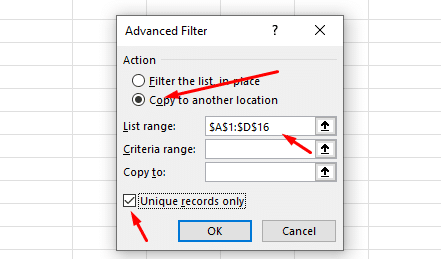
- Choose “Copy to another location.”
- For “List range,” select your data range.
- Leave “Criteria range” blank if you want all unique records.
- For “Copy to,” choose where the filtered data will be copied.
- Check the “Unique records only” box.
- Press OK: Excel will copy the unique records to the specified location.
This alternative method is more straightforward for deleting every other row. It uses a combination of a helper column, a simple formula, and the standard filter functionality in Excel.
Next, let’s look at how to do it with VBA code.
3. How to Delete Rows Using Every Nth VBA (Visual Basic for Applications) Script

set of instructions for creating and running a VBA macro to delete every other row:
How to Delete Every Other Row Using a VBA Script:
Access the VBA Editor:
Press Alt + F11 on your keyboard to open the VBA Editor.
Alternatively, if you have the Developer tab enabled, click “Visual Basic” in the Developer tab.
Insert a New Module:
In the VBA Editor, you’ll see a window titled “Project – VBE.” This contains a list of your Excel workbooks and sheets.
Right-click any of the objects (like “VBAProject (YourWorkbookName)”), select “Insert”, and then choose “Module”. This will add a new module to your project.
Enter the VBA Code:
In the new module window, paste the following VBA code:
Sub DeleteEveryOtherRow()
    Dim i As Long
    For i = Cells(Rows.Count, 1).End(xlUp).Row To 1 Step -2
        Rows(i).Delete
    Next i
End Sub
This script starts from the bottom of your worksheet and deletes every other row, moving upwards. It ensures that the row shifting doesn’t affect the process.
Run the VBA Macro:
Close the VBA Editor and return to your Excel worksheet.
Press Alt + F8, select DeleteEveryOtherRow, and click “Run”.
Alternatively, you can run the macro from the Developer tab by clicking “Macros”, selecting DeleteEveryOtherRow, and then clicking “Run”.
Note: Always save your work before running any VBA macro, as macros can make irreversible changes to your data
This VBA script provides a simple and efficient way to delete every other row in an Excel sheet. Remember that VBA scripts can be powerful but should be used cautiously, especially on essential data.
Let’s look at an alternative method for deleting every Nth row in an Excel table.
4. Alternate Method: How To Delete Every Nth Row In An Excel Table

Method to Delete Every Other Row Using Excel Formulas:
Create a Helper Column:
Add a new column to your dataset. This column will help you identify every other row.
Assume your data starts in row 2 (row 1 being the header). In the new column (let’s say column B), enter the following formula in cell B2: =MOD(ROW()-1, 2).
Drag this formula down the column to apply it to all rows in your dataset. This will assign a 0 to every even row and a 1 to every odd row.
Filter Rows to Delete:
Apply a filter to your dataset, including the helper column.
Filter the helper column to show only the rows with the value 0 or 1, depending on which set of rows (even or odd) you want to delete.
Delete the Filtered Rows:
Select the visible (filtered) rows that you want to delete.
Right-click and select “Delete Row” or use the keyboard shortcut Ctrl + – to delete these rows.
Remove the Filter and Helper Column:
Clear the filter from your dataset.
Optionally, you can delete the helper column as it has served its purpose.
This method is efficient and does not require any complex formulas or additional functions like FILTER (which is unnecessary for this task). It’s straightforward to delete every other row in an Excel dataset.
Now, let’s reflect on some final thoughts.
Final Thoughts

Deleting every other row in Excel is a common task that can be approached in various ways, each with its own merits depending on the size and complexity of your dataset.

Whether you choose the manual method, use a helper column with formulas, create a VBA script, or employ the Advanced Filter technique, each method serves the purpose efficiently and effectively.
Manual Deletion: Best for small datasets, this method offers simplicity and direct control, allowing you to select and delete rows visually. It’s quick and requires no technical knowledge beyond basic Excel skills.
Helper Column with Formulas: This method provides a more systematic approach beneficial for larger datasets. By using a simple formula in a helper column, you can quickly identify the rows to be deleted and then use standard Excel functionality to filter and remove them.
VBA Scripting: Ideal for those comfortable with programming, a VBA script can automate the task, saving time and effort in repetitive tasks. This powerful method should be used cautiously, especially when working with important data.
Advanced Filter for Unique Records: While not a direct method for deleting every other row, the Advanced Filter technique is a versatile tool in Excel that can be creatively used for this purpose, especially when dealing with complex data sets.
Each method has its place and can be chosen based on your comfort level with Excel, the size of your dataset, and the specific requirements of your task.
Remember, saving a backup of your data is crucial before performing any deletion operation. This ensures that you can recover your data if something goes wrong or if you change your mind about the deletions.
By understanding and using these methods, you can significantly enhance your productivity and data analysis capabilities in Excel!
Frequently Asked Questions

How do I delete every second row in Excel Online?
To delete every other row in Excel Online, you can create a simple formula using the MOD function. Enter a formula like ‘=MOD(A1, 2)’ in an empty column and drag it down.
This will result in a column of 0s and 1s, where every second row will have a 1. Then, apply a filter, select all rows with a 1, and delete them.
What is a straightforward method to remove alternating rows in Excel?
To remove alternating rows in Excel, you can create a helper column with a formula like ‘=ISEVEN(ROW())’ to generate ‘TRUE’ for even rows and ‘FALSE’ for odd rows. Apply a filter to this column, select the rows with the desired value, and delete them.
How can I stop a formula from skipping a line?
If Excel is skipping a line when calculating a formula, you need to update the formula to point to the correct range or cell reference. Ensure the formula includes the correct range or reference, as skipping a line might indicate an error in the formula’s logic.
What is the formula for skipping numerical order in Excel?
You can use the OFFSET function to create a formula that skips numerical order to generate a sequence(alternate row). For example, the formula ‘=A1+2’ will create a sequence by adding 2 to each cell, effectively skipping one number.
Which Excel formula should I use to delete every nth row?
While Excel offers no built-in method to delete every nth row directly, you can create a helper column or use a formula like ‘=MOD(A1, 2)’ in an empty column to mark the rows for Deletion, apply a filter, delete the filtered rows, and then remove the helper column.
How do I prevent continuous numbers in Excel?
To prevent continuous numbering in Excel, you can insert empty cells or rows between the constant sequence, use conditional formatting to hide the numbers or create a formula that generates the desired sequence by skipping numbers using the OFFSET function.+


