This tutorial will discuss about choosing or filtering a specific date in your Power BI data reports. The material used in this tutorial comes from the Enterprise DNA Forum. You’ll learn how to solve the problem and understand the methods used. You may watch the full video of this tutorial at the bottom of this blog.
Understanding The Data Report In Power BI
This is the sample data report that will be used. It consists of one table visual and two slicers.
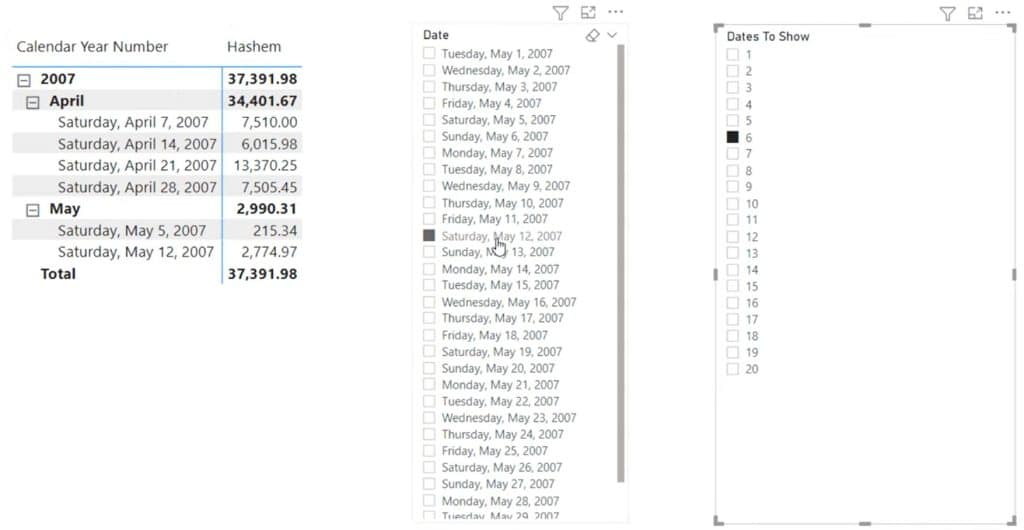
The objective is to have a date selection over the Date column on the slicer. It means that once a date in the slicer is selected, the table visualization will show the previous days with a 7-day interval. In this example, the data selected in the Date slicer is May 12, 2007.

The table should show the previous with a 7-day difference between the dates.

You also need to create a what if parameter to dynamically show the number of dates based on the selection. If you select 3, the table visual should only show 3 dates.


Recreating The Table And Visualizations
The first step is to create a what if parameter. Inside the Power BI desktop, go to the Modelling tab and select New parameter.

Add a name to the parameter and set the Data Type to Whole Number. Then, set the minimum, maximum, increment, and default values as seen in the image below. Add the slicer to the page by checking the box.

After you press OK, a slicer will be generated. Convert the slicer into a list by clicking the dropdown button and selecting List.

The next thing to do is create a duplicated date table which will be used as a disconnected date table. Go to the power query editor and duplicate Dates.

Then, rename the duplicate DisDate and click Close & Apply.

Loading The Date Tables And Slicers In Power BI
Once the duplicated table is loaded in the Power BI model, create a slicer with the date column from the disconnected date table. Open the DisDate table and drag Date to the canvas.

Then, turn the visualization into a slicer.

After that, change the format of the slicer to List. The visualization will then look like this.

Next, duplicate the slicer and change the data field with the Date column from the Dates table.

Selecting a date from the Dates slicer will limit the Sales table’s number of visible rows in the matrix. If you select March 14, 2005, the matrix will only show that date.
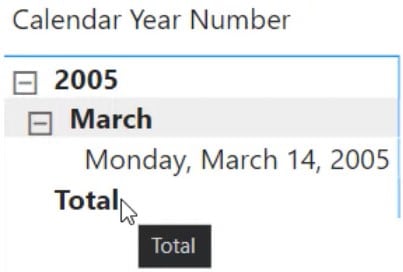
The result and the measure won’t work if you use this setup. The reason is that even before the measure starts working, the access of the matrix has already been filtered. For those filtered values, you won’t be able to generate the dates with intervals.
Creating Measures For The Selection Slicers
You need to create a setup of dates that doesn’t filter the matrix directly when a selection is placed over a slicer. The filtering of the matrix must come through the DAX code and not directly from the slicers. So if you select a date from the DisDate slicer, no changes will occur in the matrix.
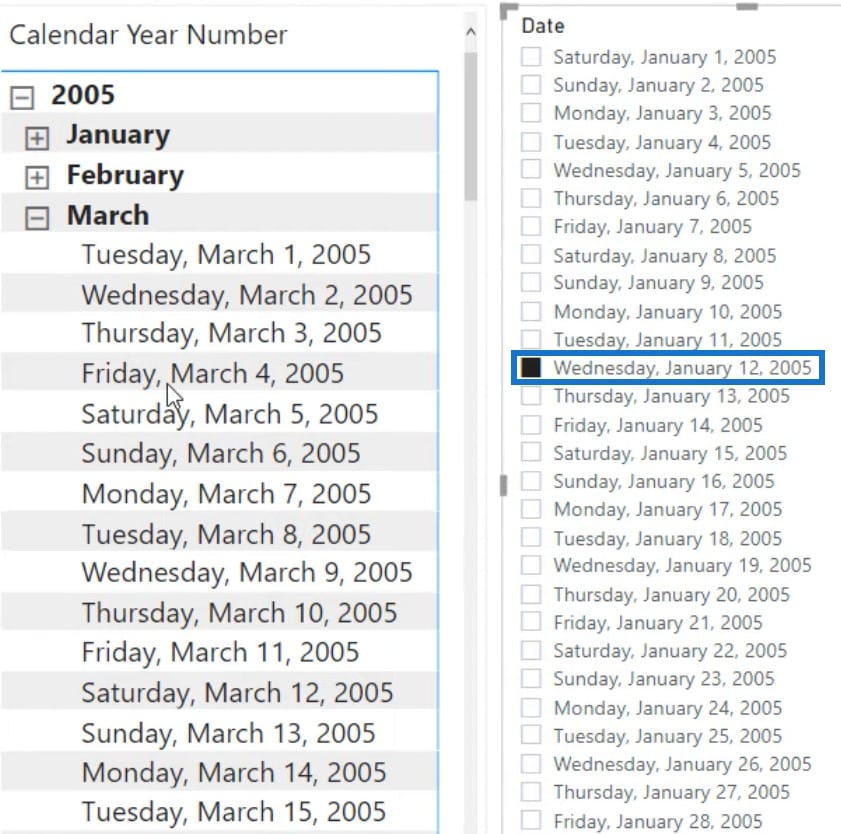
This happens because the DisDate table doesn’t have a relationship with the Dates table. This is why the disconnected table is essential.
Delete the slicer with the Dates table and create the first measure. The measure will retrieve the value that is selected from the Dates To Show slicer. The first variable that you need to create is ValuesToShow. Next, equate it with the Dates To Show value and input RETURN to return the values that are selected.

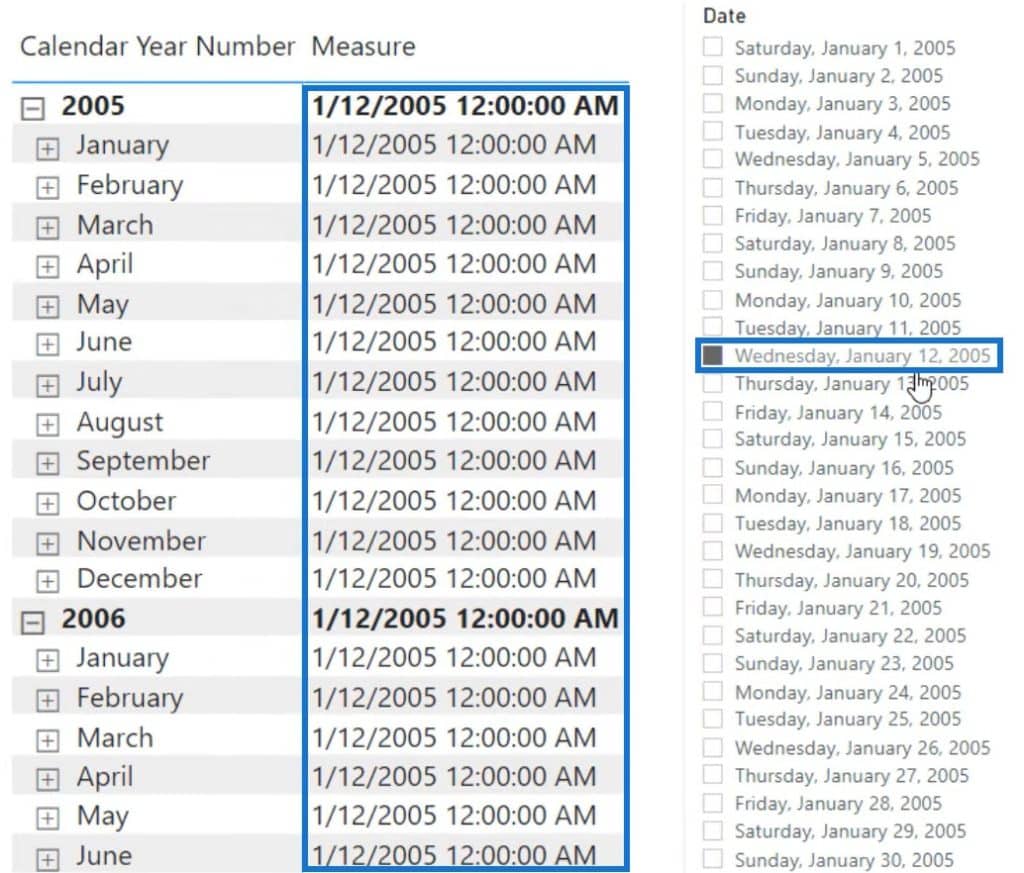
Drag that measure into the matrix. If you select 6 from the Dates To Show slicer, the Measure column in the matrix will also yield 6.

Next, create another variable that will retrieve the disconnected date selected in the slicer.
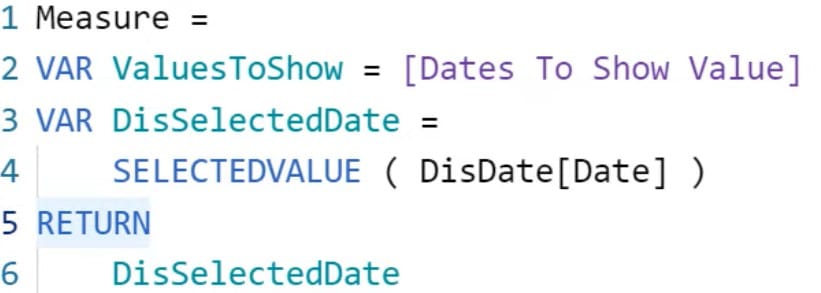
Once done, you’ll see the value selected in the DisDate slicer shown in the Measure column.
Creating A Calculated Table
Create a list of dates with 7-day intervals starting from the selected date in the slicer. Then, ensure that the matrix will generate the number of days based on the Dates To Show slicer selection. To do this, you first need to create a calculated table.
The calculated table helps you visualize how dates are generated inside the DAX code. Go to the Data View and click New Table.

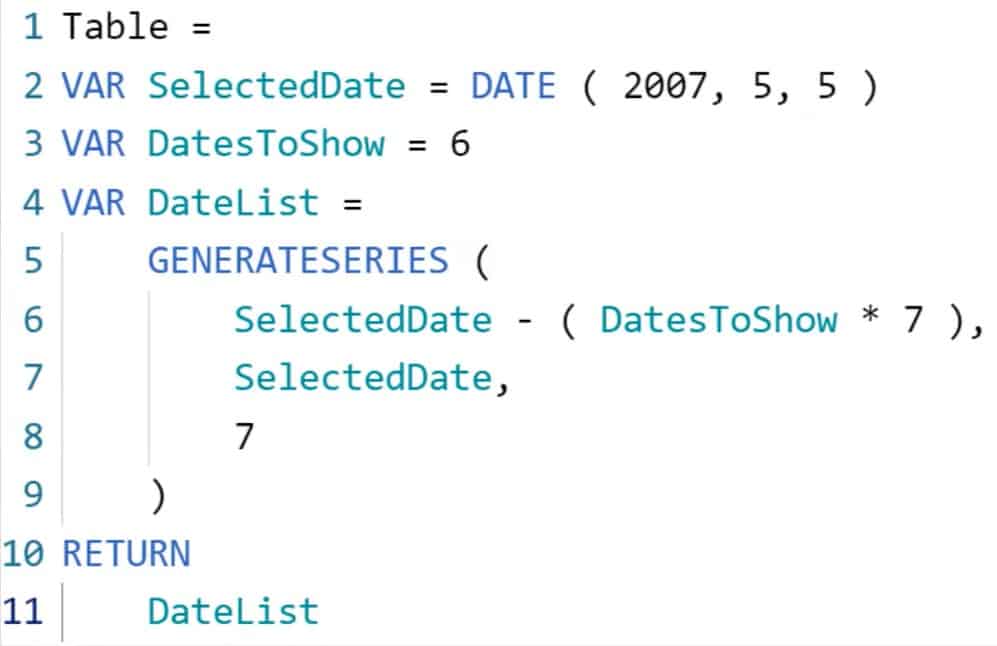
Input the variable SelectedDate and equate it with the DATE function. Then, input a date inside the parentheses. Next, create another variable that will specify the number of dates that you want to show in the matrix. Input DatesToShow and equate it with the number of dates.
After that, create another variable that will generate a list of dates with 7-day intervals. Input DatesList and use the GENERATESERIES function. GENERATESERIES is a function that generates a list of numbers by passing in several arguments.
For the first argument, input SelectedDate – (DatesToShow * 7) as the start value. Next, input SelectedDate as the end value. For the last argument, input 7 for the increment value or the interval between dates. Once done, close the function and input RETURN and DateList.
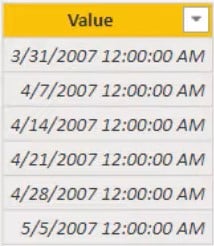
You can then see a table containing seven values starting from the 5th of May and going back with increments of seven.
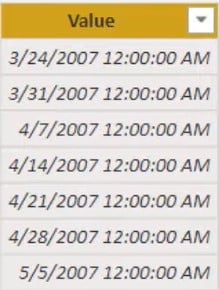
Now, you’ll notice that it created too many dates than what you need. In the original sample report, the last date shown with the same Dates To Show and Date selections was March 31.
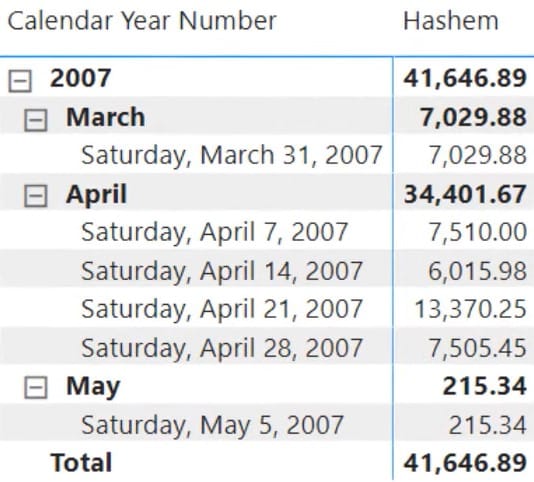
To fix that, you can either change the DatesToShow variable value to 5 or subtract 1 from 6. In this example, 1 is subtracted from 6.

After that, you’ll then see that the values end on the 31st of March.
Injecting Dates In The Filter Context
Next, you need to use and inject these dates into a date filter context. You also need to calculate the Sales amount in the filter context. So, copy the GENERATESERIES syntax and go back to your measure.

In the measure, add a new variable and input DatesToShow. Then, equate that variable with the GENERATESERIES syntax. Change the variables inside the syntax from SelectedDate to DisSelectedDate, and DatesToShow to ValuesToShow.

Lastly, create a variable for the result. Equate it with the CALCULATE function over the Total Sales and DatesToShow to inject all the dates received from the GENERATESERIES syntax into the filter context. Once done, input Result in the RETURN function.

Now, you’ll see that the matrix won’t show the dates that the DAX code is requesting. If you bring the Total Sales measure in the matrix, you’ll see that the code is returning the Sales amount itself.

The problem with the measure is that the date that was created in the GENERATESERIES syntax has a data lineage with the disconnected date table. This means that the Date table is not connected to the Sales table. That is why when the list of dates was applied in the filter context, it didn’t include the Sales table.
You need to use the TREATAS function to create virtual relationships and apply the filter context.
Using TREATAS To Fix The Date In Power BI Matrix
You need to treat the values that were received from the GENERATESERIES syntax as if they were part of the original Date table. This is basically building a lineage with the Date column of the Date table that’s in the data model.
So in the Result variable, input TREATAS after the Total Sales table and provide the arguments. For the first argument, provide the column or table that doesn’t have the relationship. In this case, the DatesToShow column is used.
For the second argument, provide the column to which you want to map the lineage of the column in the first argument. In this example, the Date column from the Dates table is used.

However, even with the corrections in the code, the Measure column in the matrix still won’t show the correct values when using the slicer. You can also notice that the values inside the column are repeating.

The problem lies in the way the code was written. TREATAS applies all values into the filter context and CALCULATE overrides the existing filter context at the selected date with all the values that have been retrieved from the GENERATESERIES function.
Using The KEEPFILTERS Function Over TREATAS
To make sure that the filter is injected into the filter without overriding the existing filter context, you need to use the KEEPFILTERS function. KEEPFILTERS changes the CALCULATE’s filtering semantics.
Input KEEPFILTERS before the TREATAS function and confirm the measure.

You’ll now see that the values inside the Measure column aren’t repeating.

If you expand the months of May and April, you’ll see that the values in the Measure column are equal to the values of the Total Sales column.

Remove the Total Sales measure in the matrix and select a number in the Dates To Show slicer. You’ll then see the equivalent number of dates being shown in the matrix.

Fixing Missing Date Issues In The Power BI Matrix
Another problem with this report is that when you select 8 in the DatesToShow slicer, the matrix doesn’t change.

If you select 9 in the slicer, the matrix only shows 8 dates. You’ll also notice that March 17 is missing from the list of dates.

The reason is that on some days in the Date table, there are no matching transactions in the Sales table. So the measure returns a blank for those dates. Since it is returning blank, the code that runs behind the matrix removes the blank rows from the result.
Power BI then uses the returned result to populate the matrix. So since some days are returning blank, you can’t see the Sales and entries of those days in the matrix.
If you want to show something for the days with no Sales in your data, go back to the measure and remove the CALCULATE syntax.

Using DAX To Solve Missing Date In Power BI
Create a data lineage by writing TREATAS over the DatesToShow and Date column of the Dates table. Then, check if all the dates returned by the TREATAS function are included in the filter context.

From there, split the execution by multiple variables. Change the variable name from Result to CreateDataLineage to show that it stores the result of TREATAS.

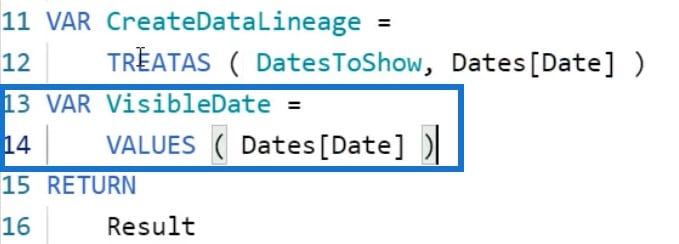
Then, create another variable that will hold all the dates that are visible in the filter context coming from the matrix. Input VisibleDate as the variable name and use VALUES over the Date column.
The next thing to do is create a column over the result of the TREATAS function that would contain the Sales amount. Write DatesWithSales as the variable name and use ADDCOLUMNS over the CreateDataLineage variable.
Inside the function, create a new column and name it Sales Amount with the Total Sales measure in the row context to initiate context transition.

After that, create a variable that would check if all the dates that are stored in the DatesWithSales variable are included in the filter context. Input IsDateInFilterContext as the variable name and use the FILTER function.
From there, write DatesWithSales as the first argument of the function. Next, input Dates[Date] IN VisibleDate as the second argument to check if the date contained in the DatesWithSales table is included in the VisibleDate variable.

The last variable that you need to create is Result. Use the SUMX function over the IsDateInFilterContext variable. Write [@Sales Amount] + 0 to include the days that were not previously included.

After all that, you’ll then see the missing date, March 17, in the matrix.

Using +0 In The Original Measure
The previous steps showed you how to build a measure to include all the dates that don’t have transactions in the Fact table. Now, if you use the + 0 in the original measure that you created, the values in the Measure column will all be 0.


The reason is that the Result variable contains either a blank or a Sales amount. So if you add 0, you are replacing the blank with 0. Remember that summarized columns remove the blank rows from the dataset. Return them to Power BI so that they can only show limited rows and not the blanks.
But since 0 is added, the summarize column is forced to keep the rows. It then returns a table that contains all the dates that exist in the Dates table and shows zero wherever it is applicable or when it is blank.
This the reason why you need to rewrite the measure in a way where you only need to add 0 to the dates that are visible in the filter context and are included in the DatesToShow variable.
***** Related Links *****
Power Automate Connectors: Number, Text, And Date Time
Extended Date Table Power Query M Function
Power Query Power BI | Create New Records Based On Date Fields
Conclusion
To create a data report that lets you select a specific date in a Power BI matrix, you need to use calculated tables and DAX functions. DAX functions and measures need to be written in a way that can easily obtain results.
Enterprise DNA Experts
[youtube https://www.youtube.com/watch?v=jTmq_g6DjMI&w=784&h=441]


