
Ever felt overwhelmed by Excel and its sea of features?
We get it. Splitting a cell in Excel might seem like a complex task because Excel offers a large range of functionalities and capabilities around data manipulation.
In Excel, splitting cells is about dividing one cell into multiple cells, either vertically or horizontally. Investing time and effort into understanding features such as the ‘Text to Columns Wizard’, ‘Flash Fill’, and ‘Power Query’ can greatly simplify the task.

We’ll start by covering basic Excel functionalities like how to manage cells and rows or convert text to columns. Then we’ll delve into more complex data manipulation techniques, such as splitting cells into multiple columns or rows using these tools.
Ready to unleash the full potential of cell manipulation in Excel?
Before we take a look at some examples, let’s dive into the reasons to split cells in Excel.
Understanding Reasons to Split a Cell in Excel

Navigating through an Excel sheet shouldn’t feel like you’re lost in a maze. Organizing data clearly and coherently is vital to staying sane. So, why should you bother mastering the skill of splitting cells?
Let’s examine 3 reasons we might want to split data in Excel.
Improving Readability: Ever stared at a spreadsheet and felt it looked like a chaotic jumble of alphanumeric symbols? We’ve all been there. Splitting cells into columns is like having a magic wand that declutters your spreadsheet, transforming it into an easy-to-read, organized format.
Facilitating Data Reformatting: You’ve copied a chunk of text from a webpage, a PDF, or another source, and it lands on your Excel sheet in a rather messy state. Fear not! Splitting cells into columns comes to the rescue, allowing you to segregate and categorize data effortlessly.
Enhancing Data Analysis: Data analysis is where Excel truly shines, and the more refined your data, the brighter this star shines. Splitting cells into columns means that you can sort, filter, and analyze your spreadsheets with greater precision.
Okay, now that you understand the rationale behind splitting cells in Excel, let’s explore different methods to split a cell in Excel.

1. How to Split Cells with Columns Wizard in Excel

The Text to Columns Wizard is just magical! It’s the perfect tool for when you have a column of full names that you wish to split into first and last names or a data set that contains addresses you need to split into separate components.
In this section, we will explore where to find this feature and step-by-step instructions on how to unleash its powerful functionalities.
Split cells with the Columns Wizard in Excel
1. Accessing the Wizard
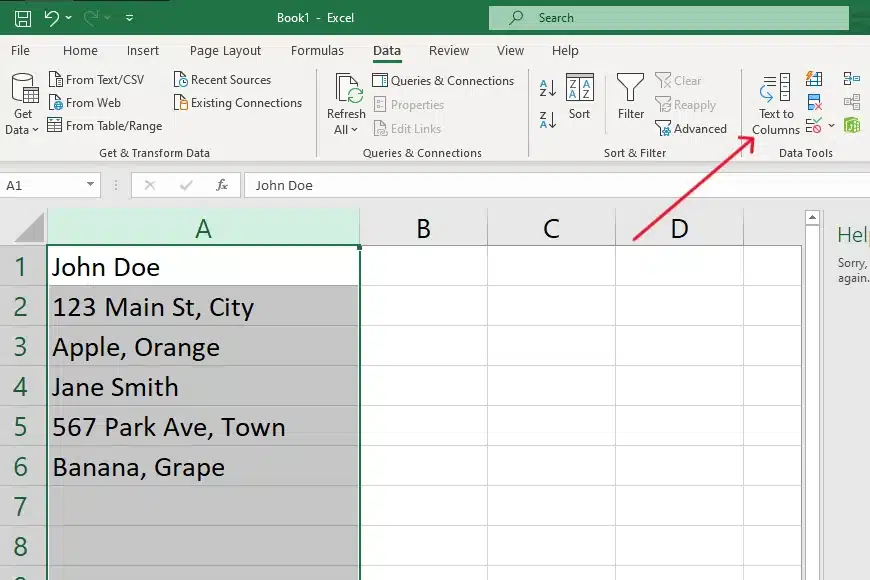
Open your Excel worksheet and navigate to the Data tab located on the ribbon at the top. Within the Data tab, find and click on the Text to Columns option so the columns wizard opens. This is where the magic begins!
2. Choosing a Split Method
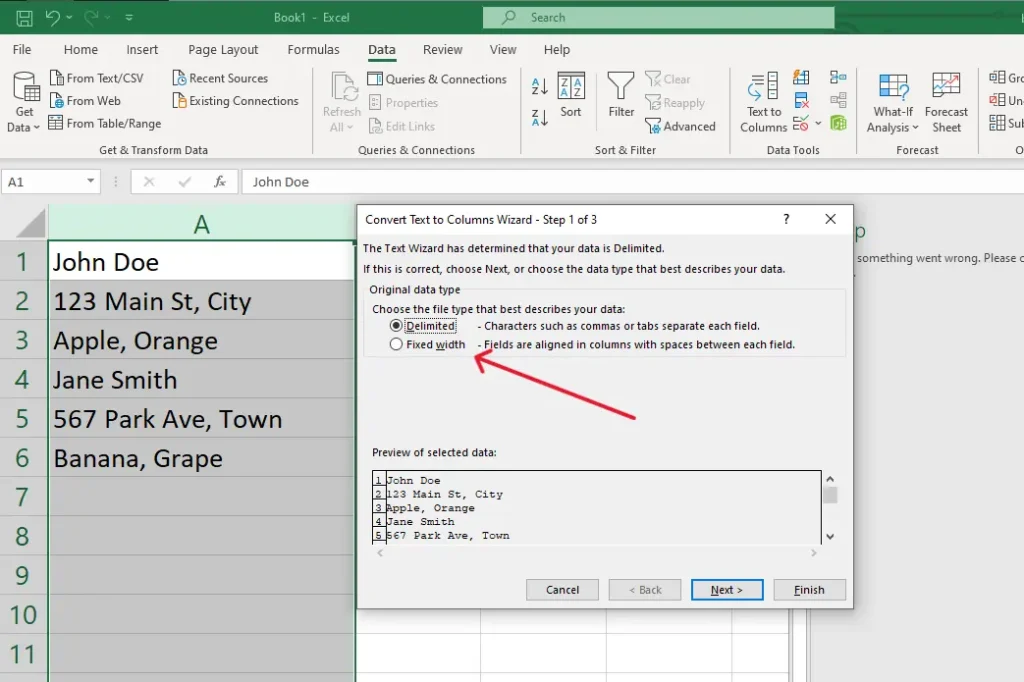
A dialog box will appear, offering two data splitting methods. “Delimited” will split text using specific characters like commas or spaces. The “Fixed Width” option divides data at set character counts or positions, ideal for uniformly structured data.
3. Setting Delimiters or Field Width
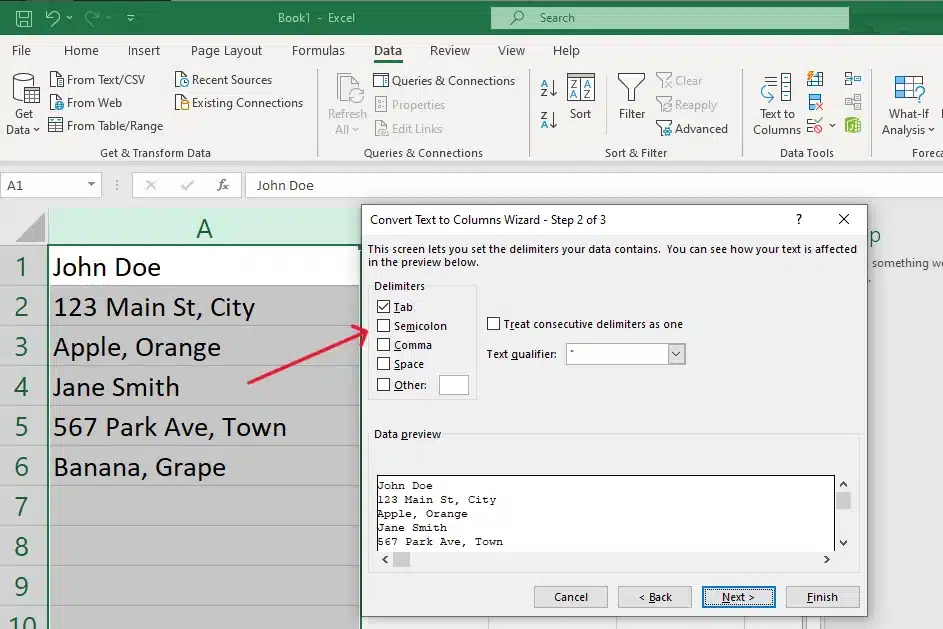
When selecting the Delimited option, choose a delimiter that aligns with your data, such as a comma, space, tab, or even a custom character. Alternatively, if you opt for Fixed Width, you’ll manually specify the positions where the content of the cells will be divided.
4. Formatting and Completing the Split
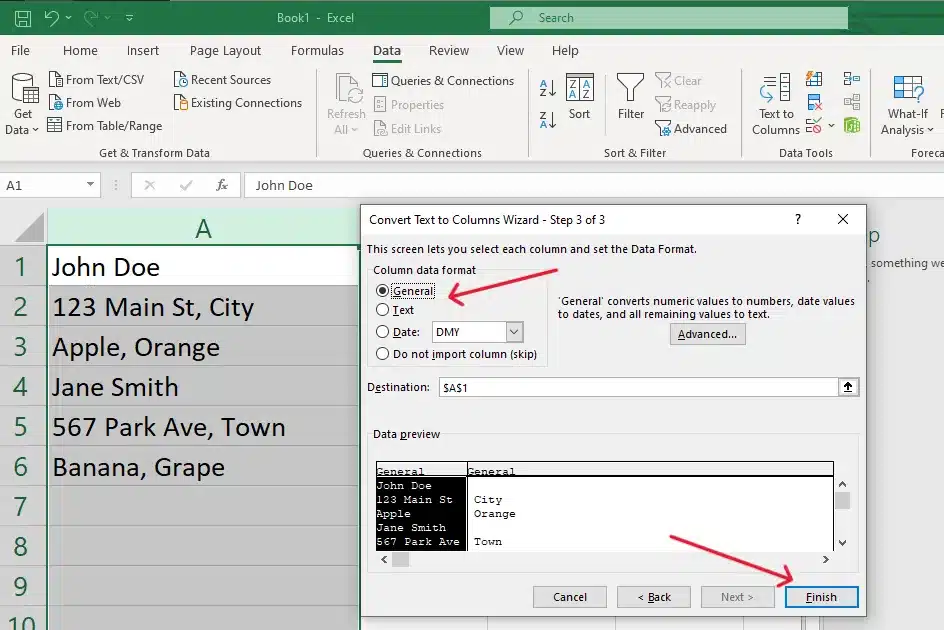
After setting your preferences, choose the data format for your new columns by selecting general, text, date, or a custom format. Decide where you want the new split data to appear, and you’re good to go!
5. Splitting Cells Containing Multiple Words or Characters
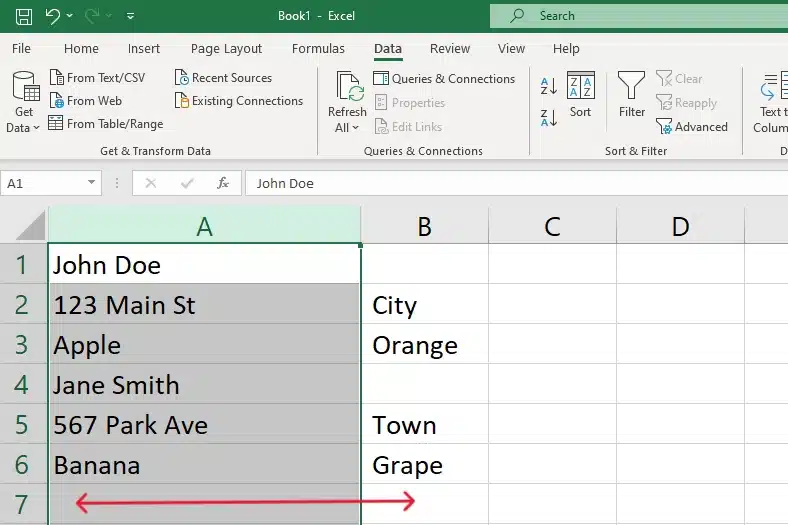
Example: Suppose you have a cell containing “Apple, Orange, Banana”. By using the delimited method and selecting a comma as the delimiter, the Wizard will place each fruit in its separate column, making your data much easier to manage and analyze.
Armed with the Text to Columns Wizard, you’re now well-prepared with a variety of ways to split cells.
Now, just explore and experiment with this tool to discover how it can best serve your Excel needs and make your data management tasks more streamlined and efficient.
Have you got the hang of the Text to Columns Wizard?
Great! Next up, let’s explore using Text Functions for splitting cells in Excel.
2. Use Text Functions to Split a Cell in Excel

Text functions in Excel greatly enhance our data management capabilities. In this section, we’ll examine the powerful text functions that Excel has to offer, allowing us to split cell contents with precision and flexibility.
Key Functions and Their Uses
LEFT, RIGHT, MID: These stalwarts allow for the extraction of specific text segments within a cell, targeting the start, end, or middle of the content.
FIND, SEARCH: Integral for locating character positions, these functions play a crucial role in text-splitting strategies, with FIND being case-sensitive and SEARCH allowing wildcard usage.
LEN: Essential for size assessments, LEN determines a text segment’s character count within a cell.
Split Cells with Text Functions
1. Identifying the cells
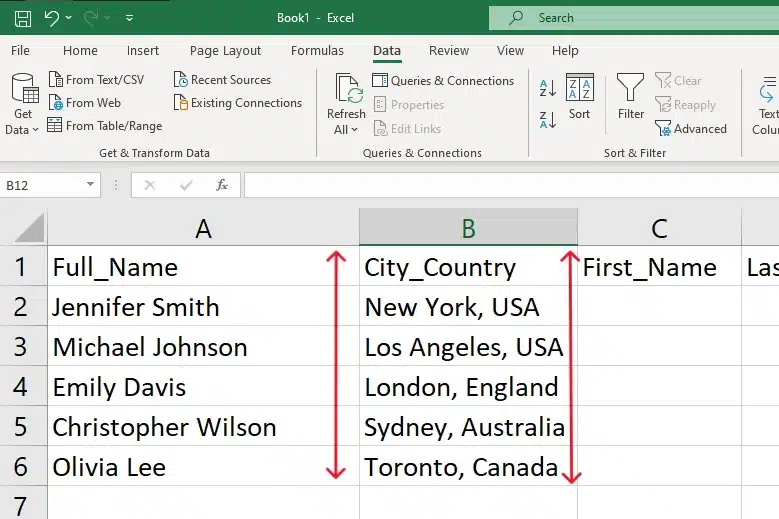
Start by identifying the cells that hold the text you aim to split. For instance, in our example, focus on the “Full_Name” and “City_Country” columns. Ensure you have accurately identified the parts of the text you want to separate.
2. Implementing Basic Splits
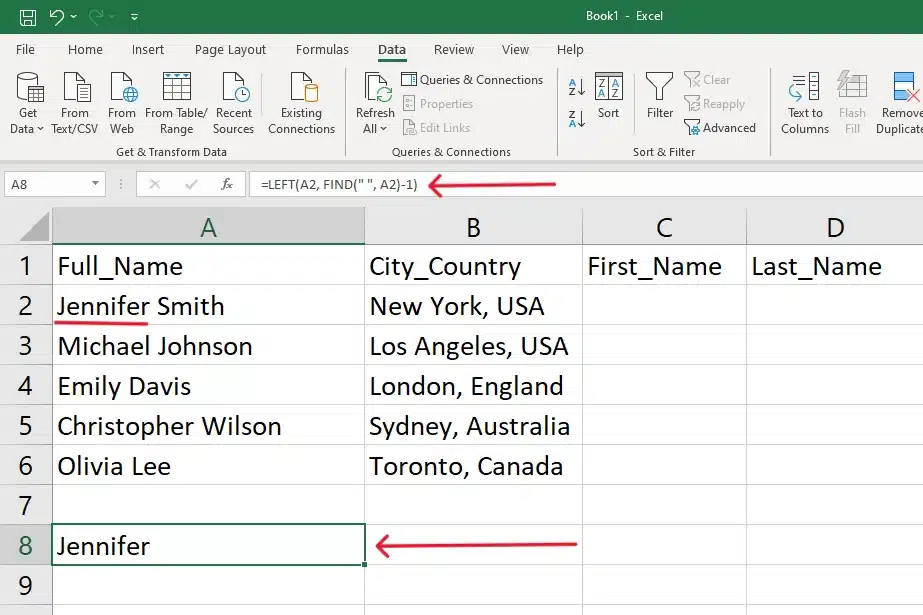
For the initial split, let’s extract the first name from the “Full_Name” column. Use the formula =LEFT(A2, FIND(” “, A2)-1). Apply this search in the “First_Name” column, specifically in Excel cell C2. This formula searches for the first space in each full name and takes all the characters before it as the first name.

For example, with the full name “Jennifer Smith” in cell A2, applying the formula will display “Jennifer” in C2.
3. Advanced Strategies to Split Cells in Excel
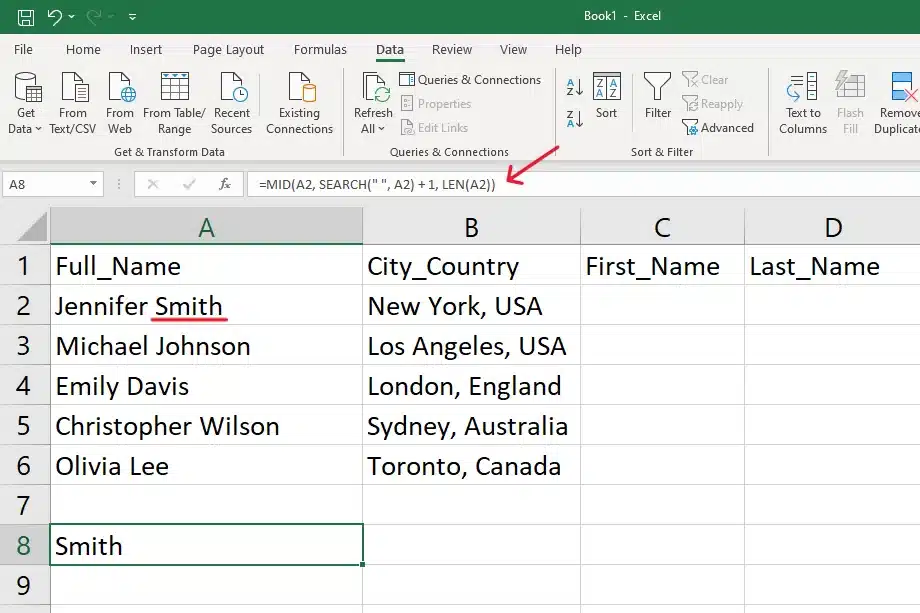
Moving to more nuanced splitting, consider the extraction of the last name. Here, the formula =MID(A2, SEARCH(” “, A2) + 1, LEN(A2)) becomes useful. Position this formula in the “Last_Name” column, ideally in cell D2.
This function carefully carves out the last name from the full name, considering all characters following the first space character. Continuing with “Jennifer Smith” in cell A2, the formula will reveal “Smith” in D2.
4. Splitting Full Names and Cities
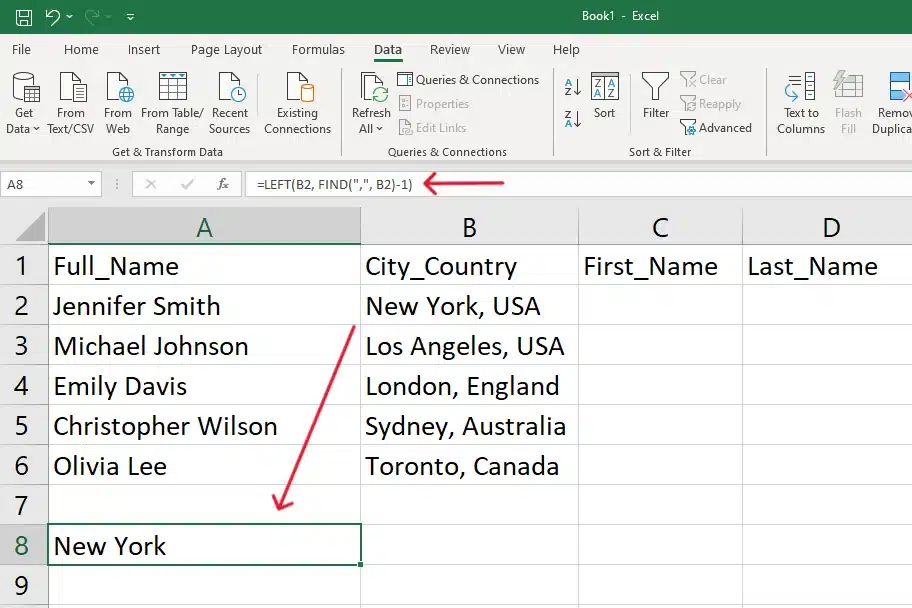
Lastly, let’s focus on extracting the city from the “City_Country” column. Employ the formula =LEFT(B2, FIND(“,”, B2)-1) in the “City” column, applying it to cell E2. The function targets the comma, extracting text before it as the city name. For instance, where cell B2 holds “New York, USA”, the formula will neatly display “New York” in E2.
Immerse yourself in the hands-on application of these functions, exploring various scenarios to unveil a realm of endless possibilities.
3. Utilizing Flash Fill To Split Cells in Excel

Flash Fill, introduced in Excel 2013, is a smart assistant that automatically fills in values in your worksheet by recognizing patterns or sequences.
It is especially powerful when it comes to splitting text, as it intuitively understands the splitting pattern you intend to apply, making the task considerably more straightforward and less reliant on formulas.
Let’s check it out.
Split Cells with Flash Fill
1. Accessing Flash Fill
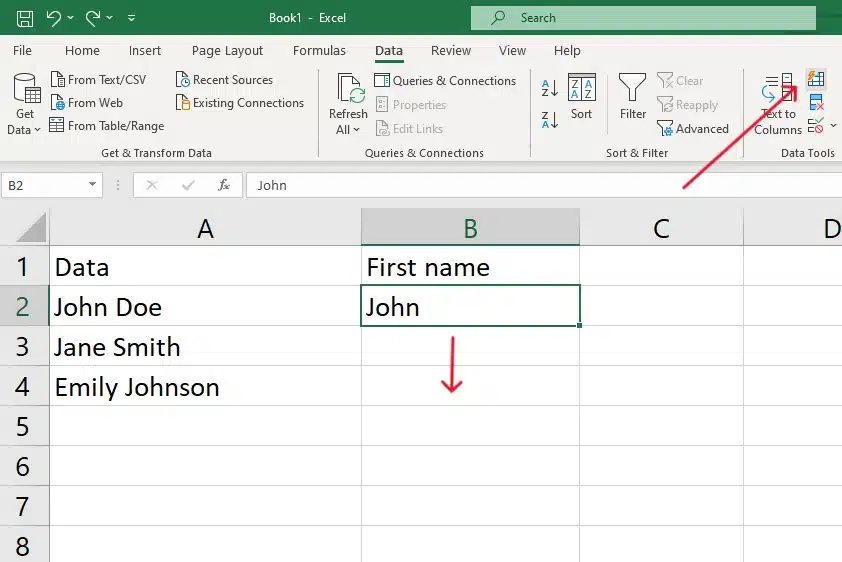
The journey begins by accessing Flash Fill. You can initiate this by typing in a cell next to the one you aim to split then Ctrl+E. Excel, identifying the potential pattern, will add auto-completions. This feature is also accessible directly through the Data tab by selecting the Flash Fill option.
2. Using Flash Fill to split cells
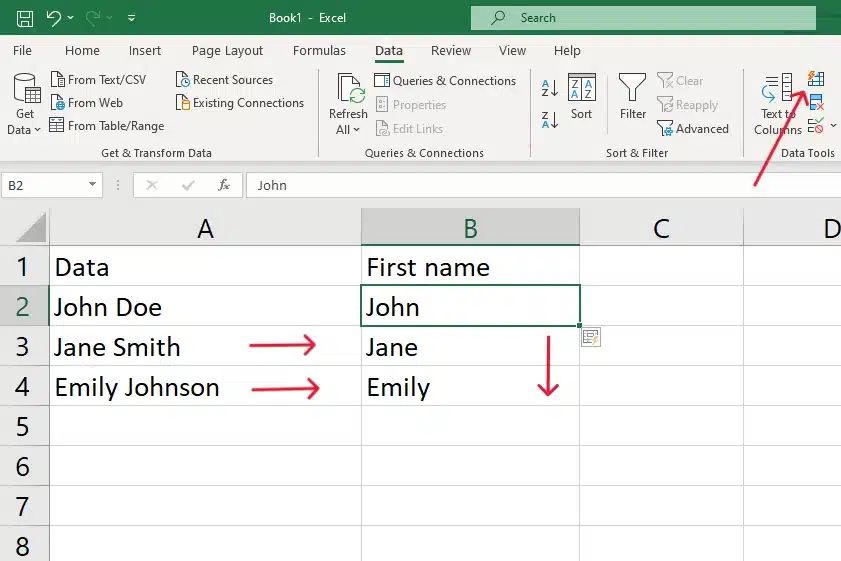
Utilizing Flash Fill is a user-friendly process. Simply commence by typing the section of the content you wish to separate. Flash Fill will automatically present completion suggestions, recognizing the pattern you intend to employ. By pressing Enter, you accept the suggestions, allowing the cells to be populated according to the recognized patterns.
Flash Fill is a dynamic and intuitive tool that brings a breeze of ease and efficiency to splitting cells in Excel. Embrace its intelligence, learn through practical engagement, and apply the best practices to make the most out of it.
Enjoyed the ease of Flash Fill?
Your journey to split cells doesn’t stop here.
Next, we’ll explore Power Query, another extraordinary tool to transform multi-line cells into multiple rows effortlessly.
4. Split a Multi-Line Cell into Multiple Rows with Power Query

In Excel, handling spreadsheets with cells that contain multiple lines of data can be quite intricate, yet mastering this task is essential for effective data management and analysis. In such instances, Power Query comes to the rescue as a powerful tool, facilitating the restructuring of multi-line cells into a more organized and analyzable format.
Detailed Explanation of the Process
To manage cells with multiple lines, Power Query’s advanced features can be utilized. Power Query is an ETL (Extract, Transform, Load) tool integrated into Excel, enabling the transformation and reshaping of the imported data set from an external source, enhancing the data preview section with rich, well-organized visual cues.
1. Load the Data into Power Query
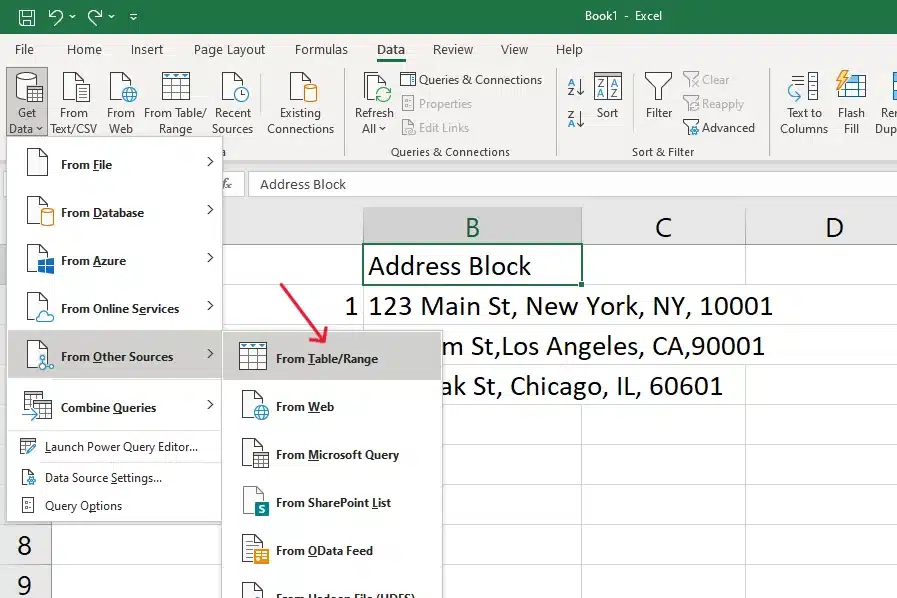
Open Excel, go to the “Data” tab and select “Get Data” to access Power Query. Choose the range of cells or the table that you wish to transform by inputting the values or dragging over the area. Then click on the “OK” button.
2. Splitting the Cells
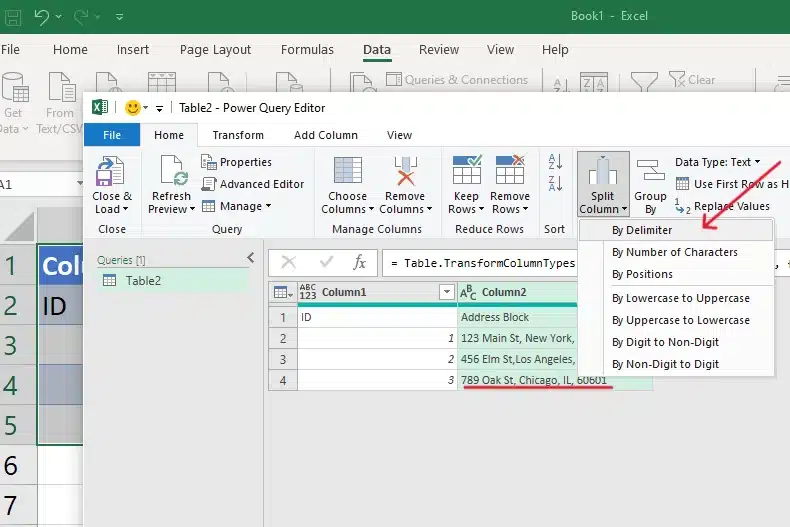
Within Power Query, locate the column containing the multi-line cells, identifying patterns that can help in splitting cells in Excel efficiently. Utilize the split column functionality, using line breaks as separators.

This action will initiate the creation of resulting cells according to the delimitators chosen.
3. Loading the Transformed Data
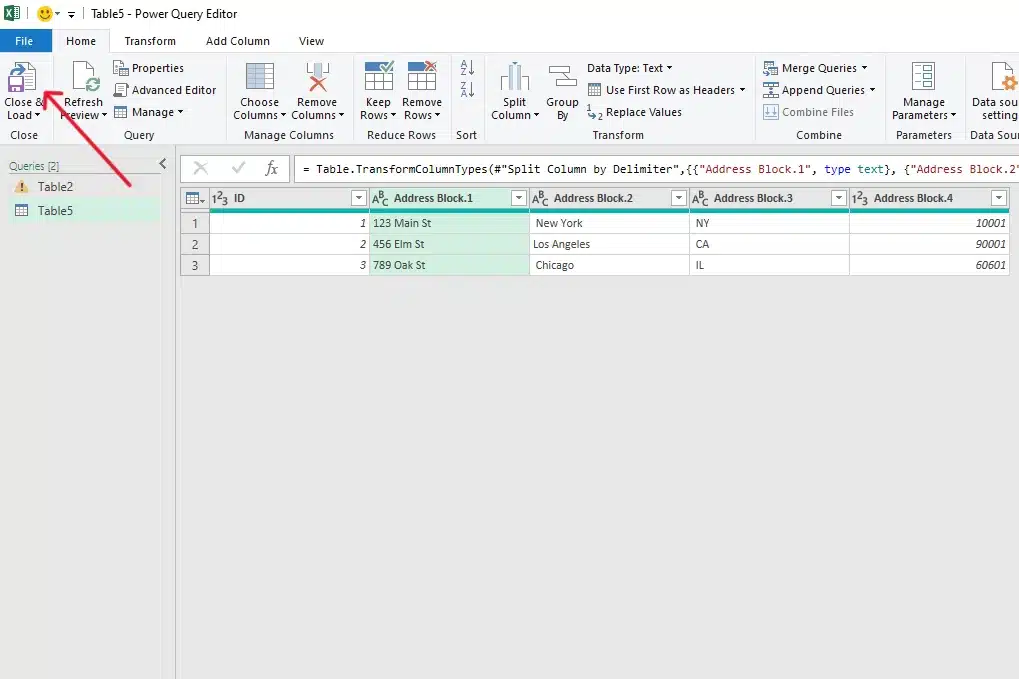
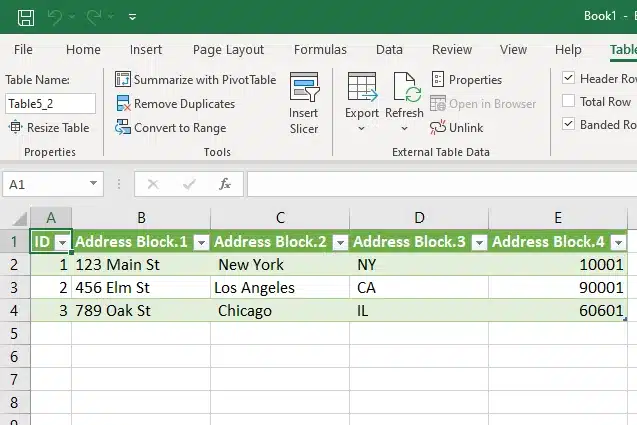
After the process of splitting the cells into rows, you can load the transformed data back into Excel by clicking on the ” Close& Load” button. The spreadsheet will now house the newly structured data, ready for further analysis or operation.
4. Power Query Improves Readability
Power Query revolutionizes the way we manipulate data in Excel. In this case, it eases the process of converting multi-line cells into a structured format of rows and columns, making the data more manageable and ready for analysis.
Advanced Tips for Working with Rows and Columns
Utilizing the Advanced Splitting Options: Power Query offers advanced splitting options. Familiarize yourself with these to handle various data complexities.
Managing Null or Blank Rows: After splitting, you may encounter blank or null values. Learn how to manage or remove these to maintain data integrity.
Optimizing Column Data Types: Ensure the new rows and columns created have the appropriate data types and formats to facilitate subsequent data analysis and operations.
Splitting multi-line cells into multiple rows is an essential skill that amplifies your Excel proficiency, especially in data preparation and analysis. Power Query lives up to its name, turning potential complexities into a streamlined and manageable process.
Did you enjoy our previous examples of splitting cells?
Next, let’s take a look at how to unmerge cells and create a new column.
5. Unmerge Cells and Create a New Column

Working with data in Excel often involves various tasks such as managing merged cells, splitting cells, and creating new columns based on existing ones. Let’s take a look at splitting cells in Excel that have been merged.
How to Unmerge/Split Cells in Excel
Excel allows for two or more cells to be merged into one, primarily used for design and formatting. To revert merged cells to individual cells, follow these steps:
1. Select the Merged Cells
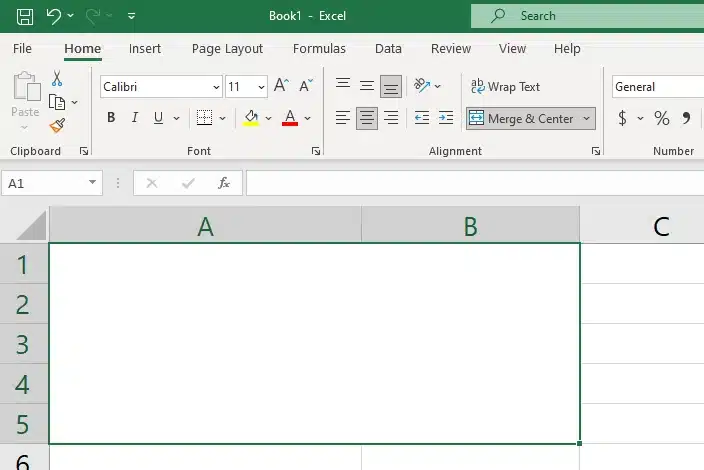
Click on the merged cell or use Ctrl + A to select all content if you want to unmerge cells in the worksheet.
2. Unmerge the Cells to Split them Again
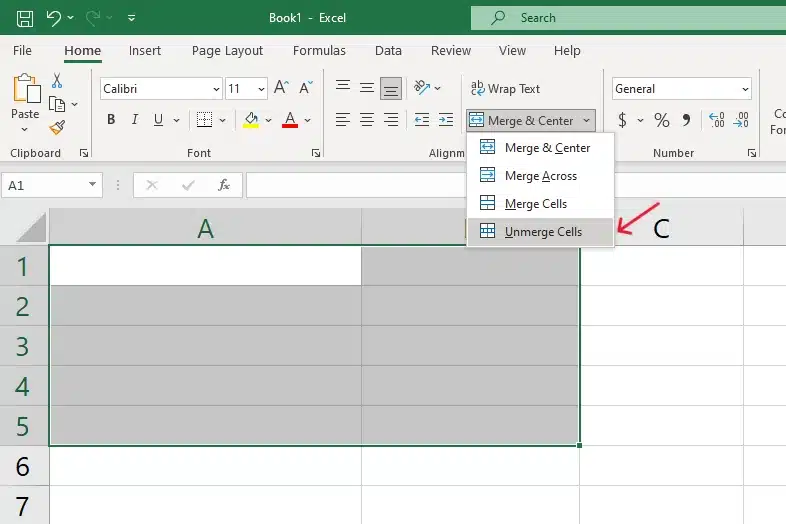
Go to the Home tab on the Excel Ribbon. Find the Merge & Center dropdown in the Alignment group. Click on it and select Unmerge Cells. The merged cells are now split back into individual cells, allowing for more detailed data manipulation and organization.
Having clarified the process of merging and unmerging cells, we are now ready to consolidate and solidify our enhanced Excel skills. As we reach the final section of our guide, it’s time to bring together all the knowledge we’ve gathered so far on Splitting Cells in Excel.
Final Thoughts

Our journey began with the exploration of the “Text to Columns Wizard”, a powerful tool for splitting the contents of a cell into new columns based on specific delimiters or fixed width. We also navigated through some Excel functions such as the LEFT function and SEARCH function, where precise formulas enabled complex manipulations of text strings within cells.
Next, we dived into “Flash Fill” and the “Power Query Editor”, two tools that offer superpowers for maintaining consistency, managing date formats, and creating just the right columns. Finally, we took a look at how to unmerge cells and create a new column.
Excel is a dynamic platform, particularly when it comes to cell splitting and data organization. To maximize its capabilities, continuous learning and experimentation are essential. By deepening our understanding and improving our skills, we can leverage Excel’s features to enhance data splitting, organization, and overall data management efficiency.
Hungry for more insights into Data Science, and eager to wield cutting-edge tools like the ChatGPT code interpreter? Quench your thirst for knowledge at EnterpriseDNA on YouTube.
Frequently Asked Questions
How do I merge cells in Excel?
Head to the “Home” tab on the Excel Ribbon. Find the “Merge & Center” option in the Alignment group, allowing you to merge multiple cells into a single cell, improving column data format and structure.
How can I split content in a cell into different cells?
You can do this using the “Text to Columns” wizard. This tool specializes in splitting a single cell into multiple destination cells, using specific characters as delimiters, and ensuring the text strings are systematically separated and data consistency is maintained.
How do you split a cell vertically in Excel?
Certainly! Use tools such as the “Text to Columns” wizard. By applying this function, you can designate content from your cell to be divided vertically, aligning data precisely in separate rows or columns based on specific characters.
How to Split cells with multiple delimiters?
The “Text to Columns” wizard is quite handy. It discerns and treats consecutive delimiters as separate entities, thus allowing a nuanced separation of text strings, ensuring each part is properly allocated to its destination cell.
How to create a new column from the data of an existing one?
Utilize Excel functions that facilitate the extraction of specific text strings, enabling you to define and position data in a new cell effectively, all while keeping in alignment with your desired output and maintaining data consistency.
How to maintain format consistently when splitting cells?
Employ formulas that respect the integrity of the original date format. Such thoughtful utilization of Excel functions guarantees that the consistency and readability of date formats remain uncompromised across cells.
Is there a way to automate cell splitting?
Yes, through automation features like double-clicking the fill handle after inputting the initial formula. This action replicates the following formula across various cells, ensuring that specific patterns are recognized and applied swiftly for efficient data manipulation.


