In this tutorial, we’ll have a quick overview on what Business process flows are and how they work. This is more like a Power Apps feature rather than a Power Automate feature. Business process flows is a way to make the current traditional business process a lot easier by adding a checklist or a flow around it.
Understanding Business Process Flows
Let’s say we might have a business process where we onboard and employ. There’s a process that the HR team usually follows. After they get hired, we make sure they have a laptop, they know the necessary company information, and we get their name, phone numbers, address, and the like. The HR probably has a little checklist and forms that they need to fill out for that person.
With business process flows, we can make a digitized process for all those things. So, instead of the HR thinking about the correct sequence of the usual manual process, or if they really got all of the information they need, we can create a process that the HR team could follow sequentially.
The purpose of business process flows is to put structure around a current business process and to put a checklist around it.
A business process is completely in the hands of the person who’s using it. They’re just doing one thing after another and so on like a step by step process. With this, it makes a business process much easier without making it automated in any sense.
Creating Business Process Flows
Let’s now create a sample business process flow. First, we need to switch our environment to one that has an entity. So, make sure that you’ve created an environment first. Then, click on the Environments and change it from our default environment to the new environment with entity.
Let’s now click the Business process flow.
Let’s name it “OnboardingANewEmployee”.
For the Choose an entity textbox…
…scroll down and look for the NewEmployee, click on its checkbox and click the Create button.
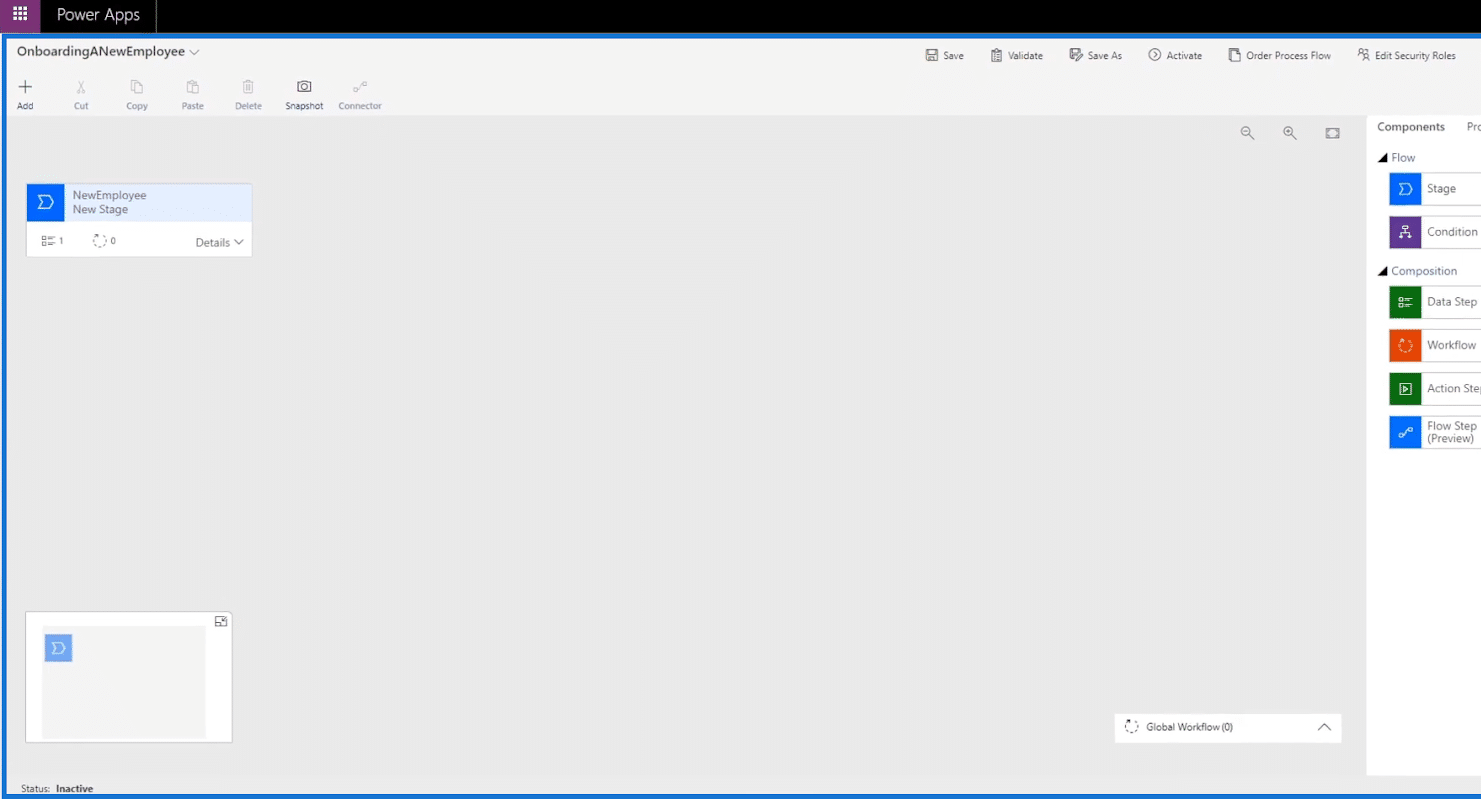
It might take a few minutes to load up but it will then redirect us to this page. This is not our usual flow diagram. This is a business process diagram which is completely different from a flow diagram.
Business Process Flow Diagram
A Business Process Flow diagram contains a number of similar features usually found in a Flow diagram.
Now, let’s try opening up a form. To do that, go to the Power Apps website. Then, click Data. Afterward, Click Entities. Then, the list of the available forms will be displayed.
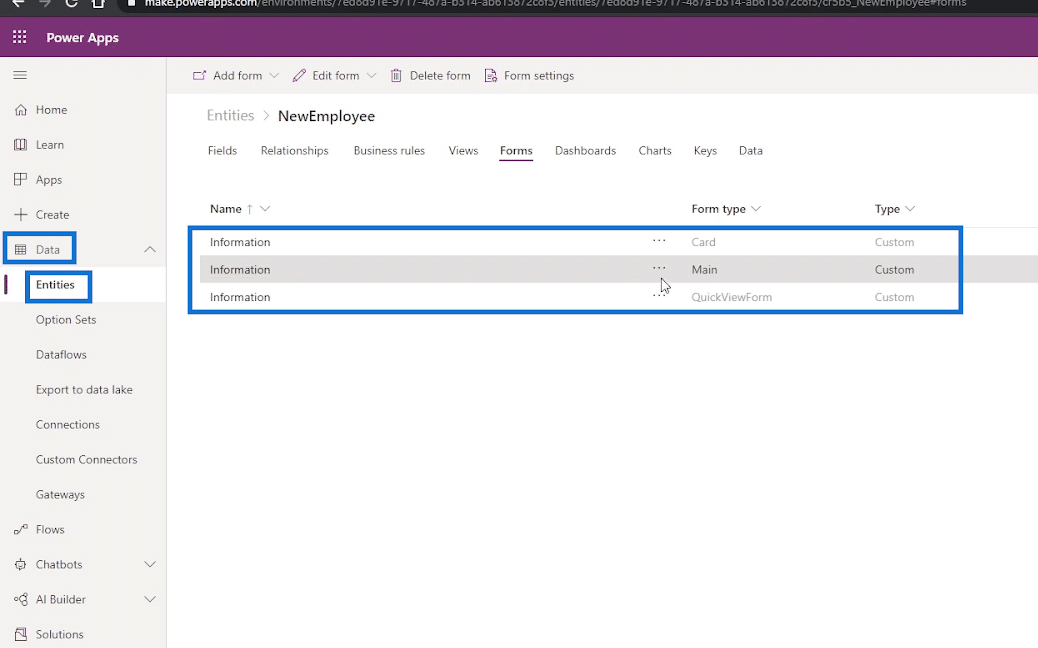
Click the ellipsis (…) from the form we’d like to open. Then, click the Edit form option. Lastly, click the Edit form in new tab option.
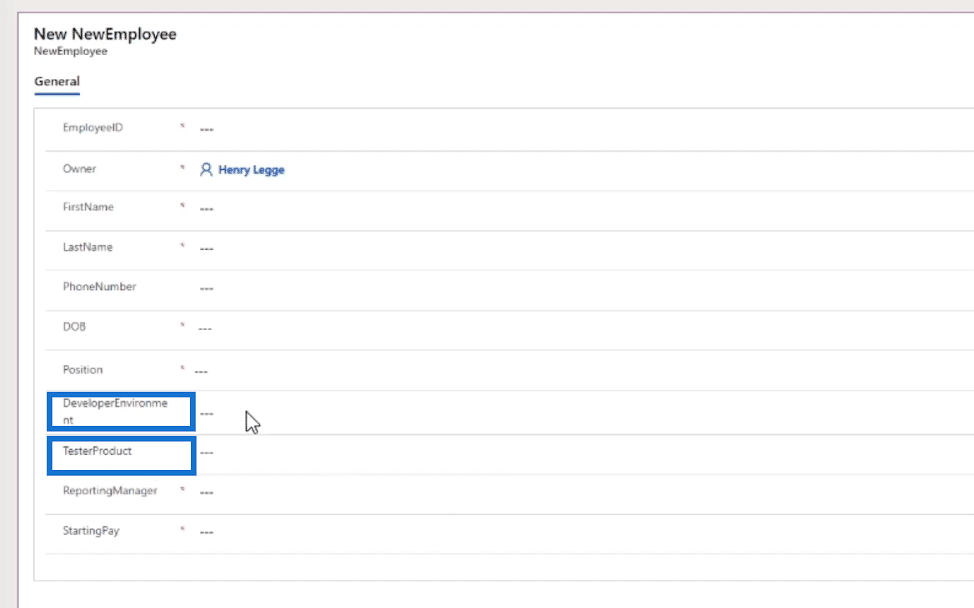
We’ll then see the form that’s ready for us to edit.
So, instead of the user going through all that process of opening up the form and typing in all the details required in the form, we can just guide them on what fields we’d like the user to answer by creating a business process flow. For instance, we can let them answer the first 3 questions of a set of questions. This way, we are able to direct the user through a form that they need to fill out as a part of the business process.
Business Process Flow Components: Stage
Looking into the Business Process Flow diagram, we’ll see the Stage button. When clicked, the Stage diagram will appear.
A Stage is a group of steps that you’d like the user to follow. For example, Stage 1 would be to get the basic information of employees, Stage 2 would be to get their salary information while Stage 3 would do a background check, and Stage 4 would get them their laptop.
Business Process Flow Components: Data Step
Each Stage contains Data Steps. When clicked, its diagram will be displayed.
A Data Step is a step or a number of steps with required data that you’d like the user to collect within the Business Process Flow. For example, the Stage 1 earlier, which is to get the basic personal information of employees might include Data Steps such as getting the first name in Data Step #1, getting the last name in Data Step #2, getting the address in Data Step #3, getting the phone number in Data Step #4, and so on and so forth.
Business Process Flow Components: Condition
We also have the Condition feature that we can set. This is where the user answers questions having certain results that would prompt a different Stage or a different Data Step to follow.
For example, with the use of Condition, we can set the user to answer the DeveloperEnvironment field in the form if they’re a Developer. If not, they’ll put in the TesterProduct field instead as a Tester.
Business Process Flow Components: Action Step
An Action Step is used when we’d like the user to make an action such as emailing data. For example, we direct the user to email a set of basic personal employee information to the Accounts Payable Team to make sure they get paid. So, instead of entering pieces of data in Data Step, we ask the user to perform an action.
There are also two other Business Process Flow Components such as Workflow and Flow Step but we won’t be focusing too much on that in this tutorial.
Modifying The Stage
Now that we know the usage of the different components, we can then proceed to modifying the stage for our first Business Process Flow. To do that, let’s click the New Stage diagram.
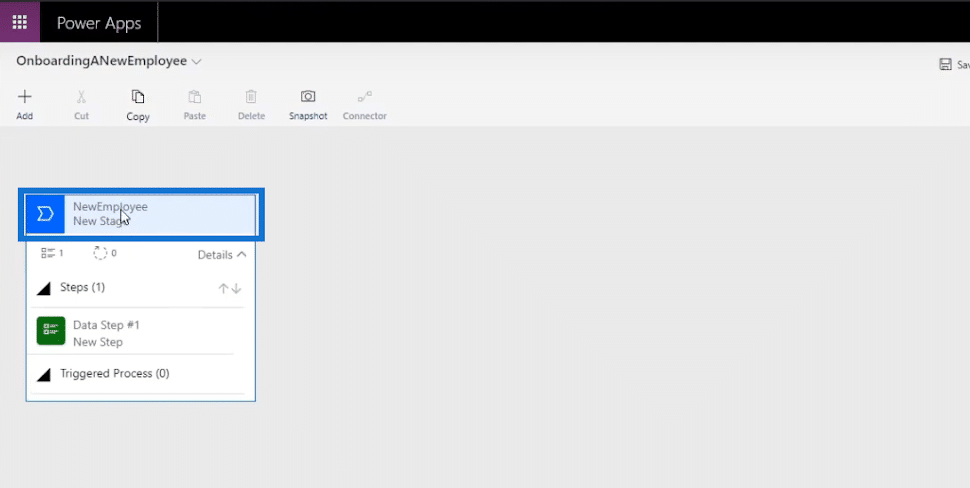
When clicked, the Properties of the Stage will appear.
Then, let’s change the default Display Name to “Get Employee Basic Information” and click Apply.
We’ll then see the edited name of the Stage.
Afterward, click Details to display Data Step #1 in the diagram. Then click it.
When clicked, the Properties of the Data Step will be displayed.
In the Step Name, let’s type in the particular information we’d like the user to collect. So for Data Step #1, it’ll be “First Name” and select FirstName in the Data Field as well.
Let’s tick Required and click Apply. Then, we’ll see the edited name of our first Data Step.
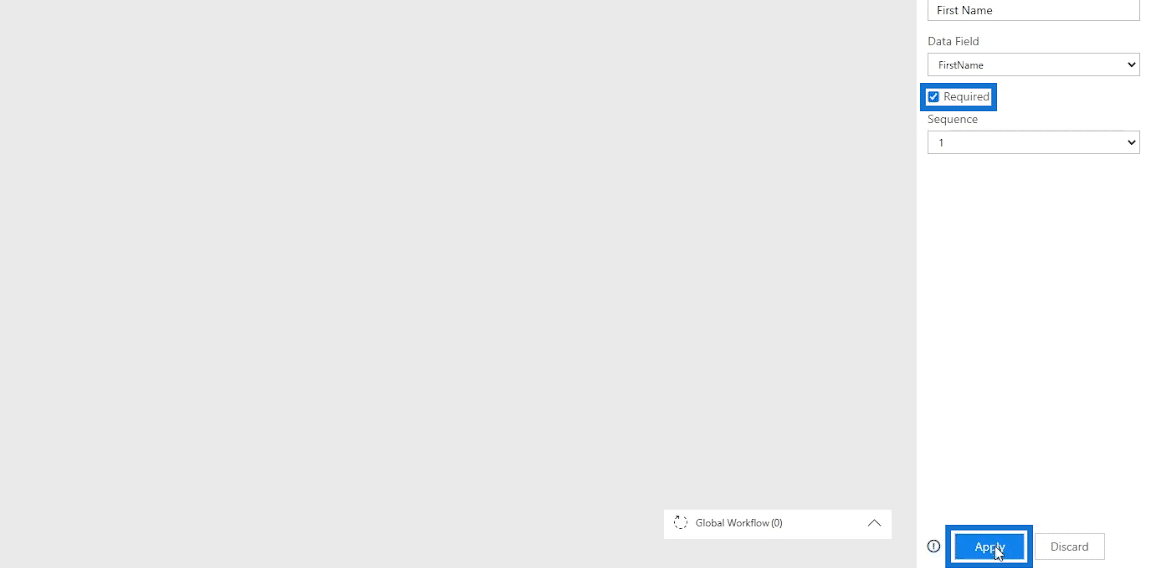
Then, we’ll see the edited name of our first Data Step.
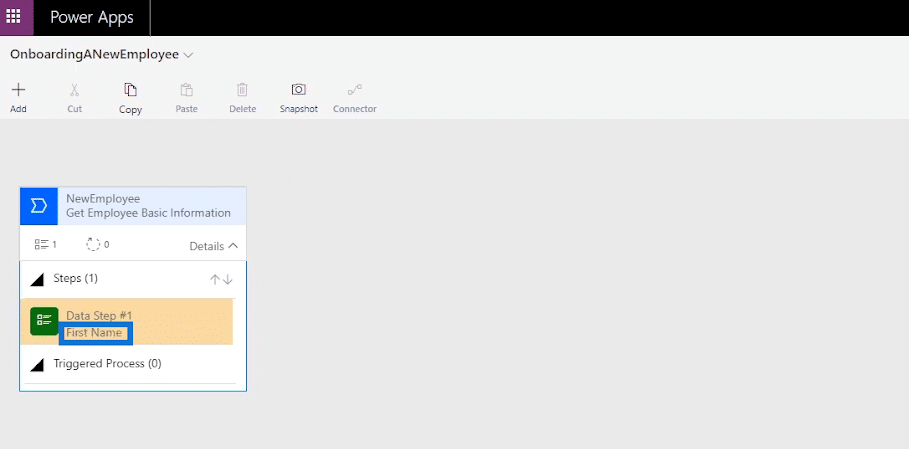
Adding Data Steps Component
To add a new Data Step in the diagram, just select and drag the Data Step button under Components.
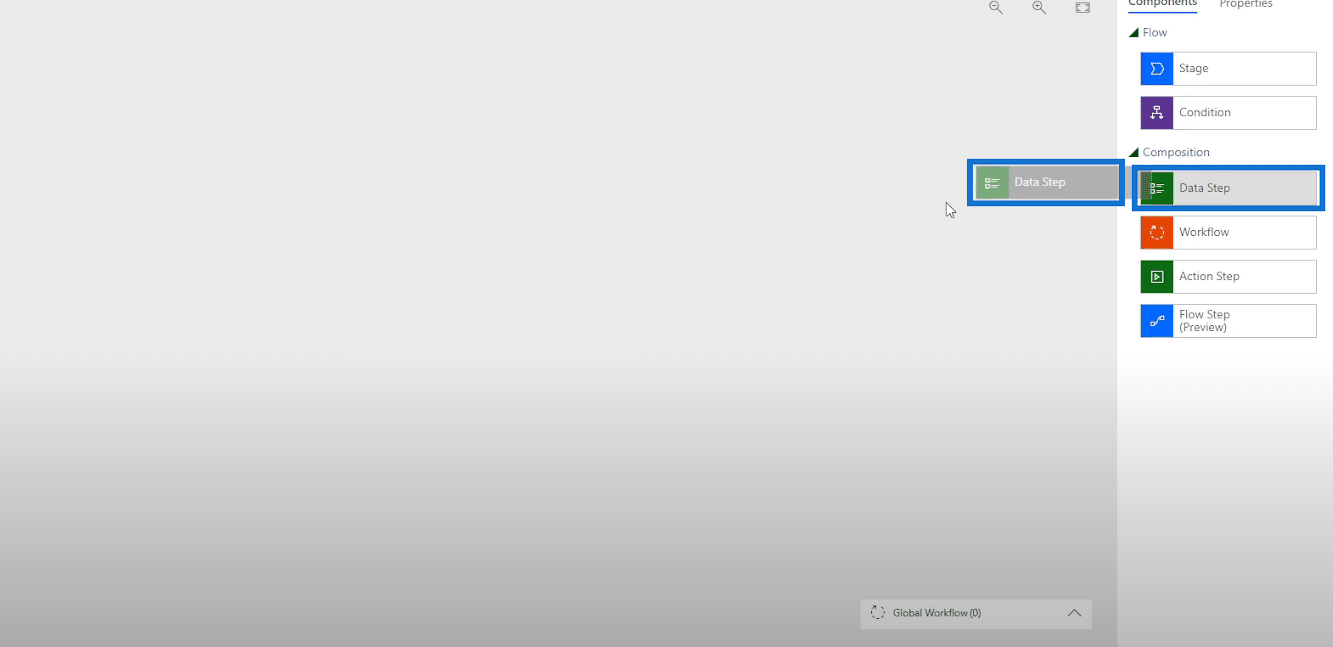
Then, place it in the plus sign (+) under Data Step #1.
When done, we’ll see Data Step #2 added in the diagram.
Let’s also specify the particular information we’d like the user to collect for Data Step #2. Type in “Last Name” as the Step Name, select LastName also in the Data Field, tick Required and lastly click Apply.
Let’s add another Data Step for this diagram. To do that, drag and drop the Data Step button in the plus sign (+) under the recent Data Step, just like ejat we did earlier.
For Data Step #3, type in “Phone Number” for the Step Name, select PhoneNumber in the Data Field as well, tick Required, and lastly, click Apply.
Let’s add another Data Step in the diagram.
For Data Step #4, the user will collect Date of Birth but will just type in “DOB” as the Step Name. Select DOB in the Data Field, tick Required, and click Apply.
Now we’re done creating our first Business Process Flow diagram consisting of 4 Data Steps.
Adding A Stage
To add another Stage in the Business Process Flow diagram, select and drag the Stage button found under Components.
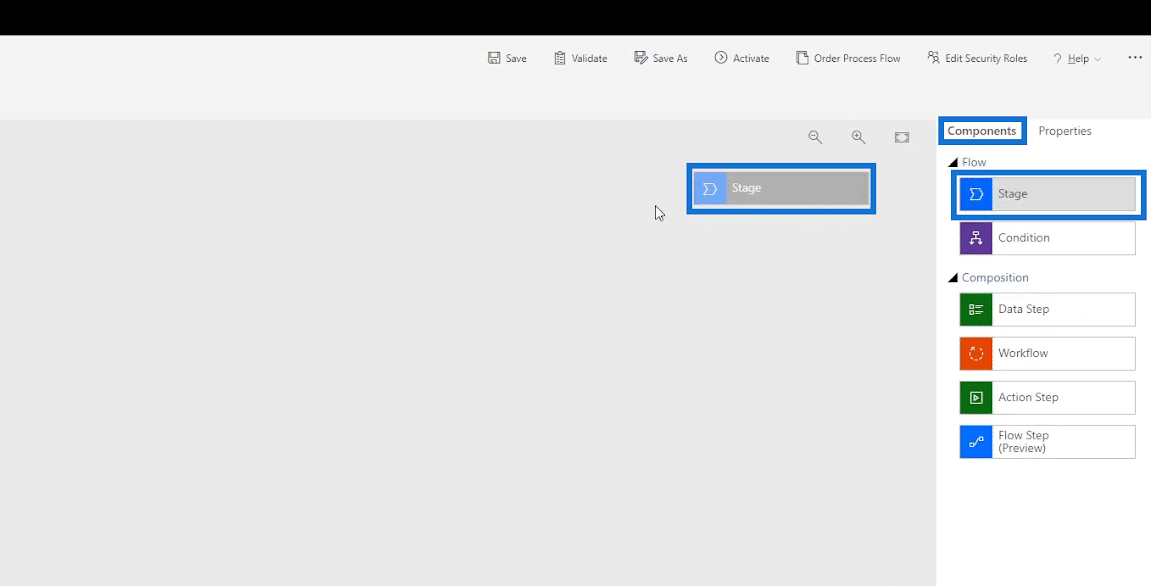
Then, place it in the plus sign (+) beside our recent Stage.

When done, we’ll see the diagram for the new Stage.
After getting the employee’s basic information, we need to determine the employee position. So, we’ll name the added Stage “Determine Employee Position” and click Apply.
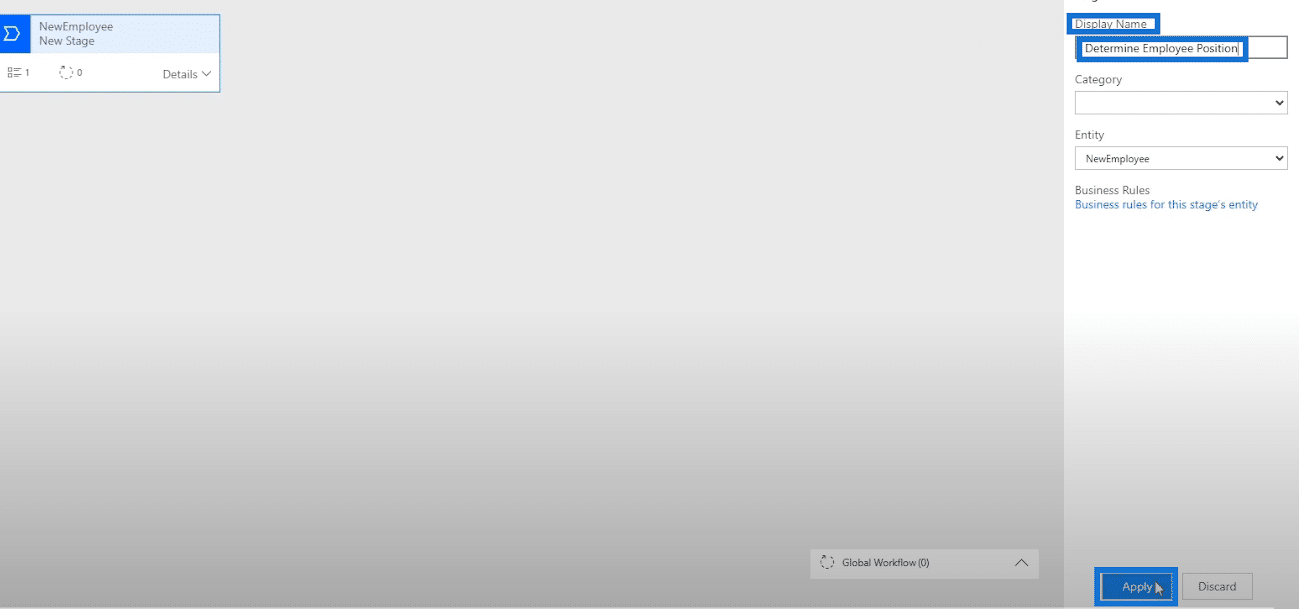
After naming the Stage, we’ll create a Data Step. Click Details within the diagram then click Data Step #1.

Let’s name the Data Step “Main Position”, select MainPosition as well for the Data Field and lastly click Apply.
Adding Condition To Business Process Flows
We’ll now add a Condition because we’d like the user to only populate the DeveloperEnvironment field if their main position is a Developer. Otherwise, the user would populate the TesterProduct field if the main position is a Tester. This is the main reason why we’re making this flow in the first place. To do that, let’s select and drag the Condition button.

Then, place it in the plus sign (+) right next to the Stage where the Condition will be added.

We’ll then see the new Condition diagram. The condition statement we’ll have is to test whether or not the main position is the same as the value of a developer or a tester. So, we’ll set the Yes path (?) for the Developer and the No path (X) for the Tester. If the user is a Developer, then he’ll follow the condition for Yes path. If it’s a Tester, then the condition for the No path will be followed, instead.
To set the Condition, edit its Properties. To do that, let’s type the statement “Is Employee a Developer?” as the Display Name for the Condition. Then, we’ll set the rules Main Position Equals the Value of a Developer. After that, click Apply.
Adding Stage To The Condition Diagram
Now, let’s add a Stage with Data Steps for the path when the user’s position matches the condition within the yes path (?). Select and drag the Stage button then place it in the plus sign (+) right next to the check mark (?).
Type in the Display Name “Fill out Develop Information” for the Stage.
After that, let’s set the Data Step. Click Details, then Data Step #1. Select DeveloperEnvironment as Data Field under Properties.
Then, tick Required and click Apply.
Let’s also add a Stage for the no path (X) or the “no” answer for the Condition. Like what we did earlier, we’ll just select and drag the Stage button then place it in the displayed plus sign (+) just beneath the no path (X).
Then, we’ll see the New Stage displayed for the path.
If the user is NOT a developer, this Data Step should be the Tester Product. Let’s type in the Step Name “Tester Product ” and select TesterProduct for the Data Field. Then click Apply.
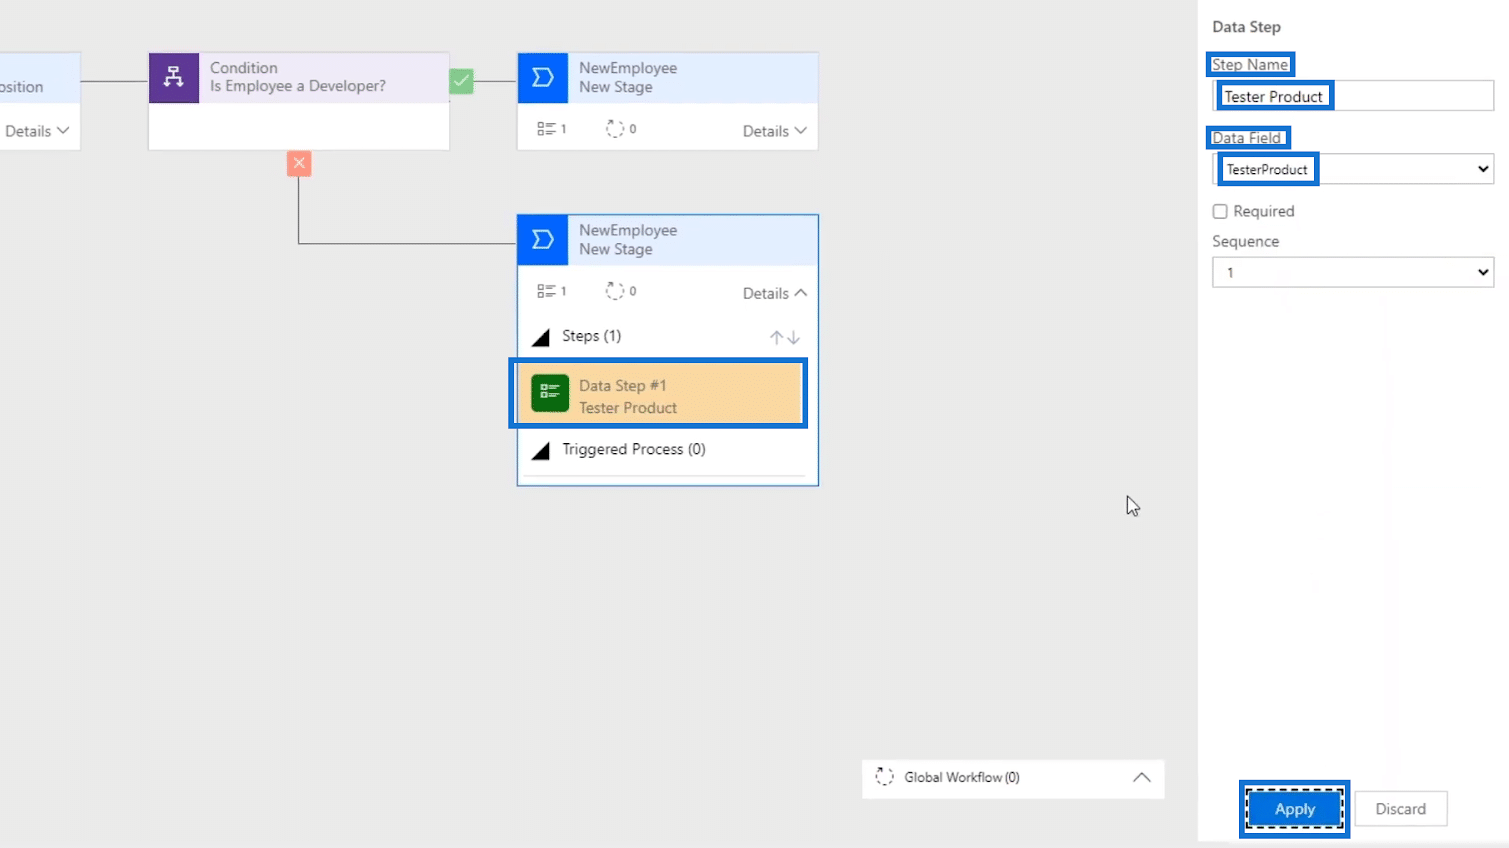
Now, we’re done with adding Conditions to the business process flow. This just made filling out the form easier since the user won’t have to worry about the Tester Product field when he’s a Developer or the other way around if he’s a Tester.
Adding A New Stage For The Other Fields
The last thing we’ll do is to add a New Stage diagram for the Manager field and Starting Pay field for both users — Developers and Testers. To do that, we’ll select and drag the Stage button from Components then place it in the plus sign (+) beside the Stage we made for the yes path (?) or for the Developers.
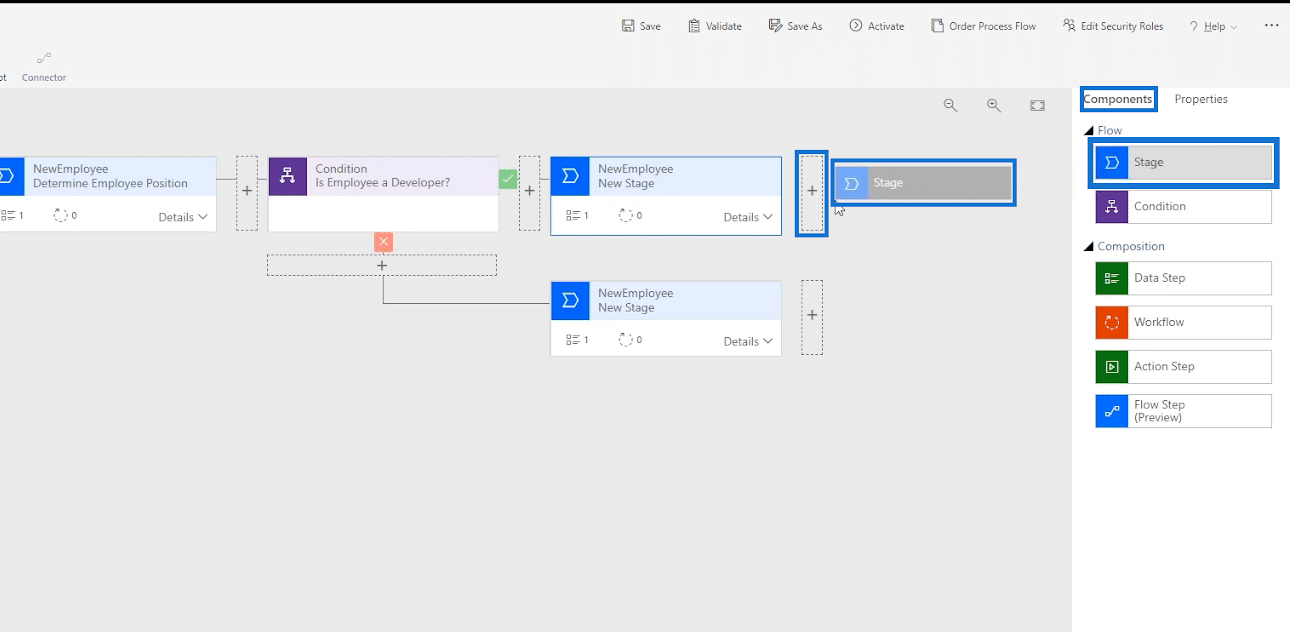
Let’s call the added New Stage “Manager and Salary” by typing it in the Display Name under Properties, then click Apply.
We also need to add Data Steps to the Stage. Click Details, then the Data Step #1. Select ReportingManager as the Data Field in the Properties.
After that, tick Required and click Apply.
Since we need 2 fields in this diagram, we’ll add another Data Step for this. Simply select and drag the Data Step button under Components then place it in the plus sign (+) under Data Step #1.
While in the Properties, we’ll select StartingPay for the Data Field and click Apply.
We’ll also do the same for the no path (X) or for the Testers. Select and drag the Stage button under Components and place it in the plus sign (+) beside the Stage of the Tester path.
After that, we’ll also add two Data Steps in this Stage. Similar to what we did in the Developer path, just click Details, then click Data Step #1. Select ReportingManager in the Data Field and click Apply.
To add the second Data Step, just select and drag the Data Step button under Components then place it in the plus sign (+) under Data Step #1.
While in the Properties, select StartingPay in the Data Field and click Apply.
So now, we have a full Business Process Flow diagram set up for the process of Onboarding A New Employee.
Saving, Validating And Activating The Business Process Flow
Before we can see our Business Process Flow in action, we need to save, validate and activate it first. To do that, let’s click Save.
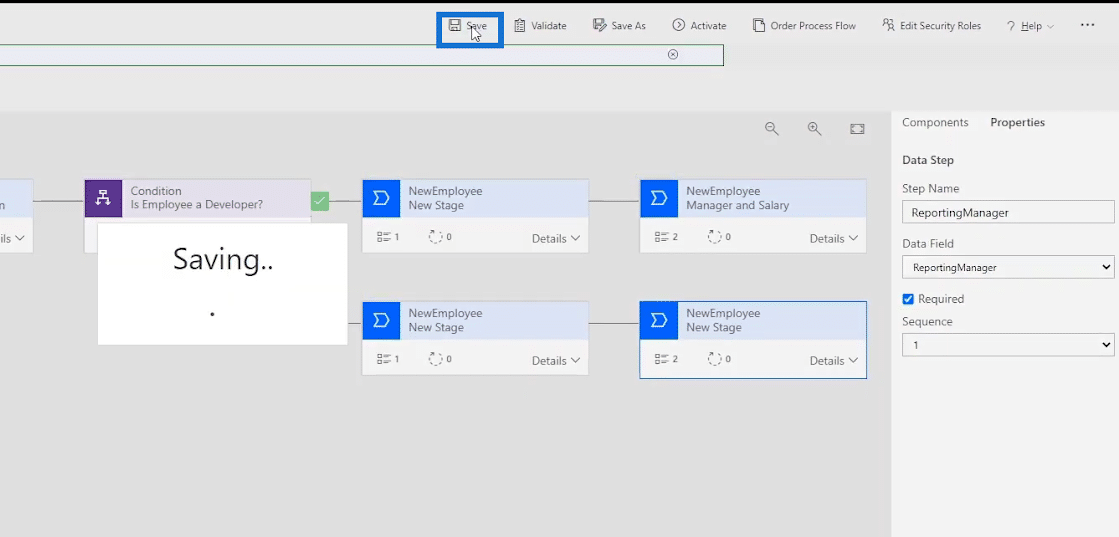
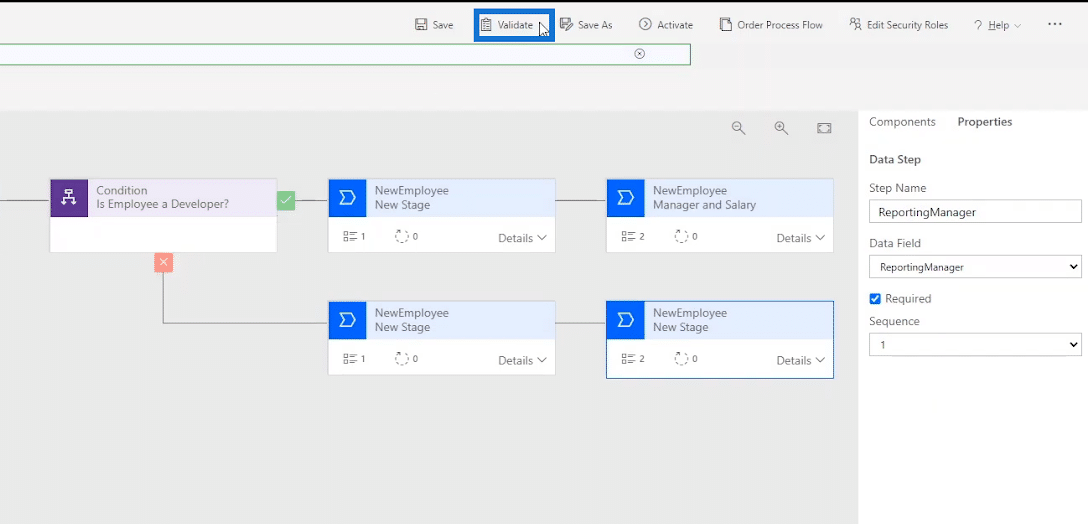
Then, click Validate.
After that, click Activate.
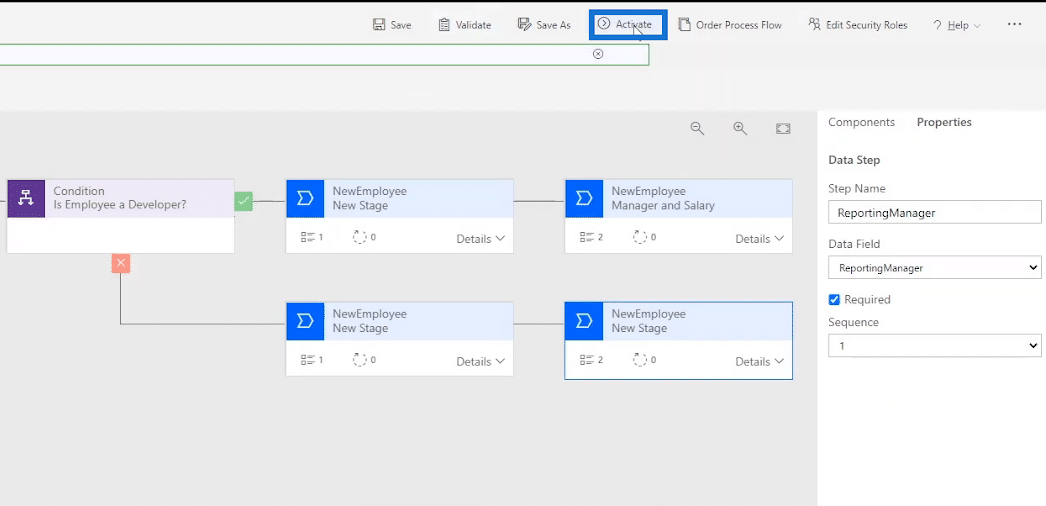
When clicked, a dialogue box will appear. Click the Activate button to confirm the process of activation.
The activation process may take a while then we’ll be good to go after that.
Running The Business Process Flow
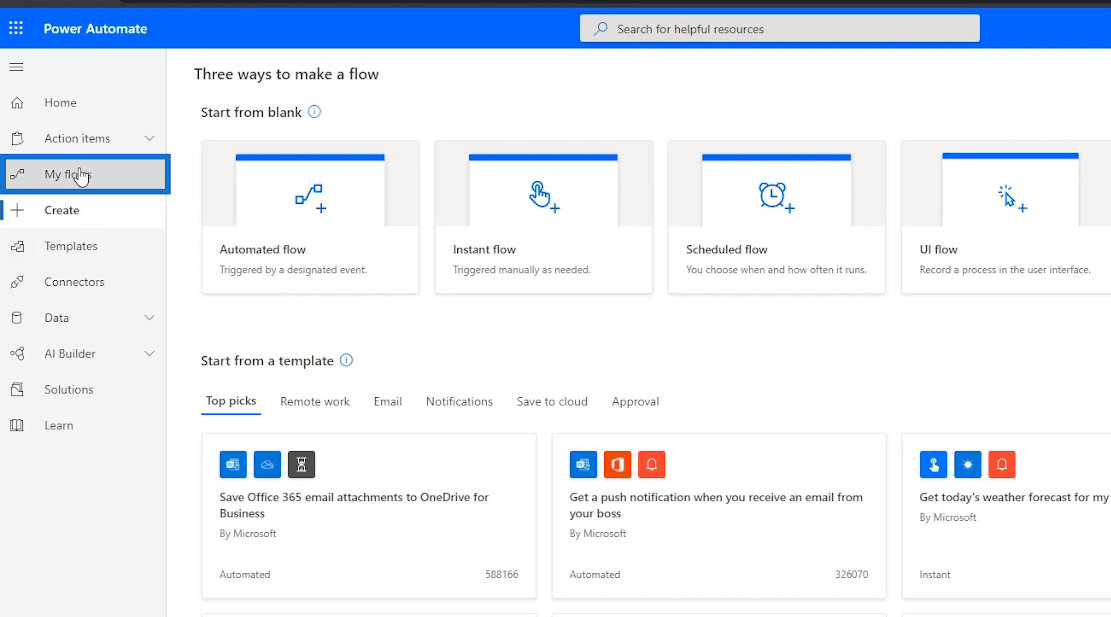
Since we’ve already activated our Business Process Flow, we can now run and test it. To do that, let’s go back to Power Automate and click My flows.
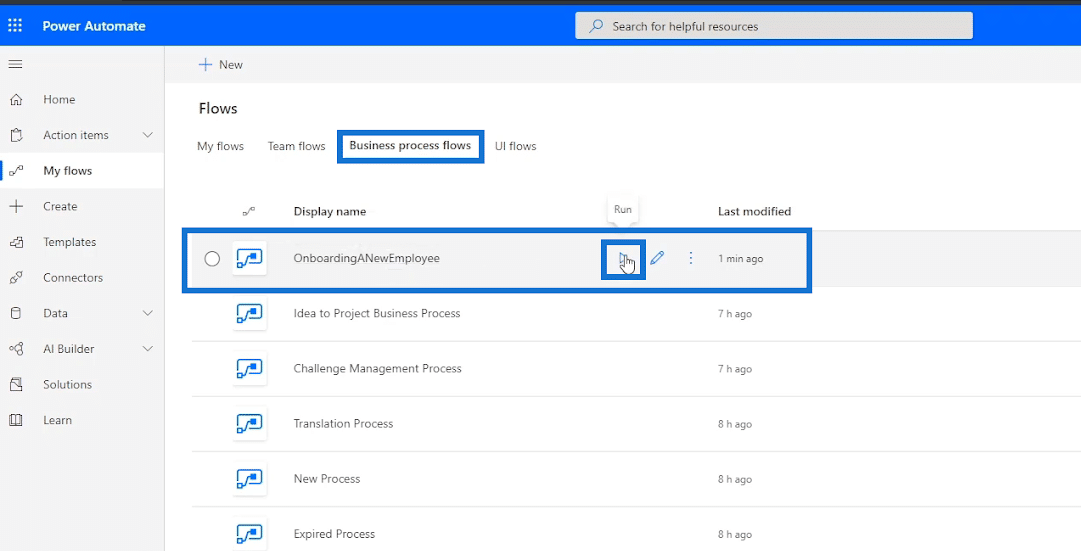
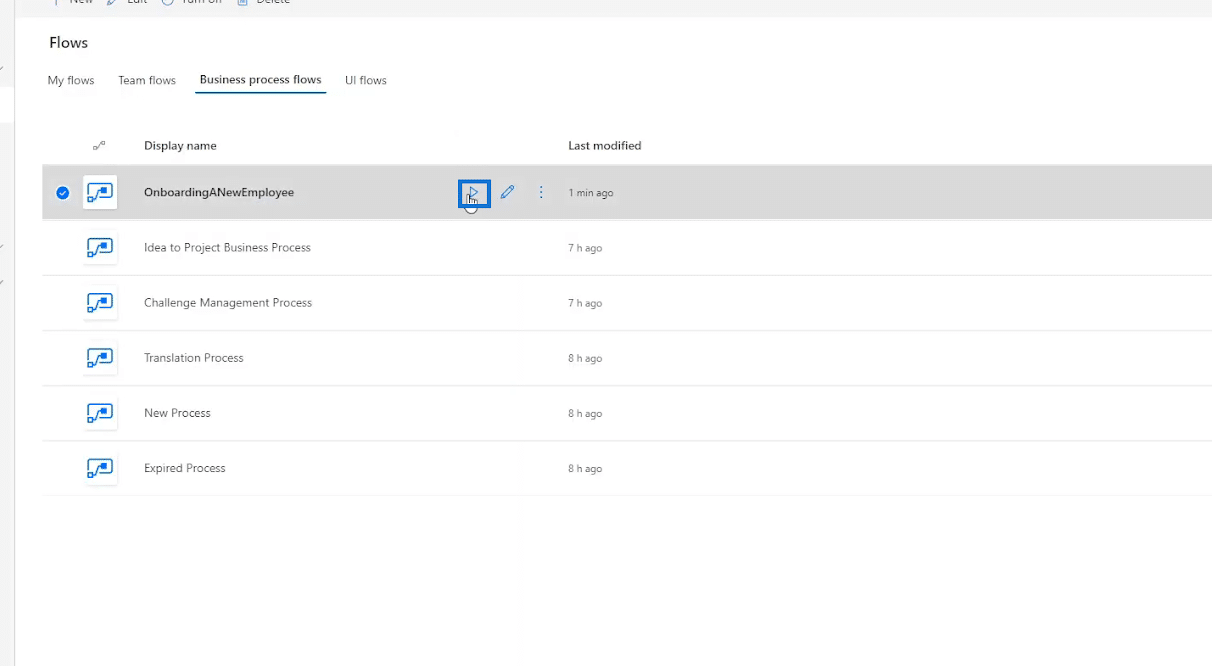
Go to the Business process flows tab and click the Run icon across the flow OnboardingANewEmployee.
When clicked, we’ll be redirected to the similar form we had earlier.
The user can still fill in the form manually as desired, but we’ve already added a process for them to follow which is displayed on top.
The first target we’ll see in the process is the stage that we’d like the user to follow first which is to Get Employee Basic Information.

Let’s click it and the specific portion of the form will be displayed where it wants the user to type in the employee’s First Name, Last Name, Phone Number, and the Date of Birth (DOB). These are the same things we specified in the first stage of our Business Process Flow diagram earlier.
Let’s try filling in the details. For example, let’s type in “Henry” as the First Name, “Legge” as the Last Name, a random Phone Number “5023369985” and the Date of Birth “February 7th, 1973”.
As we fill in the details of the Business Process Flow, the form is also filled in automatically.
To go to the next stage, we’ll click the forward arrow on the far right of the last stage.
When clicked, the next stage Determine Employee Position will then ask the Main Position of the user.
For this one, let’s try selecting Developer from the drop-down list.
Testing The Condition
If we’ve done the flow set up correctly, the next stage should only ask for the DevelopmentEnvironment and not the TesterProduct when the position is Developer. That’s what we’ve set as the Condition statement. Let’s click the forward arrow to check that.
As we can see, the next stage wants the user to type in the DevelopmentEnvironment which means the flow setup was correct.

Now, let’s go back and change our selection to Tester. To do that, we’ll just click the back arrow.
Select Tester as our position this time.
Click the forward arrow and the next stage will then tell us to type in a Tester Product.
Now, let’s go back and continue as a Developer. Click the back arrow to do that.
Choose Developer.
Click the forward arrow to move to the next step.
We’ll type in “Linux” as the DevelopmentEnvironment for example.
Click the forward arrow.
Then, the Manager And Salary stage will be displayed asking us to type in the details for the ReportingManager and the StartingPay.
Let’s type in “Steve Jobs” in the ReportingManager field with the StartingPay of “80000”.
Click the forward arrow.
Then click the Save button.
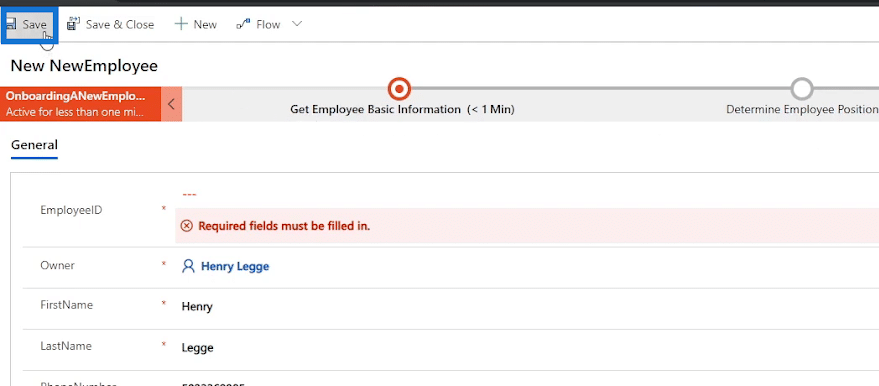
After saving the form, it’ll notify us that the EmployeeID is a required field to fill in. Hence, this is one thing we forgot to integrate into our Business Process Flow and we’ll fix this one later on.
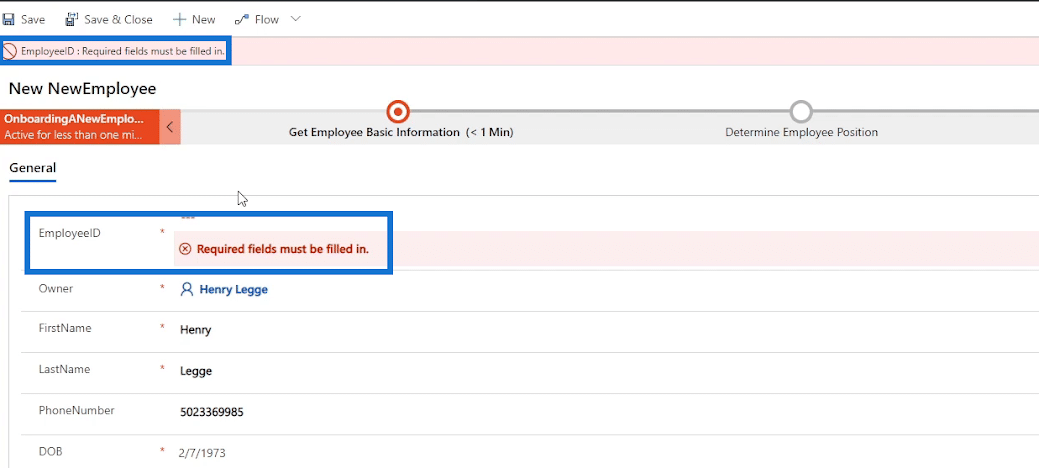
For this example, let’s just enter the Employee ID “212” manually in the form.
Lastly, click Save & Close.
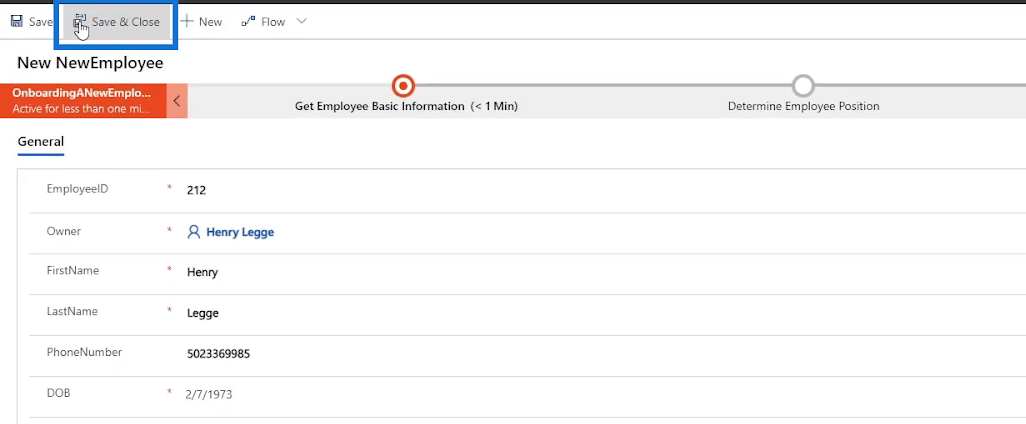
Then, it will redirect us to our business process flows in the Power Automate page.
Fixing Form Errors
We can also fix the different issues we have with our flow. For example, the Position field in the form earlier should’ve been MainPosition instead.
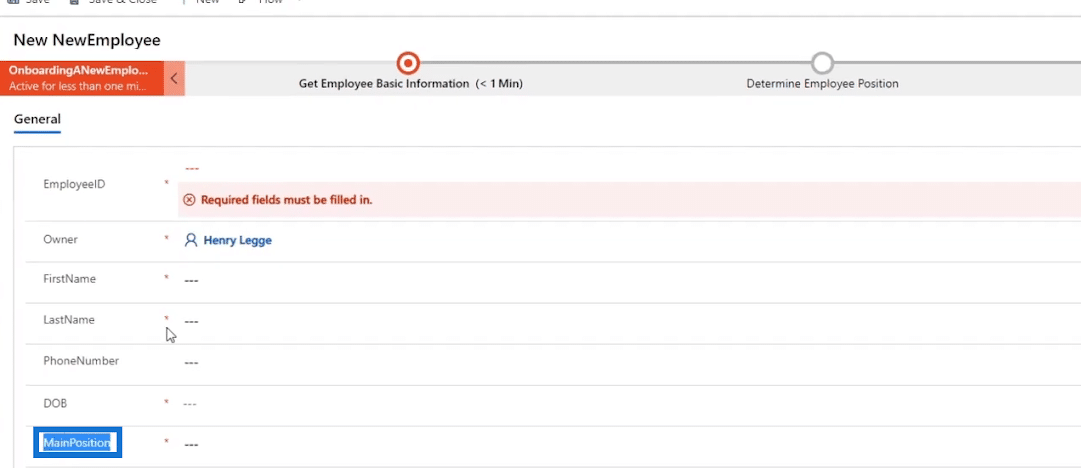
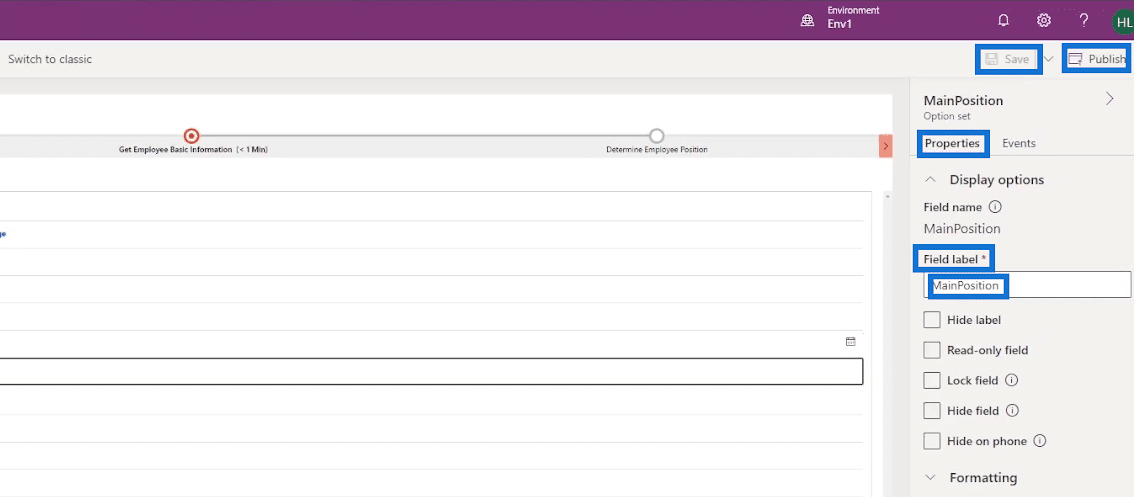
To correct that, we need to go back to Power Apps Form and edit the displayed field label.
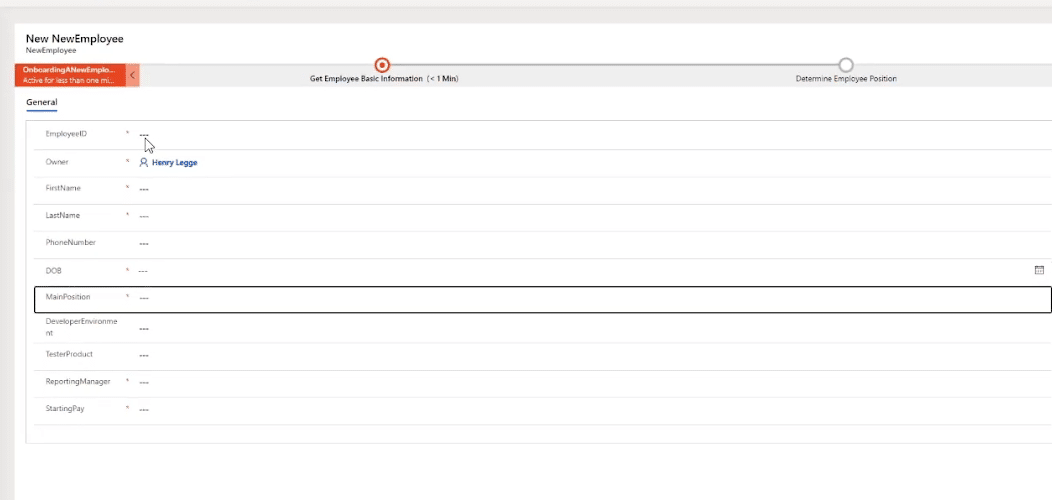
Since I already corrected it, MainPosition is now displayed as the label. What I did was just click the label in the form I want to correct.
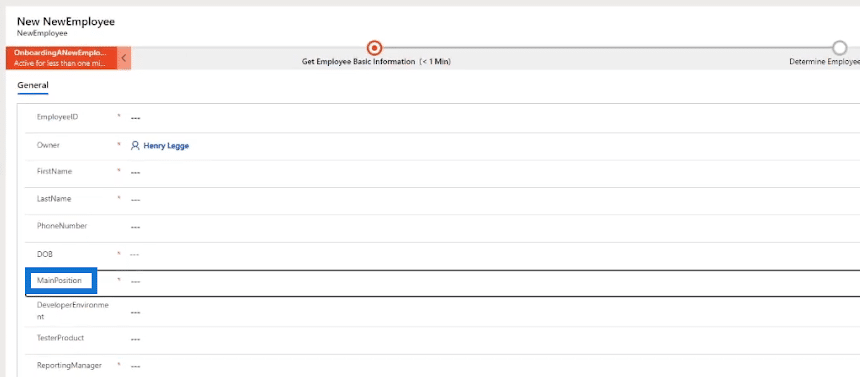
Then in its Properties, type the correct Field label, click Save and click Publish.
Fixing The Current Flow
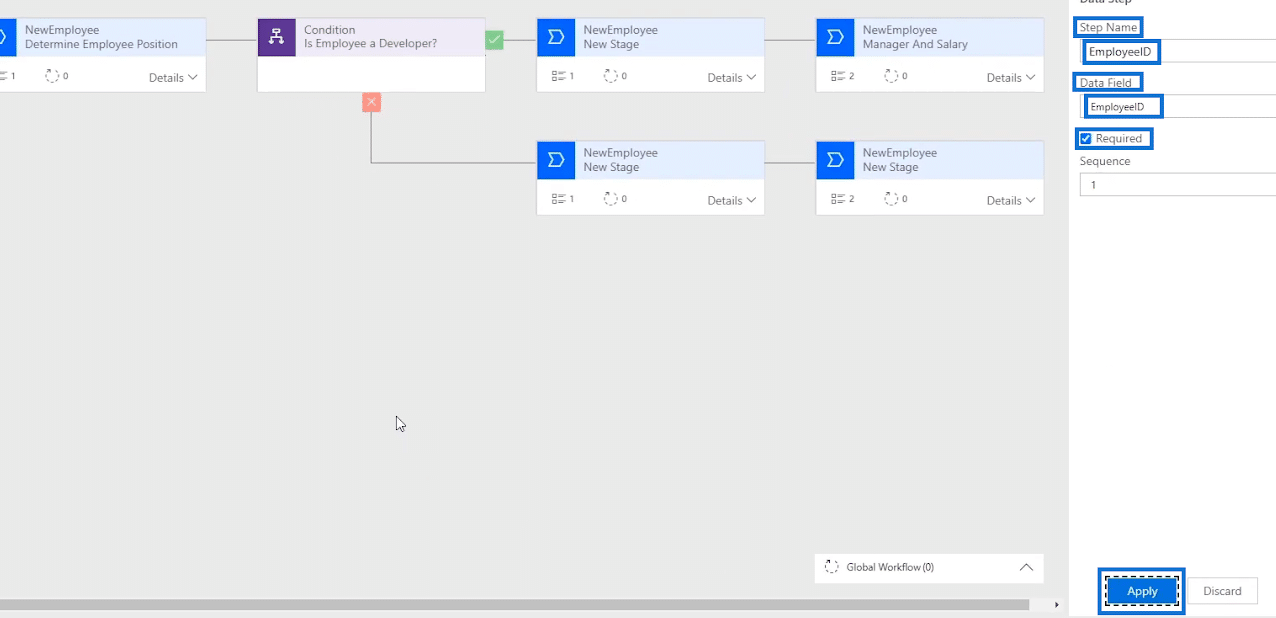
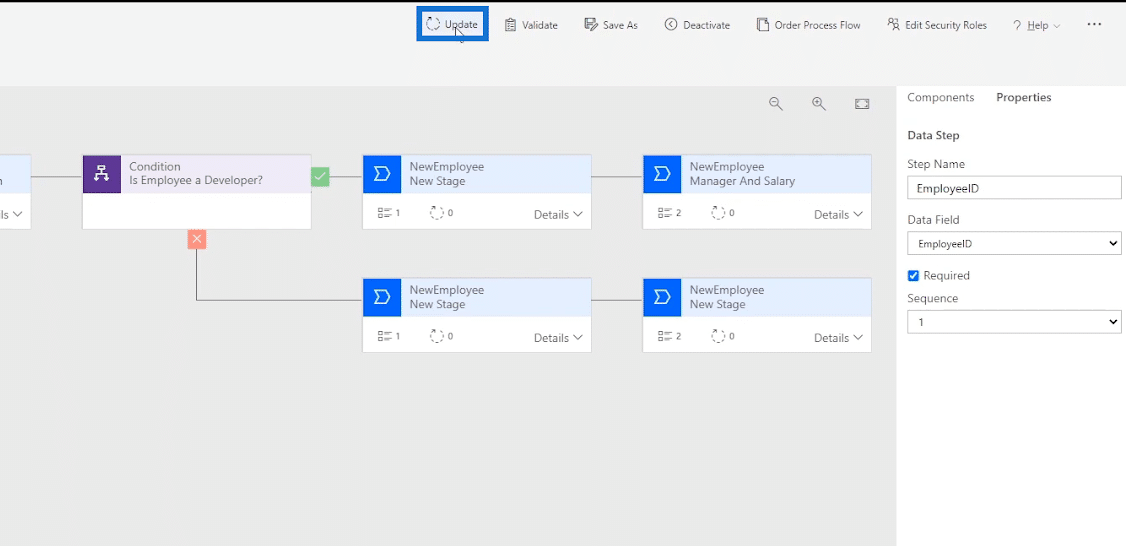
We also need to fix the flow since our current flow doesn’t tell the user to enter an Employee ID. To do that, let’s go back to our Business Process Flow diagram. First, add a new Data Step to the stage Get Employee Basic Information by selecting and dragging the Data Step button under Components then place it in the plus sign (+) above Data Step #1.
Under its Properties, let’s type in “EmployeeID” as the Step Name. Select EmployeeID in the Data Field, tick Required, and lastly click Apply.
After that, let’s click Update to save the form.
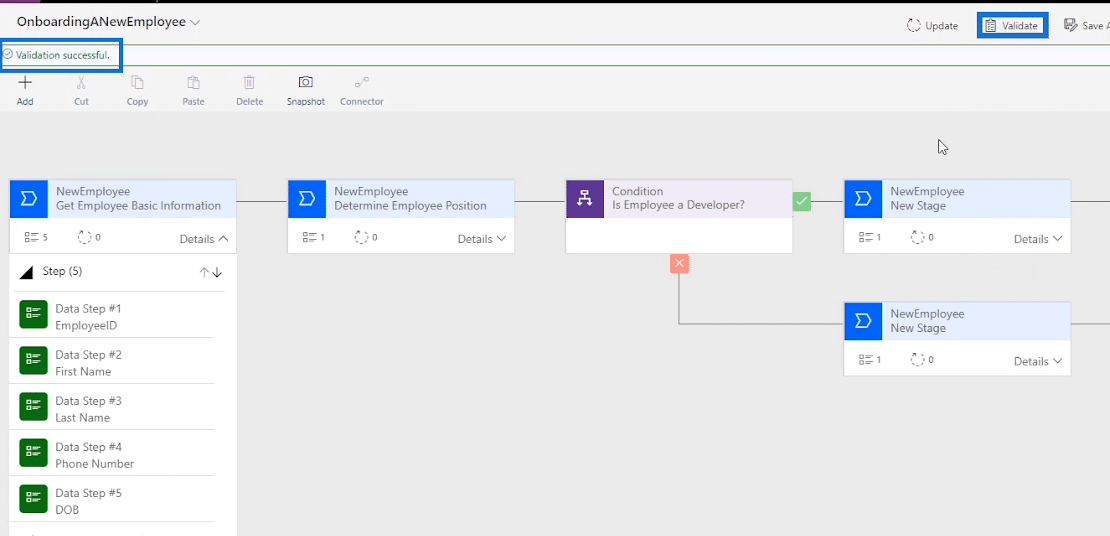
Click Validate and make sure the validation is successful as displayed.
Rechecking The Business Process Flow
Let’s run the flow to check if the fixes were successful. To do that, go back to Power Automate and click the Run icon to display the form.
When the stage Get Employee Basic Information is clicked in the form, it’s now requiring us to fill in the EmployeeID field.
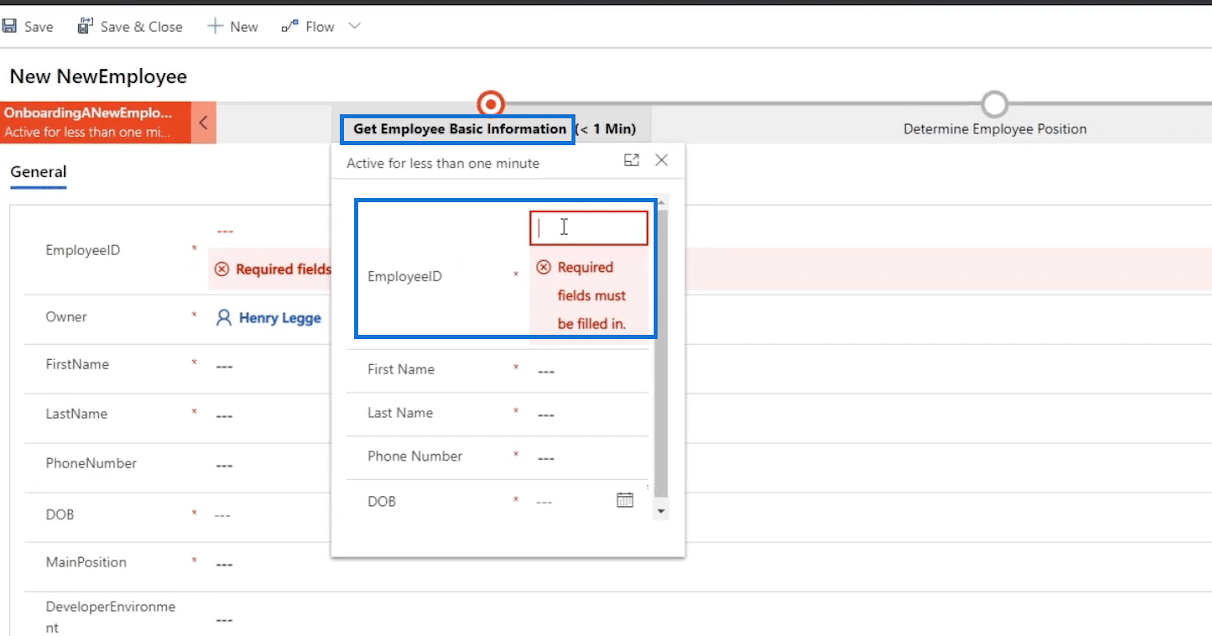
Let’s try it. Type in “1234” as our Employee ID.
Fill in the other fields as well. For this time, we’ll type in “Bob” as the First Name, “Chuck” as the Last Name, “1234567890” for the Phone Number and “September 1, 2020” as the DOB.
Click the forward arrow.
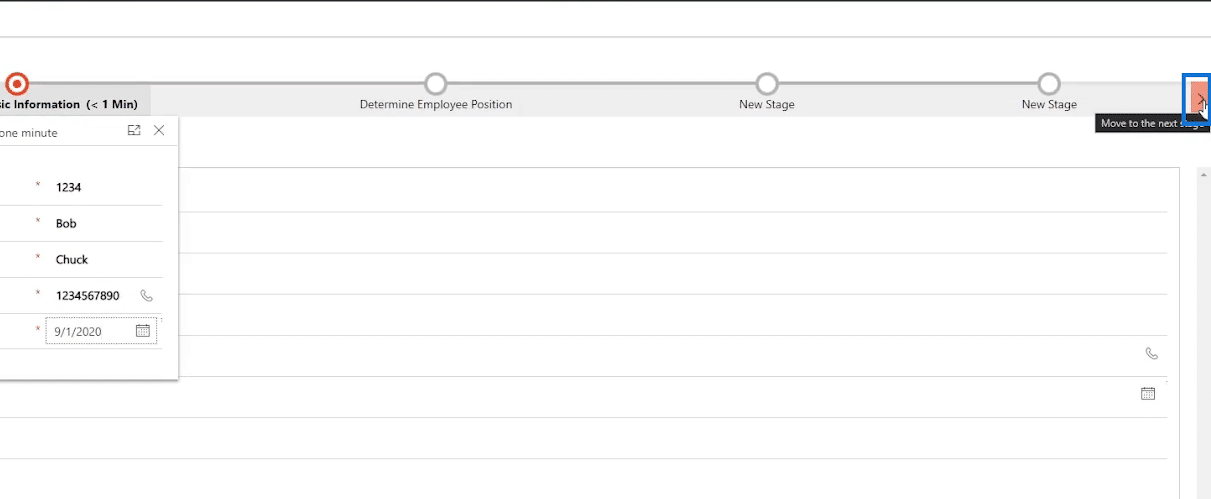
Let’s select the Main Position “Tester” for this one.

Click the forward arrow.
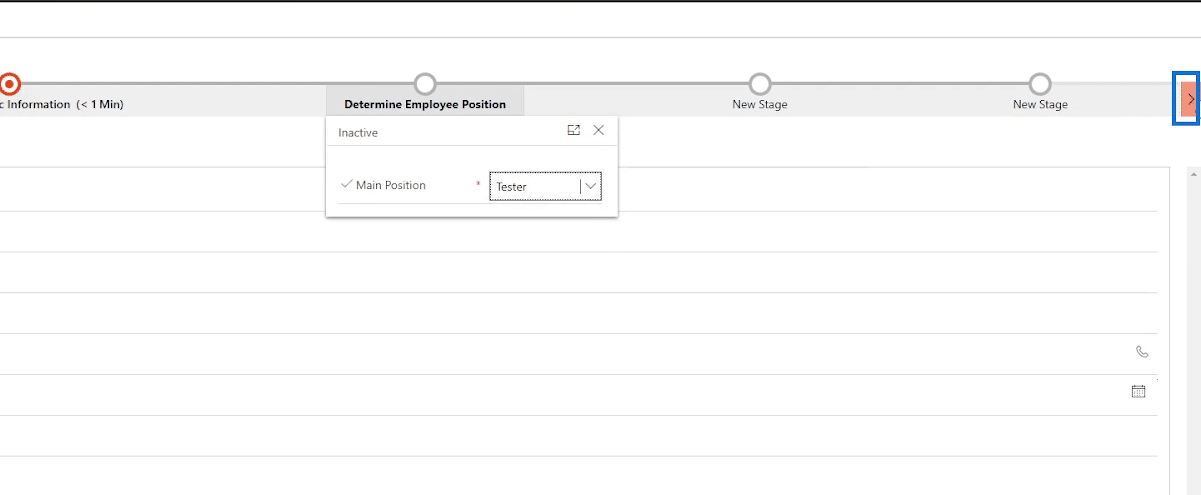
For the Tester Product field, let’s type in “Video Game”.
Click the forward arrow.
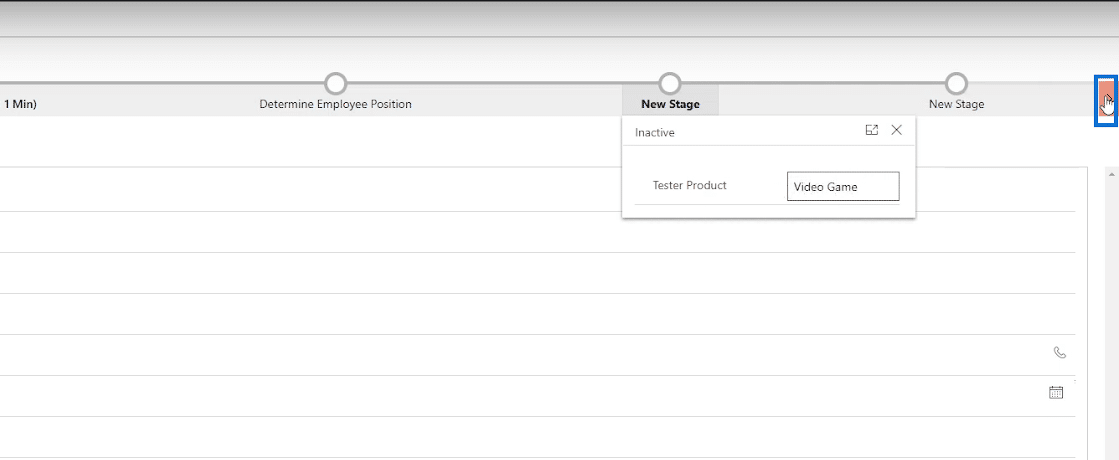
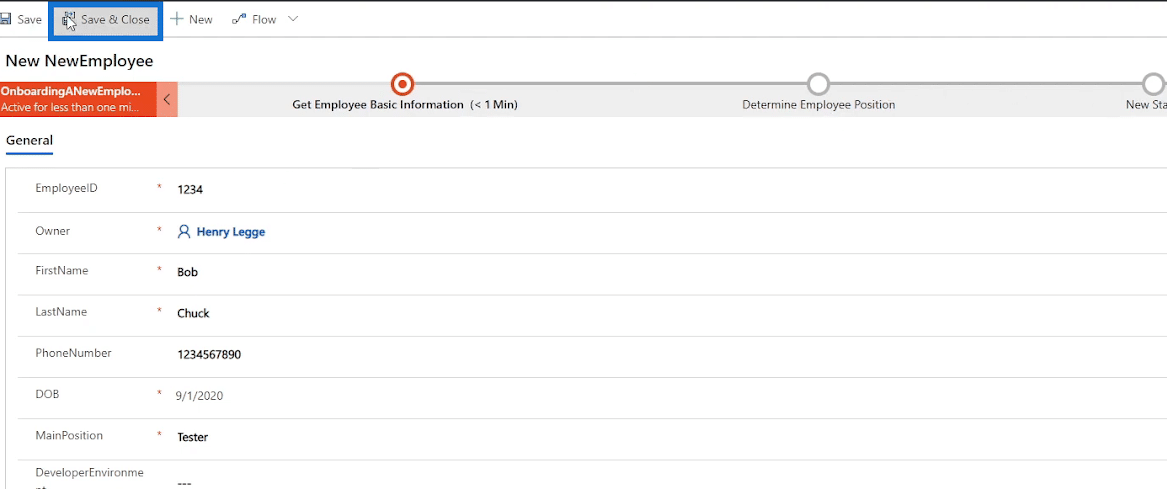
Then, on the ReportingManager field let’s type “Bill Gates” and “90000” in the StartingPay.
Lastly, click the Save & Close button.
***** Related Links *****
Business Process Flow Integration In Power Automate
PowerApps Form: Adding And Modifying Fields
Microsoft Power Automate: Workflow Automation
Conclusion
That’s how we can use business process flows to create a flow guide for the HR Personnel that needs to submit a form when they’re onboarding a new employee.
A business process flow powerfully works as it shows a user what specific steps to follow through Stages and Conditions consisting of Data Steps and Action Steps. The flow simply guides a user through a business process. In addition, a business process flow is useful when we’d like the user to enter and fill out only specific fields of a business process form rather than going through the form from top to bottom which is rather confusing most of the time. Hopefully, you were able to clearly understand its usage and concept via this tutorial.
All the best,
Henry


