This tutorial will talk about calculation groups and how to implement them in a matrix using the Tabular Editor in Power BI. You’ll learn how to efficiently retrieve and show data in your reports.
Creating A Matrix In Power BI
Calculation groups can be used to selectively show a measure in a matrix or any kind of visual. But before that, here’s how to create a matrix without using calculation groups.
First, create a matrix by dragging columns from different tables. In this example, Month Name, Total Profit, Total Sales, and Total Cost are used.

Next, create a slicer with the columns to filter and show data depending on the selection. Go to the Enter Data option and create a table.

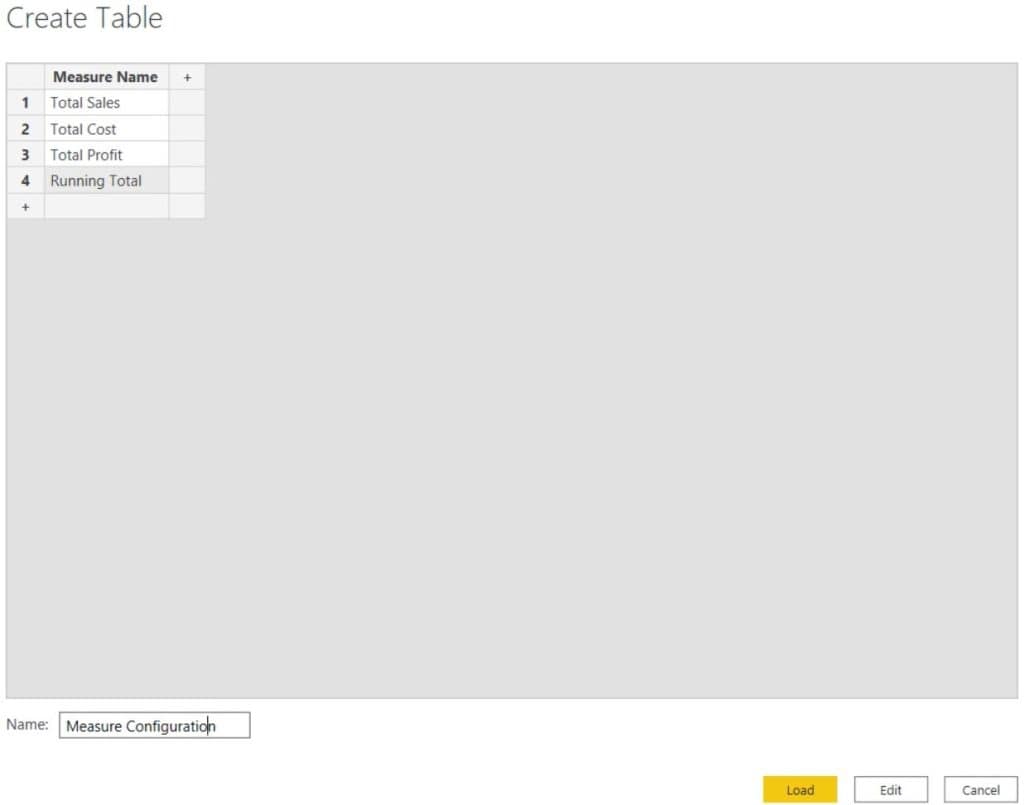
In the table, name the column Measure Name and input Total Sales, Total Cost, Total Profit, and Running Total. Then, name the table Measure Configuration.

After that, drag the Measure Name column in the layout and turn it into a slicer.


Once done, create a measure to make the slicer change the data inside the matrix based on the selection. Then, name the measure Measure To Show.
Before calculation groups, a SWITCH measure was created to check the selected value of the Measure Name in the Measure Configuration table.

Next, drag the Measure To Show measure in the matrix. After that, the matrix will only show the values of the selected measure. For example, if you select Total Cost, only the Total Cost measure will appear in the matrix.

Using Calculation Groups In The Power BI Matrix
The same logic is implemented when using calculation groups. First, open Tabular Editor and right-click on Table. Next, select Create and choose Calculation Groups.

Once the Calculation Group is created, rename it Measure Configuration 2.

Creating Calculated Items
Right-click on Measure Configuration 2 and select Create. Then, choose Calculation Item and name it Total Sales.

Lastly, input Total Sales in the Expression Editor.

Create two more calculation items and name them Total Cost and Total Profit. Input the Total Cost and Total Profit measures in the Expression Editor, respectively. Once done, press CTRL + S to load the changes in the Power BI model.
Whenever you make changes in the calculation groups, you need to refresh the Power BI model or Analysis Services to avoid breaking your reports.

In the Power BI layout, place the Month Name and Total Sales measure.

Next, drag Name from the Measure Configuration 2 table to the layout and turn it into a slicer. You can then see the calculation items created in the Tabular Editor.

If you select a measure in the slicer, the matrix will show you the values of the selected measure.

Instead of doing the slicer selection using the Enter Data option, you can use the Calculation Group. Tabular Editor makes it easier to add calculation items unlike the hard-coded method where you need to update DAX codes and use power query.
With calculation groups, calculation items will automatically appear in the slicer and matrix once you refresh the Power BI model.
Changing The Order Of Items In A Power BI Matrix
The order of the measures in the slicer can be changed; you can change the Ordinal field value or simply drag and drop a measure on top of the other.
To access the Ordinal field, Open Tabular Editor and right-click on a calculation item. Then, select Properties.

The order of the measure in the slicer depends on the Ordinal field.

Once done, press CTRL + S to load the changes to the Power BI model. After refreshing the model, you’ll then see the order and arrangement of the measure in the slicer. In this example, the order is as follows: Total Profit, Total Sales, and Total Cost.

Creating Multiple Variations Using Functions
If you have 5 base measures and you want to create 10 variations by using functions like PREVIOUSYEAR, you’ll have 50 measures in your model. Maintaining those measures is difficult because you need to name and store them in the Power BI file which bloats and slows down the model.
However, the problem can be solved by using calculation groups. First, create a calculation group and name it Time Intelligence.

Next, create calculation items. Name the first item CY (Current Year) and input SELECTEDMEASURE in the Expression Editor. Based on the selection or the measure that you are viewing in a visual, the selected measure will be replaced by that measure.

Then, create another measure and name it PY (Previous Year). In the Expression Editor, input CALCULATE and use SELECTEDMEASURE as the first argument. Next, input SAMEPERIODLASTYEAR over the Date column.

If you select Total Cost in the matrix, it will be replaced with the selected measure. The SAMEPERIODLASTYEAR function will be applied to the filter context. Lastly, CALCULATE will move the values in the previous year.
After that, create another item and name it Previous Month. Input the same code as the PY item but change SAMEPERIODLASTYEAR to PREVIOUSMONTH.

Create another calculation item and name it Running Total. Copy the previous code but change the time intelligence function to DATESYTD.

Transforming A Measure Into A Visualization
Once done, press CTRL + S to save and load the changes. Next, go to Power BI and refresh the model. Drag Name from the time intelligence table and turn it into a slicer.

If you select a field in the slicer, the matrix will show you data depending on your selection.

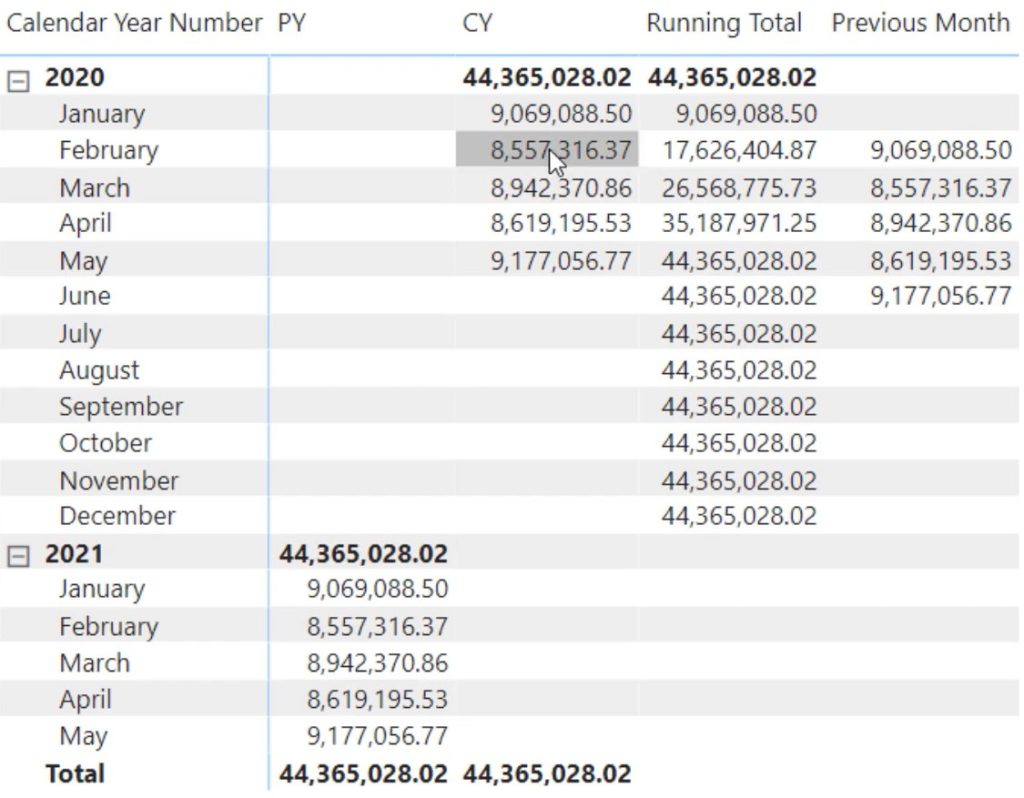
If you want to see the running total, drag Calendar Year Number and place it in the Rows field of the matrix.

By selecting Running Total in the slicer, you’ll see that values are being added.

Selecting PY in the slicer will give you the values of the year 2021.

If you select CY, you’ll see that the field changes to 2020 and the values of the current year.

Now, if you drag and drop Name from the time intelligence table into the matrix’s Columns field, you’ll see all the data inside the matrix.

***** Related Links *****
DAX Calculation Groups – Power BI Report For Problem Of The Week #7
Use Tabular Editor To Create Calculation Groups In Power BI
Power BI Tabular Editor 3: Automate With A Script
Conclusion
The tutorial has shown you two ways to create matrices in Power BI. If your model only has a few measures, the first method can be used. However, if you’re dealing with multiple measures and large matrices, using calculation groups is recommended.
Calculation groups can be used to show and switch between measures and data in your model. Calculation items can also be created and applied to a single measure to create multiple variations.
Enterprise DNA Experts


