
Are you tired of manually entering dates in your Excel spreadsheets?
You’ll be happy to know that there’s a solution.
By inserting a calendar in Excel, you can easily select and populate dates with just a few clicks, saving you time and reducing the chance of errors.

To insert a calendar in Excel, follow these steps:
Navigate to the “Developer” tab within Excel. If you don’t see the “Developer” menu, right-click on the top bar and check the “Developer” box in the pop-up window.
Click “Insert” and “More Controls.”
Scroll down and look for “Date and Time Picker Control.” Then, click “OK.”
Go to the cell where you want the upper-left corner of the control. Click and drag to the desired size.
Double-click the object to open the calendar control settings.
Specify the “Linked Cell Reference” and settings as needed.
However, adding a calendar is tricky, and you cannot easily find it like other spreadsheet programs.
In this article, we’ll show you how to include a calendar in your Excel spreadsheet.
Let’s get into it
How to Add a Calendar in Excel

Adding a calendar to your Excel spreadsheet can be incredibly useful for tracking dates, events, or schedules.
Whether you want to create a monthly calendar, a yearly overview, or a dynamic calendar that updates automatically, Excel provides several methods to accomplish this.

Here’s a step-by-step guide on how to add a calendar in Excel:
Method 1: Creating a Basic Monthly Calendar
Open Excel: Launch Microsoft Excel and open a new or existing workbook where you want to insert the calendar.
Select a Cell: Click on the cell where you want to start your calendar. Typically, this is the cell where the top-left corner of the calendar will be located.
Insert a Table: Go to the “Insert” tab in the Excel ribbon and select “Table.” This will open the “Create Table” dialog box.
Set Up the Table: Ensure that the “My table has headers” option is selected if your calendar will have column headers (e.g., Days of the Week). Click “OK.”
Populate the Calendar: Depending on the month you want to create, manually enter the dates for that month in the appropriate cells. For example, if you’re creating a calendar for January, enter the dates from 1 to 31 in the first column.
Format the Calendar: You can format the calendar cells to make it more visually appealing. Add borders, change fonts, and apply cell shading to highlight weekends or special dates.
Add Events: Use the cells beneath each date to add events, appointments, or notes. You can also use Excel’s data validation feature to create drop-down lists for each day.
Save and Customize: Save your Excel file, and you now have a primary monthly calendar that you can customize further to suit your needs.
For our second method, lets take a look at creating a yearly calendar with formulas.
Method 2: Create a Yearly Calendar with Formulas
Open Excel: Launch Excel and open a new or existing workbook.
Set Up Your Calendar Grid: Create a grid for the entire year by labeling columns with months (e.g., January, February) and days of the week (e.g., Sunday, Monday). You’ll need to have 12 columns for each month.
Fill in Dates: From the first day of the year, enter the dates for each day in the appropriate cell. Excel allows you to autofill dates by dragging the fill handle in the corner of a cell.
Use Formulas: In the cell corresponding to the first day of the year (e.g., A2 for January 1), you can use Excel’s formulas to generate the dates for the entire year. For example, you can use the formula =DATE(YEAR(TODAY()),MONTH(TODAY()),1) to get the first day of the current year.
Customize Your Calendar: Format the calendar cells and add events or notes as needed. You can also use conditional formatting to highlight weekends or holidays.
Save Your Calendar: Save your Excel file, and you now have a yearly calendar that can be updated automatically by changing the year in your formula.
This method should help you create a calendar for personal use, project planning, or keeping track of important dates and events.
Next, let’s take a look at some free Excel calendar templates.
How to Use Excel Calendar Templates

One of the easiest ways to insert a calendar into your Excel spreadsheet is by using pre-designed templates. Excel offers a variety of calendar templates that you can download and customize to suit your needs.
Follow these steps to use a calendar template in Excel:
Open Excel and create a new workbook.
Click on the “File” tab in the Ribbon to go to the Backstage view.
Select “New” from the list of options.
In the search box, type “calendar” and press Enter.
Choose a template that suits your needs (e.g., a monthly or yearly calendar).
Click on the template to select it, then click “Create” to download the template to your computer.
Once you have downloaded the template, you can customize it by changing the colors, adding or removing holidays, and adjusting the layout to fit your needs.
To customize the template, follow these steps:
Click on the template to select it.
Click on the “Design” tab in the Ribbon to access the design tools.
Choose a new color scheme from the “Colors” drop-down menu.
Click on the “Page Layout” tab to access page layout tools.
Adjust the size and orientation of the calendar as needed.
Click on the “Insert” tab to insert additional elements, such as pictures or shapes.
Save the customized calendar template for future use.
When using a calendar template, it’s essential to ensure that the dates are accurate and up-to-date. Some templates may not include the current year or have incorrect holiday dates.
Always, verify the information and make any necessary adjustments before using the template in your spreadsheet.
Do you want to create a custom calendar in Excel?
Read on below.
How to Create a Custom Calendar in Excel

If you need a calendar that is unavailable as a pre-built template, you can create a custom calendar in Excel.
This allows you to design a calendar that meets your needs, including a specific date range, custom formatting, and additional elements like pictures or logos.
To create a custom calendar, follow these steps:
Open a new workbook in Excel and go to the “Insert” tab.
Click on “Table” and enter the number of rows and columns needed for your calendar. For example, a monthly calendar typically has 7 columns (for the days of the week) and 6 rows (for the dates).
Customize the table to match the layout of a calendar. You can merge cells to create larger spaces for headers, and format the cells to display the dates and days of the week as desired.
Enter the dates for the month, starting with the correct day of the week. You can use the “TEXT” function to display the dates in the desired format, such as “mm/dd/yyyy” or “dddd, mmmm dd, yyyy”.
Format the dates to make them stand out. You can use bold text, different font sizes, or color coding to highlight important dates.
Add any additional elements, such as pictures or logos, to customize the calendar to your liking.
Save the custom calendar as a template for future use.
When creating a custom calendar, paying attention to the details is essential.
Ensure the dates are accurate, the layout is easily read, and any additional elements are placed appropriately.
If you need a calendar for a specific year, you can use the “Calendar” feature in Excel to generate a calendar for that year quickly.

To access this feature, click on the “Insert” tab and then click on “Calendar” in the “Illustrations” group. This will open a dialog box where you can select the year and month for your calendar.
Moving on, let’s take a look at some different methods for using a dynamic Excel calendar.
How to Use a Dynamic Excel Calendar

A dynamic Excel calendar is a calendar that updates automatically based on the date or time in your spreadsheet. This calendar type can help track events, deadlines, or other time-sensitive information in your workbook.
Depending on your specific needs, there are 2 ways to create a dynamic calendar in Excel. In this section, we’ll cover two popular methods: using formulas and using calendar control.
Method 1: Using Formulas
Follow these steps to set up a simple dynamic calendar using formulas:
Open a new workbook in Excel and go to the “Insert” tab.
Click on “Table” and enter the number of rows and columns needed for your calendar. For example, a monthly calendar typically has 7 columns (for the days of the week) and 6 rows (for the dates).
Customize the table to match the layout of a calendar. You can merge cells to create larger spaces for headers, and format the cells to display the dates and days of the week as desired.
Enter the following formulas in the appropriate cells to display the dates and days of the week:
For the first day of the month: =DATE(YEAR(TODAY()), MONTH(TODAY()), 1)
For the last day of the month: =EOMONTH(TODAY(), 0)
Use the “TEXT” function to format the dates as needed. For example, you can display the dates in the “mm/dd/yyyy” format or as “dddd, mmmm dd, yyyy”.
Save the workbook and check the calendar regularly for any updates or changes.
Creating a dynamic calendar is straightforward and requires no special tools or add-ins. However, it may not be as flexible or customizable as other options.
Method 2: Using the Calendar Control
Another way to create a dynamic calendar in Excel is by using the calendar control. This built-in feature of Excel allows you to add a calendar to your worksheet and interact with it using VBA (Visual Basic for Applications) code.
To use the calendar control, follow these steps:
Make sure the Developer tab is visible in the Excel ribbon. If not, go to File > Options > Customize Ribbon and check the Developer box.
Click on the Developer tab, then click “Insert” in the Controls group.
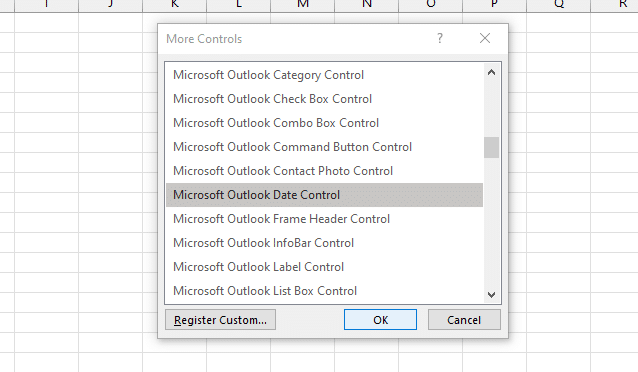
In the ActiveX Controls section, click the “More Controls” button (it looks like a hammer and a wrench).
Scroll down and select “Microsoft Date Control.”
Click “OK” and then click on the cell where you want to insert the calendar.
The calendar control will be added to the cell, and you can resize it as needed.
Right-click on the calendar control and select “Properties.”
You can change various settings in the Properties window, such as the date format, font size, and initial date. For example, you can set the calendar to display the date it opened by setting the “Value” property to “=Now.”
Close the Properties window and save the workbook.
You can now interact with the calendar by clicking and selecting a date. The selected date will be displayed in the linked cell, and you can use it in your formulas and calculations.
This method is more advanced and requires some knowledge of VBA programming. However, it offers more flexibility and customization options than the formula-based approach.
Troubleshooting Excel Calendar Issues

If you’re experiencing difficulties with inserting or using calendars in Excel, this focused guide is here to help.
Let’s tackle the most common issues related to Excel calendars, date pickers, and related functionalities.
Having trouble with the Date Picker?
It’s a handy tool, but sometimes it’s just not there in Excel. This can be a bit puzzling, right? If you’re missing it, it’s likely your version of Excel doesn’t have it by default.
Don’t worry, though. You can often find a third-party add-in that does the trick. It’s like getting an extra tool for your Excel toolkit!
Dates looking a bit weird?
If you’re seeing dates that don’t look quite right, it’s probably a formatting hiccup. Try right-clicking on the cell where your date is, hit ‘Format Cells’, and pick the date format that makes sense for your needs. It’s a bit like telling Excel, “Hey, this is how I want to see my dates!”
Inserting a calendar – more tricky than expected?
Sometimes, getting a calendar into your Excel sheet can feel like fitting a square peg into a round hole. If you’re going for a template, you can find these under File > New.
Just search for calendar templates and pick one that fits your style. For a date picker, remember to check if the Developer tab is on. It’s like flipping a switch to access more tools.
ActiveX Controls acting up?

These controls can be super useful, but they can also be a bit finicky. If they’re not behaving, make sure you’re not in Design Mode.
Conditional Formatting not playing nice with your dates?
This feature is great for highlighting important dates, but it can be a bit like a puzzle. If it’s not working, double-check your rules. Make sure they’re set up just right for the dates you’re interested in.
Dropdown Calendar disappearing act?
If it’s not showing up or not working properly, first make sure it’s properly set up and linked to the cell you want. If it’s a third-party tool, it’s a bit like checking compatibility – see if it’s a good match for your version of Excel.
Hopefully, these tips help you iron out those calendar issues and make your Excel experience a bit smoother!
Final Thoughts

An Excel calendar is invaluable for anyone working with dates and keeping time. It makes data entry a breeze, reduces errors, and helps you stay organized.
Previously, adding an interactive calendar to your spreadsheet was a bit of a hassle, but now you have a variety of methods at your disposal, each offering its advantages.
By utilizing the calendar features in Excel, you’ll be on your way to becoming a proficient user of this powerful spreadsheet software.
Combine this tool with Excel’s other capabilities, and you’ll unlock a whole new level of productivity.
So, go ahead and unleash the power of the Excel calendar! And while you’re at it, check out the following clip on YouTube to take your Excel skills to the next level.
Frequently Asked Questions

How do I create a calendar in Excel?
To create a calendar in Excel, you can use a pre-made template or build one from scratch. For a pre-made template, go to the “File” tab and select “New.” Search for “calendar” in the search bar and choose a template.
For a custom calendar, create a table with seven columns for the days of the week and enough rows for the month’s dates. Add the dates and format the cells as needed.
How do I insert a calendar in Excel without using a template?
To insert a calendar in Excel without a template, you can create one from scratch. You can use the “Insert” tab to add shapes and lines to represent the days of the week and dates.
You can also use conditional formatting to highlight specific dates. Another option is to use a formula to calculate dates and display them in your spreadsheet.
How do I add a monthly calendar in Excel?
To add a monthly calendar in Excel, you can use a pre-made template or create one from scratch. For a template, go to the “File” tab and select “New.”
Search for “calendar” in the search bar and choose a monthly template. For a custom monthly calendar, create a table with seven columns for the days of the week and enough rows for the month’s dates. Add the dates and format the cells as needed.
How do I make a dynamic calendar in Excel?
To make a dynamic calendar in Excel, you can use a combination of formulas, functions, and conditional formatting.
For example, you can use the “TODAY” function to display the current date and the “WEEKDAY” function to calculate the day of the week. You can also use conditional formatting to highlight specific dates, such as today or upcoming events.
How do I create a yearly calendar in Excel?
To create a yearly calendar in Excel, you can use a pre-made template or create one from scratch. For a template, go to the “File” tab and select “New.” Search for “calendar” in the search bar and choose a yearly template.
For a custom yearly calendar, create a table with 12 columns for the months and enough rows for the year’s dates. Add the dates and format the cells as needed.
How do I insert a dynamic date in Excel?
You can use the “TODAY” function to insert a dynamic date in Excel. Type “=TODAY()” in a cell, and it will display the current date.
You can also use the “NOW” function to display the current date and time. To update the date automatically, you can press the “F9” key or set the calculation options to “Automatic” in the “Formulas” tab.


