Power BI Report Builder is a powerful tool developed by Microsoft, designed for creating and publishing paginated reports. These reports are specifically geared towards being shared or printed, as they offer formatting that fits well on a page and is able to display all data in a table, even if it spans multiple pages.
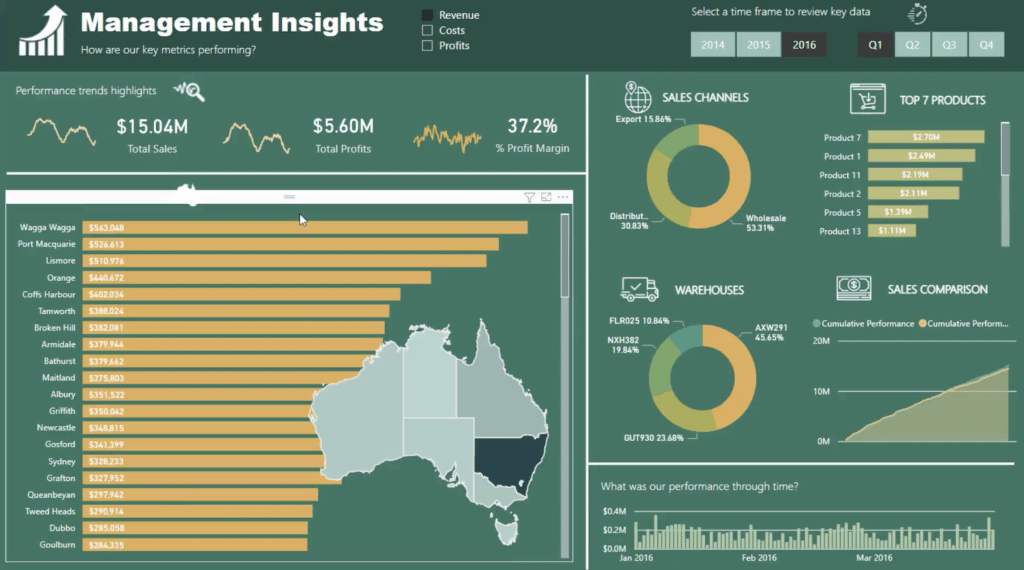
By utilizing Power BI Report Builder, users can deliver these comprehensive and visually appealing reports to their audiences in the Power BI service environment.
Using Power BI Report Builder is straightforward, as it is optimized for creating RDL (Report Definition Language) reports in the Power BI Service. This allows users to log in to Power BI, open and save reports from their workspaces, and even support querying advanced datasets and datasets from non-advanced users that have been shared with them.
With its user-friendly interface and a range of ready-to-use tools, Power BI Report Builder makes it easy for users to design their reports, offering flexibility in terms of data representation and organization.
In order to get started with Power BI Report Builder, users should first familiarize themselves with Power BI Desktop and the Power BI service.
Before we jump into things, let’s give you a quick overview of what the report builder is.
Overview of Power BI Report Builder
As we mentioned, Power BI Report Builder is a tool designed for authoring paginated reports that can be published to the Power BI service. Let’s have a look at a few of the key features and components:
Key Features
Some of the key features of Power BI Report Builder include:
- Optimized for creating RDL (Report Definition Language) reports in Power BI Service.
- Allows you to open and save reports from workspaces.
- Supports querying Power BI advanced datasets and datasets of non-advanced users
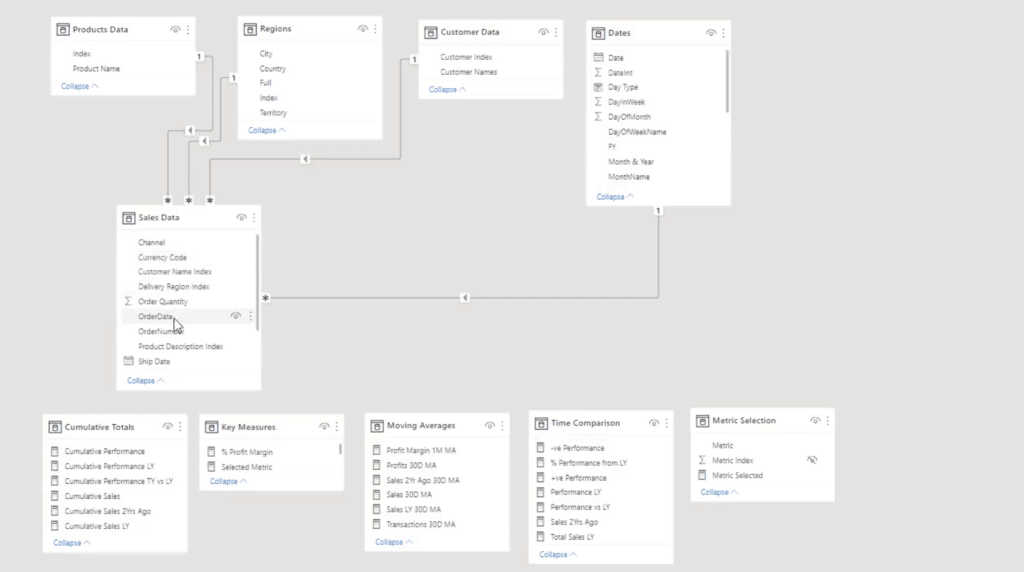
- Use a Power BI query use a table query to show you how a table has been built with DAX
- You really only need a basic level of Power BI and DAX to use paginated reports.
Components
There are several components involved to create and manage reports:
- Power BI Desktop: Used for creating, deploying, and managing Power BI reports.
- Power BI Report Server: A solution deployed behind your firewall that delivers reports to users in different ways.
It includes tools and services for working with Power BI Desktop reports and paginated reports created in Report Builder - Report Builder: The tool used for authoring paginated reports and designed for seamless integration with Power BI
By utilizing these components and the features provided by Power BI Report Builder, you can create pixel-perfect data visualizations from your Power BI dataset.
Getting Started with Power BI Report Builder
With an assumption you are totally new to this, make sure you read below, are you a little more advanced? Scroll down to our examples.
Installation
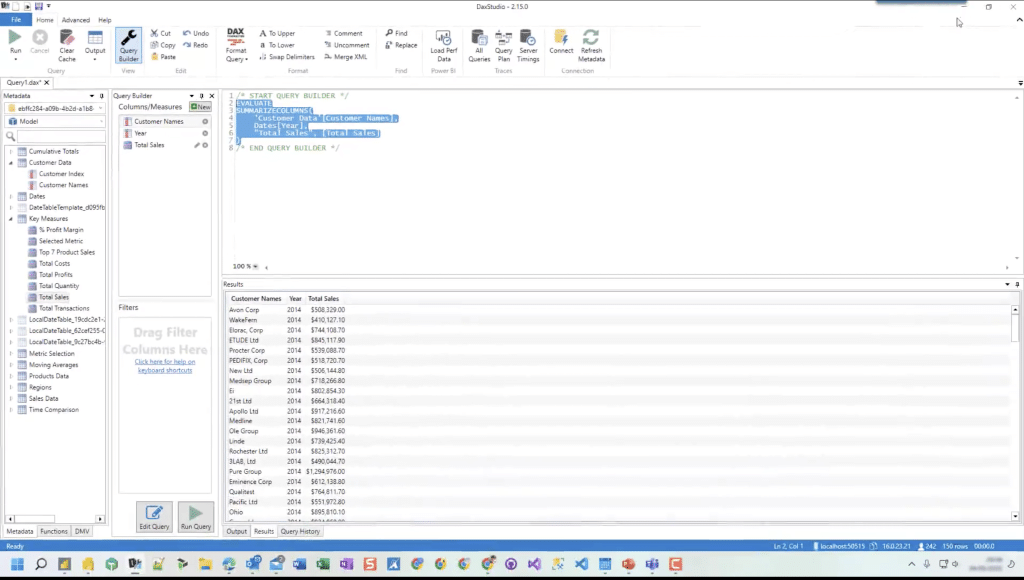
To get started with the Power BI Report Builder, you will first need to download and install the software. Follow these steps:
- Visit the Power BI website.
- Click on the “Download” button and choose “Power BI Report Builder.”
- Run the installer and follow the prompts to complete the installation process.
System Requirements
Before installing Power BI Report Builder, ensure that your system meets the following requirements, I mean most people will have the below, but it is still important to know:
- Operating System: Windows 7 or later
- Processor: 1.4 GHz or faster, with at least 2 cores
- Memory: 4 GB minimum, with 8 GB recommended
- Storage: 2 GB of available disk space
- .NET Framework: 4.5 or later
With Power BI Report Builder installed and your system meeting the necessary requirements, you are now ready to start creating paginated reports. Yehaaaa!
Creating Reports
In this section, we will cover the process of creating reports using Power BI Report Builder. Creating paginated reports involves two main aspects: selecting data sources and designing the report.
Data Sources
Before you start designing a report, you need to connect to a data source. Power BI Report Builder supports various data sources, such as SQL Server, Oracle, and Azure SQL Databases.
To connect to a data source, follow these steps:
- Open Power BI Report Builder.
- Click on the Data Sources tab on the left pane.
- Select New Data Source and choose the appropriate data source type.
- Enter the required credentials and connection information.
- Click Test Connection to verify that you’ve successfully connected to your data source.
Now it is time to design your report.
Report Designing
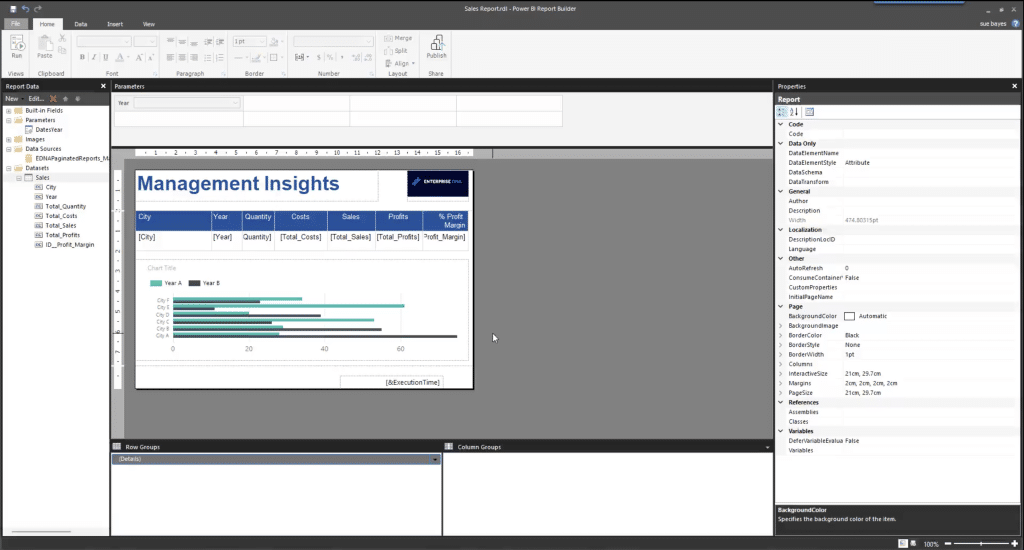
Once you have connected to a data source, you can start designing your paginated report. Power BI Report Builder provides a drag-and-drop interface that allows you to easily create and edit tables, charts, and other elements of your report data.
Follow these steps to design your report:
- Click on the Report tab on the left pane.
- Select a layout for your report using the available templates, or use a blank report as your starting point.
- Drag and drop report items, such as tables or charts, onto the report canvas.
- Customize the appearance of your report items by adjusting properties like font, color, and size.
- Group, sort, and filter your data as needed.
Once your report is designed, you can save it and publish it to the Power BI service for sharing or printing.
Now, it’s time to visualize!
Visualizations
Visualizations play an essential role in Power BI Report Builder by presenting your data in a visually appealing and easy-to-understand format.
This section focuses on two critical types of visual elements in Power BI Report Builder: charts and tables, and interactive elements:
Charts and Tables
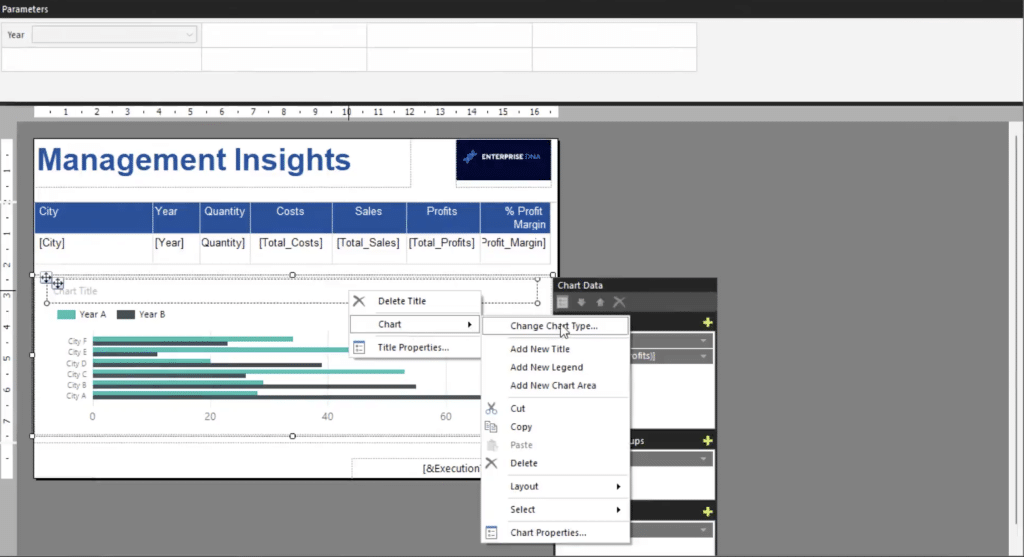
You can create various types of charts, including pie charts, bar charts, line charts, and more. Charts often display the relationships and trends found in your data, making it easier for others to interpret and gain insights from it.
Tables, on the other hand, present raw data in a structured format with rows and columns, allowing users to easily view and compare the data. Creating a chart or table is fairly straightforward.
Start by selecting a field from the Fields pane, and Power BI will automatically create a visual based on the selected data.
In addition to default aggregations, you can also use series grouping to dynamically generate series, as described in the Charts in Power BI paginated reports article.
Interactive Elements
Beyond charts and tables, Power BI Report Builder also supports the incorporation of interactive elements into your visualizations. Interactive elements allow users to engage directly with your visualizations, enabling them to drill down or filter data based on their specific requirements, delivering a customized experience.
When you create reports in Power BI Desktop, interactive visuals can be created in Report View. In the Power BI service, you can add interactive elements using the report editor’s Editing View, as mentioned in the Overview of report visualizations in Power BI service and Desktop.
In summary, visualizations are crucial components of your Power BI Report Builder projects, helping users explore and understand data effectively.
By employing various visualization techniques like charts, tables, and interactive elements, you can simplify data analysis, and empower your audience to gain valuable insights from Microsoft Power BI.
Forget about Powerpoint, forget about Excel, and trying to make things pretty in a csv file. Getting experience as a report designer in Power BI will level up your career opportunities.
Now let’s publish and share
Publishing and Sharing Reports
Using the Power BI Report Builder, you can not only create paginated reports but also share dashboards with your team members or clients.
In this section, we will discuss options for exporting, saving, and collaborating on reports created with the builder.
Exporting and Saving
Once you have created a report, it is important to save and export it in a suitable format. To save your report, select the ‘Save’ option from the File menu. To publish the report to the Power BI service, follow these steps:
- On the Report Builder File menu, click ‘Publish’.
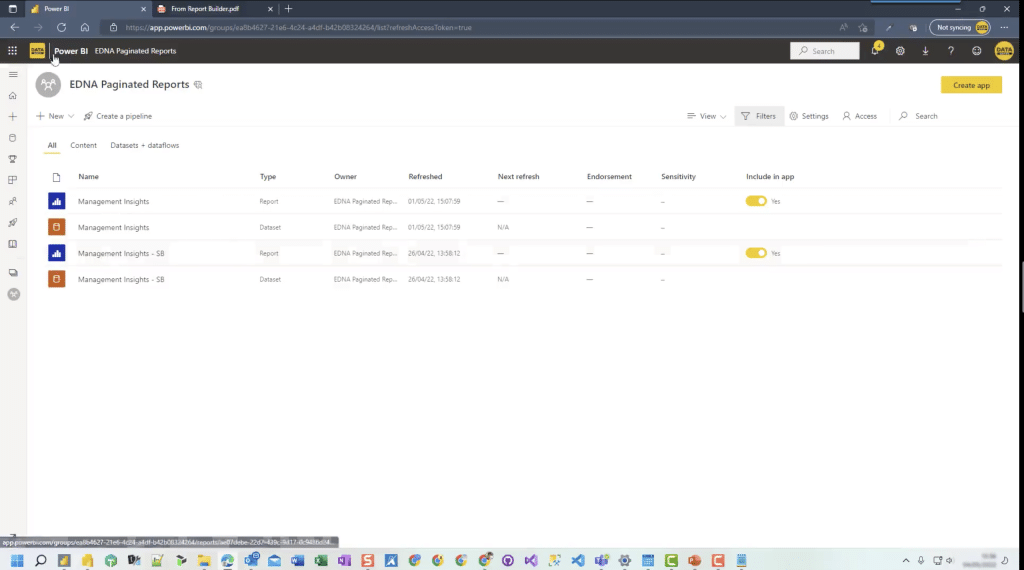
- In the list of workspaces on the left, select the workspace you want to publish to.
- Click ‘Publish’ to save the report to the Power BI service. Your report will now be available in the selected workspace. You download your report in a PBIX format.
You can find more information on publishing paginated reports to the Power BI service here.
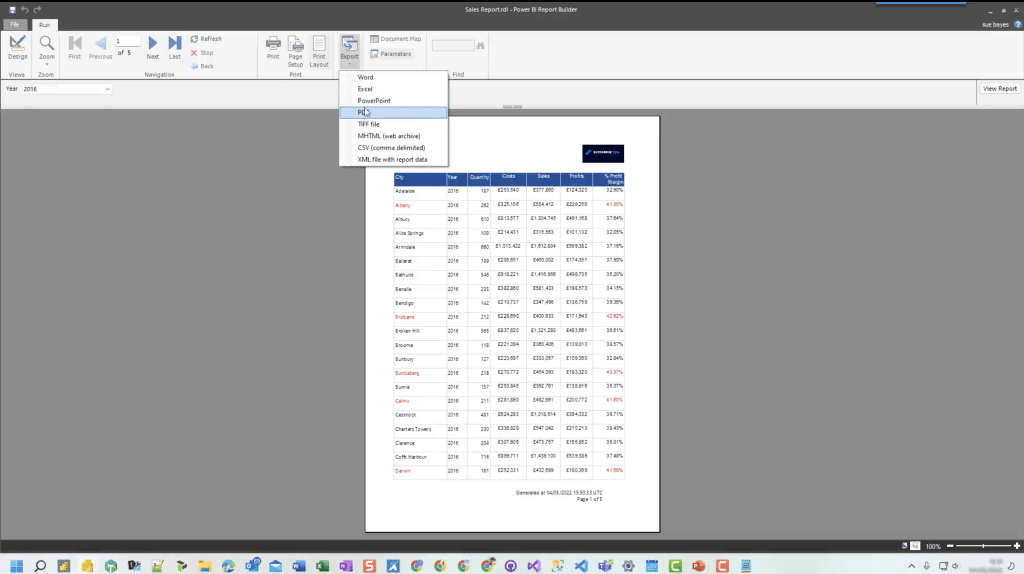
Power BI Report Builder also allows you to export your reports to various formats like PDF, Excel, or Word, making it easy to share them with your team members or clients in their preferred format.
Collaborating with Team Members
Sharing your reports with your team members or clients is essential for effective collaboration. With the Power BI service (Power BI Pro or Power BI Premium), you can invite users to access your published reports, establishing a seamless collaboration environment.
To share a published report, follow these steps:
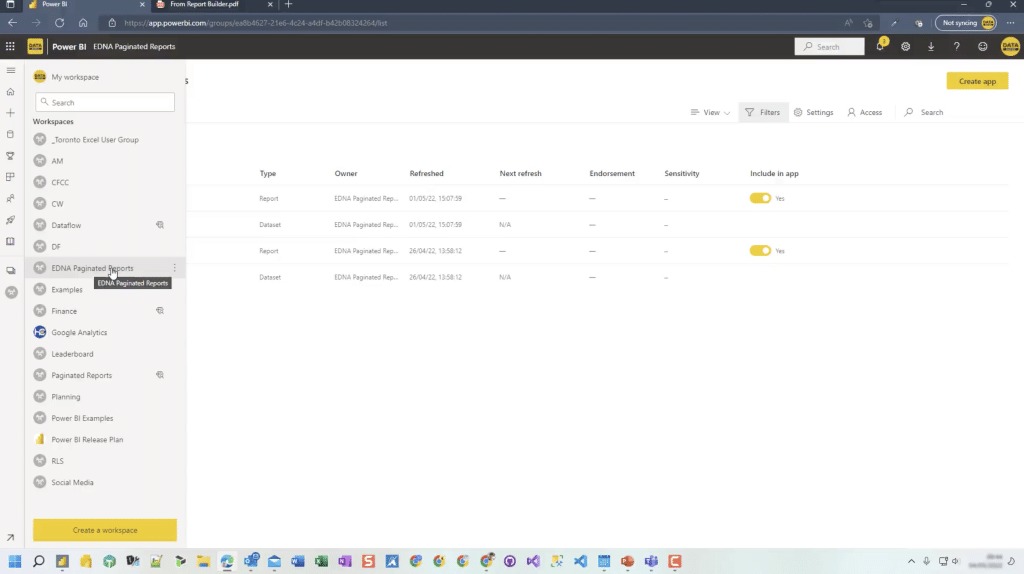
- Open the Power BI and navigate to the “my workspace“ where the report is published.
- Select the report you want to share, and click ‘Share’ on the top-right corner of the report.
- Enter the email addresses of the team members you want to share the report with, and click ‘Share’.
Your team members will now be able to access the report and collaborate on it. Furthermore, with features like comments and annotations, your team members can easily communicate their insights and suggestions regarding the report.
The Report Builder, combined with the Microsoft Power BI service, provides a comprehensive solution for creating, publishing, and sharing paginated reports. Utilizing these features enables you to effectively collaborate with your team members and clients.
What about security?
Security and Governance
Security is becoming more important by the day, especially when dealing with any type of data or analysis services.
This section will focus on key elements of security and governance in the Power BI Report Builder, such as access controls and data protection.
Access Controls
One of the crucial aspects of security is its robust access control system. This system ensures that only authorized users can access and modify reports, data sources, and other resources.
Access controls rely on a combination of user authentication, role-based access control (RBAC), and object-level security. User authentication can be done through various methods, including single sign-on (SSO), and it is used to verify the identities of users accessing the system.
RBAC, on the other hand, grants permissions to users based on their roles within the organization. Finally, object-level security allows administrators to configure access permissions for individual objects like reports, datasets, and data sources.
Furthermore, you can integrate with the SQL Server Reporting Services (SSRS) report server, which provides additional access control capabilities, such as managing permissions for native mode or SharePoint integrated mode operations.
What about data protection?
Data Protection
Protecting sensitive data is another essential aspect of Power BI Report Builder’s security and governance. Power BI offers various data protection features, including data encryption, which safeguards data both at rest and in transit.
To enhance data security in Power BI, Microsoft implemented measures like tenant-level data encryption and oversight capabilities that allow you to monitor and analyze risky behavior patterns.
Power BI also offers integration with Microsoft Information Protection sensitivity labels, enabling users to classify and label sensitive data according to predefined categories and use cases.
This feature helps enforce data governance policies and ensures that only authorized persons can access sensitive data based on the assigned sensitivity labels.
In addition, Power BI users can take advantage of Azure services such as Azure Private Link, service tags, and Azure Virtual Network to improve network security and further protect the data.
Ok, so now you have a good overview, let’s roll up our leave and get our hands dirty!
In this tutorial, you’ll learn about the different objects you can place in your paginated report and how to format them using Report Builder in Power BI.
A paginated report is a report that’s designed to be printed or shared. And as the name suggests, they’re called “paginated” because they’re made to fit well on a page.
Roll Up Your Sleeves, Let’s Level Up Your Paginated Report
In this tutorial, you’ll learn about the different objects you can place in your paginated report and how to format them using Report Builder in Power BI.
A paginated report is a report that’s designed to be printed or shared. And as the name suggests, they’re called “paginated” because they’re made to fit well on a page.
Report Builder In Power BI Menu #1: The Insert Tab
The Insert tab at the top of Report Builder contains the different visualizations or objects you can add in your report.

A Table in Report Builder remains static. It doesn’t expand and therefore doesn’t affect your page size. If your page size grows and goes over the designated width, you’ll end up with blanks in your report.
On the other hand, a Matrix grows. For example, if your data contains five years, you’ll get five rows or columns.
List allows you to add data in free form. Chart inserts a specific chart visualization in your report which include bar, line, or pie charts.
Gauge allows you to create visualizations that show achievements or progress. A Map displays analytical data against a geographical background.
A Data Bar is often added as a supplement to tables, matrices, or lists. A Sparkline allows you to create a small chart that indicates the progress over time. Meanwhile, the Indicator option displays KPI indicators in your report.
You can also insert report items such as a Text Box, Image, Line, or Rectangle. A Rectangle allows you to keep or group items together.
Subreports allow you to import other reports in Report Builder. It displays another report inside the body of the main report. When dealing with subreports, you need to be careful with how you embed them in your main report and ensure that the parameters are intact.
Report Builder In Power BI Menu #2: The View Tab
In the View tab, you can decide which elements to view in Report Builder.

If you’re not using any parameters in your report, it’s recommended to disable its view option to free up space in your Report Builder Design View. This makes your working area less cluttered and easier to maneuver.
Insert Objects And Data
There are two ways you can insert visualizations and other objects in your paginated report.
You can either use the Insert tab or use the shortcut. You can access the shortcut by right-clicking on your canvas and then clicking Insert.
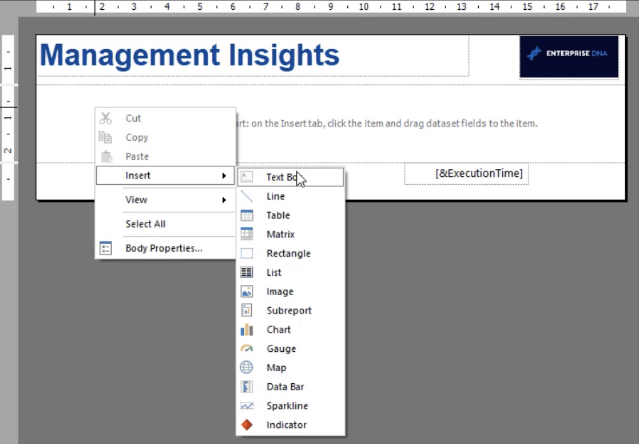
To delete an object, click on it and press the delete or backspace key on your keyboard.
For this example, you’ll learn how to insert a matrix and add data in it. In Report Builder, the object holding a matrix is called a tablix. You can change the name of the tablix in the Properties pane.
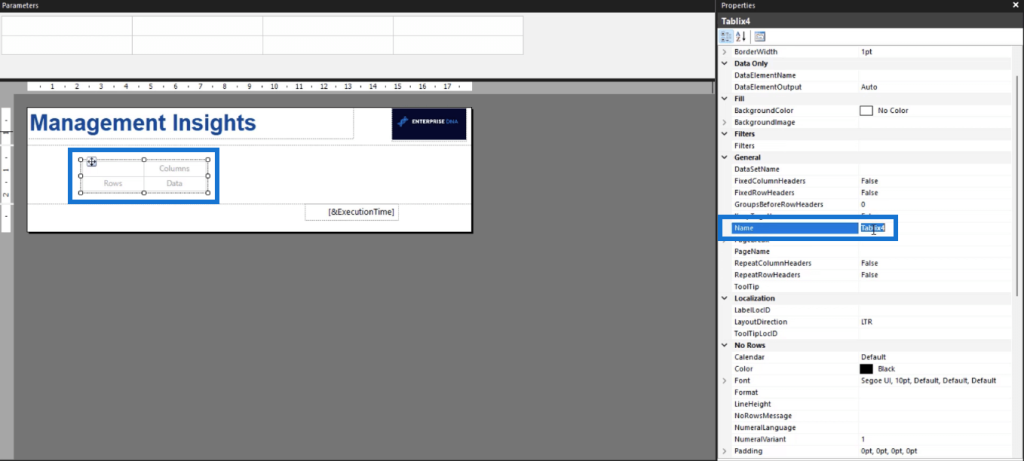
You can select a matrix using the square/rectangle found at the top or left-hand side of the tablix.
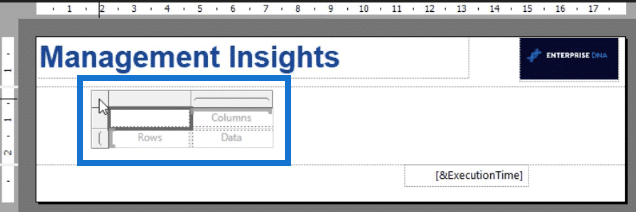
When you click on the small square button found at the upper left corner of the tablix, you’ll see options you can choose from.
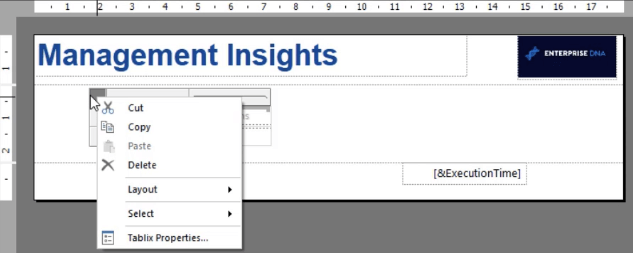
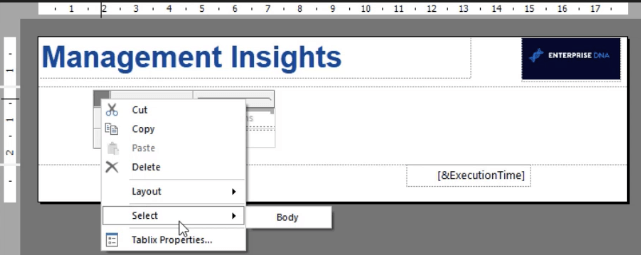
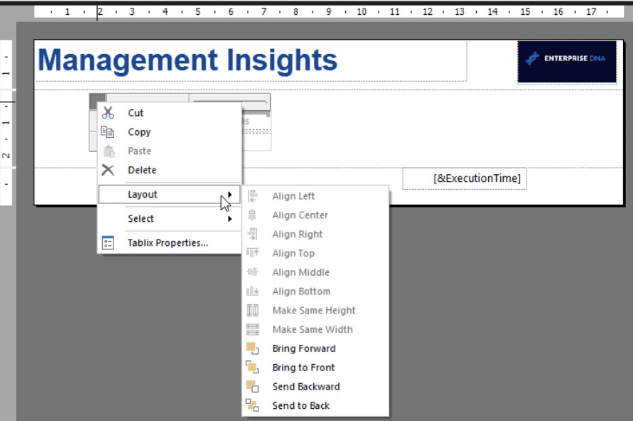
The Select option allows you to select the body of your report. While the Layout option allows you to format the layout of the tablix. You can bring use this to bring an object forward or back.
Format Tablix Properties
When you click on the Tablix Properties option, you’ll open the Tablix Properties window. In this window, you can select the Dataset you want the matrix to contain.
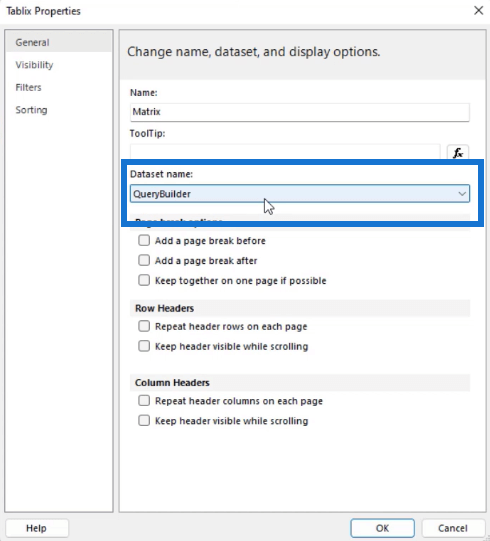
There are also other options you can customize such as the Page break options, Row Headers, and Column Headers.
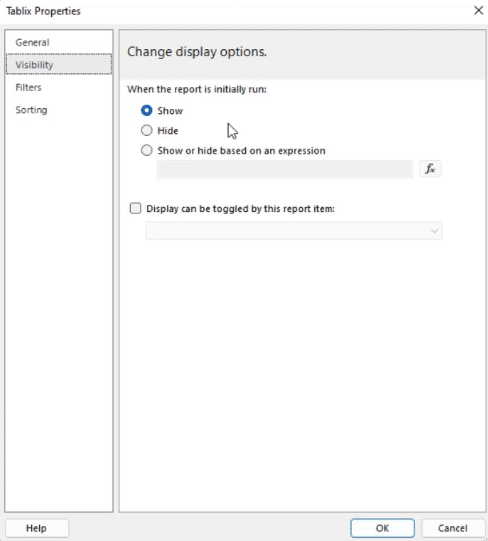
In the Visibility tab of the Tablix Properties window, you can choose when the matrix is displayed on the report.
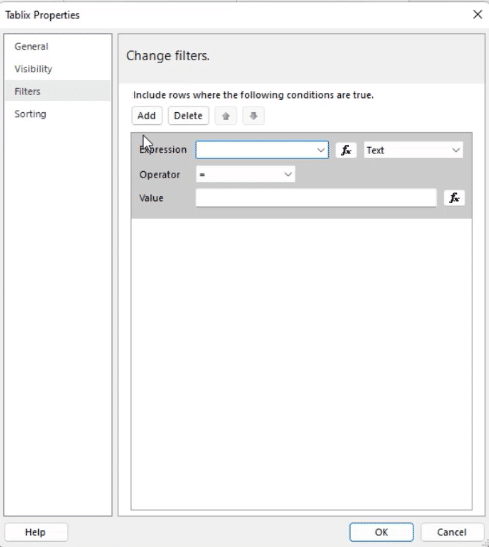
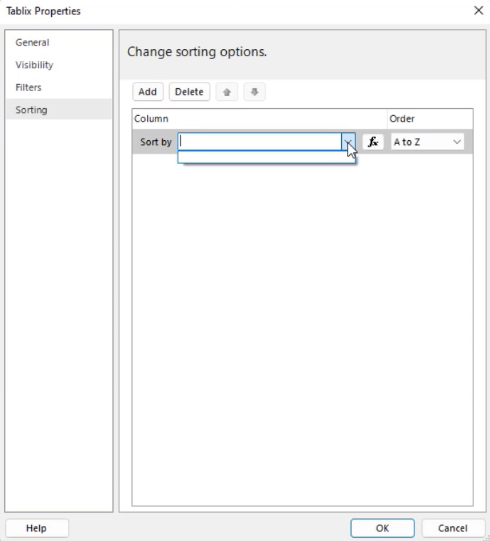
The Filters and Sorting tabs allow you to add filters and a sort order to your dataset.
Move Objects Around
Create the object you want to add in your paginated report. In this example, a tablix is created.
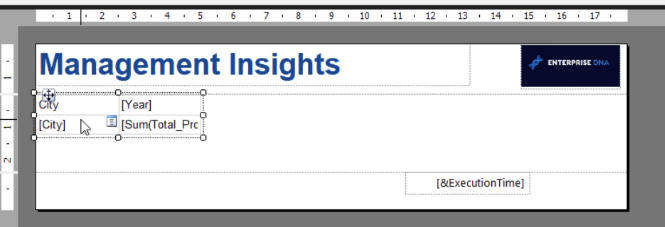
You can move an object using the move cursor icon. Report Builder also has gridlines which you can use as guides when arranging objects on your report.
When you export a paginated report, this will result in a pixel perfect output even when you place objects at the border of the canvas.
And instead of moving objects around, you can use the Properties pane to format the size and position. This gives a more accurate formatting compared to dragging objects around the body of your report.
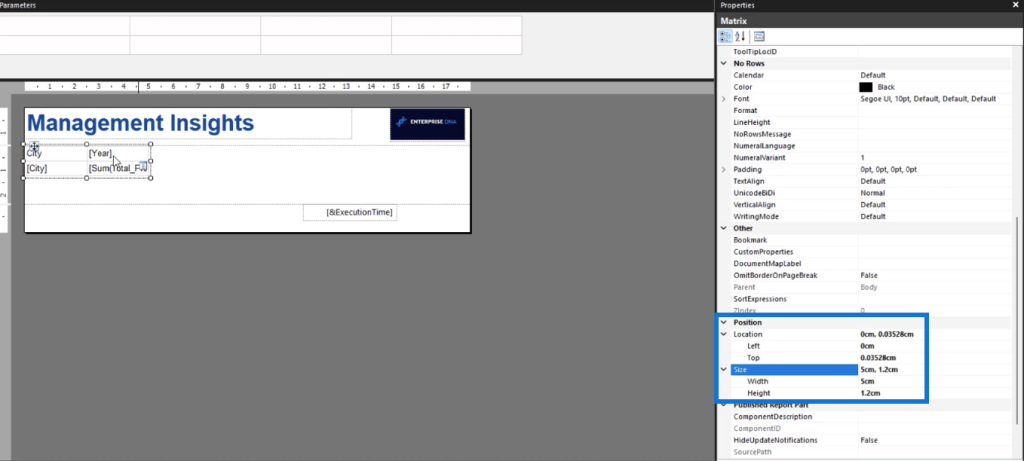
The Top is based on the upper-left dot of an object.
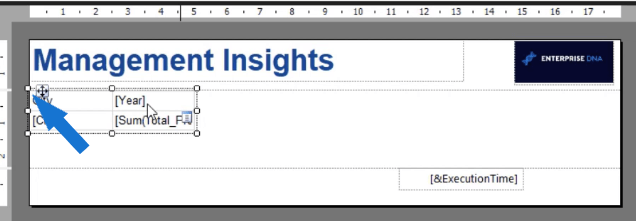
Resize Tablix
As for the size, you can either alter rows and columns individually or collectively. The size format will only take effect on rows you’ve highlighted.
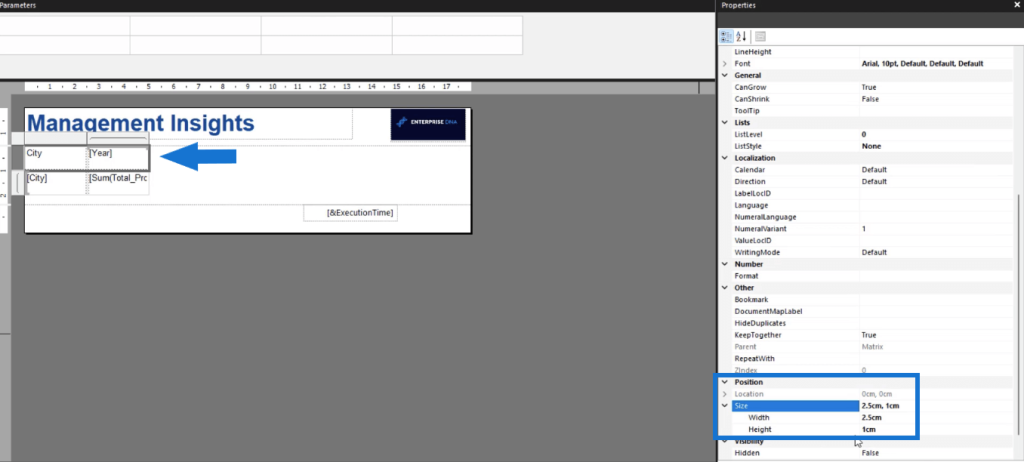
For example, you can make the column header height longer than the rest of the rows to emphasize it.
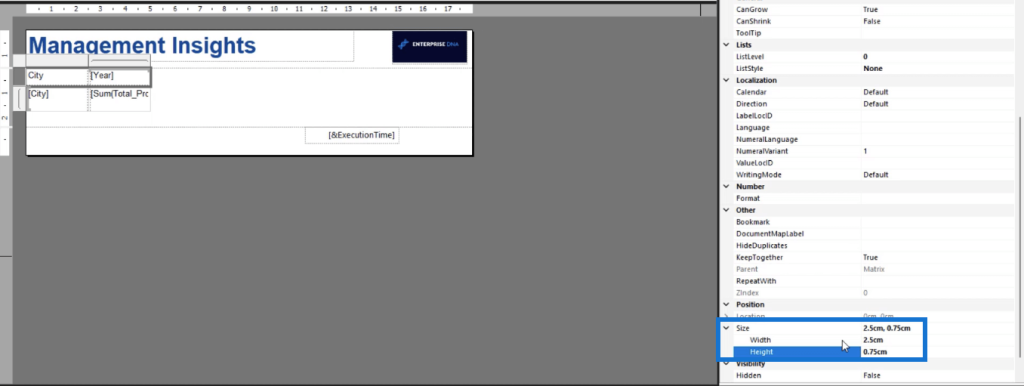
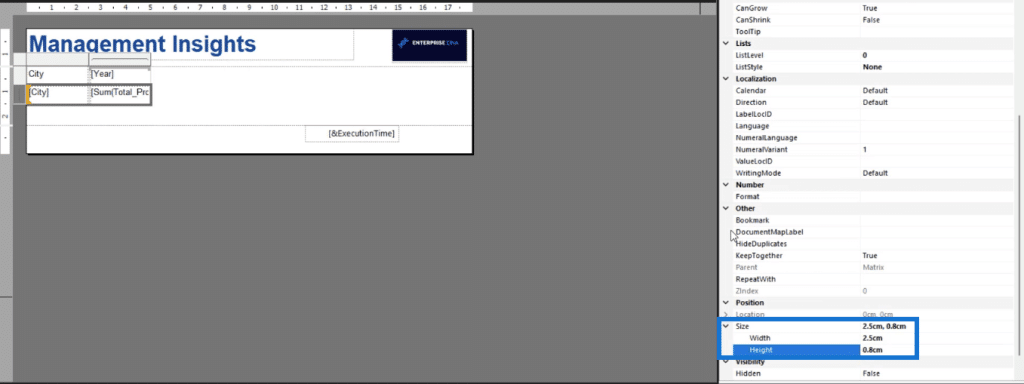
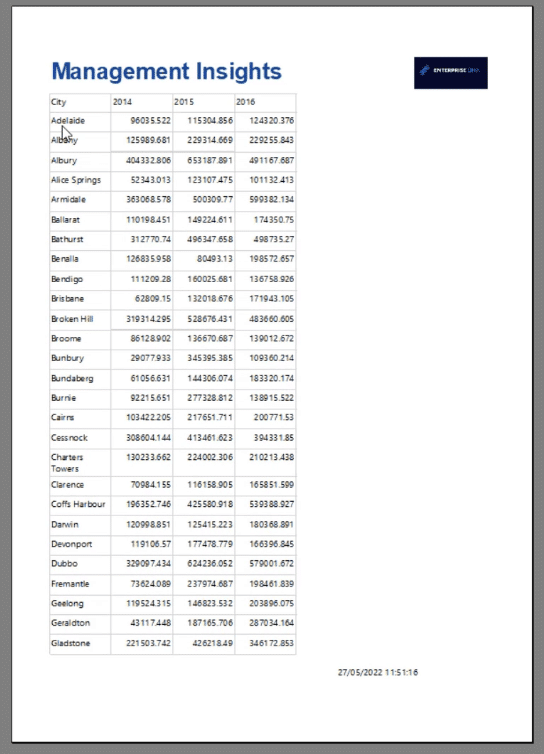
When you run the report, you’ll see that there’s a distinction between the header and rows.
To increase or decrease the width of each column in a Tablix, you can drag each column border from left to right and vice versa.
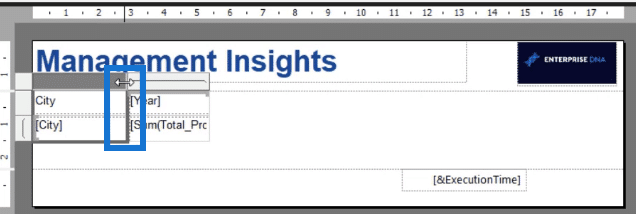
But if you want a specific width, it’s better to use the Properties pane.
Format Objects In Report Builder In Power BI
After you’re satisfied with the position and size of your matrix, you can proceed to format it along with the headers.
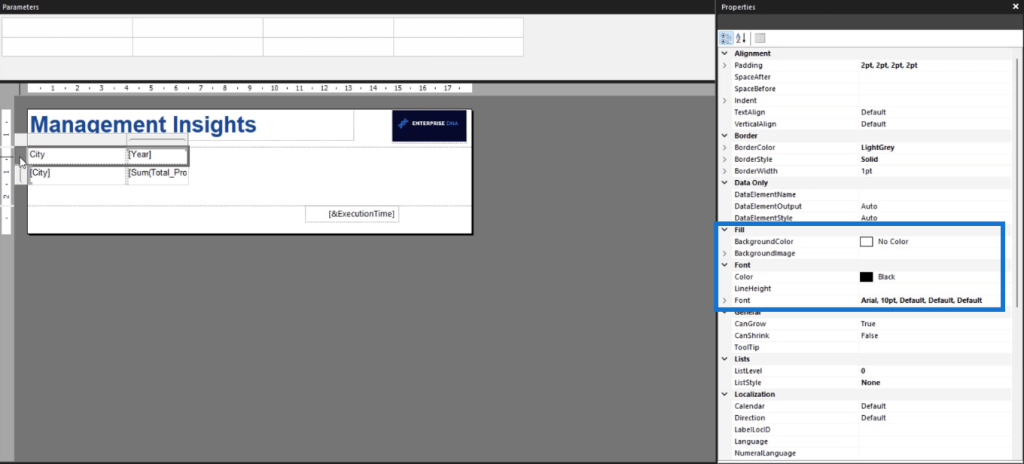
Using the Properties pane, you can change the background and font color. Similar to resizing, you can format matrix rows and columns individually or collectively.
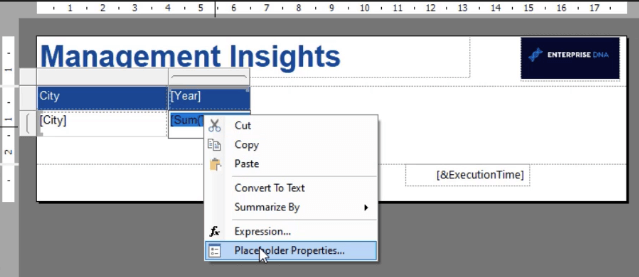
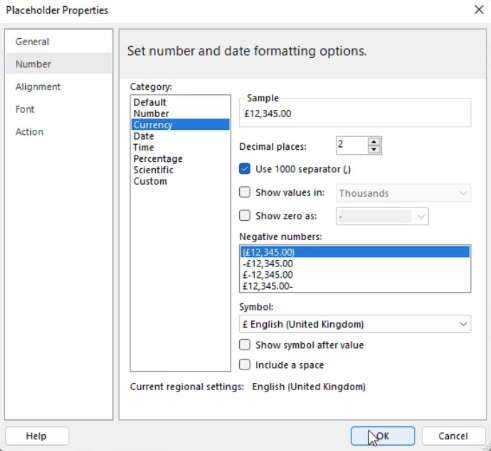
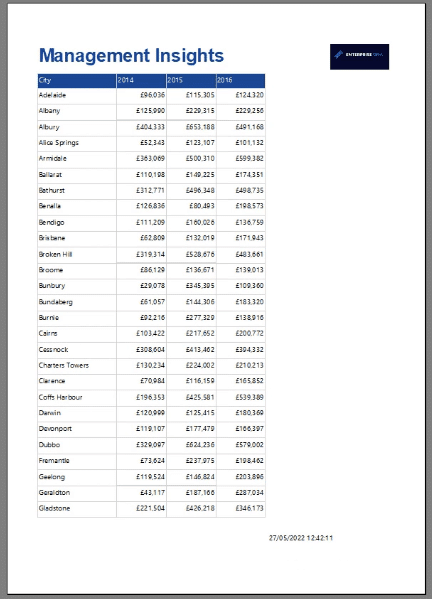
For columns that contain monetary amounts, you can go to the Placeholder Properties and change it to Currency.
You can format the number of decimal places the currency will show or if it’ll be displayed with separators.
A great feature in Report Builder is the description box of the Properties pane.
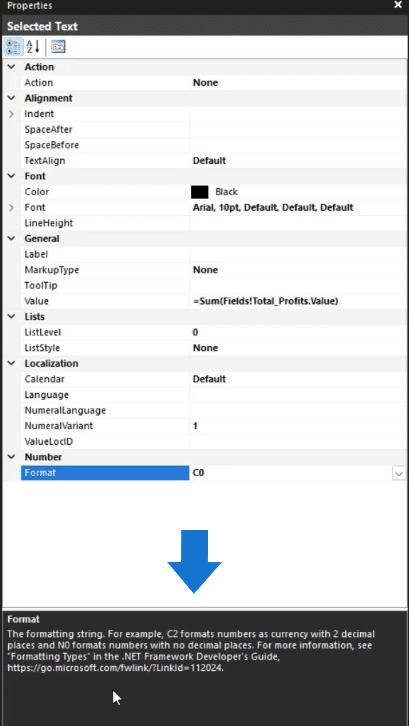
This box gives a concise description on the format option you selected and provides helpful tips on how they’re used.
When you run your report, you’ll see that with a few clicks, the simple formatting you applied made it look more comprehensible.
***** Related Links *****
Create A Blank Report Using Power BI Report Builder
How To Import Datasets Into Report Builder
Paginated Report In Power BI: An Introduction
The Final Word
This tutorial offered a quick demonstration on the different visualizations or objects you can add in a paginated report. It also offers a discussion on how to format them in a way that makes your final report cohesive.
It’s recommended to use Report Builder when you want a pixel-perfect copy of a report. Its built-in features make it easy to draft a report that looks professionally made.
This is different when creating reports in the Power BI program. The main purpose of using Report Builder is to create a report that fits perfectly within a page regardless of the number of rows or columns in the table.
Want to learn about our Paginated Reports Course, check out the below.
Sue


