
Ever found yourself sitting on a treasure trove of insights, all neatly packed in a Power BI report, but scratching your head over how to share it with your team? Don’t worry, you’re not alone! Even the most seasoned data wranglers can get tangled up in the details sometimes.
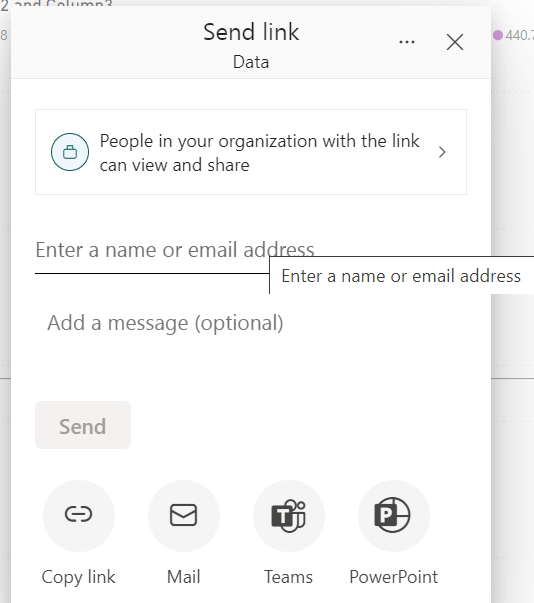
To share a Power BI report, first, you need to publish it to the Power BI service from Power BI Desktop. Once published, navigate to the report in your workspace, then select the “Share” button at the top of the screen. In the sharing pane, enter the email addresses of the people you want to share with, then hit the “Share” button again. Voila! Your report is on its way.
With the knowledge from this article, you’ll be able to confidently share your Power BI reports and foster a culture of data-driven collaboration within your organization. You’ll learn about different methods to share a Power BI report and the benefits of each approach.

Let’s get started!
4 Best Ways to Share a Power BI Report
Power BI offers various sharing options to collaborate and distribute reports with internal users. Here are some of the key sharing options available:
1. Use a Power BI App Workspace
App Workspaces provide a collaborative environment where you can create, edit, and share Power BI reports and dashboards with a group of people.
Below are the steps to share a report with your team:
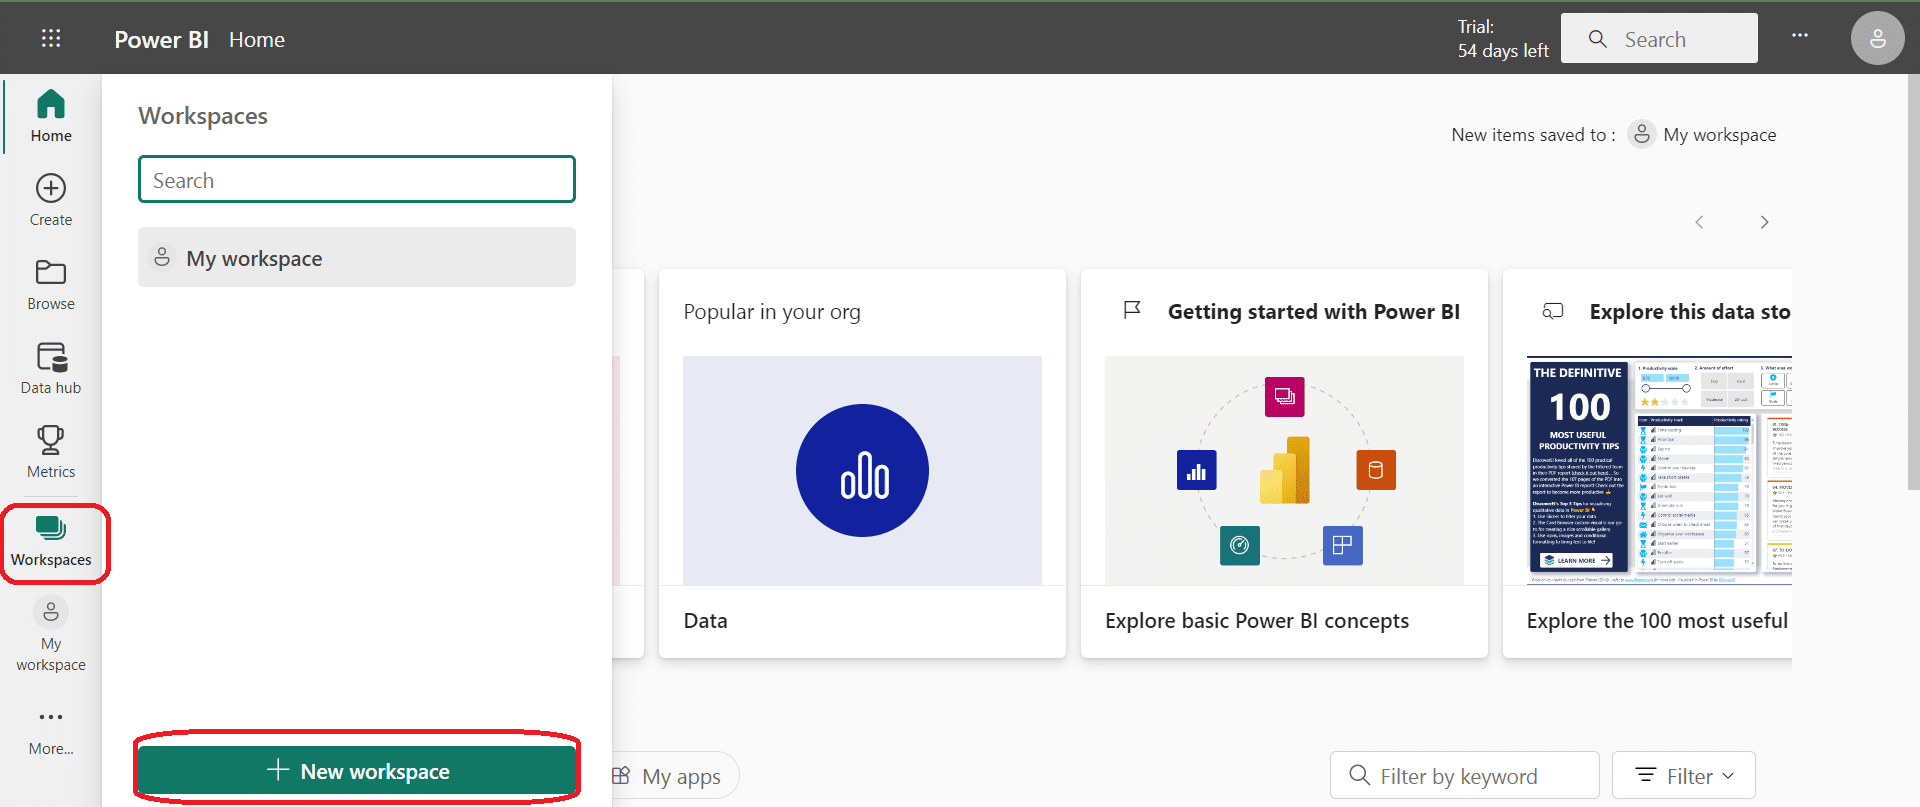
Create a new app workspace on Power BI Desktop or select an existing one.
Add the desired members to the workspace with appropriate permissions.
Now, your team members will have access to the same data within the workspace.

This method of sharing is ideal for teams that need to collaborate on developing reports and dashboards. However, some functionality may be limited without a Power BI Pro license.
2. Publish Your Power BI Report to Web
Publish to Web allows you to share Power BI reports through a public URL that can be accessed by anyone. To use this option:

1. Open your report in the Power BI service.
2. Select the ‘Share’ option.
3. Choose ‘Publish to Web’ and generate a URL.
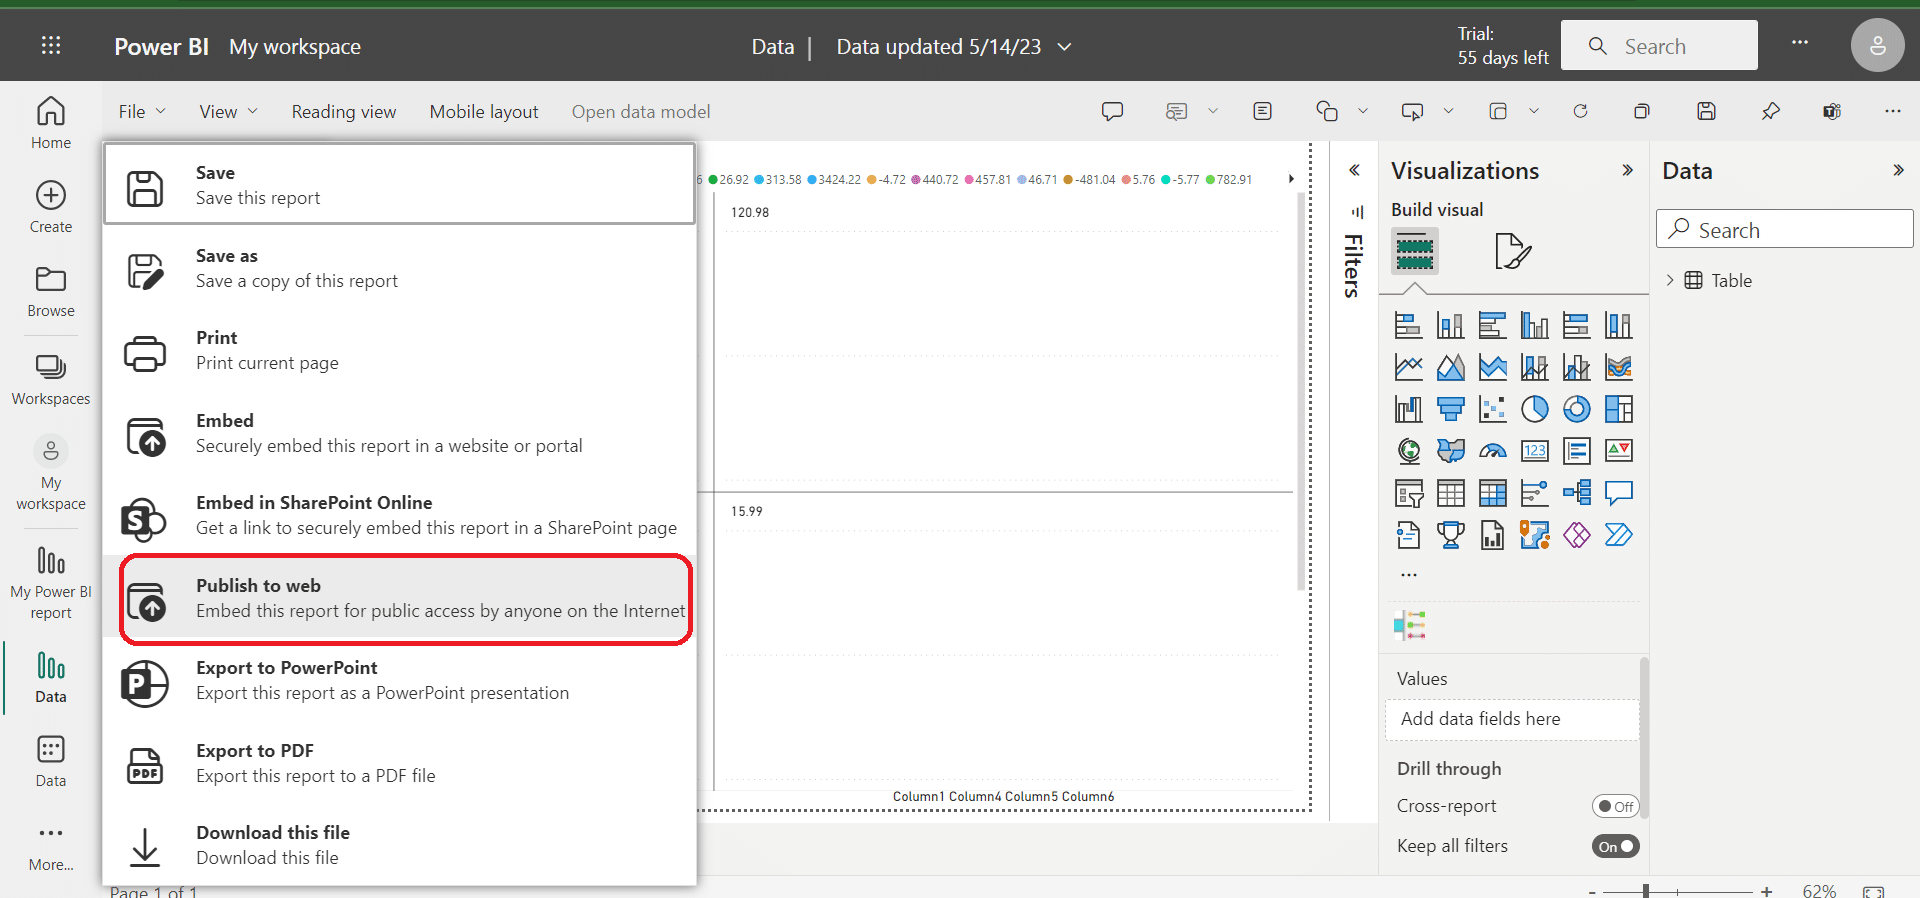
Keep in mind that this method makes your Power BI report accessible to anyone on the internet, so be cautious if you’re using this option to share sensitive information.
3. Embed Your Power BI Report in SharePoint
If you are using SharePoint Online, you can easily embed Power BI reports in your SharePoint pages. To do this:
Edit a SharePoint page and add the ‘Power BI’ web part.
Configure the web part to display your report by providing the report’s URL.
Save your changes and publish the page.
Using this method, you can share your Power BI reports with users who have access to the SharePoint site.
4. Export Your Power BI Report to File Formats
Another way to share Power BI reports is by exporting them to various file formats, such as PDF, PowerPoint, or CSV. To export a report:
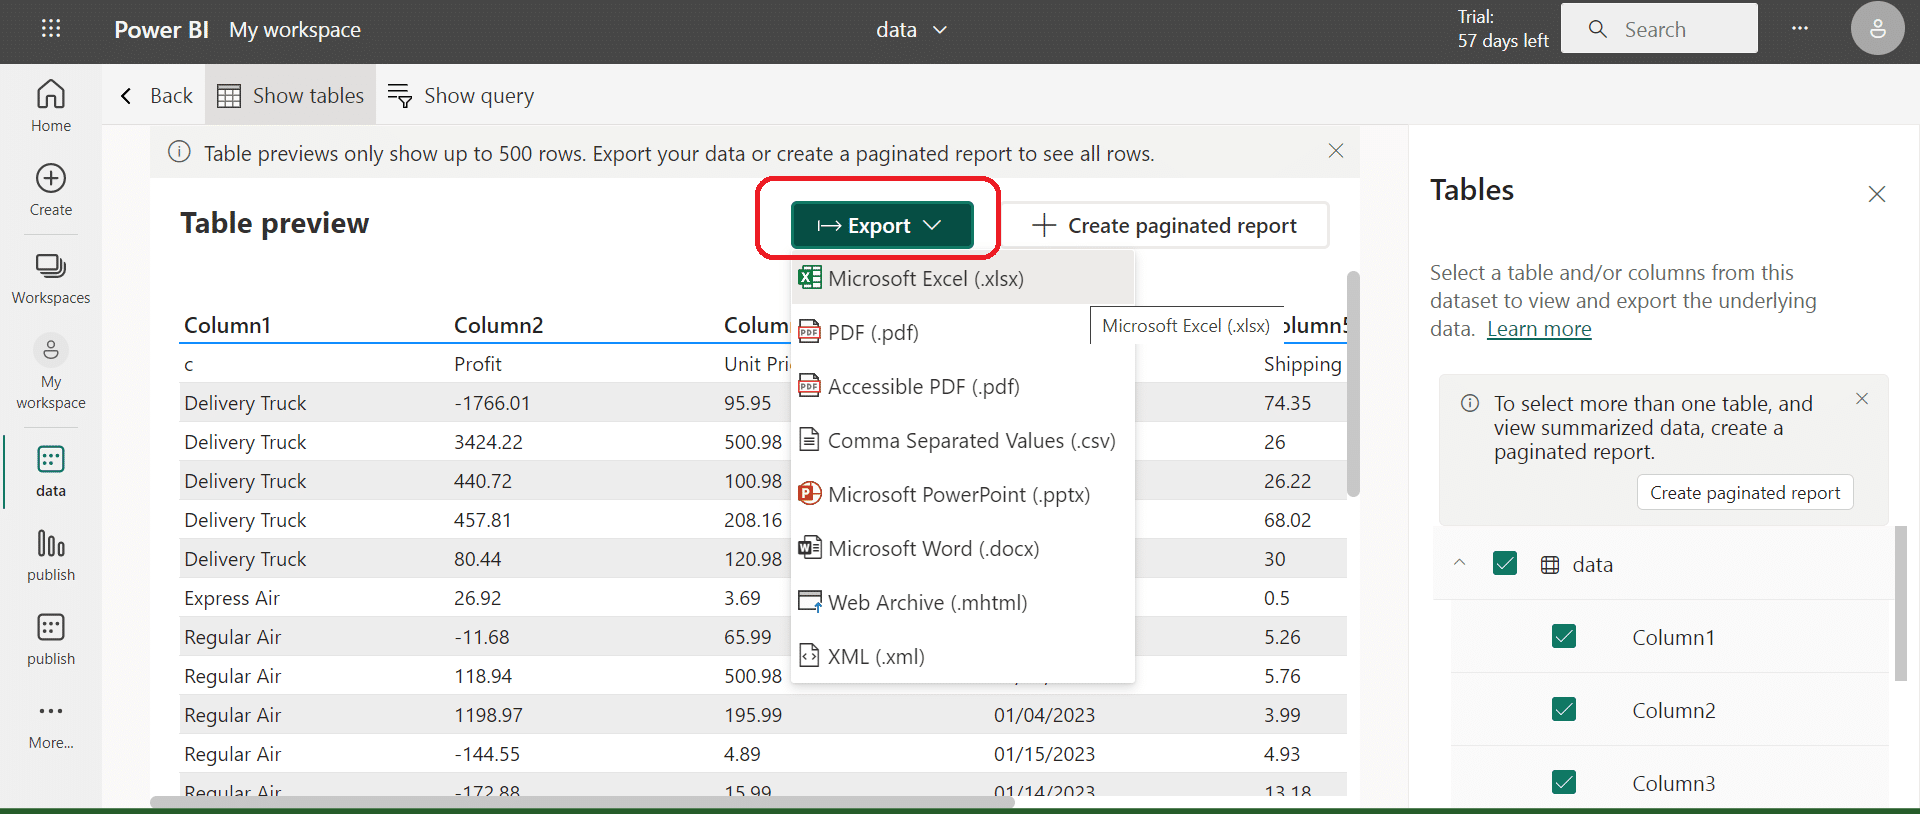
Open your report in the Power BI service or Power BI Desktop.
Select the ‘Export’ or ‘Save As’ option from the menu.
Choose the file format and save the report to your desired location.
Once exported, you can share the file with others through email or other file-sharing services. This option is useful when you need to provide a static snapshot of your report to users without giving them access to the interactive version in the Power BI service.
Next, let’s look at how you can share your Power BI reports with users outside your organization.
How to Share Power BI Reports With External Users
When you need to share a Power BI report with external users, there are several approaches you can take:
Invite guest users with Azure AD B2B: To invite guest users with Azure AD B2B, you’ll need to distribute the content to external guest users via Microsoft’s external sharing solution. This method requires the external user to have a Power BI Pro license.
Use Power BI Premium: Using Power BI Premium, you can publish Power BI reports and share them both internally and externally without requiring a Power BI Pro license for each individual user. This is an excellent option if your organization has a large number of users who need access to shared reports.
Share through a template app on Microsoft AppSource: Creating a Power BI template app allows you to distribute your reports and dashboards to external Power BI users via Microsoft AppSource. With this method, you can bundle content that can easily be shared with users outside your organization.
Embed in secure portals or public websites: You can embed Power BI reports into secure portals or public websites. By using this method, external users can view your reports without needing to be a Power BI customer. However, be cautious when sharing sensitive data, as embedding reports in public websites may compromise your data security.
Now that we have covered the sharing options in Power BI, we’ll explain how to set up report permissions in Power BI in the next section.
How to Set Up Report Permissions in Power BI
Setting up report permissions in Power BI is essential for maintaining data security, confidentiality, privacy, collaboration, compliance, and governance.
It helps ensure that the right people have access to the right information while maintaining control over the report’s accessibility and integrity, so let’s go over how you can set up permissions!
How to Assign Viewer, Contributor, or Member Access to Power BI Reports
To share a Power BI report with others, you need to assign appropriate access levels, depending on their required level of interaction with the report.
There are three main roles to choose from:

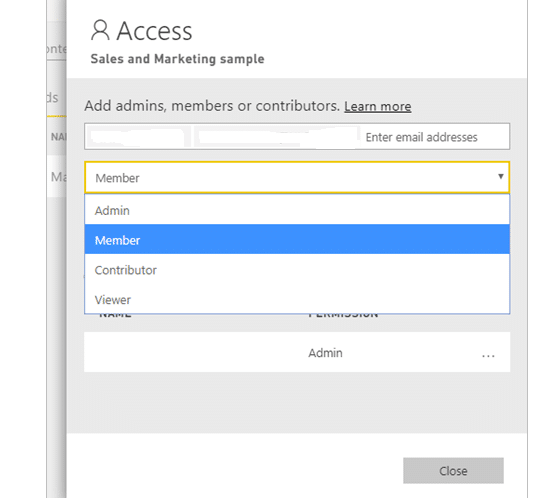
Viewer – Can view the report but cannot make any changes to it.
Contributor – Can view and make changes to the report, but cannot manage permissions.
Member – Can view, make changes, and manage permissions on the report.
To assign access levels, follow these steps:
Select the Share icon on a Power BI dashboard, report, or app.
In the sharing dialog, enter the email addresses of the users you want to grant access to.
Select the desired access level (Viewer, Contributor, or Member) for each user.
Click the Share button to confirm the access level assignment.
And that’s it! Now that we’ve gone over how to assign permissions, we’ll discuss data security in Power BI in the next section.
How to Configure Data Security in Power BI
When sharing a Power BI report with others, you should also set up proper data security to prevent unauthorized access.
Here’s how to do it:
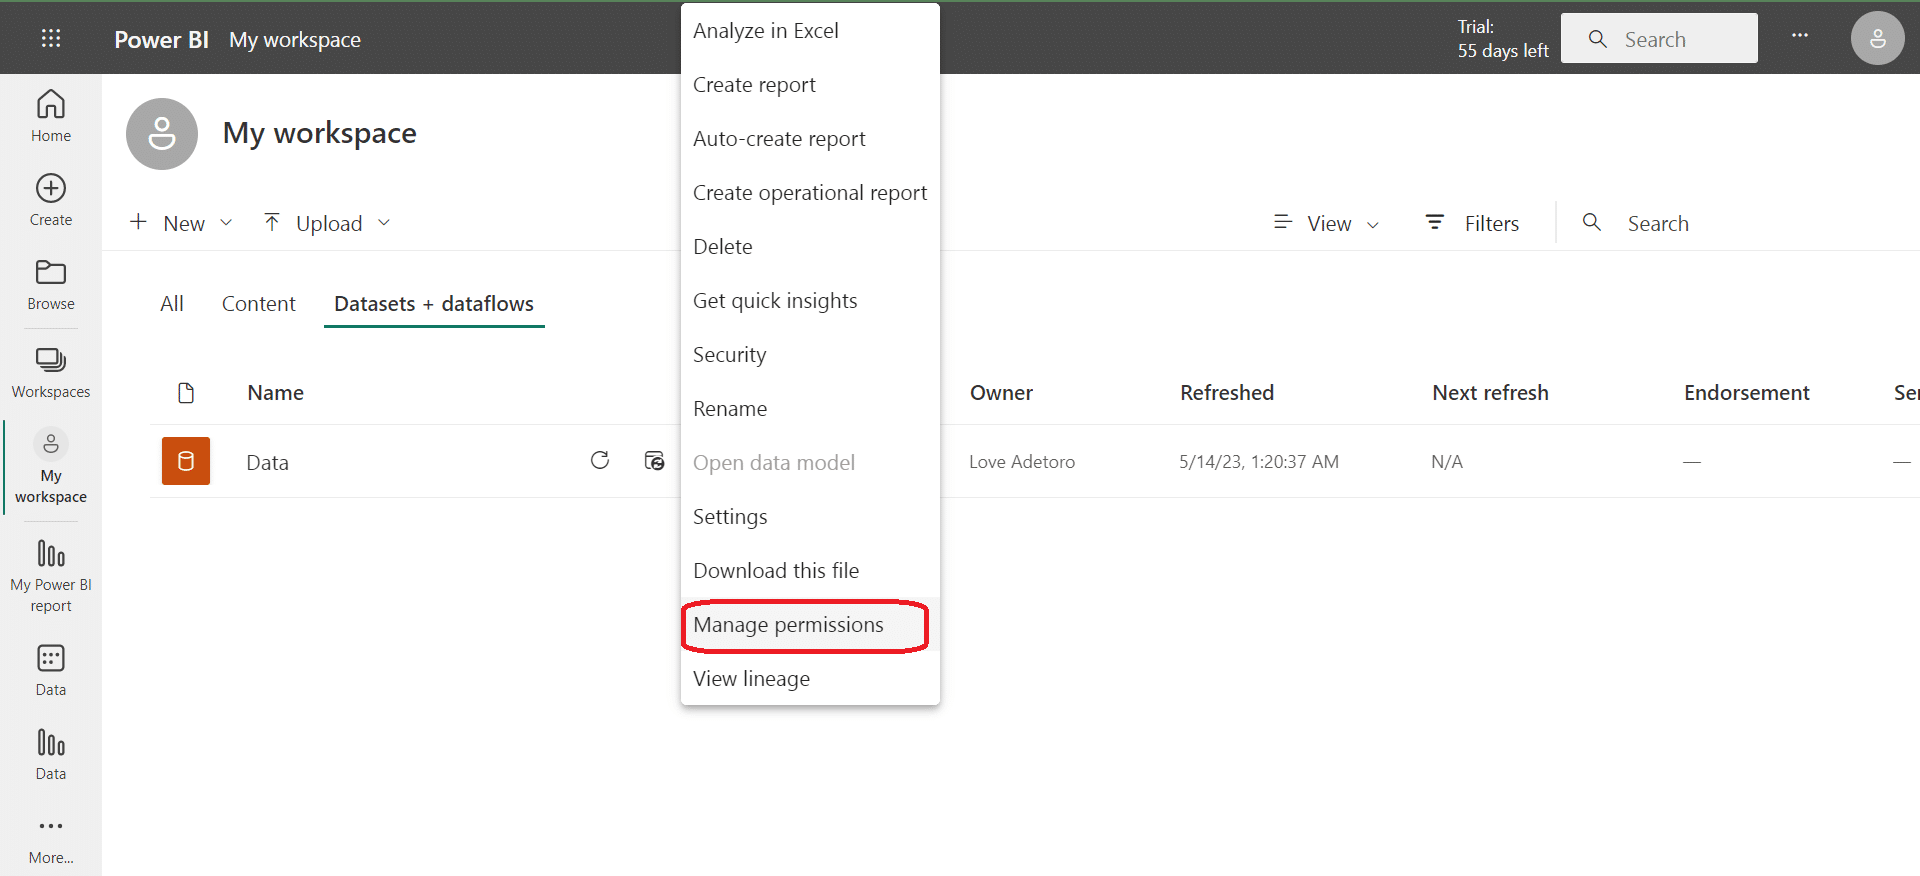
1. Manage Dataset Permissions
In the Power BI service, navigate to the dataset you want to manage permissions for. Click on the More options (…) menu and select Manage permissions.
2. Restrict access based on roles
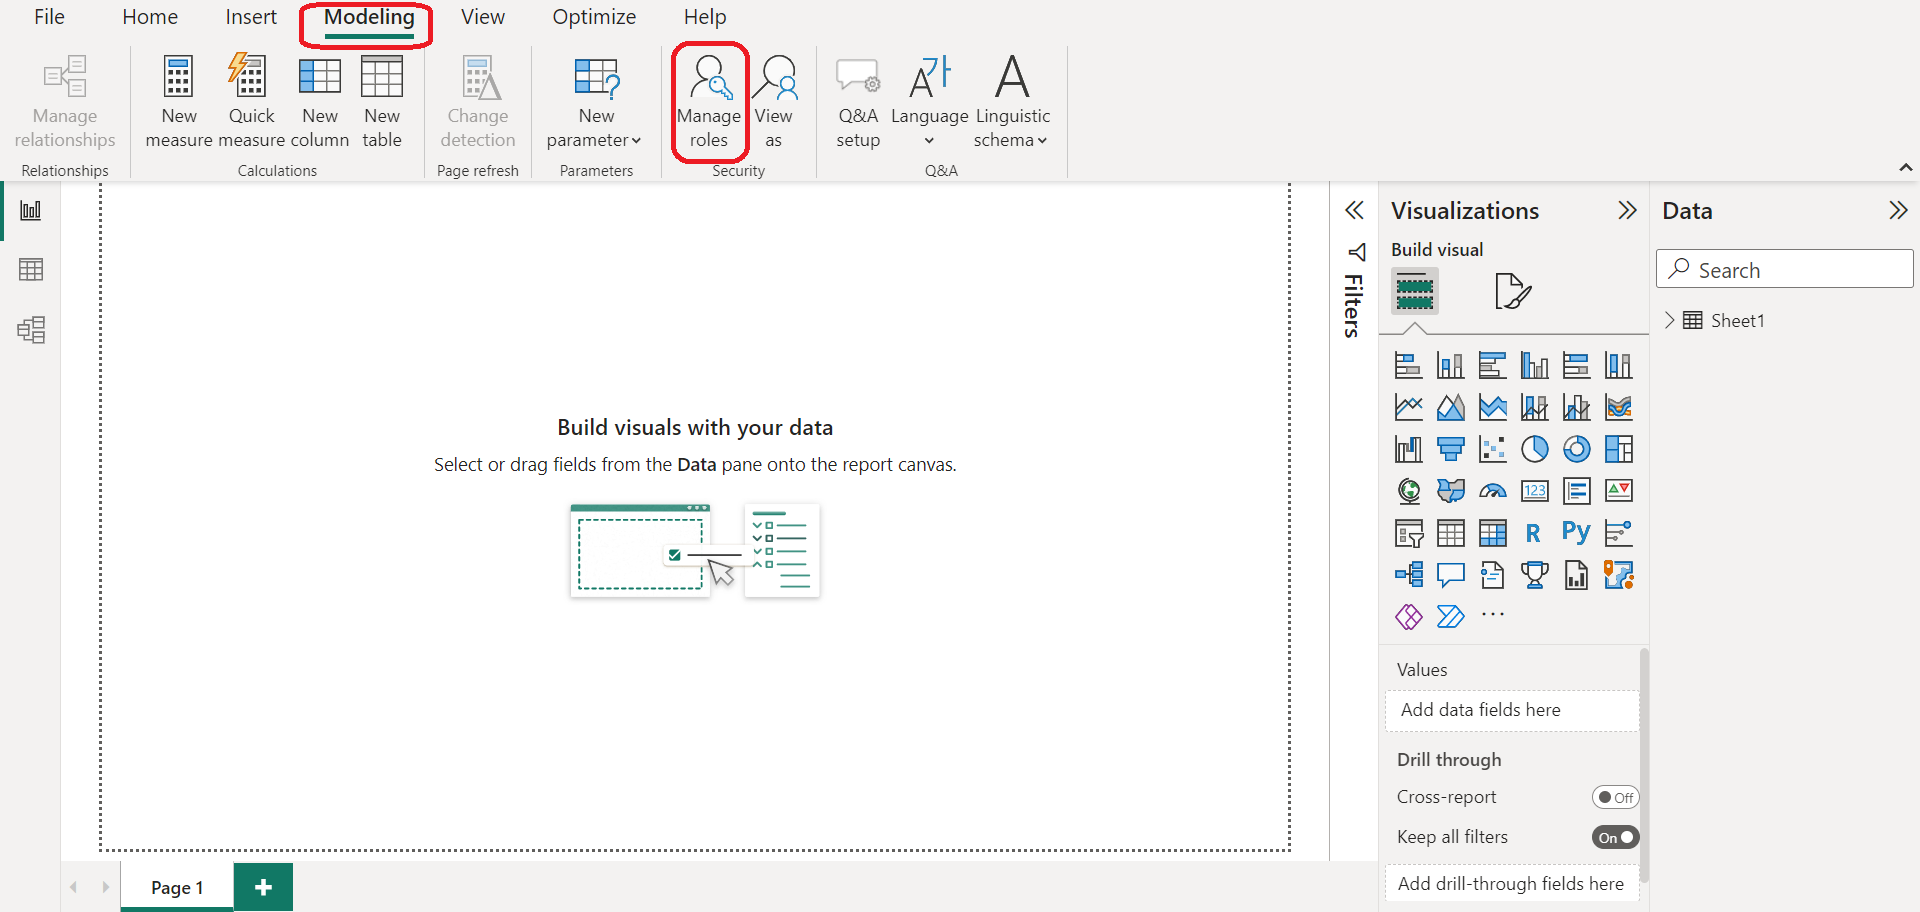
Define roles with specific access levels to the dataset. This can include roles such as Sales Manager and HR Manager, with different data access requirements. To create a role:
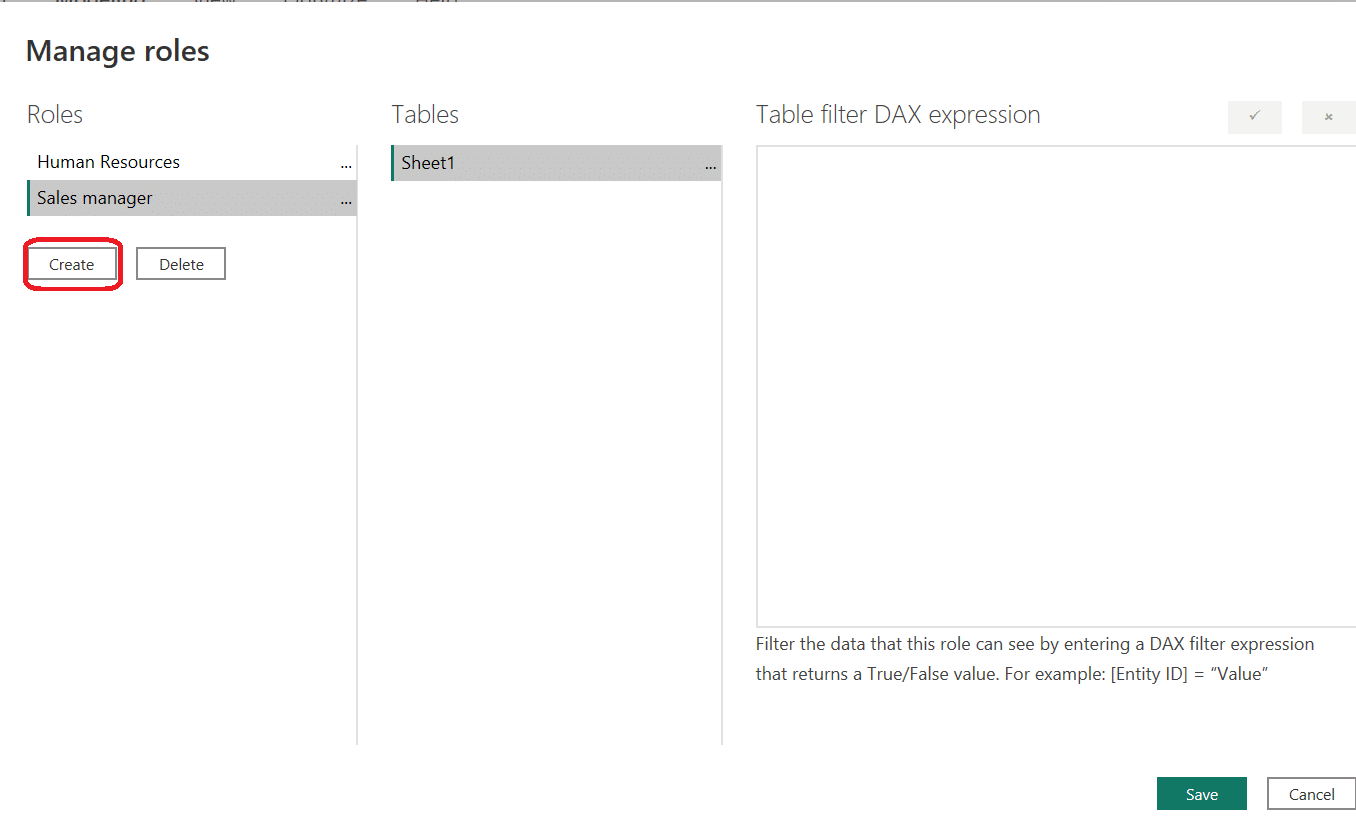
Open the dataset in Power BI Desktop.
Click on the Modeling tab and then click Manage Roles.
Create a new role, input the role name, and define data access restrictions using DAX expressions.
Publish the dataset to the Power BI service.
3. Assign roles to users or groups
In the Power BI service, go to the dataset you want to manage permissions for. Click on the More options (…) menu and select Security.
In the security dialog, add users or groups to the appropriate roles.
Following these steps will ensure that your Power BI report is shared with the right people and that the data within it is properly secured.
Next, we’ll go over monitoring and auditing shared reports in Power BI
How to Monitor and Audit Shared Reports in Power BI
Monitoring and auditing shared reports are crucial for maintaining data security and understanding report usage amongst your collaborators, so let’s go over how to effectively do that with your shared Power BI reports.
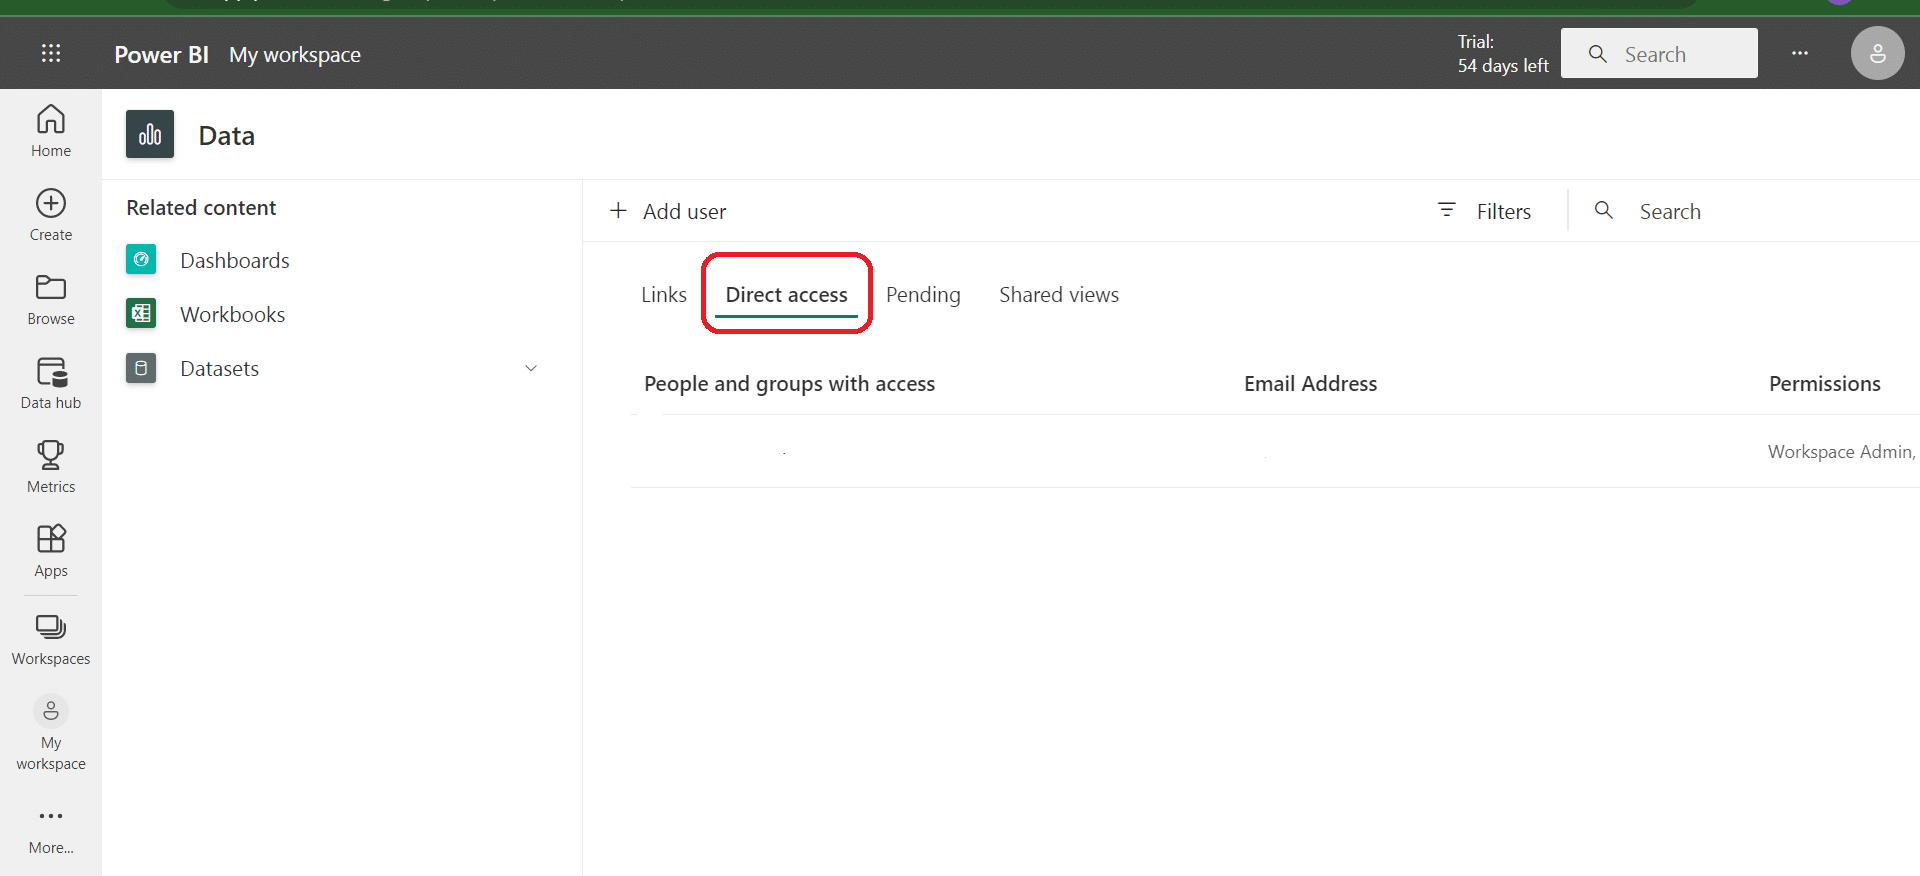
First, be aware of who the shared reports are accessible to. When you share a report or dashboard, make sure you note the people or groups it has been shared with.
You can check and manage the permissions for each report by clicking the ellipsis (three dots) next to the report, selecting “Manage Permissions,” and navigating to the “Direct Access” tab.
You can also keep track of report usage. In Power BI, you can create usage metrics reports to monitor views and interactions with your shared reports.
To access a usage metrics report, simply select the ellipsis next to the report and click “Usage metrics.” This will give you insights into how frequently your shared report is being viewed, the number of unique viewers, and more.

To audit report-sharing activities, you can use the Power BI audit logs. The audit logs provide detailed information about sharing events, including the users involved, the time, and the specific action taken.
To access audit logs, you’ll need the appropriate permissions, such as being an Office 365 global administrator or a Power BI service administrator.
If you have those permissions, navigate to the Microsoft 365 admin center and access the “Security & Compliance” section. From there, you can locate the “Audit log search” option to start analyzing your Power BI sharing activities.
Remember that keeping an eye on shared report activities and usage helps ensure data security and enables you to optimize the sharing process.
In the next section, we’ll go over troubleshooting best practices when sharing reports in Power BI.

Troubleshooting Best Practices When Sharing in Power BI
You may encounter issues or obstacles when sharing a Power BI report. In this section, we’ll explore common troubleshooting tips and best practices for effectively sharing Power BI reports.

If you are having trouble sharing a dashboard or report, make sure you have the necessary permissions. You can manage permissions by going to the “All” or the “Datasets + dataflows” tab in your content list.
Select More options (…) next to a dataset, then choose “Manage permissions.” Enter the full email addresses of individuals, distribution groups, or security groups that you want to add. Keep in mind that you can’t share dashboards or reports with dynamic distribution lists.
Best Practices for Sharing Power BI Reports
When sharing Power BI reports with coworkers and others, consider the following best practices:
Keep your reports clean and well-structured to make it easier for others to understand your data.
Use descriptive names for your reports and dashboards to help users find and understand the information they need.
Regularly update your reports to ensure they contain the most up-to-date information, and notify users when important changes are made.
Make use of the available collaboration features to enhance the sharing experience
Initiate conversations by adding comments to Power BI dashboards, reports, or specific visuals on a report or dashboard. This can help facilitate discussion and collaboration among your team.
Take advantage of mobile apps to view, annotate, or share your reports on the go.
For advanced integration, consider embedding Power BI reports into secure portals or public websites to reach a wider audience.
By following these troubleshooting tips and best practices, you can effectively share your Power BI reports and foster collaboration within your organization.
Final Thoughts

Sharing a Power BI report is a straightforward process that involves a few simple steps. By following the steps we mentioned above, you can quickly and easily share a report with internal and external users, granting them view or edit access as appropriate.
No more data insights hidden away in your workspace, no more team members left in the dark. With these simple steps, you’re now well-equipped to share your Power BI reports far and wide, contributing to a more informed, data-driven culture in your organization.
But remember, sharing process is just the final touch. The real magic lies in creating insightful, impactful Power BI reports that can truly make a difference.
So keep crunching those numbers, keep asking those tough questions, and most importantly, keep sharing your findings. Because in the world of data, sharing is indeed caring!
If you are interested in learning more about how Power BI works, check out the video below:


