
When you’re dealing with dates and times in Excel, you might find it necessary to separate the time component from the date. Well, there are a couple of ways to accomplish this, depending on your specific needs!
One approach involves using Excel functions like TEXT and INT. For example, to separate the time from a date in Excel, you can use the following formula:
= TEXT(A2, "dd-mmm-yyyy") & TEXT(A2, "hh:mm:ss")You can also use Excel’s Flash Fill feature or its custom formatting function to accomplish this

We’ll be going through all these methods in this article, and we’ll also be dropping some neat tips and tricks to help you separate times and dates more efficiently. So, read on to learn about separating time from date in Excel!
How to Remove Time From Date in Excel
Excel stores dates and times as serial numbers, with dates as the integer part and times as the decimal part. This allows for easy arithmetic operations and comparisons.
However, some situations might require you to separate the two components from each other. Here are some methods you can use to separate the date and the time portions:
1. Using the TEXT Function to Extract Time from Date in Excel
The TEXT function in Excel is a versatile tool for manipulating text and extracting specific parts of a date and time value. It converts the date-time value from its number format into a text value in the format you specified.
To extract time from a date-time value, you can use the following formula:
=TEXT(A2, "hh:mm:ss")Where:

A2 is the cell reference that contains the date and time value you want to extract the time from.
“hh:mm:ss” is the custom format string that tells Excel to display the hour, minute, and second components of the time.
For example:
To extract the date value in the dd-mm-yy format, you can use this formula:
TEXT(A2, "dd-mmm-yyyy")Here’s an example:
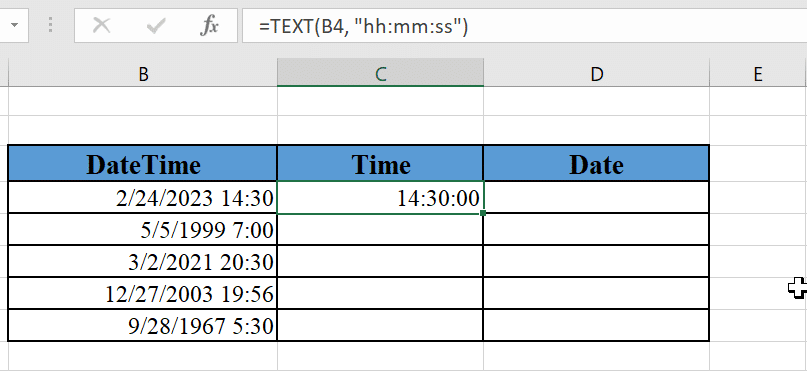
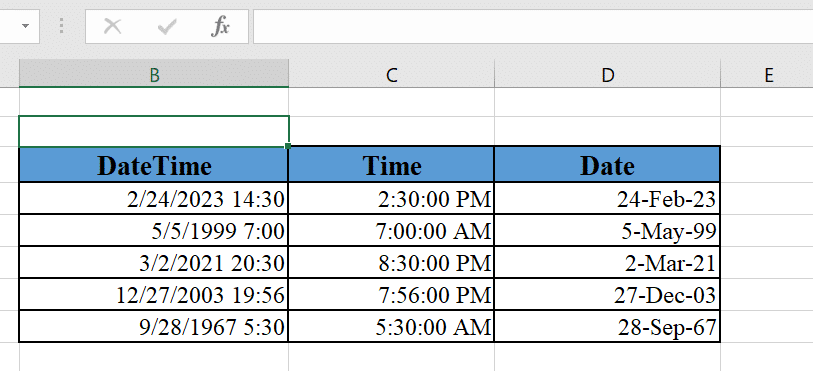
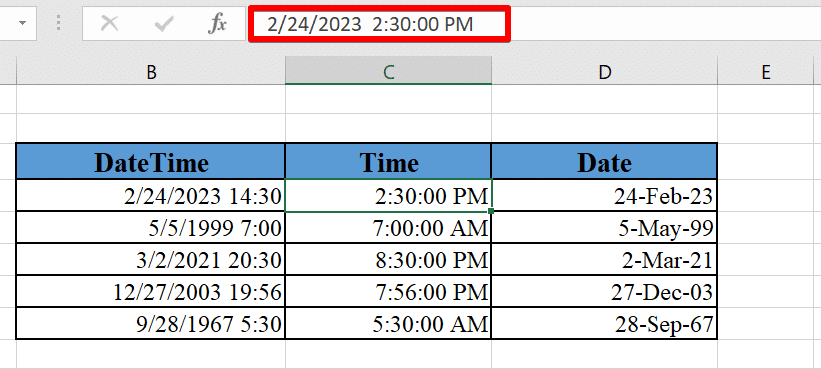
The cell B4 contains the date and time value “2/24/2023 14:30”. The formula =TEXT(B4, “hh:mm:ss”) will return the text string “14:30:00” which represents the time component.
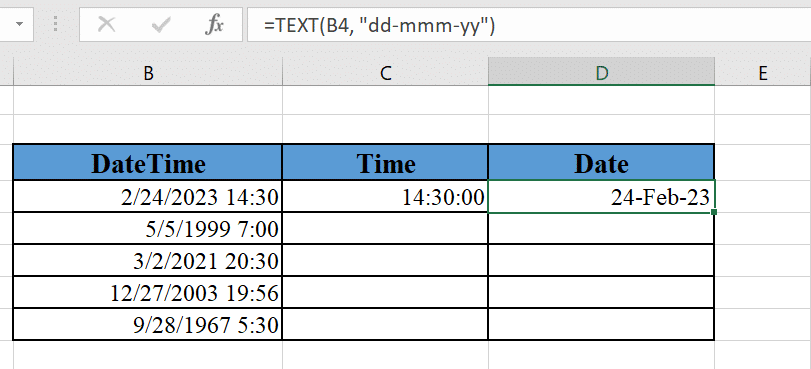
Also, the formula =TEXT(B4, “dd-mmm:yy”) will return 24-Feb-23 which is the date component.
2. Using the INT Function to Move Time from Date in Excel
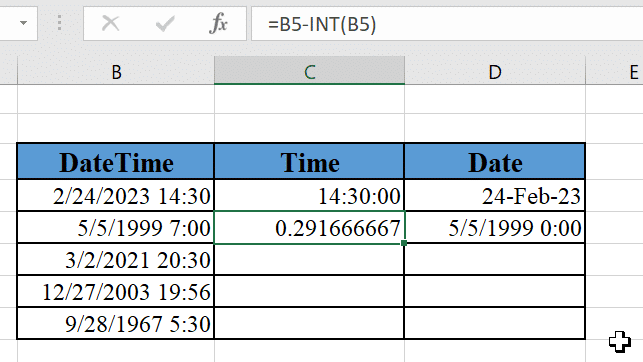
Another method for extracting time from a date and time value in Excel is by using the INT function. Recall that we said that Dates and times are stored in Excel as numbers with integers and decimal components.
Well, we can separate this number into its components using the INT function. The INT function cuts away the decimal part of the number that represents the time, leaving only the Integer, which represents the date. Here’s how it works
To extract the time portion of a date and time value, you can use the following formula:
=A1 - INT(A1)To extract the date portion:
=INT(A1)Here’s an example:
Once you extract the individual components, you can modify them into any date or time format.
3. Using Flash Fill to Remove Time From Date
Flash Fill is another great method you can use for separating the time and dates in Excel. This is particularly useful if you have a long list of date-time values you want to separate and you don’t want to use any Excel formulas.
All you need to do is to separate one or two date-time values in the list manually and Flash Fill will detect the pattern and handle the rest. Here’s how:
Separate the first value in the column manually.
Click on the cell containing the separated date value to make it the active cell.
Navigate to the data tab on the Excel Ribbon and click on Flash Fill.
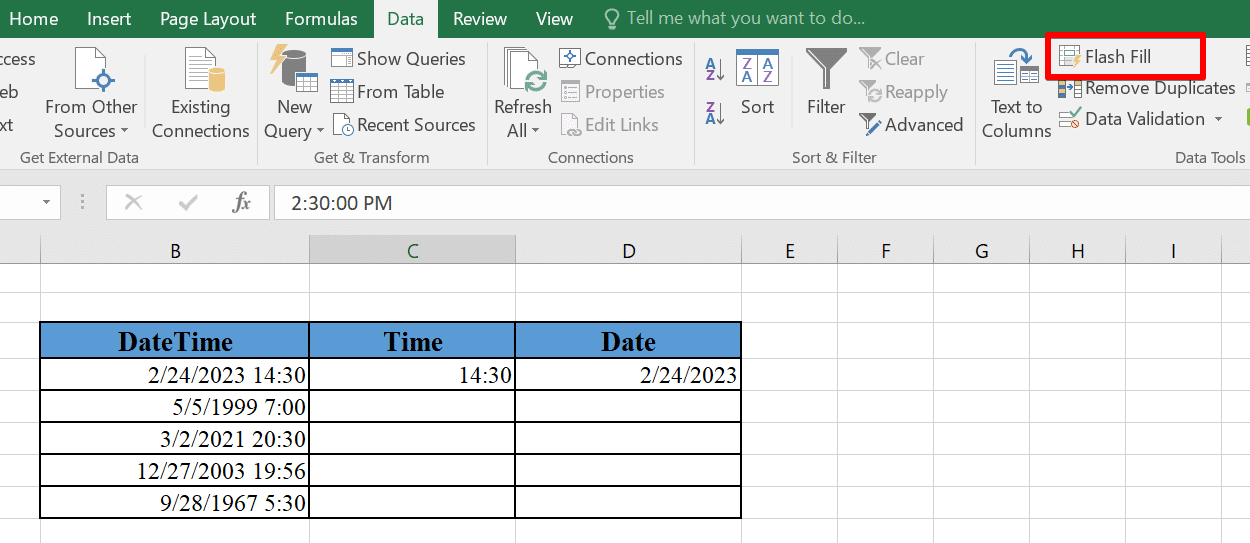
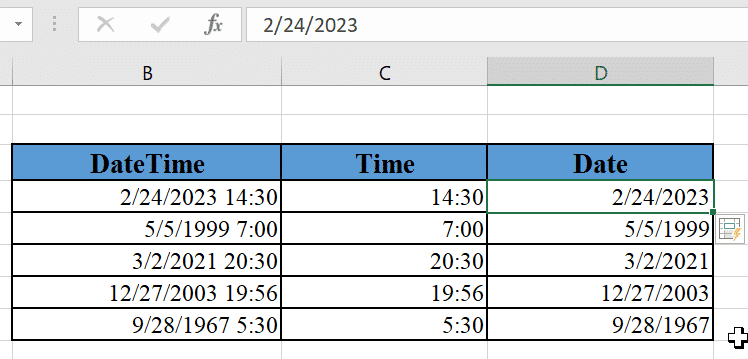
It will detect the pattern and fill in the rest of the Time column.
Repeat the same for the date column.
4. Using Formatting to Move Time From Date in Excel
Formatting is a powerful tool in Excel that allows you to control how numbers, dates, and times are displayed. When you have a date and time value in a cell, you can use custom number formatting to show only the time or date portion.
To display the time portion of a date and time value, follow these steps:

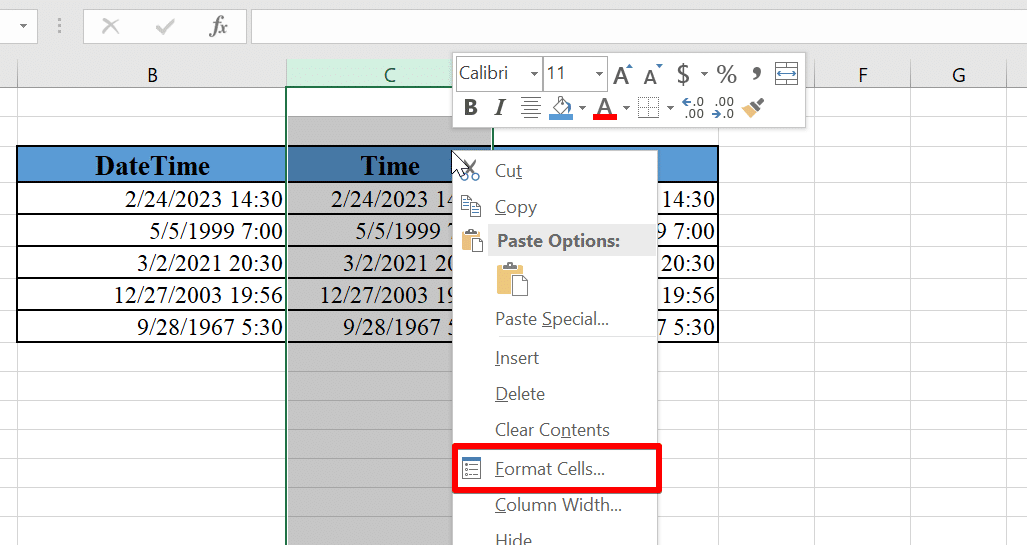
Copy the date-time values to the time and date columns.
Highlight the Time Column, right-click on it, and select the Format Cells option. You can also access it by clicking on the Home tab > Format numbers > More number formats on the Excel Ribbon.
In the “Format Cells” dialog box, click on the Time tab to display the different time formats. Select the format you want and click OK.

Now that the Time column is formatted, repeat the same for the Date Column.
This time, once the Format Cells dialog box comes up, click on the Date section to reveal the various date formats.
Choose any one you prefer and click ok.
After following these steps, the Time Column will display only the time portion of the original date and time value, formatted according to the custom time format you specified. Similarly, the Date column will display only the date.
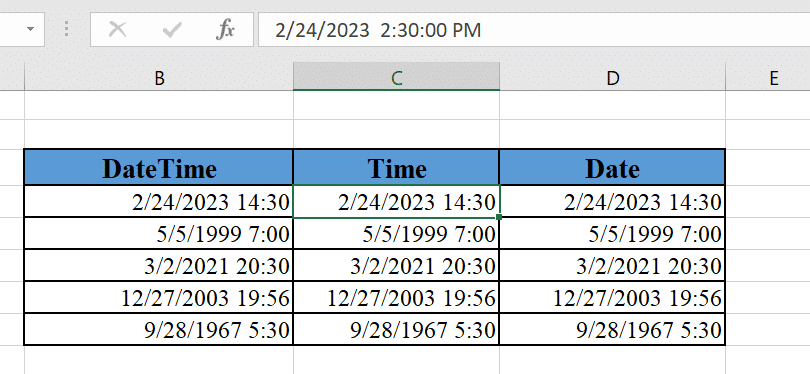
Note: Unlike other methods, this method doesn’t remove the date or time components. Rather, it only hides them through formatting.
In the example above, we can still see the date component in the formula bar.
By using these techniques, you can effectively separate the time from a date in Excel, making it easier to perform calculations and analysis based on time data.
Remember to select the method that best fits your specific needs and preferences.
Happy number crunching
Final Thoughts
Separating the time from a date in Excel might seem like a small task, but it can make a big difference in how you manage and analyze your data. By learning and using the various methods we’ve discussed, you’ll have the flexibility to work with dates and times with confidence.
Remember, Excel is a powerful tool, and saving time on seemingly small tasks like this can add up to big improvements in your productivity and data management.
Are you new to data analytics? Check out our video to discover which platform is the best for you:
Frequently Asked Questions
How to extract date from datetime in Excel?
To extract the date from a datetime value in Excel, you can use the TEXT function with a custom date format. For example, if your datetime value is in cell A2, you can use the following formula:
=TEXT(A2, “dd-mmm-yyyy”)This formula will return the date in the datetime value in the specified format (day-month-year).
What is the method to remove time from a datetime in Excel?
To remove the time from a datetime value in Excel, you can use the INT function. For example, if your datetime value is in cell A2, you can use the following formula:
=INT(A2)This formula will return the date part of the datetime value without the time component.
How to convert date to text in Excel?
To convert a date to text in Excel, you can use the TEXT function. For example, if your date is in cell A2, you can use the following formula:
=TEXT(A2, “dd-mmm-yyyy”)This formula will return the date as a text value in the specified format (day-month-year).
How to convert text to date in Excel?
To convert text to a date in Excel, you can use the DATEVALUE function. For example, if your text date is in cell A2, you can use the following formula:
=DATEVALUE(A2)This formula will return the text date as a proper date value in Excel, which you can then format as needed.
How to separate date and time in Excel?
To separate the date and time in Excel, you can use the TEXT function with custom date and time formats. For example, if your datetime value is in cell A2, you can use the following formulas:
For the date:
=TEXT(A2, “dd-mmm-yyyy”)For the time:

=TEXT(A2, “hh:mm:ss”)These formulas will return the date and time components as separate text values.


