A common use of Power Automate is to automate workflows that begin with the receipt of emails. For example, [receive email] à [do action]. In order to do this, we need to know how to parse data within emails, and how to add/save any email attachments. In this tutorial, I’ll explain this concept with a very familiar example. I will show you how to parse emails and save them to a SharePoint List. You can watch the full video of this tutorial at the bottom of this blog.
Here I’ve drawn up a very simple example that I’ve seen my clients use all the time. Let’s say we’re working for a consulting company and they have applications that they deploy to their own clients and they need an efficient ticketing system.
What currently happens is if someone is finding an issue with their application, they send an email, then someone has to go in and look at the email, and then manually they need to add it to the SharePoint list called tickets. After it’s been added to the SharePoint list, it then gets triaged by engineers and then it’s eventually resolved.
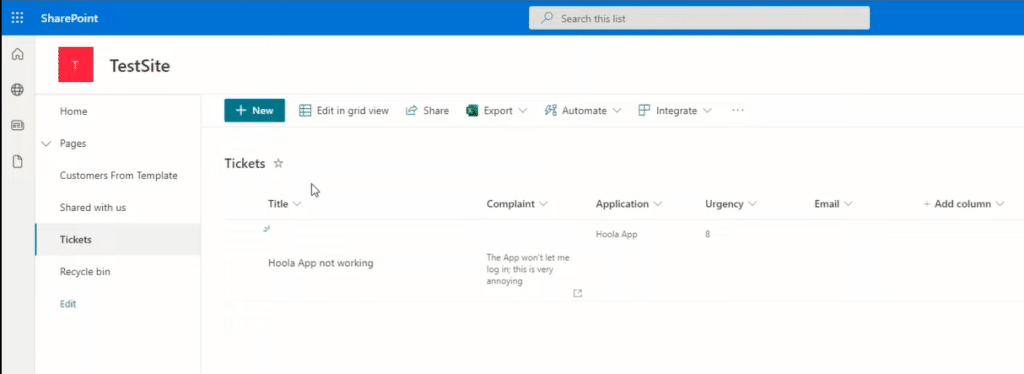
So that’s the whole workflow; we’re going to automate the part where someone actually reads the email and then manually uploads it to SharePoint. We’re going to automate that with Power Automate.
One other complication is that this email inbox is a general inbox. It’s used for all types of emails. We only want emails that are related to tickets to go into the SharePoint list. The other problem is that emails sometimes contain attachments, such as photos of the issue or other things to help the engineers determine what the problem is. We want to make sure we also save that to the SharePoint list as well.
Now that we have set the scenario, let’s go ahead and get started.
How To Parse Emails Using Power Automate
Let’s open up Power Automate and create our flow. Let’s click the create button over here. The type of flow that we’ll be creating is called an Automated Cloud Flow, which is a flow that is triggered by a designated event. Our designated event is obviously the email coming into our inbox.

So, let’s click on the Automated Cloud Flow. We won’t give it a name for now or a trigger, so we’ll just click Skip.
Now obviously it needs a trigger, and our trigger is going to be when a new email arrives. So, I’m going to look for Office 365 Outlook. I’m using outlook. This can work with Gmail, Yahoo Mail, or any connector that Power Automate has, which is in the thousands.
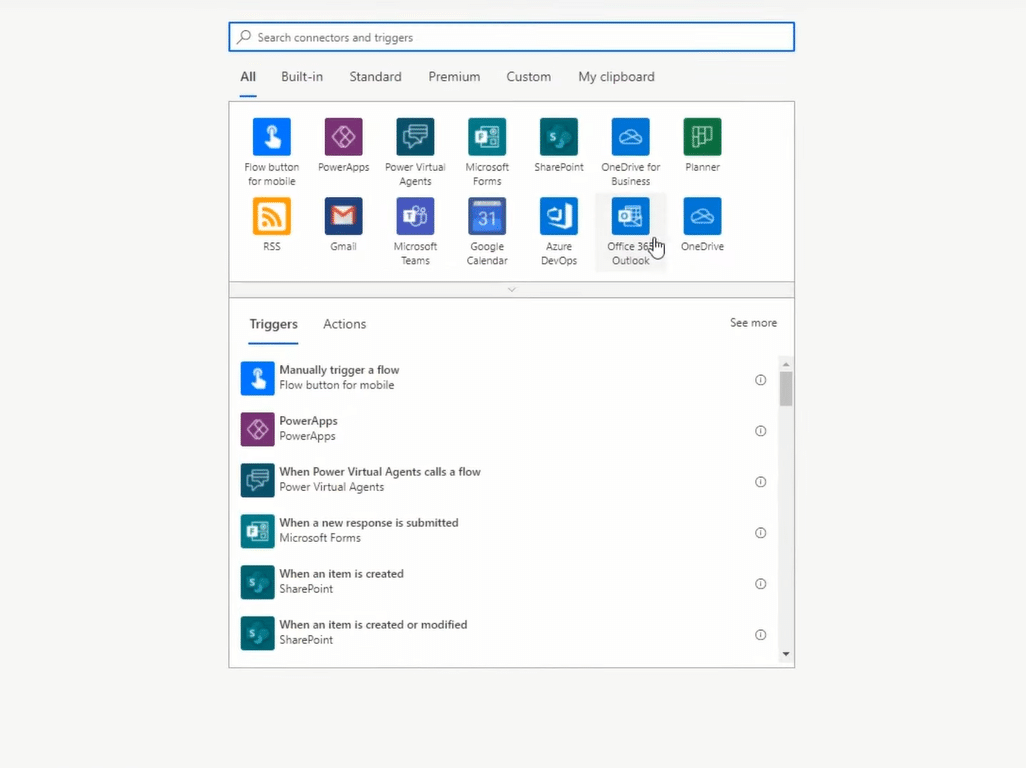
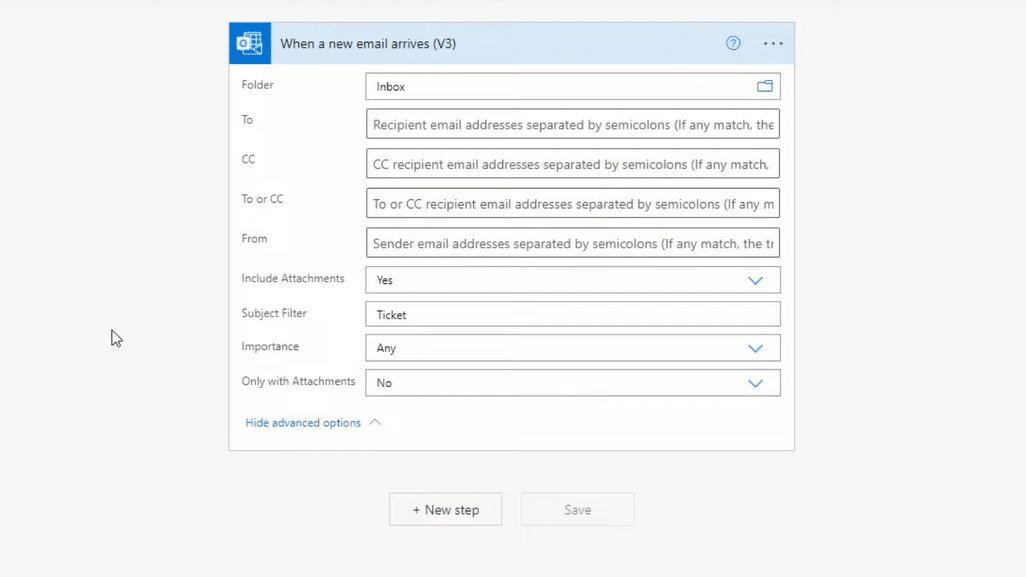
So, I’m going to choose Office 365 Outlook, and the action I’m going to choose is when a new email arrives. Now I have a bunch of options I can choose from. I want to make sure that when a new email arrives in the inbox folder, the flow gets triggered. However, I don’t want all emails to trigger this workflow, but only emails that may have this subject filter called Ticket.
So, I’m going to go to show Advanced Options and I’m going to type in a subject filter called Ticket. That means that this flow will only be triggered if the Ticket string is within the subject of the email. I’m going to also say include attachments, so then we can actually add attachments to the SharePoint list.
Usually what you can also do is if you know you’re only going to get ticket requests from a few inboxes, you can also modify the From here as well, but we’re just going to look at the ticket subject filter.
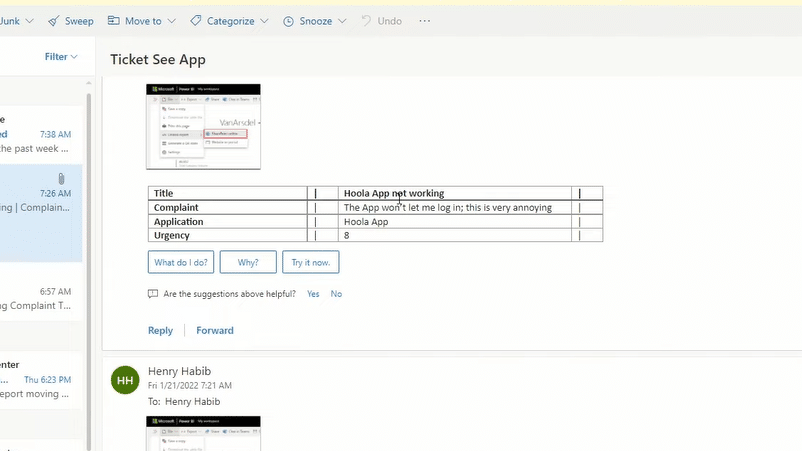
The next thing to know is what a ticket email looks like before we parse through it. Now we’ve given our users a standardized email form to use when they email us with tickets. And this is kind of what it looks like.

They have a table, wherein the first row is Title, where they put in the title of their complaint, then the Complaint, where they describe what’s happening that they don’t like. The Application is what the complaint relates to. We might have several different applications deployed to our users. And then finally the Urgency is out of 10.
This is probably an email template that we’ve given them. And that’s important because if you want to be able to parse through your emails, you want to make sure that your emails come in a very standardized template form.
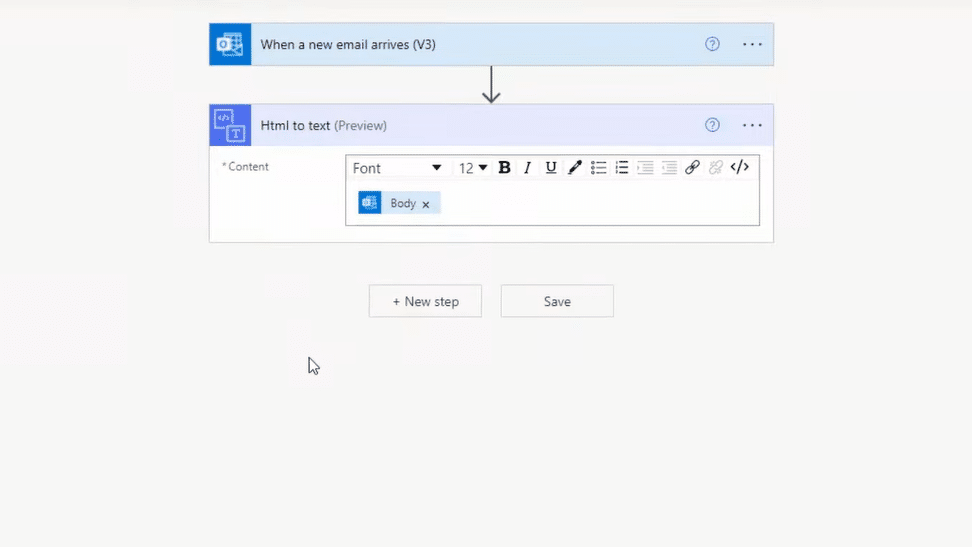
The next part of the flow is the ability to transfer an HTML email, which is what we usually get with emails these days, and turn it into a text email that we can then parse through. So our next step is called the HTML to text action.
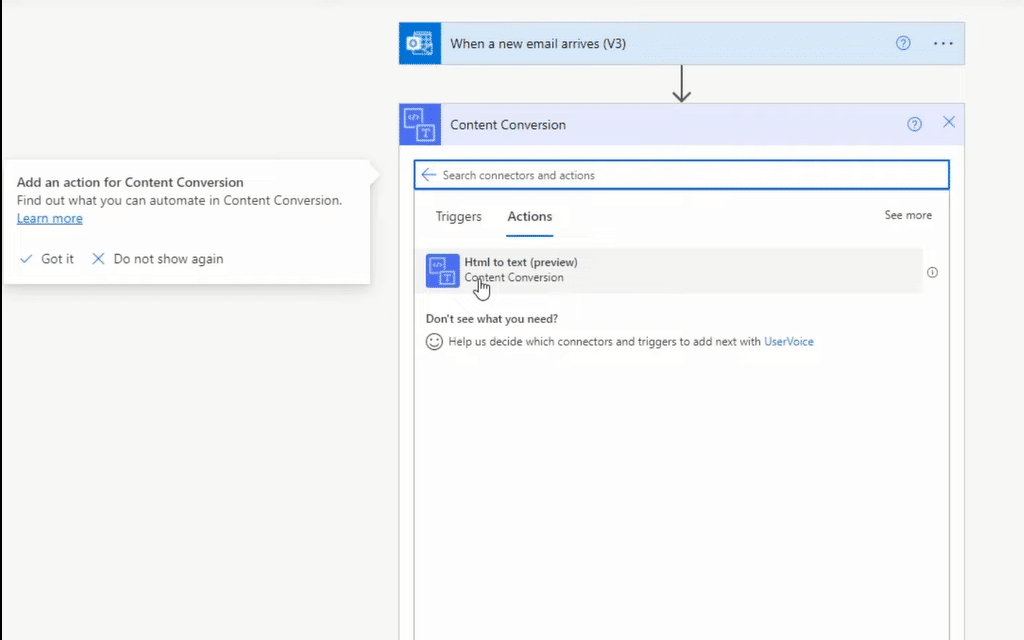
We click on this and all it needs is the actual content. The reason we need to do this is that tables like the ones we receive are in HTML form. It’s difficult to parse through HTML tables. So, I’ll choose Body. This step will convert the body of this email to text.
The next step is to be able to create the SharePoint list. We have everything we need now to be able to create it.
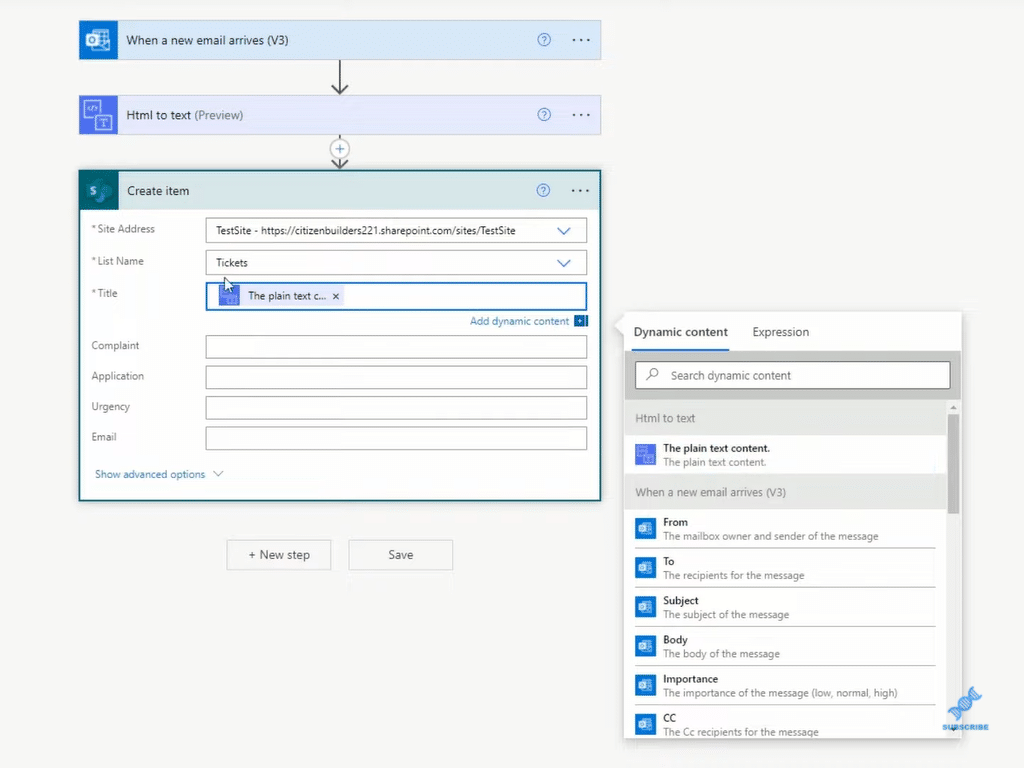
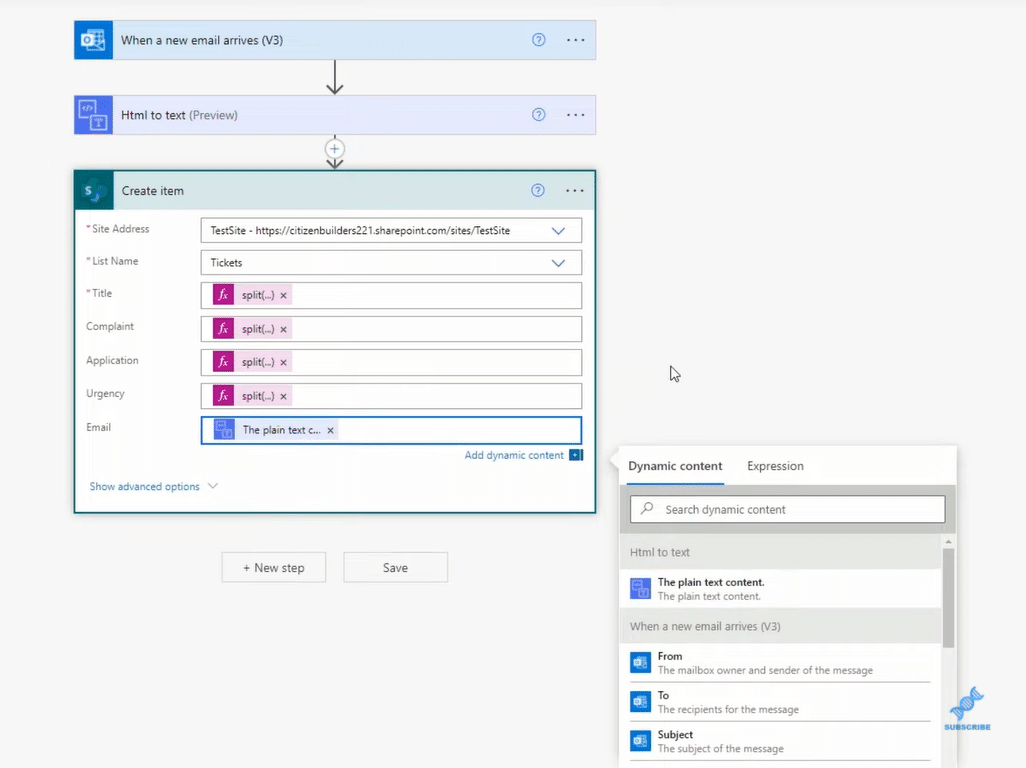
So, we’ll go to SharePoint and create an item, which basically means creating another row in a list. We need to specify our site address, and we’re using Test sites. Our list is going to be Tickets. After that, it should pop up with a list of values that corresponds to the columns that are in our list.
We want to make sure that we get the same results. So, we’ll have the title, complaint, application, and urgency. And then, we also have another field called email, where we’ll dump the entire contents of the email into that field because we want to keep the entire email just in case our parsing method has become corrupted or incorrect or anything like that.
So, we’re going to take this output. This output will basically be the table, but without the actual lines.
We want to be able to split this long text into an array where the first element of the array is the title. The second element of the array is Hoola App not working. The third element is the complaint, and so on and so forth.
After we do that, we can specify exactly what we want in each one of these columns. In the first column called title, we want the first element, Hoola App not working. In the second column, that complaint, then we want the third element, etc.
The function we use for this is called Split. It returns an array that contains sub-strings separated by commas, based on the specified delimiter. Our delimiter, the characters that separate our text, are the pipes on the table.
So now let’s go over our title and go to expression, and we’re going to call the split function. We can see the split function takes two arguments, a text, and a delimiter or a separator. The text will be the plain text content. The output of this action, the comma, and then the second argument, which is the separator, or the delimiter will be the pipe.
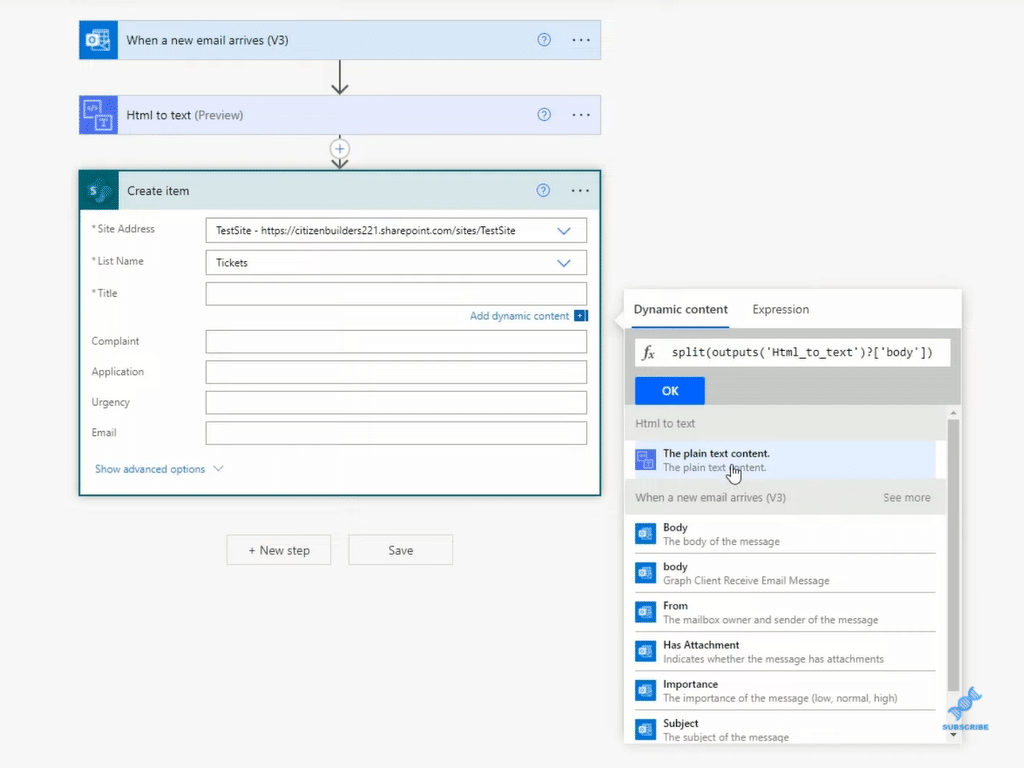
Now, after it’s been split, we need to specify the element. The title element will then reside in the first element. We’re going to copy that, and then we’re going to click Okay. We’re going to do the same for complaint, application, and urgency. Finally, we have the entire email. We want to save the entire email, so we don’t need to do any of the split array types of logic. So we’re just going to select the plain text context.
Lastly, we need to do something about the attachments as well. So, we click on New Step, and in the SharePoint connector, there’s an action called add attachment. We’re going to click that and it specifies for us the address and the list. The address is Site. The list is the Tickets.
The ID is where you want to attach the attachment. Now this will be an output of the create item action, so we’ll click on it. We’ll look at Create Item and we need the ID. We also want to add the file name, so we’ll just call it Attached. And then the contents of the file will be the attachment itself from the email. If we scroll down to where we see the email, the attachment content is what we would want to add in.
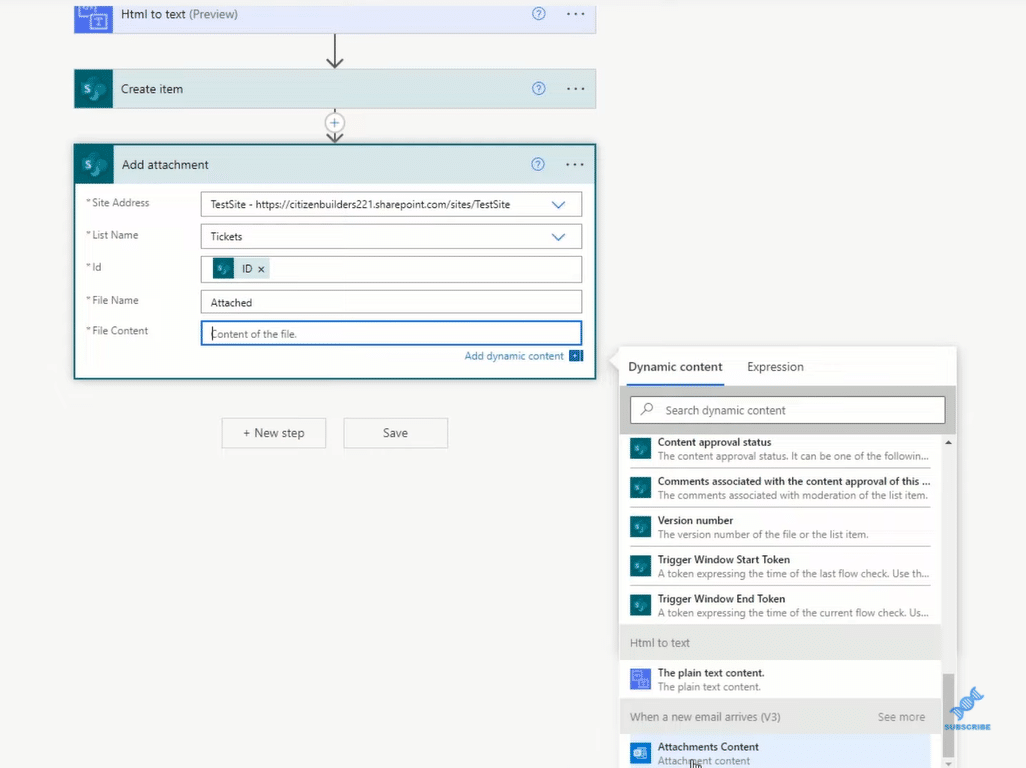
You can technically have multiple attachments in one email, so this process will be carried out for each attachment. If they have more than one image, you’ll get all their images for example.
Then, we click Save.
***** Related Links *****
Business Process Flow Integration In Power Automate
Microsoft Power Automate: Workflow Automation
Using Power Automate To Refresh Data In Power BI
Conclusion
In this blog, I’ve shown you a very simple example of how to parse emails in a Power Automated workflow that takes the contents of an email and populates a SharePoint list.
We’ve created a very simple workflow, but you can imagine that it can get more complex.
The second thing here is that we’ve only automated the loading aspect of tickets. Tickets have a very long life cycle. A ticket originated, which is what we’ve automated, and it’s also commented on as resolved. Then the resolution is communicated back to the customer. That is a whole Power Automated workflow that you can actually automate.
We’ve also had our customers use email to trigger the workflow. However, you might also want Power App instead.
You can watch the full video tutorial on how to parse emails below. If you want to learn more about Power Automate, check out the links below.
All the best!
Henry


