Today, we’ll show you how to connect Power BI and Power Automate platform. One simple use case for this is if you have a Power BI report that lists customers, clients, and members of your own team in a list, and you want to be able to cycle through each one and do something for each customer, client or team member.
For example, you want send them an email. You can connect Power BI to Power Automate and highlight the records that you want that action to occur for. When you click a button, a Power Automate script basically gets triggered that either sends an email or creates a file for each customer, client or team member.
When Tim and I were first tackling this, it was fairly easy to do. But the error that we came up with is when you have users who will click the button before actually filtering two specific records.
Let’s say you are a part of a 10,000-employee company and you have a list of all your team members in your organization. You don’t want to send emails to 10,000 people. You need to have a threshold or a filter in your Power Automate script; otherwise, you’ll end up sending thousands of unnecessary emails, which blocks your Outlook system.
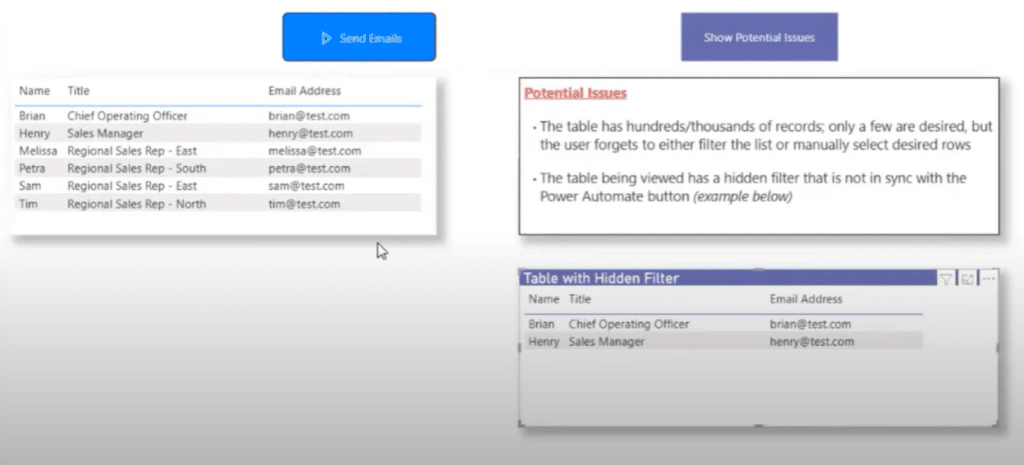
Here’s a good example of a really simple table. In my example, I’m only showing six names, but in your report, you could have hundreds or thousands of records in this table.

The great thing about Power Automate is using the functionality to send emails automatically rather than sending them manually.
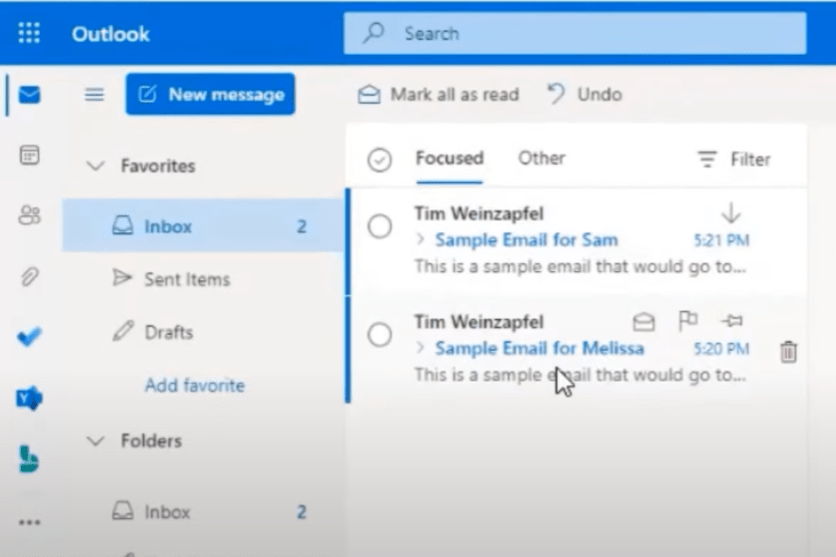
However, you could run into some potential issues. Let’s say we have to send an email to our sales reps in the east: Melissa and Sam. We have a Power Automate button that is connected into our report.

We’ll just trigger it to send the email. In this situation, I had the email sent to me just so that I could show this. In my inbox, here are the two emails that were triggered from Power Automate and Power BI report. Obviously, these would’ve also gone to the user.
Some Potential Issues In The Power Automate Platform
Before I walk you through the setting up of the email process and putting in the conditional stop gap measure, I want to highlight a couple of issues that I have experienced.
The first one is when you have a table that has hundreds or thousands of records, this can clog up your email system.
The second thing that people may not be aware of is if your table has a hidden filter that’s not the same filter that is in your Power Automate platform button, you can have some unforeseen results.
Sending An Email Using The Power Automate Platform
First, I’ll walk through how to set up and send the email, then I will throw in the technique I use to prevent lots of emails from going through.
Here’s my table in Power Automate, which should be a standard visual that shows up in the visual pane.

Every time you pull Power Automate over, the first thing it will ask for is fields. Now, it does not have to be all of the fields that you have in your visuals, but only the data that you need for your flow. In my case, I need the email address, name, and title.
I’ll add my name and title into my visual. I’ll click on the ellipses and then click Edit. This action will send me to Power Automate.

One thing also to be aware of is that in order to access the the fields here, you have to access the flow once I’ve saved it in the Power Automate application itself. It’s more difficult to actually access the the dynamic fields in Power BI, which is why I tend to do a lot of my development here. But just so you know, you can do both.
This is a Power Automate shell within Power BI and it’s much easier to develop the flow here rather than opening up a Power Automate web browser and doing it there.
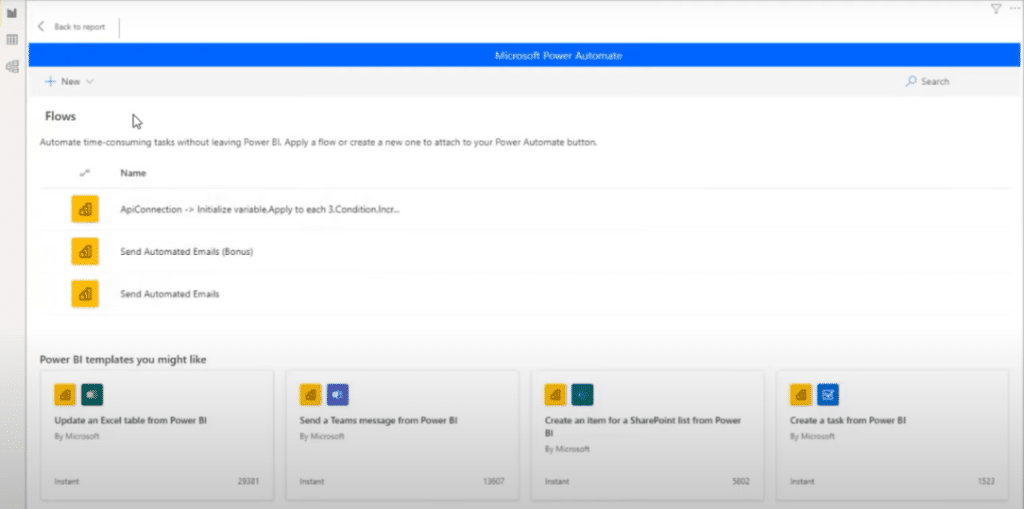
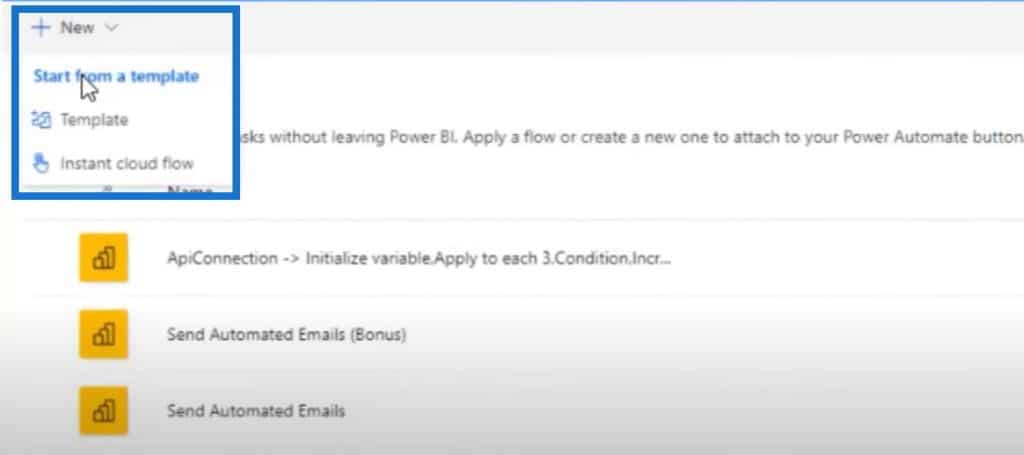
I already have a couple flows already set up, but let’s go ahead and create a new one. Click New, then Start from a template, then Instant cloud flow.
It will automatically add Power BI button clicked. Then I will go into my connector and choose an operator. When I type in send an email, it will show the V2 and V3.
My understanding and my experience with the V3 is that this will be sent from the Power Automate service itself, while the V2 will actually come from the user who built the flow. It will come from their email inbox.

One thing to be aware of is when you send an email notification through Power Automate, you are limited to 100 emails a day. However, if you wanted the email to come from you, then obviously you have to use the send an email approach (V2).
It asks me for the name, which will come from my dynamic content. There are only two email addresses that I need: the user email (the default one which I will actually access later) and the data field that I’ve added.
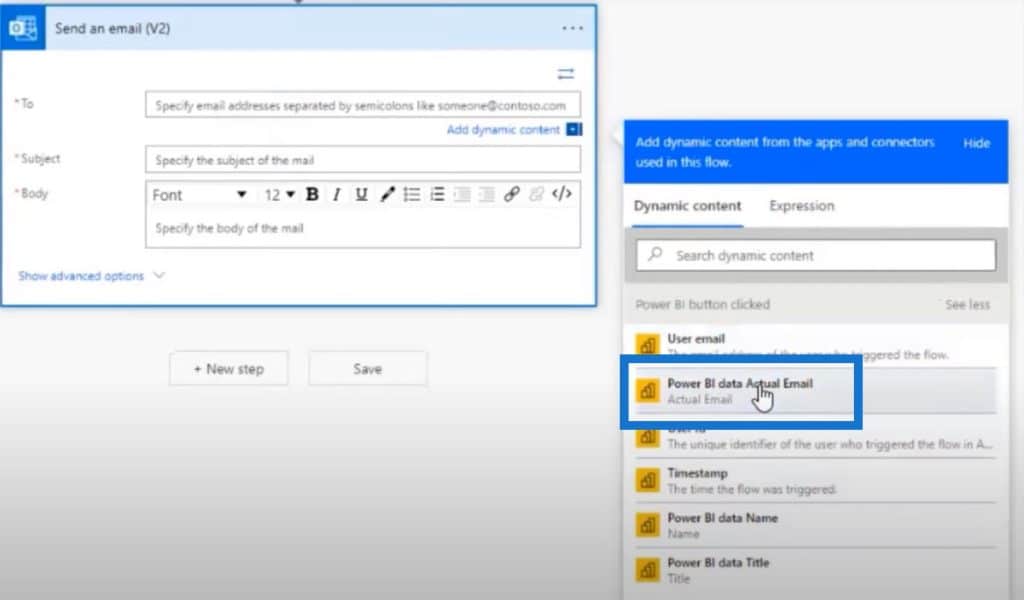
So just to clarify, the first dynamic data is the user’s email address, or the person who actually clicks the button, while the second one is the Power BI data email, which is the email in the table and the one we’ll be using.
And because the data that is coming from the Power BI report has multiple records, it automatically converts it to the Apply to each control.

I added my subject which is This is an email for <user> and in the body I typed in Dear <user>. Then I click on Save and apply.

This right here is the basic principle, and all you need to know to set up an email. So if we save and apply this, when we go back and run these tests, it will send the email. But if you have a thousand rows, it will cycle through the Apply to each function a thousand times.
I want to be able to tell the flow that if it is above a threshold of three, it will not stop the flow and send email to the user. To do this, we’ll create a variable.

Initializing The Variable
The first step is to initialize the variable. Let me call this RecordCount, choose the type Integer, and start with 0.

Now that I have my variable initialized, the next step is to increment the variable. This will help me determine how many records were selected when I clicked on the Power BI button. The easy way to do this is to add an action.

And because I want to cycle through every one, I’ll use the Apply to each control.

Then add an action and increment my variable.

For my variable, I will select RecordCount, which I initialized previously, and I want to increment it by a value of one.

This will cycle through every single record in my dataset and increment it by 1. By the end, I’ll have the total count of how many records there are, which is what I can use in my conditional statement.
Adding A Conditional Statement
The next step is to add a condition. I’ll pull in my RecordCount variable, choose the less than or equal to three because I only have six records.
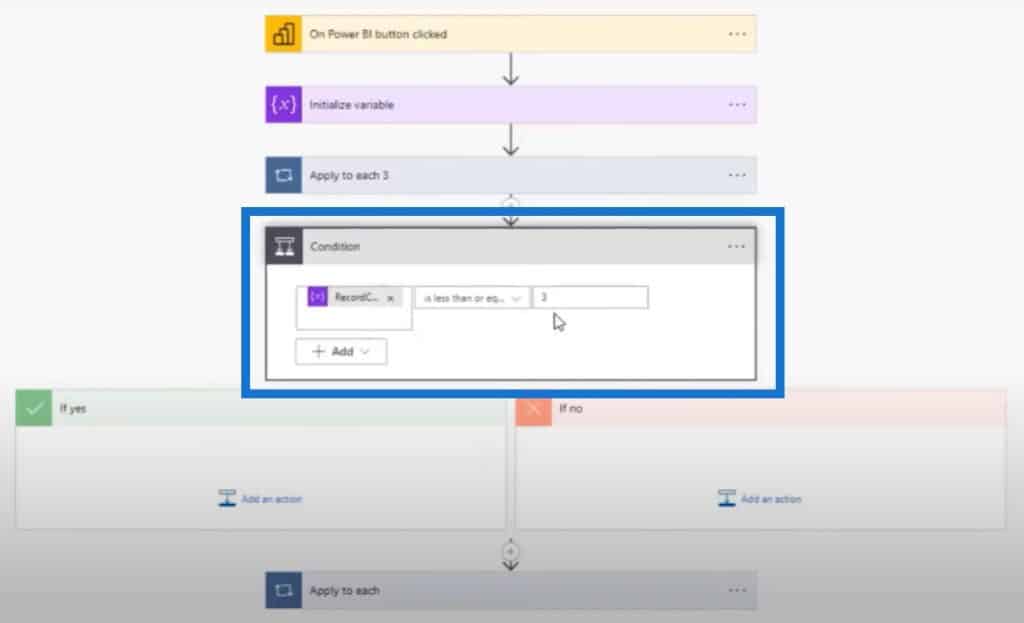
If it’s less than or equal to three, then the flow will go down the yes path. It’ll send the email and all will be good.
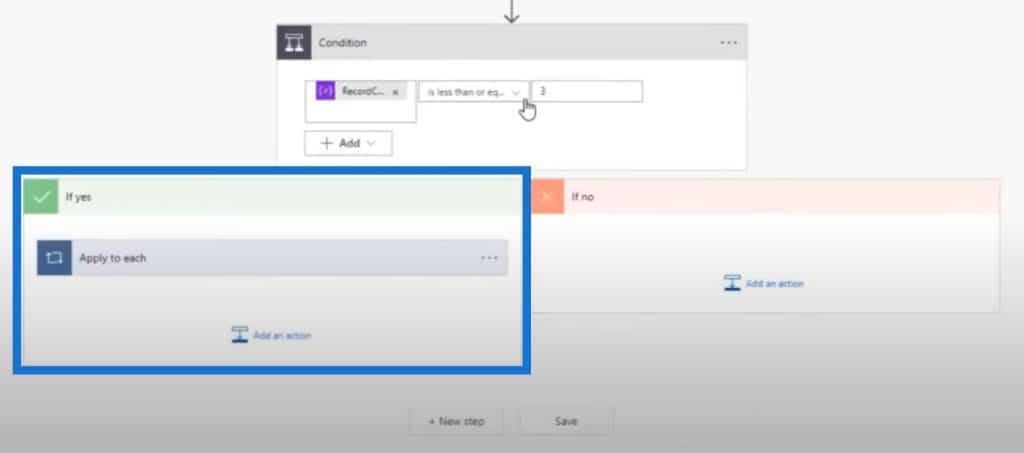
If not, then it will go down the no path where I cancel the flow. If this variable is greater than three, it will do two things. First, the flow will alert the user through an email. I will choose the V2 again.

Now, this is the field that comes in handy because this is who triggered the flow.

I’ll write here that the flow was canceled and pull up my variable. Then I’ll click on Save and apply.

Testing The Flow In The Power Automate Platform
Let’s make sure this flow runs, so we’ll go back to the report, select two records here and run the flow.

Since it says the flow has been triggered, let’s jump over to my inbox. We can see the two emails sent by the flow.

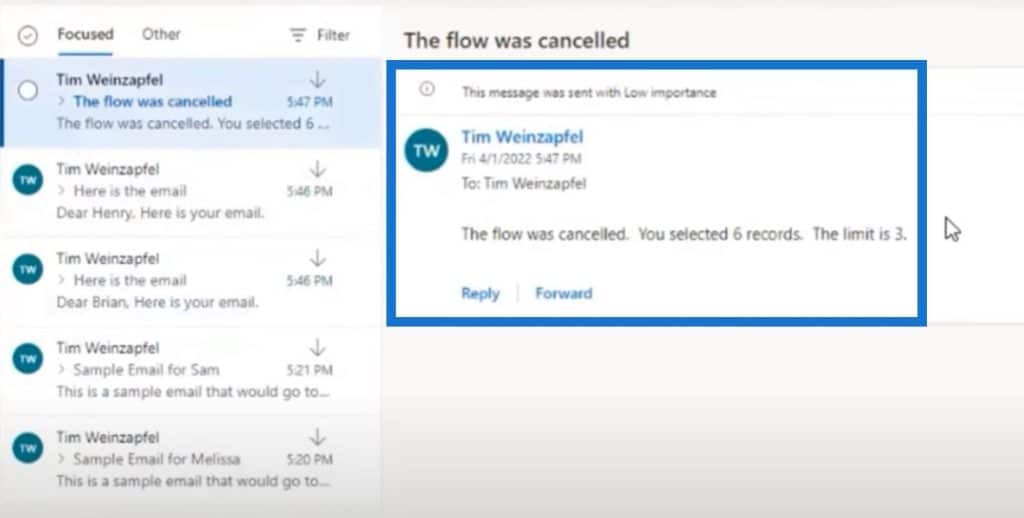
Now, when we select all, this will trigger the condition that will cancel my flow. As you can see, there’s an email informing me that the flow was canceled.
Adding A Record Limit With A Slicer
Let’s say your users don’t have access to the flow but you want to give them the ability to choose the record limit. In this example, we have a slicer.
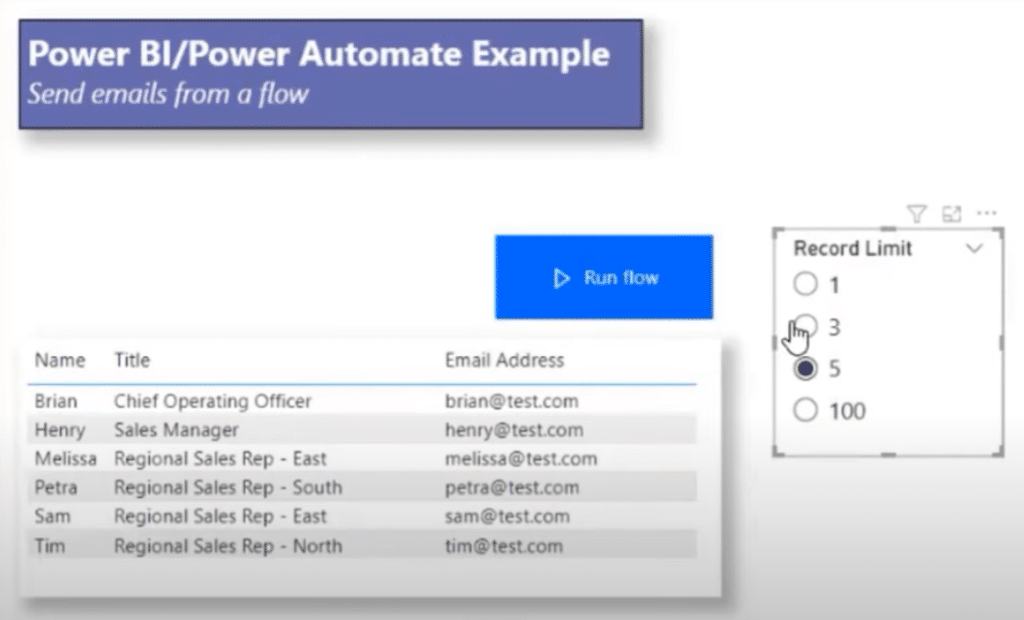
I’ll show you how I embedded this into the flow and created another variable to make this slicer. I’ve created this simple table and called it Max Selection Count, which is what I’m using for my slicer.

Then I have created a measure, called it Selected Max Records, and used the SELECTEDVALUE function. You just have to make sure that it’s converted into a radio button so that a user can select one. The next step is to add that measure into the flow.

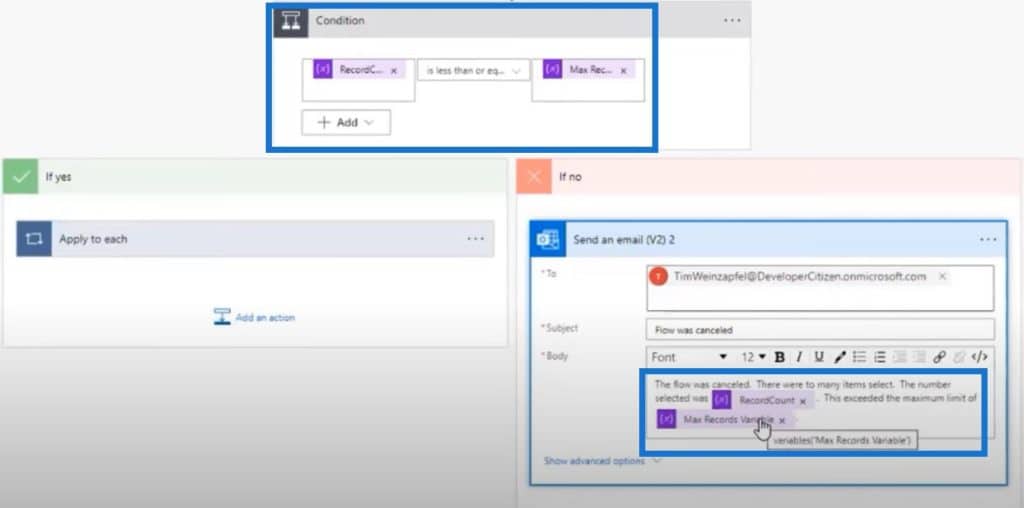
Here’s the first variable I’ve initialized, and the second variable which I turned into an integer.

And now I do another loop but instead of incrementing, I’m just doing the set variable. All I’m doing is setting that variable and it just loops through the same thing every time. Now my Max Records variable is set with the measure that I’ve just created.

As for the condition, instead of having it hard coded, I just plug in my Max Records variable to make it dynamic and then add it in my email.
***** Related Links *****
Microsoft Power Automate: Workflow Automation
Automated Flow In Microsoft Power Automate
PowerApps Integration In Microsoft Power Automate
Conclusion
For today, we learned how to take our Power BI reports to the next level using the Power Automate platform. Specifically, you can have a table and click a button that basically executes a process, which in this example, is sending email to each record. This is a new technique that we can start doing, and hopefully, people will find this useful when creating their own reports.
Henry
[youtube https://www.youtube.com/watch?v=lIZ3OuU3hsk?rel=0&w=784&h=441]


