In this tutorial, we’ll take a look at three special features in DAX Studio that help you format your DAX codes. These are the Debug Commas, DAX Format Query, and Comments options.
They’re very useful in optimizing DAX codes and improving code readability. Detailed examples are given below to help you visualize and better understand how and when they can be used.
1. Format DAX Using Debug Commas
The Debug Commas feature is best used when optimizing your DAX code.

To better explain how it works, here’s a demonstration:
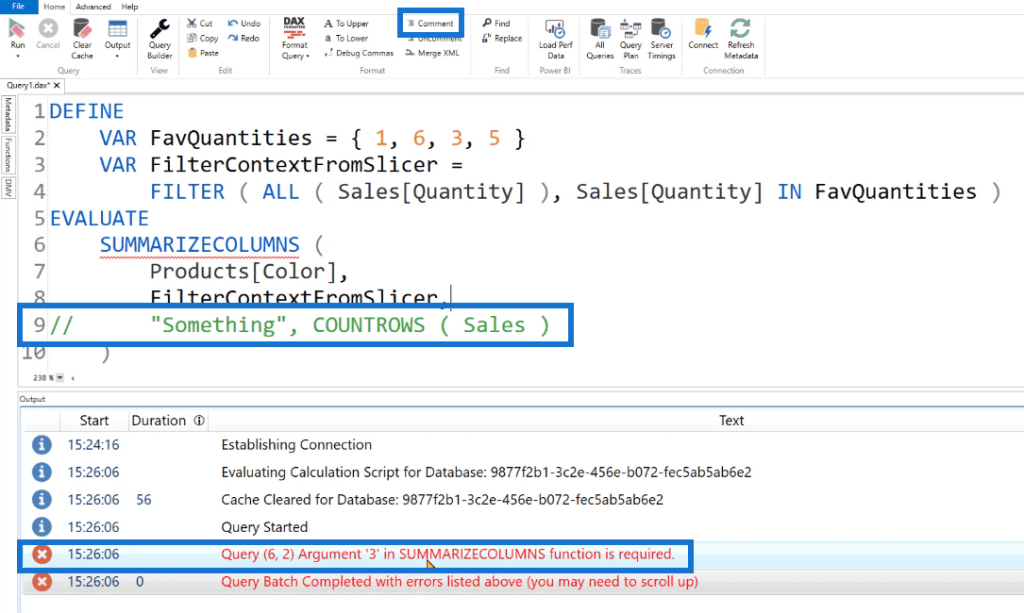
In this example, if you turn the last line into a comment by clicking the Comment option, you’ll get an error stating that Argument 3 in SUMMARIZECOLUMNS function is required.

This error appears because of the missing 3rd argument after the comma.
Now let’s test out the Debug Commas feature.
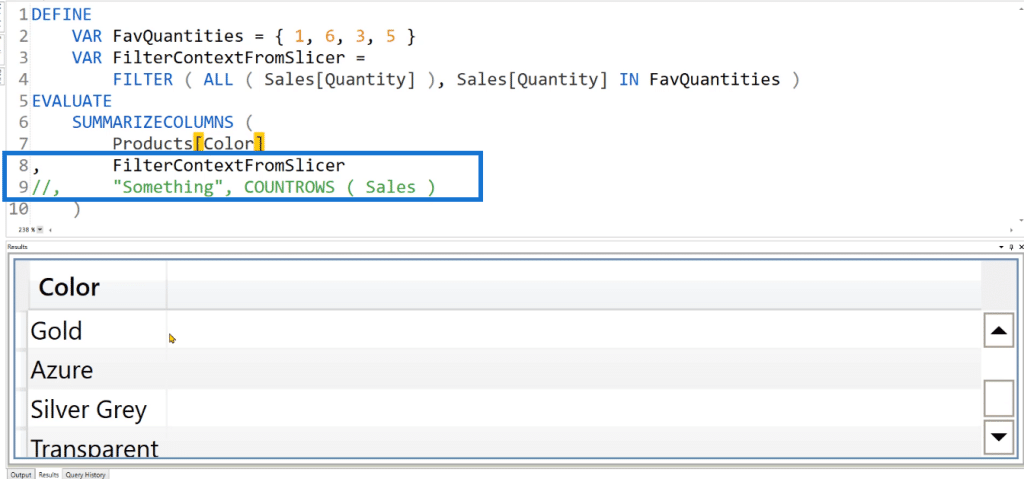
If you click on it, you’ll notice that the commas shift from the end of the line to the beginning of the line.


Notice that if you select the Debug Comma option prior to the Comment option, you’ll see that you won’t get any error unlike what happened before. Instead, you’ll get a single-columned table containing the Product Colors.

This is very useful as it eliminates the need to manually retype commas in case errors appear.
2. Format DAX Using DAX Format Query
The next feature to review is the DAX Format Query.

The code used in this example is from the Enterprise DNA forum.

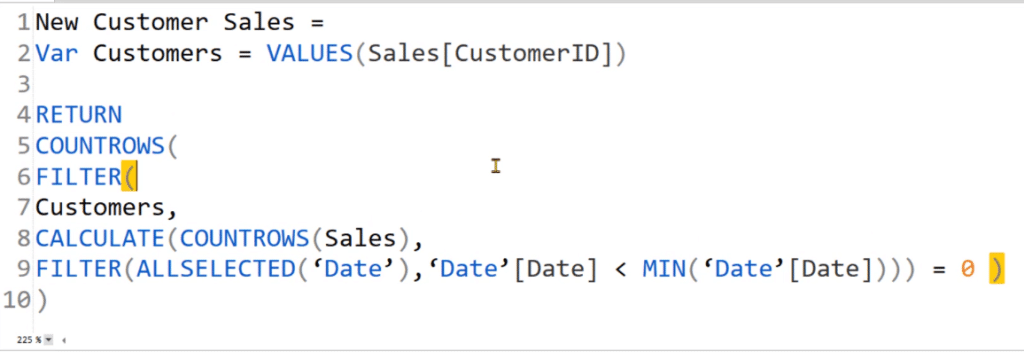
You can see that the DAX code isn’t properly formatted. You can’t tell the code’s flow or what the arguments are for each function used.
This is where the DAX Format Query option comes in. To trigger it, either click on the button or press F6.
Now, you’ll see that it’s throwing an error because inverted commas were used.

To easily fix this error, press Ctrl + H to replace the incorrect characters.

Now, if you try to click the DAX Format Query option again, the code’s format is then fixed according to the standard. Also, by clicking its drop-down arrow, you can choose between Longline and Shortline.
This is what Longline looks like:

Meanwhile, this is Shortline:

3. Format DAX Using Comment
The last demonstration for this course is the Comment option in DAX Studio.

Similar to other programming languages, DAX also has built-in support for creating comments in your code.
Comments can help you better understand what’s happening at each stage in your DAX code. It’s also a form of guidance for other users. It can explain what you’re trying to do without actually having to verbally explain it one by one.
Here’s an example:
In this case, the code is separated into several variables where each line of code has its own comment.

At a glance, you can see that the comments make the code much more descriptive in nature. In the first comment, you can easily understand that this part of the code can be written separately and that there’s no need to nest it inside a large chunk of code. The next comment explains that FILTER is starting to iterate the customer’s table such that each row will be converted to an equivalent filter context.
The third comment explains that CALCULATE will inject the PastDates variable into the filter context. Then it will count the number of rows in the Sales Table. If it returns a zero, then you’ll know that a particular customer is a new customer.
That’s how Comments can increase and improve readability. Also, if you’re revisiting a piece of code you’ve written many months ago, Comments make it easier for you to understand your past thought process.
***** Related Links *****
How To Work Through Extensive DAX Formulas In Power BI – Formatting Tips Included
Power Query Functions, Keywords, And Identifiers
Formatting DAX Code In Power BI
Conclusion
For beginners, who are still in the process of familiarizing themselves with Power BI and DAX Studio, the abovementioned features are lifesavers. They can greatly assist you in improving the readability and flow of your DAX codes. Moreover, they are valuable tools for preventing human error.
All the best,
Enterprise DNA Experts


