Let’s take another look at the problem discussed in this tutorial, which dynamically compared the first N business days of each month. This problem was based on a query from an Enterprise DNA member on our forum, where he wanted to dynamically look and compare the first 5, 10, 15, and 20 billable days (the non-weekends and non-holidays) for a given month against the previous month.
Instead of using power query, we’ll come up with a DAX coding language solution. You can watch the full video of this tutorial at the bottom of this blog.
In the first video, I came up with a power query solution on how to solve this problem. But then one of our Enterprise DNA experts, Antriksh Sharma, came up with a brilliantly efficient measure that is also worth taking a deeper dive into. We’ll discuss some of the techniques he used in developing a measure, which will provide you with additional tools in your DAX toolbox.
It certainly did for me and for some of the other experts who took a look at this. The like-for-like comparison of comparable business days across months is a valuable pattern in general that can be used in many situations.

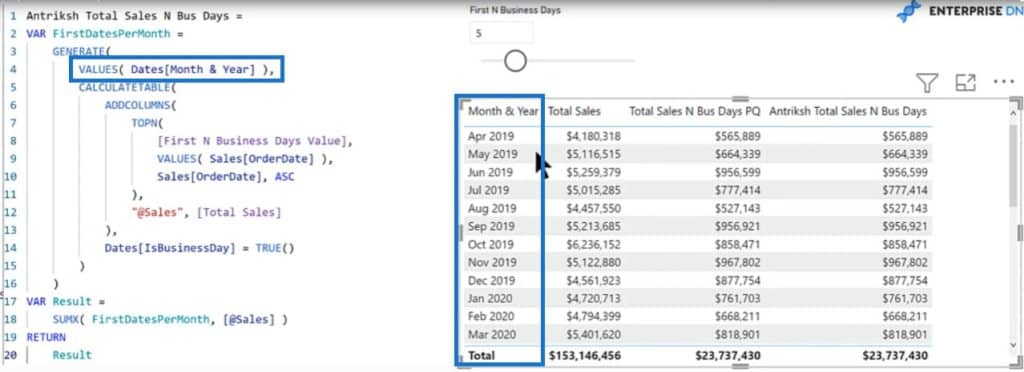
Let’s dive into power query and take a look on what Antriksh did here. We have the Month & Year, Total Sales, and lastly, the Total Sales for N Business Days that we selected using power query based on the what-if parameter that we developed.

Antriksh took a very different approach, where he used a shockingly short measure to solve this entire problem. The first thing I noticed about this was the use of the GENERATE command.

This is a DAX function that I don’t use very often, but is a perfect fit for this type of problem. If we take a look at the SQL BI DAX Guide, it says that the GENERATE function is a table function that uses as its input two different tables, and then does an equivalent of the SQL command CROSS APPLY.

So it takes a base table (Table1) and iterates on that, and then takes a second table expression and evaluates that for each row in the first table, and then returns to the table as the output.
Let’s take on Antriksh’s measure and drop it into the table. We can see that it produces the exact same results as the power query solution that we did last time. So that’s good and validates both measures quite well.

Let’s take this measure apart. The first filter applied here is Dates[IsBusinessDay] = TRUE. This takes out all of the non-weekend and non-holiday dates based on the extended date table IsBusinessDay field.
We talk about this a lot more in the first tutorial, where we also went through how to tie that into our holiday table.

The interesting part of this really comes in the two table inputs. The first table is just a one column table of the Month & Year field in the Date table.

But the second table input is where the interesting stuff happens. Antriksh used a TOPN function and then used our dynamic parameter as the number of rows in the TOPN.

The Total Sales measure is attached to the second table, and then applied to the first table.

Understanding A Complex Measure Using DAX Coding Language
One of the easiest ways to figure out what a complex measure like this is doing is to go into Tabular Editor. We can take a look at this expression and figure out what this TOPN expression is doing first.

Let’s copy the TOPN portion and create a new DAX query. Remember that DAX queries start with EVALUATE.

When we paste the TOPN portion, we’ll see that this is pulling the first 5 dates from the sales order table. There’s a table in the TOPN that is composed of the values of all the order dates within the sales table.
This TOPN function is taking the value of the what-if parameter (which in this case is 5) and applying it to the sales order date field. Then it is pulling the first 5 dates within the filter context in an ascending order based on that field.

Given that there’s no additional filter context, it’s just pulling those first 5 dates from the entire table.

The @Sales column is just adding the total sales within the proper filter context to the TOPN table.

So far, we have the first table of the Month & Year, the second table of the TOPN of the first N dates from the sales table, and then the total sales associated with that.
Using The GENERATE Table In DAX Coding Language
Let’s take a look at what this GENERATE table is doing. We’ll hop back into Tabular Editor and create a new DAX query.
We’ll start as we always do with EVALUATE, paste in the GENERATE portion of the code, and click on 5.

We can see that for each row of the first table, it is iterating and joining with the 5 rows from the TOPN table evaluated in context with the @Sales function.
It has taken the first 5 business days in April, the first 5 business days in May, the first 5 business days in June, and so on until it gets to the end of the first table.

This is exactly what we need, and now it becomes a relatively simple matter of adding those values up. We have the result (which is the table variable of the GENERATE results) and then we need to sum up the @Sales function.
Within context, we are now summing up the first 5 business days in April, the first 5 business days in May, and so forth until we get down to our total of $23,737,430, in which case it has no context of Month & Year to operate.
This sums up the entire @Sales column and gets us the exact same total that we had in our power query solution.

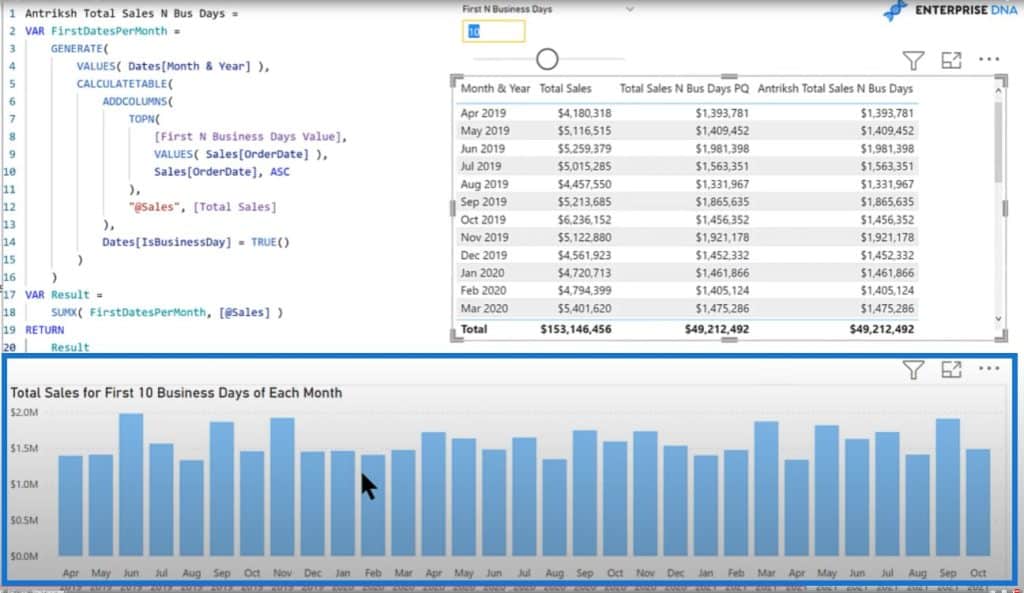
You can see that if we change the slicer to 10, we get dynamically the same results with DAX coding language as we did in power query.

We also have the bar chart at the bottom adjusting dynamically to reflect the changes we have made.

Dynamically Adjust Measure Title
There’s another additional trick I wanted to show you. You can create a dynamic adjustment on your what-if parameter and tie it dynamically into a measure title.
For example, if we change the slicer at the top to 15, it will dynamically change the name of the measure at the bottom to Total Sales for the First 15 Business Days of Each Month.

There’s an easy way to do this in DAX using conditional formatting. We basically just take three strings. The first is the Total Sales for First, and then concatenate that with the value that we harvest from the what-if parameter, and then just tie that to the rest of the title.

Then we go into the visual, go to conditional formatting of the title, and click on fx.

We’ll format by field value and choose that dynamic title measure. This will change the selection of the what-if parameter.

***** Related Links *****
Showcasing Workday Number in Power BI Using DAX
Adding Workday And Weekend Numbers Into Your Date Table
Calculate Workdays Between Two Dates In Power BI
Conclusion
What we have now is a complete solution using DAX coding language. We have discussed a really creative and efficient way to do it using the GENERATE function. I want to thank Antriksh for sharing his brilliant DAX knowledge with us. I learned a lot while going through his DAX solution, and I hope you did as well.
Brian


