In this tutorial, I will show you how you can create the ultimate dynamic navigation menu using filters in Power BI. This will increase the user experience inside your Power BI reports. You can watch the full video of this tutorial at the bottom of this blog.
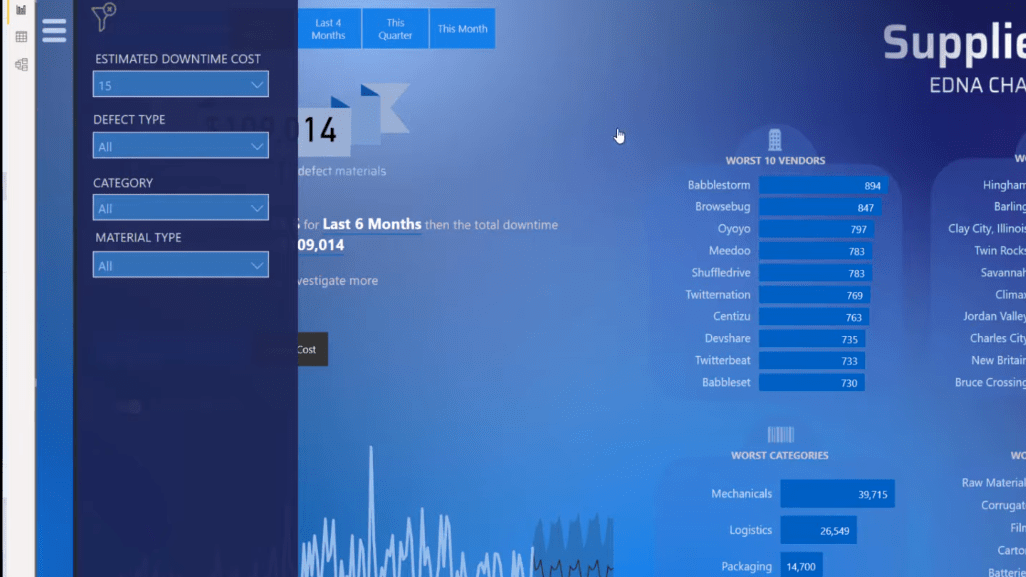
You have a lot of options in Power BI. You can have filters that are shown on the page and navigation menus that direct you to different pages of your report. You can have dynamic filters menu that can be opened and closed when clicking on specific buttons. You can also create a fully dynamic filter menu that can be opened when clicking on a button but can be closed when clicking around.
I’ll show you how to create this menu and how you can implement the same technique within your reports.
How To Add A Dynamic Navigation Menu
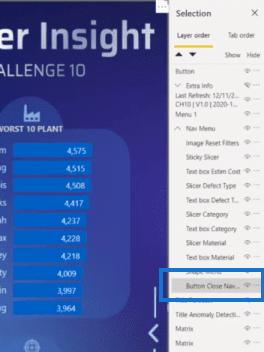
First, let’s open the Selection pane, and the Bookmark pane as well. Below is the report that I have created and you can see in the Selection pane that I have created a navigation menu. This navigation menu is composed of all the elements inside the dynamic menu.

It is very important that you group together all the elements and put them in descending order. So as you can see, I have the titles, the filters, the shape, and then I have a close button.
Creating The Blank Button
This close button is actually a blank button, so let’s create one.

We go to the Insert Tab, then Buttons, and then select Blank.

It’s a blank button that was positioned like this, covering the entire page, by stretching it out fully. Then we turn off the Background.

Renaming The Elements
As you can see, every element that we made on the page will be indicated at the top of the Selection. So we have to double-click on it and rename the element. It will be easy to understand what we’re looking at.

And then, we drag it down to the position that you find necessary.

You can see that I also created a small image that shows an icon, which means that the filters will be cleared.

Maintaining The Layer Order
Now that we have created the menu and the buttons, named the items, and grouped them together in the right order, we have to make sure that we maintain the Layer Order. This means that every element on this page has to have the Maintain Layer Order on. This is very important to keep the menu staying always under the other elements of the menu. It’s the same case for the Blank button, which has to be under our Shape Menu.
Creating The Bookmarks For A Dynamic Navigation Menu
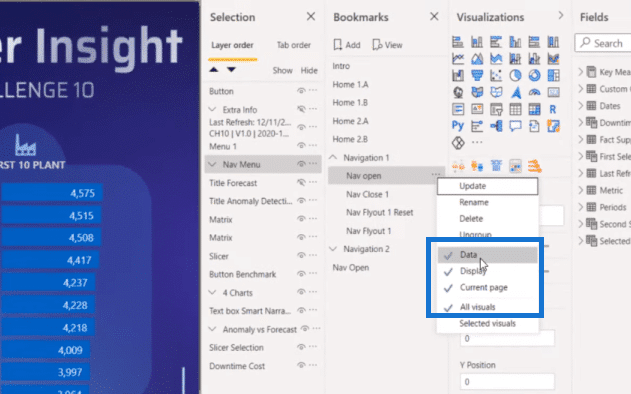
The next thing we have to do to set up our dynamic menu is to create bookmarks. So, we’ll create a bookmark and let’s call it, Navigation Open. If we will click on it, we have more options and we can see that we have Data, Display, Current page, and All Visuals selected by default. We do not want to have all these options selected.

For example, if we have Data selected, and the end-user will select another field on the page, let’s say All Dates, when he or she will open the menu, the selection will not be visible on the screen. So we do not want that.
We do not want to have All Visuals selected either. We want to have only the navigation menu that is open. So we will click on Navigation, then click on Navigation Open, and then choose Selected Visual.

Now, we want to give an action to this button. So this button is also a blank button that has an action to go to, let’s say, Navigation Open, which is the bookmark we just created.

So with this bookmark, the page will not change if we open the menu. For example, if I make a selection on the page, let’s say the Last 6 Months, the page results change. And then, when I click on the menu, you can see that all the selections I did before are still there.

The second bookmark that we want to do is the close menu. So, let’s call it the Navigation Close bookmark. Once again, we go to options, take off Data, then choose Selected Visuals, and then update.

For the action, we go to Button Close Navigation, then select Navigation Close.

With that, we can open the menu and close it if we click around it. If we click inside it, it will stay open.
Conclusion
These are the steps that you need to create a dynamic navigation menu. You have to create your menu with the buttons, group them together by giving them proper names, and make sure that all the elements have the Maintain Layer Order turned on.
Next, you have to create actions for opening the menu, the blank filter on the page, and three bookmarks.
That’s it for today. I hope you find this tutorial useful. I am confident that by implementing these simple steps, you can make the same types of menus inside your Power BI reports.
All the best!
Alex
***** Related Links *****
High-Quality Power BI Report Navigation Experience
Power BI Applications & Brilliant Navigation Ideas
Power BI Drill Through Navigation Techniques
**** Related Course Modules *****
Dashboard & Data Visualization Intensive
Data Visualization Tips
Advanced Financial Reporting w/Power BI
**** Related Support Forum Posts *****
Navigation Menu
Deploy an App without the Standard Navigation Menu
Power BI Navigation Menu
For more navigation menu queries to review, see here…..


