
In today’s blog, we will examine three ways to strip off seconds from a DateTime value. You can watch the full video of this tutorial at the bottom of this blog.
If at all possible, you’ll want to lower the cardinality of your data while still meeting business requirements. However, DateTime values can have an extremely high cardinality.
That means a DateTime column can contain a vast number of unique values, which can impact model size as well as performance.

How To Strip Off Seconds in Power Query
There are two obvious ways to deal with that. The first is to make sure to always split DateTime values so you’ll end up with one column with dates and one column with times.
The second is to determine at what granularity the analysis needs to be performed. You need to report by the second, minute, or even hour.
However, in this blog, we’ll solely focus on methods of stripping off seconds from DateTime values.
Full UI-Drive Approach for DateTime Values
Start by going to your Power Query editor. The first approach that you will be learning is a full user-interface-driven approach.
With your DateTime column selected, go to the Add Column tab, select Time, then choose Time Only.
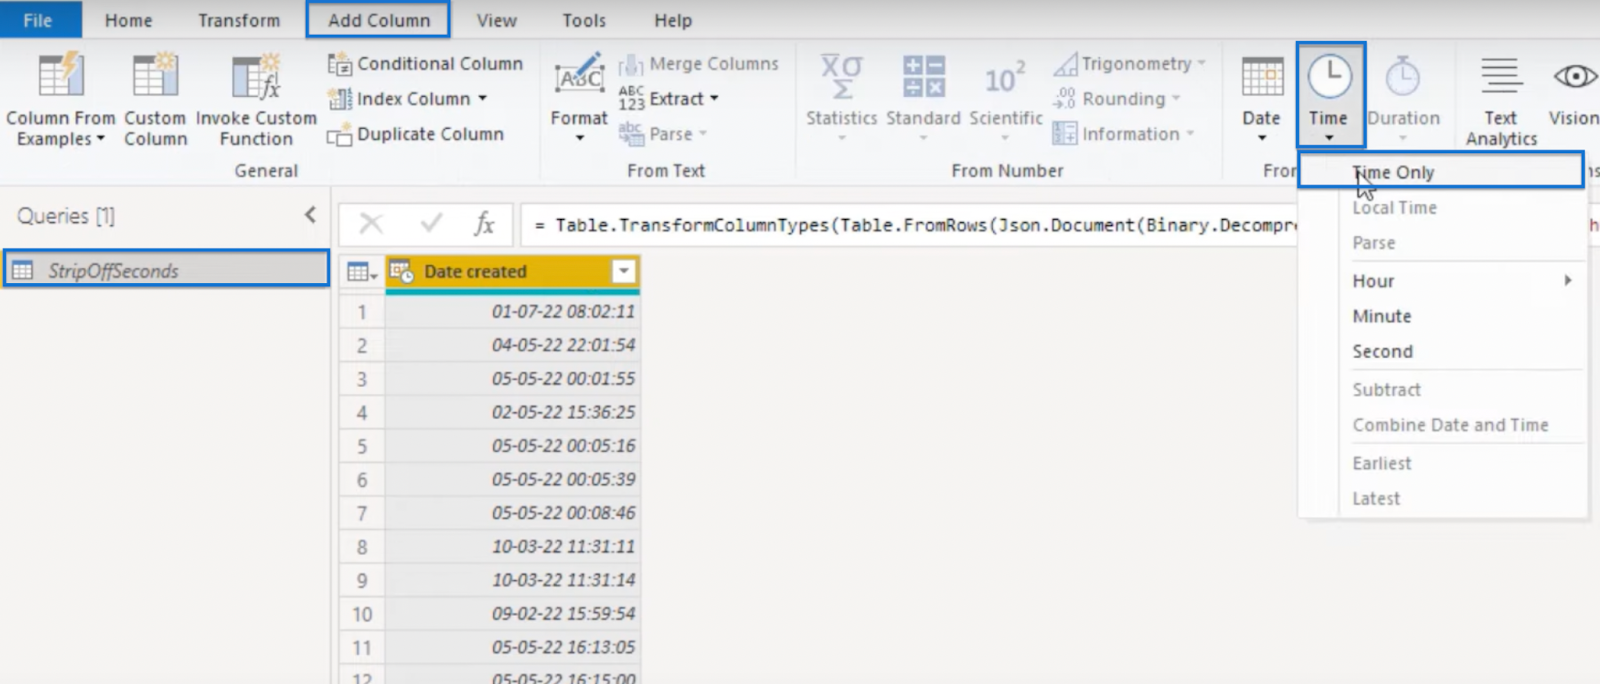
A Time Column will show up.


Click the Time icon and choose Text.

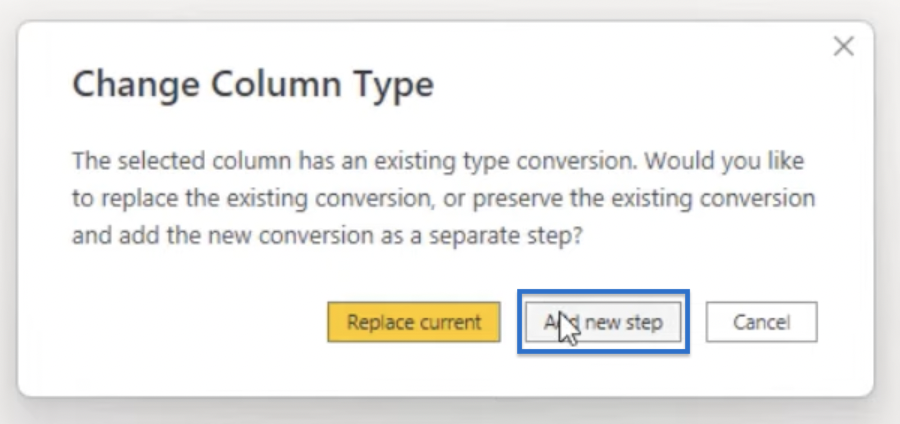
Then, revert it back to Time by following the same steps. Don’t select replace current, but Add New Step instead.
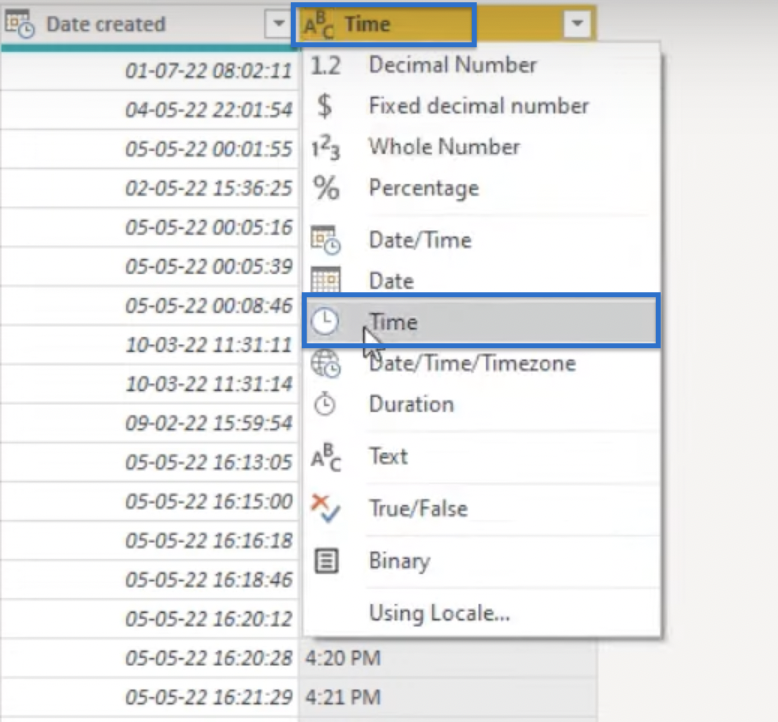
And now we’ve lost the seconds of that time value.

Personally, I used this method of converting to a text and then back to a time more frequently, but using a non-UI-driven approach for which I use a different syntax.
Non-UI-Driven Approach for DateTime Values
Let’s take a look at our non-UI-drive approach.
With the Mini Table Icon in the upper left corner, select Add Custom Column.

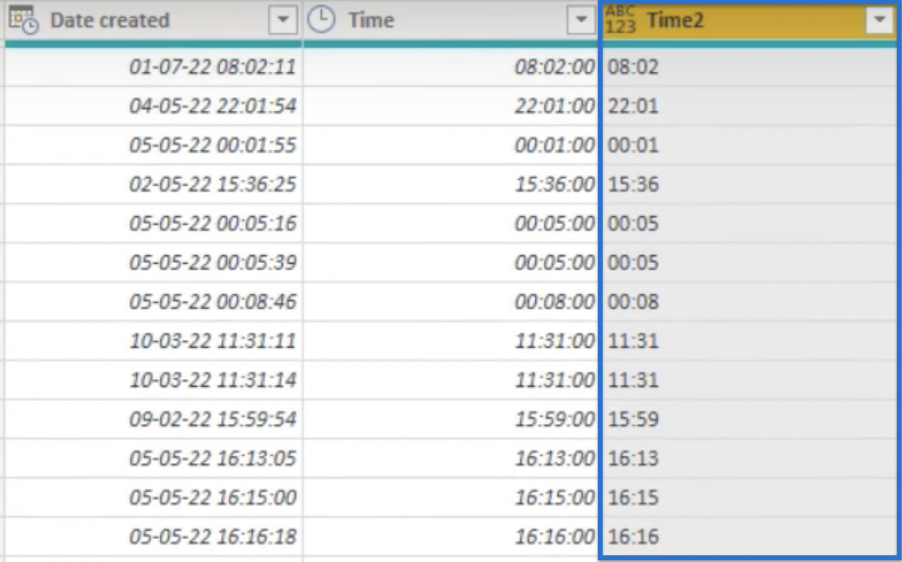
You can call the new column Time2. To convert a DateTime value into text, you can use the function =DateTime.ToText ([Date created), “HH:mm”).
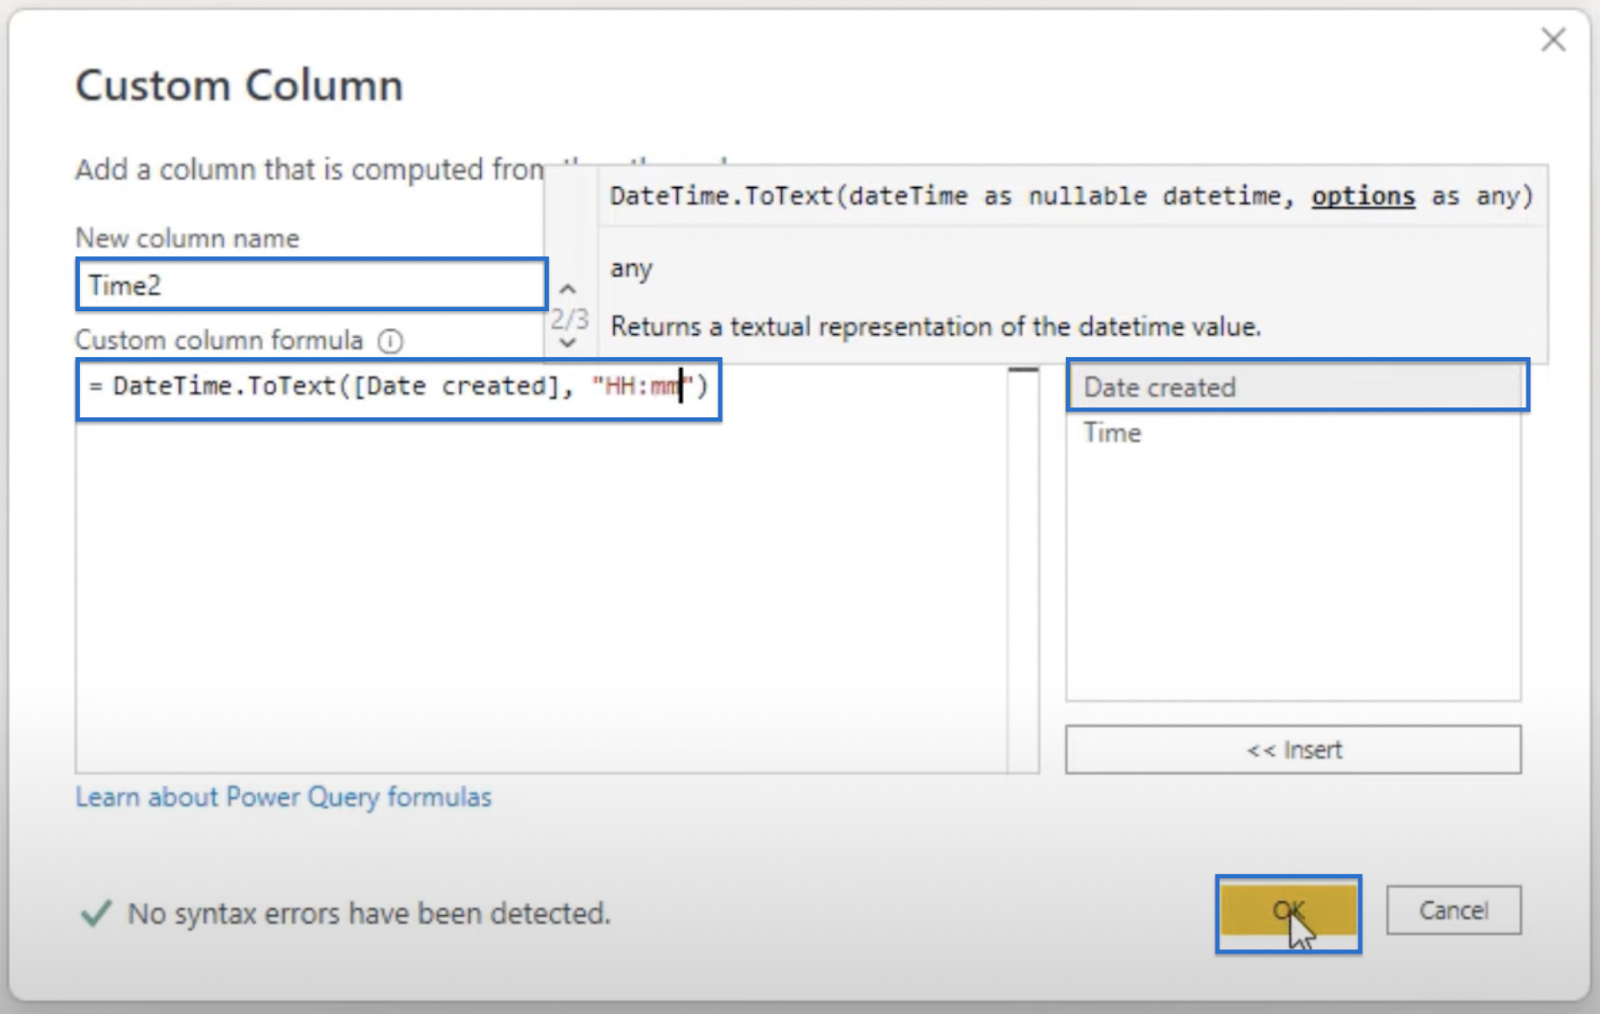
Note that the Date Created part in the function is added by clicking on the Date Created column on the right as shown in the image above. The HH:mm shows the time format, and we use capital HH to apply the 24-hour format.
Let’s click Okay. From the results, we can see a new column with the hour and minute only.
Let’s also try changing the hour format to lowercase. To do that, go to the formula bar and change HH to hh. Click the check mark afterward.
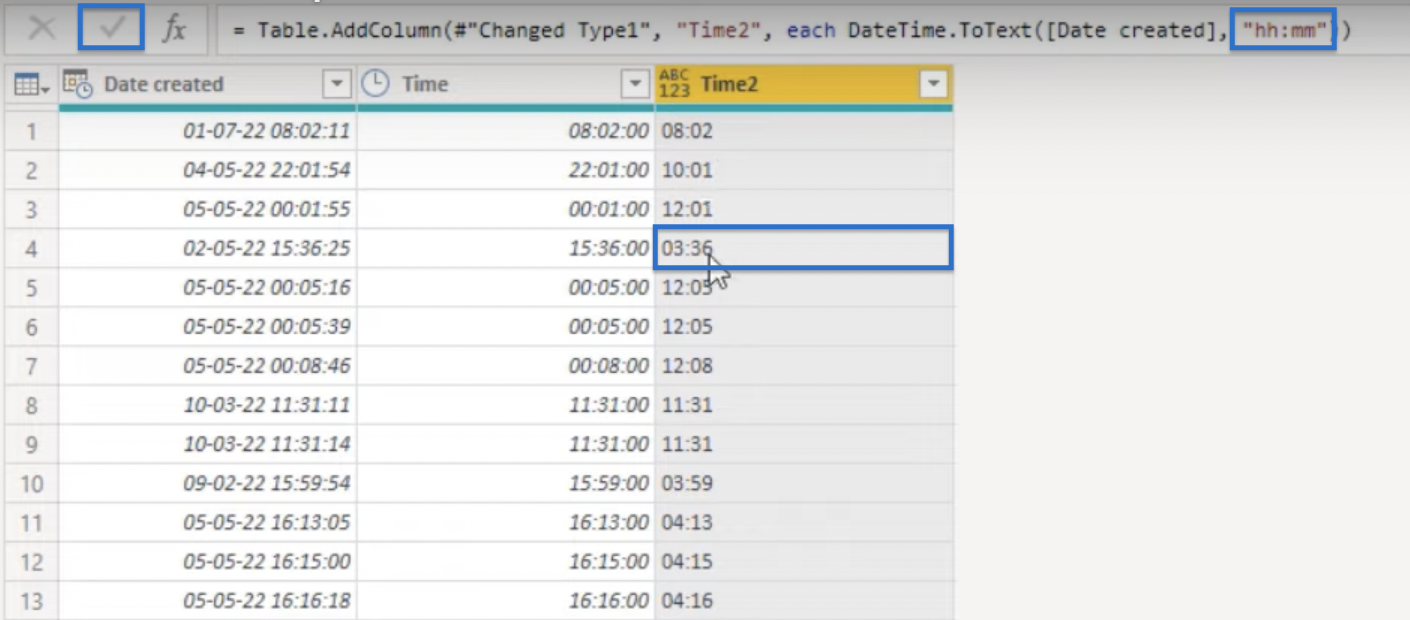
For the purpose of this blog, let’s revert our table back to the 24-hour format by changing it back to HH.
The time values you have are in the text format. To revert them back to the time format, use the function shown below and click the check mark.

Using DateTime.ToRecord
You can use one more method to do exactly the same thing. In this example, we are using the DateTime.ToRecord.
Start by going to the Mini Table Icon then Add Custom Column.

A Custom Column window will show up. You can use the name Time3 and apply the DateTime.ToRecord function using the formula shown below.


Click OK to return the record.

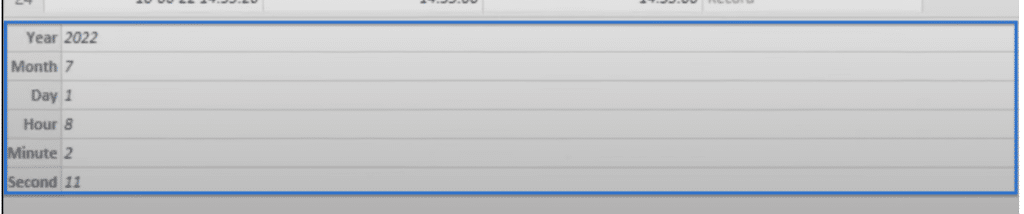
Click on one of the records, and you should see a preview down below.

In the preview, you can see that the date and time parts get a field inside the record.
Using the intrinsic #time function, you can turn that back into a time value. First, create a variable to refer to it more easily. So let t equal the function you already created with the intrinsic time value added. It takes three arguments–the hour, the minutes, and the seconds.
Extend the function by adding an opening parenthesis. For the hour, call your record t and refer to the field name hour by typing hour inside square brackets like this: t[hour].
Add comma (,), then repeat the same steps for the minute: t[Minute]. Add another comma and zero (0) for the seconds.
The resulting function is shown below. Then click the check mark.

Of course, you can also set the type by adding type time to the function.

***** Related Links *****
Power BI With Python Scripting To Create Date Tables
Time Tables In Power BI: Solution For POTW #10
Setting Up A Dynamic StartDate And EndDate For Power Query Date Tables
Conclusion
In today’s blog, you learned how to strip off seconds from a DateTime Value in Power Query. You practiced different ways to lower the cardinality of your DateTime values in three different ways including the full UI-driven approach, the non-UI-driven approach, and using your DateTime value records.
All the best,
Melissa de Korte


