In this tutorial, you’ll learn how to create values for each day using Power Query formula in Power BI.
Creating values for dates is an important technique to learn in Power BI. It can give you the data you want to see throughout the days in your model. This technique also covers the gaps between columns.
This is a great tool to use when your date tables lack information.
Here’s a step-by-step guide on how to do it: You may watch the full video of this tutorial at the bottom of this blog.
Set Additional Values
For data sets containing IDs, Dates, and Weights, you need to fill the gap between those measurements. This can be done by creating a date range to spread out the difference over the days.
To do that, go to Power Query to see your table.

You need to load a copy of your data into memory. For that to happen, you must use the Table.Buffer measure.
If you click TableBuffer, you’ll see what the measure does.
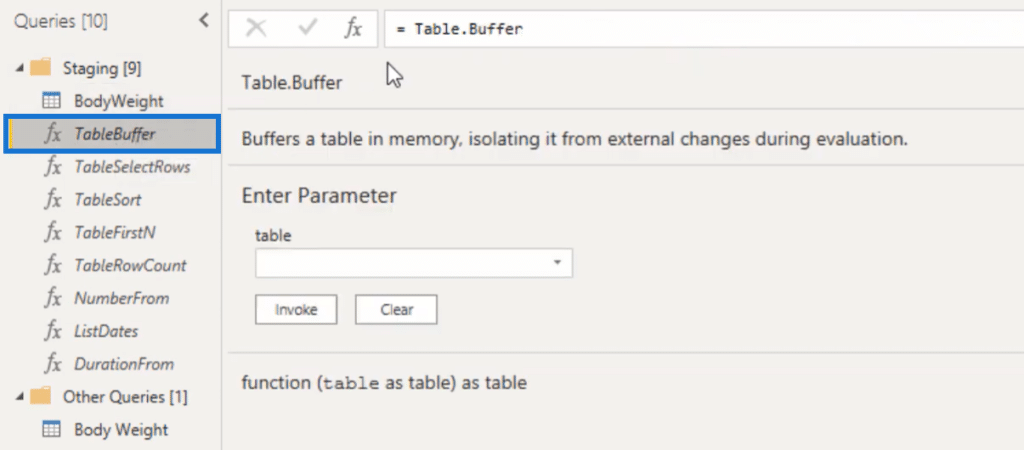
Next, go back to your data set and click the fx in the formula bar. You need to add the Table.Buffer in the measure.

Then, rename this step to BufferedTable.

Next, add a custom column.

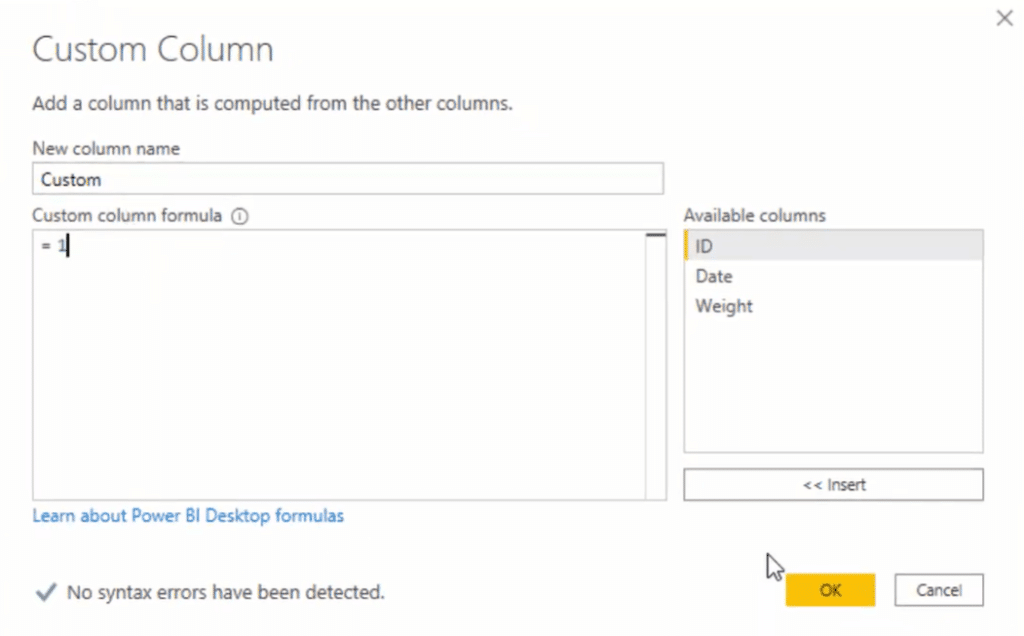
Create The Filter Condition For The IDs
In this Power Query formula, change the referenced step from BufferedTable to RenameColumns because BufferedTable should be checked first.

To check the BufferedTable, use the Table.SelectRows which returns a table that matches the selected condition.
So for each expression in the formula, use Table.SelectRows and then use BufferedTable.

As a filter condition, use a custom end function, and enter BT for Buffered Table. Check the ID Column if it’s equal to the ID from the current record. Next, access the current record by using the underscore as the access operator, and then reference the same ID column.

This will give you a filtered table that only contains the IDs which match the current record.
Add The Filter Condition For the Dates
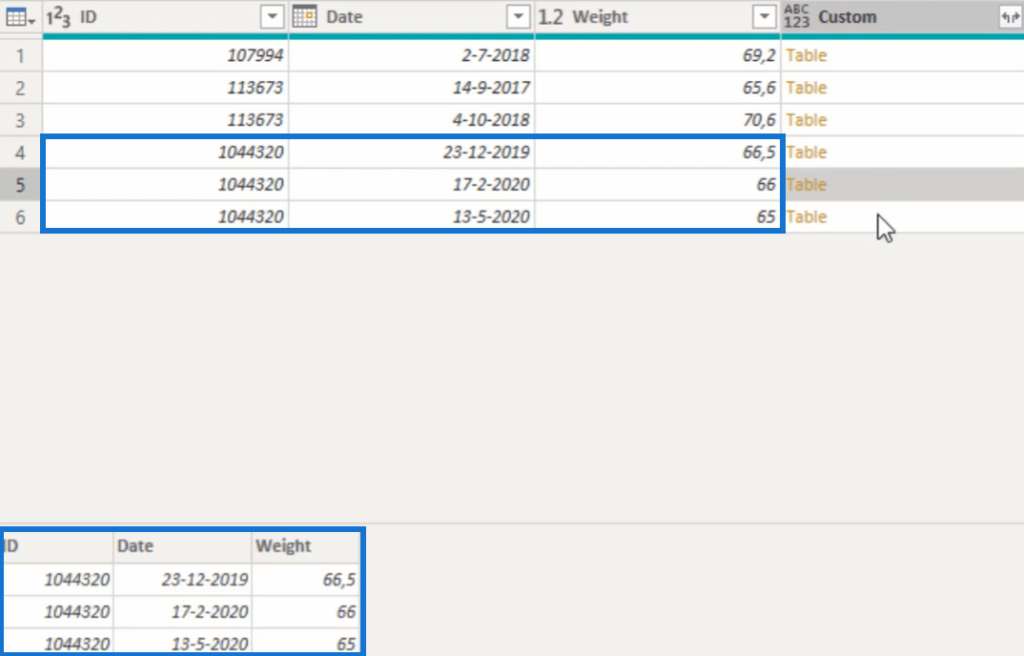
You need to filter the date column because you only need the dates that are equal to the current record.
Use these functions to check the BT date column:

This column needs to be greater than or equal to the date from the current record.
With this, the table will then contain two rows instead of three:

Check And Sort The Date Column
You need to check if the sorting of the date column is correct using Table.Sort. The function Table.Sort sorts a table on one or more columns depending on the criteria you want.
The syntax in this example is quite complicated so you have to make a down-drill on a table subject.
You need to right-click on a table and add it as a new query.

Clicking that gives you a custom query that contains that table.
Next, click on the date column, and choose Sort Ascending.
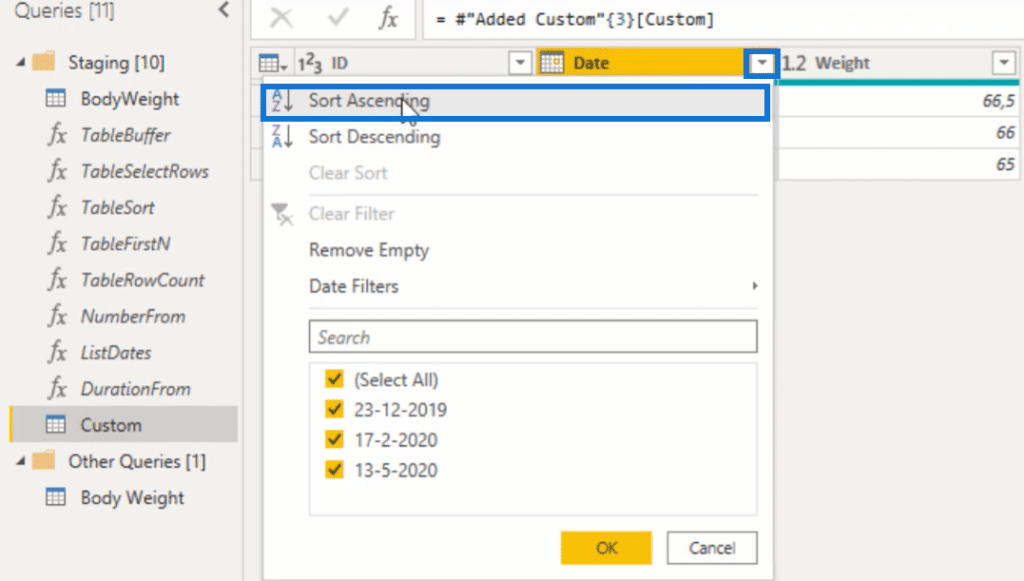
Copy the whole formula:

Go back to your main query and paste it in the formula bar:

You have to remove the reference of Table.Sort because the table that needs to pass the parameter should be the result from the Table.SelectRows.
Once you’re done, add the sort conditions back. After applying the changes, your table is now sorted correctly by date.
Use The Table.FirstN Function
For this step, you only need 2 records instead of 3.
To fix this, go back to the custom query. Click Keep Rows and then, Keep Top Rows.

Input 2 in the blank for the number of rows.

You’ll notice that the Table.FirstN function appears in the formula bar. Table.FirstN returns the first row(s) of the table depending on the value of countOrCondition.
Insert that function, along with the number of rows you need in the main query. Include the function type table at the end.

Every table object in the set will now have either 1 or 2 rows.
Get The Day Difference Between 2 Date Values
The next step is to get the number of days between the date values and extract the date that was on the second record.
Start off by adding a custom column. Name it Days. Then, follow this Power Query formula:

The syntax makes sure that there are 2 records in a table. If there’s only 1, the day difference is 0 because it has no next record. If there’s 2, you can get the difference from the date values.
Next, add type number in the formula like this.

As you can see, you get a 385-day difference from September 14, 2017 to October 4, 2018.

Determine A Weight Step
Next, you have to calculate what the weight for each day should be.
You need to add a custom column again, name it WeightStep, and copy this Power Query formula:
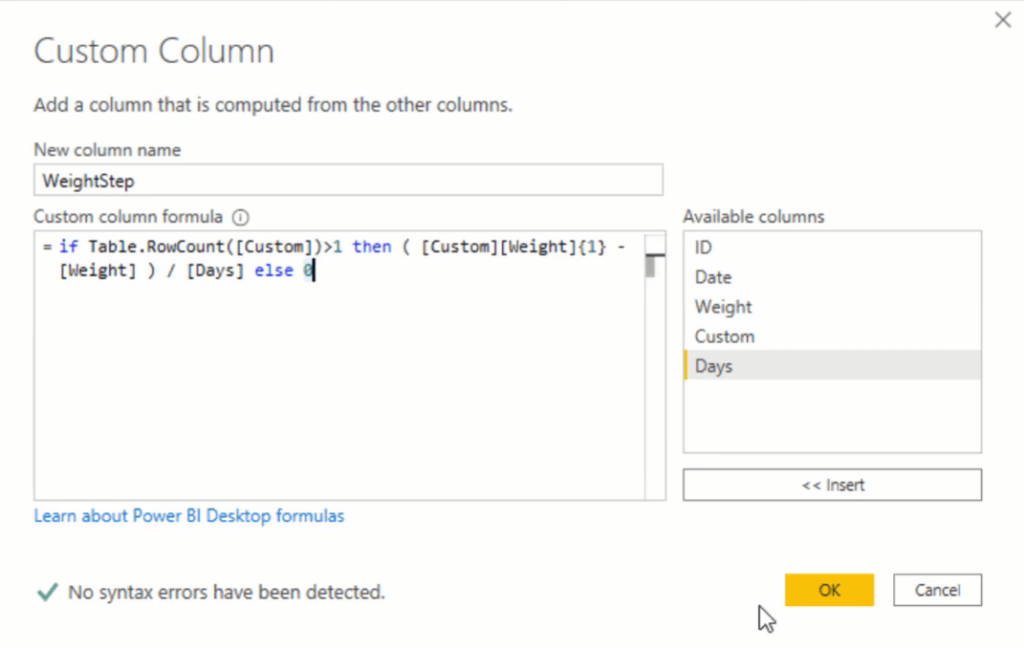
The syntax checks if the table has more than 1 row, subtracts the weight from the current record, and divides that difference by the number of days.
Again, add type number in the formula so you can see the weight of each day.

Fill The Gap
Now that you have the number of days, you can create a list of dates to fill the gap in the data set.
First, add another custom column and call it DateKey. Then, follow this Power Query formula:
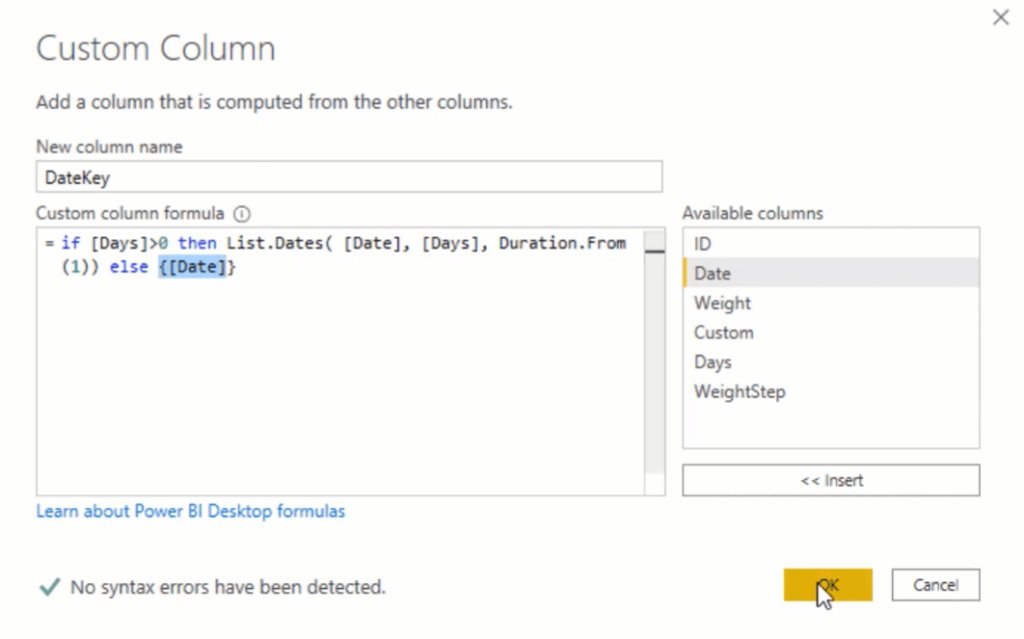
The formula checks if there is a date difference. If there is, it creates a list of dates between the starting date which is from the current record, and expands it by the number of days. But if there aren’t any differences, it returns the date.
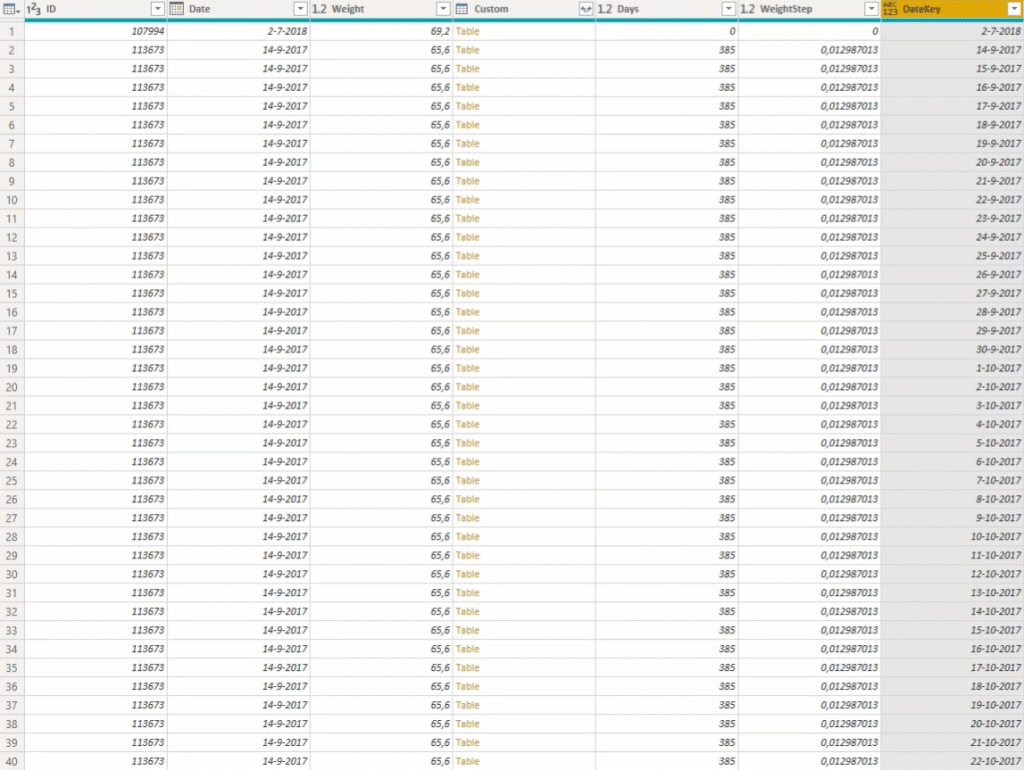
This is the result:
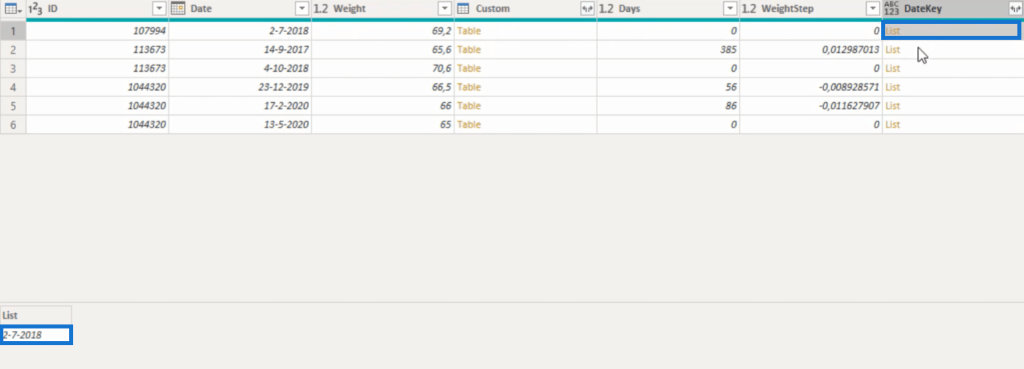
The table subjects that didn’t have any differences had its date returned; the tables that did, got a list of dates.
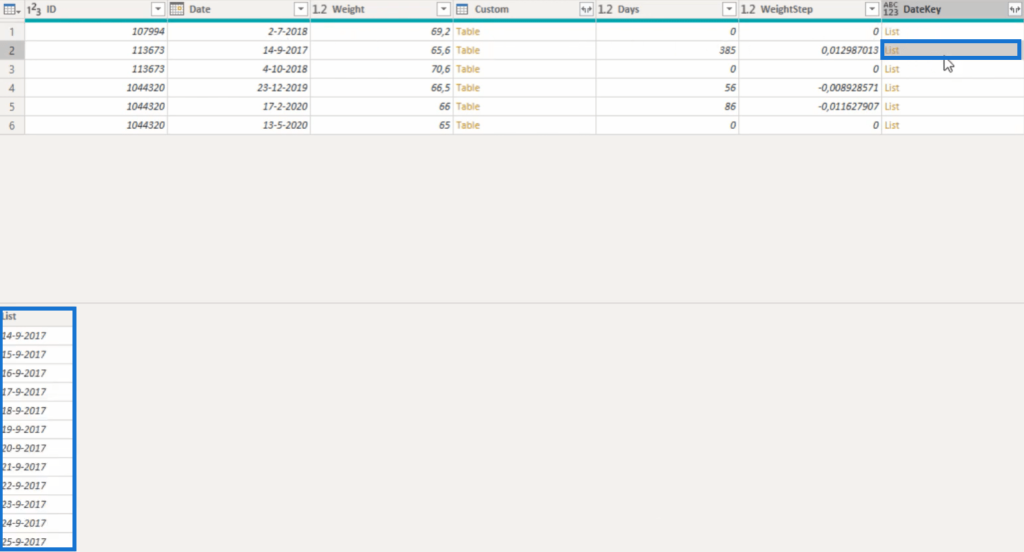
If you expand the DateKey to new rows, you can see the records of all the days.

Get The Weight Projection Of Dates
After creating a date list, you need to get a weight projection for the dates.
First, add a custom column, and name it WeightProjection. Then input this Power Query formula:
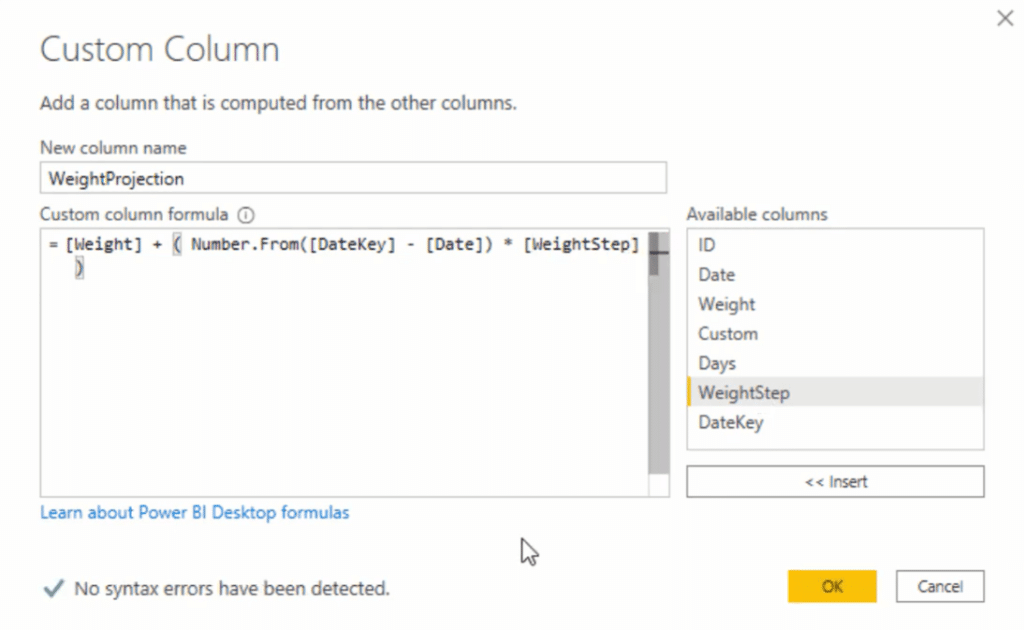
The syntax gets the weight value, adds it to the DateKey value, subtracts it from the date value, and multiplies it by the WeightStep.
Again, add type number to the end of the formula.
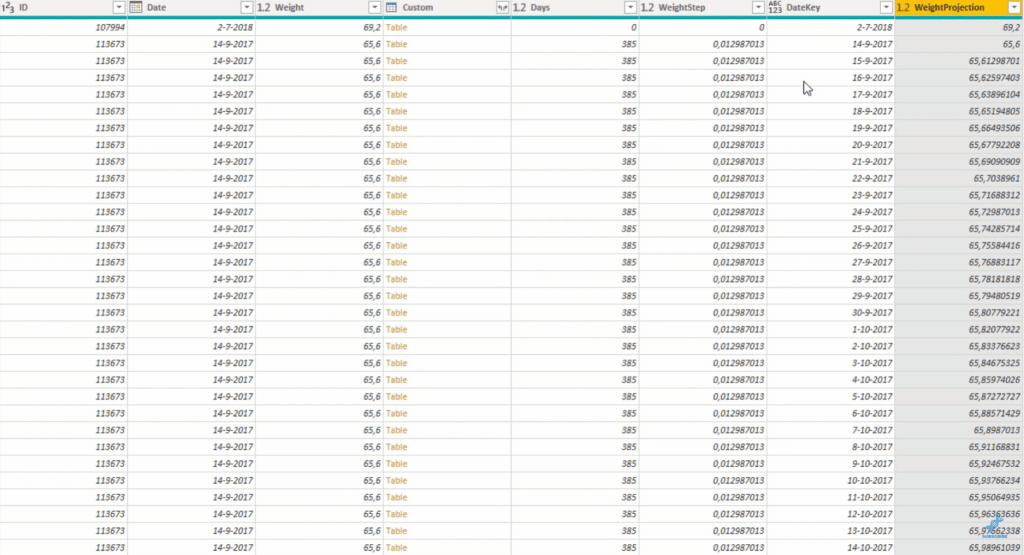
You now have the weight projection for each date.
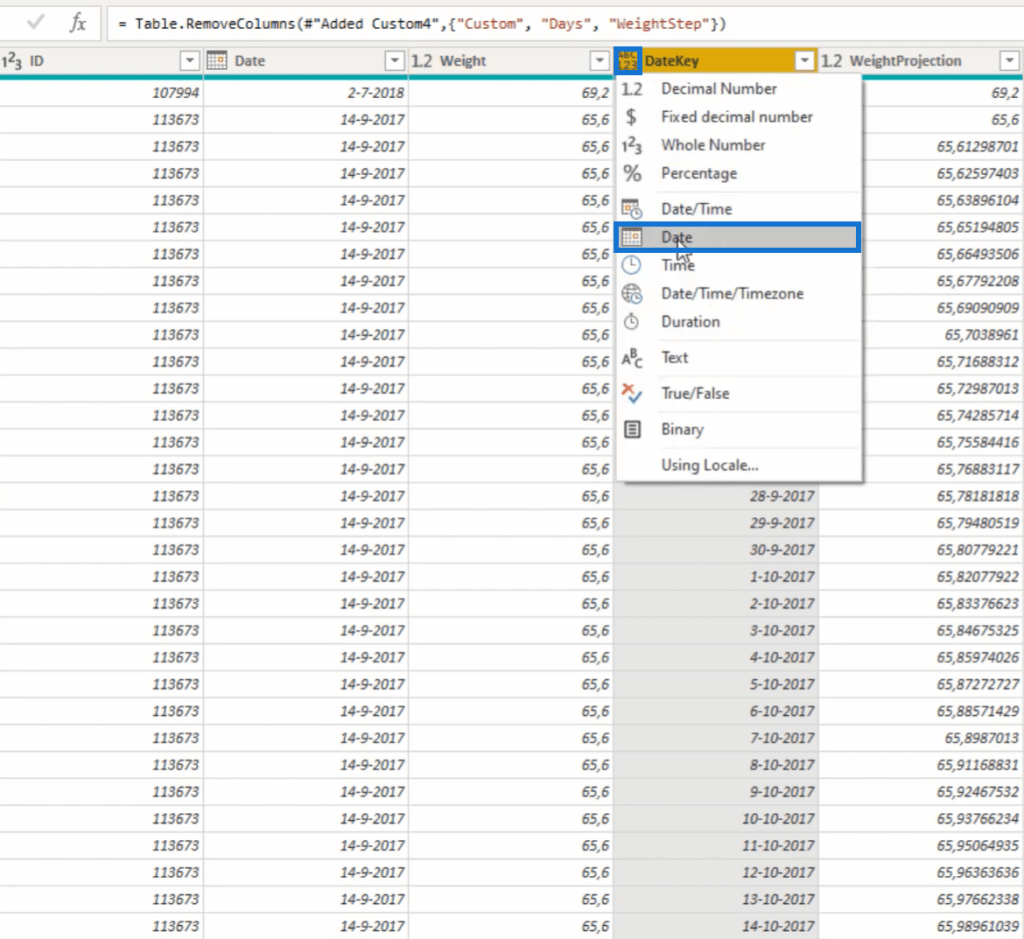
Remove the helper columns: Custom, Days, and WeightStep by using the formula below, and change the format of the DateKey column to Date.
***** Related Links *****
Power BI Query Parameters: Optimizing Tables
Turning Calendar Type Layout Into Tabular Format In Power BI Using Query Editor
Creating A Dynamic Date Query Table In Power BI: A Query Editor Tutorial
Conclusion
In this tutorial, you learned how to fill the gaps in your data set by creating values in each date list.
These date values help you get valuable insights from your model. If your tables lack information, you can use this technique to make them more comprehensive.
There may be essential data in your table that you’re leaving out, so always maximize every row and column.
All the best,
Melissa


