When working on Power BI date tables, it’s important to know the essential techniques so you can set things up as quickly as possible. In this tutorial, I’ll go over some important tips that can help you.
The date tables are important in Power BI because you’ll need them to reference dates inside your model. On top of that, building a date table can help if you need specific date information for your reports.
It’s important to get your date tables right if you plan on using them for time intelligence calculations.
The date columns in a fact table can sometimes get errors so it’s best to create a separate date table. Most importantly, don’t forget to link your date table to your fact table.
Building Up The Power BI Date Tables
To set up your date table, click New Source, and then select Blank Query.

Since you have an empty query here, you need to manually input your data. Included in the resource pack is the Power BI Date table code. When you click on it, you will see a simple text file filled with a whole bunch of codes.

Highlight this code and copy it. Then go to the Advanced Editor and paste the code into the Advanced Editor box.

After you click Save, you can see the Enter Parameters window where you need to enter the start date (January 1, 2017) and the end date (December 21, 2020).
In my example, the financial year starts in July, so you need to enter 7 and click Invoke.

As you can see, we have successfully created a table of all the date information with the MonthName, MonthinCalendar, and QuarterinCalendar columns.

Tips When Working On Date Tables
One of the tips that I frequently mention is to properly name your tables. You’ll need to rename your table from the default name Invoked Function into Dates. This way, you can easily reference the Dates table in your calculations.
Drag the Dates table into your Data Model folder. Right after that, you need to create another query and name it Dates Query.

Then, right-click and move it to a new group.

Name the group as the Parameter Query in the New Group window

When you go back to the Queries section, you have the Parameter Query, Data Model, and Other Queries groups. You can rearrange these folders accordingly to optimize how it looks.

Another technique is to properly name the columns. Initially, the column names don’t have proper spacing. You need to rename these columns and make sure they’re written correctly.
In this case, I changed the columns to Month Name, Month & Year, and Quarter & Year.

You can also remove irrelevant columns and information if necessary. For example, if you find the WeekEnding column to be insignificant to your report, you can right-click the said column and then click Remove.

Now, I’m going to teach you how to use Column From Examples. This feature is useful when you want to abbreviate the entries of a specific column.

For this example, I’ll use the Month Name column.
Click Column From Examples and then under Column1 type JAN. After clicking enter, you can see that all the January entries are updated into JAN.
However, the entries for February are written as Febr. You also need to rename it by typing FEB. All the other entries will be updated to reflect this.

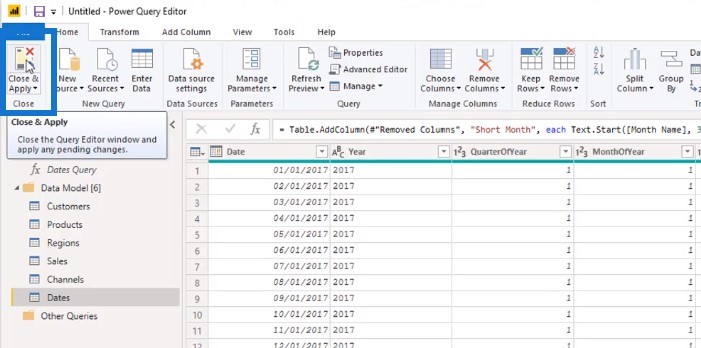
Lastly, don’t forget to rename the column itself into Short Month. If you’re looking at things by month within a visualization, the Short Month column is better to use than the complete month name, which takes up a lot of room.
Once you’ve finalized everything, click Close & Apply.

These techniques that I have mentioned can help you set up your date table fast. Over time, you can finish your set up within 10-15 minutes.
***** Related Links *****
Build A Comprehensive Date Table In Power BI Really Fast
How To Work With Multiple Dates In Power BI
Time Comparison For Non Standard Date Tables In Power BI
Conclusion
All the things that I have showed you are fundamental things you need to do to manage your data effectively inside Power BI. This should be your standard procedure every time you’re working on date tables.
You can save so much time in the Query Editor by practicing these techniques.
Sam


