In this tutorial, you’ll learn about various keywords and functions in DAX Studio with a specific query example for each one.
Specifically, you’ll learn about the ORDER BY and START AT keywords, along with the TOPNSKIP and ADDMISSINGITEMS functions.
DAX Query Example: ORDER BY Keyword
The ORDER BY keyword allows you to sort a dataset.
Basic Example
For example, by using the ORDER BY keyword, you can sort a column alphabetically.
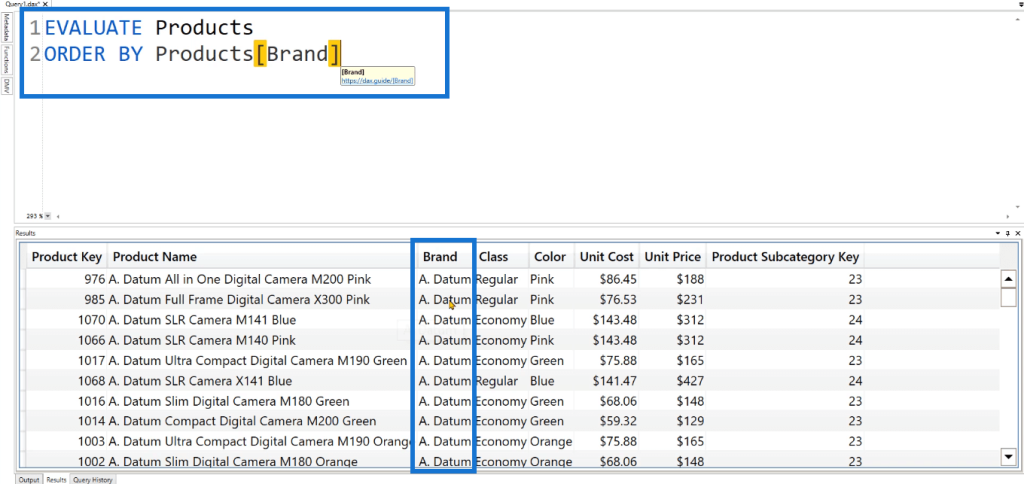
You can see that the first-row data starts with “A.” DAX Studio’s default sorting order is ascending.
If you want your data to appear in descending order, write DESC. So in this example, instead of an A, the Brand column will start with a “W.”
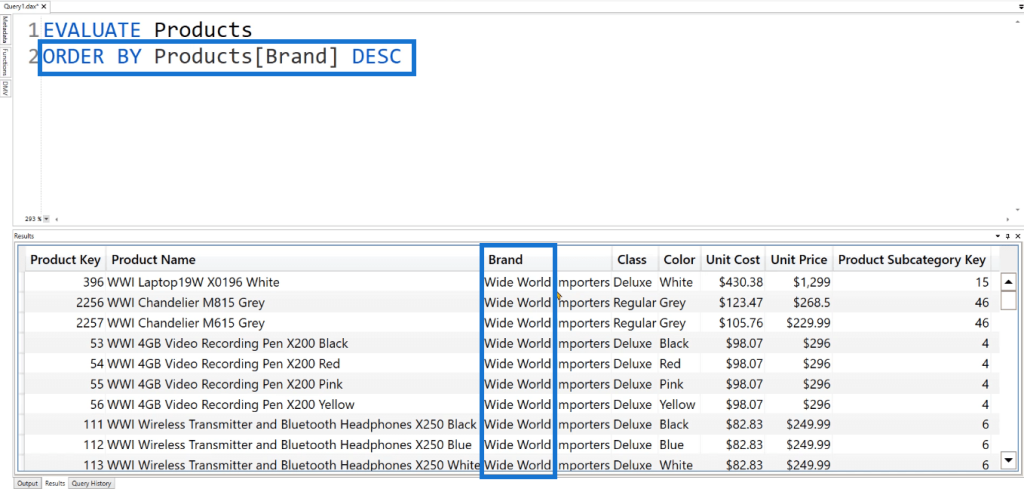
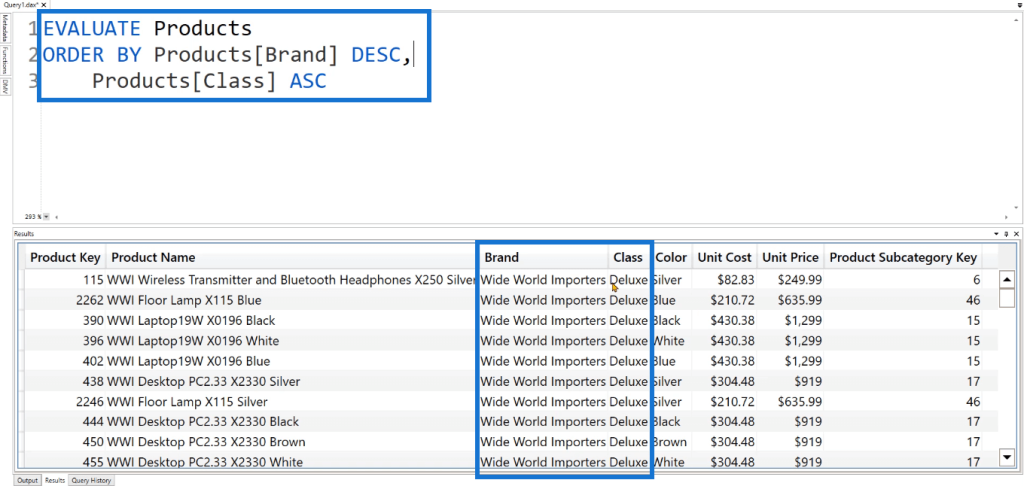
Similarly, if you want to turn it back to an ascending order, write ASC. You can also sort multiple columns at once. You can do this by writing the columns you want with each one separated by a comma.
Real-World Example
Now let’s look at a simple real-world application using the ORDER BY keyword. This is the same example used in the TABLE keyword tutorial.
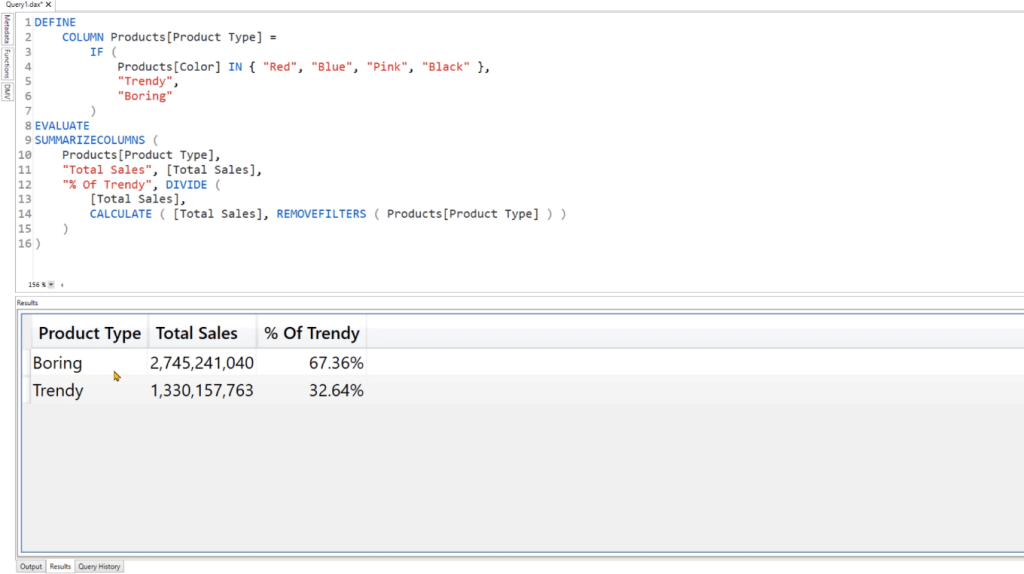
You can see that this table returns 3 columns. The first one is the Product Type, consisting of Boring and Trendy. The second column shows the Total Sales by Product Type. The third returns the Percentage of Sales.
In this example, you need to create a new column that sorts the Product Type. So after the IF statement, write the COLUMN keyword and then the name of the column you want to create.
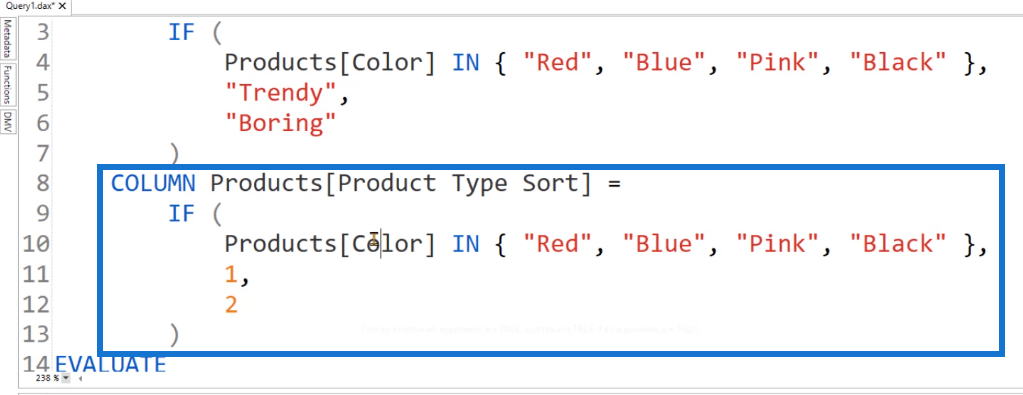
The formula for this column is same as the IF syntax but instead of “Trendy” and “Boring,” this column will show “1” for Trendy and “2” for Boring.
To see this column in the table, write it under the EVALUATE syntax.
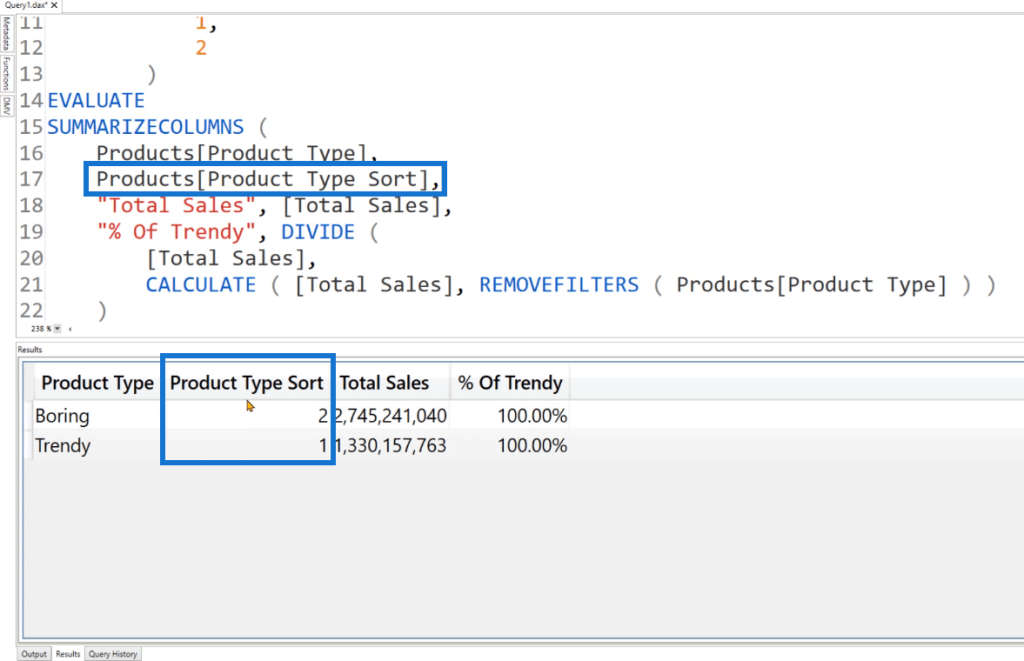
You’ll then see that a new column, Product Type Sort, is added to the table comprised of the numbers 1 and 2.
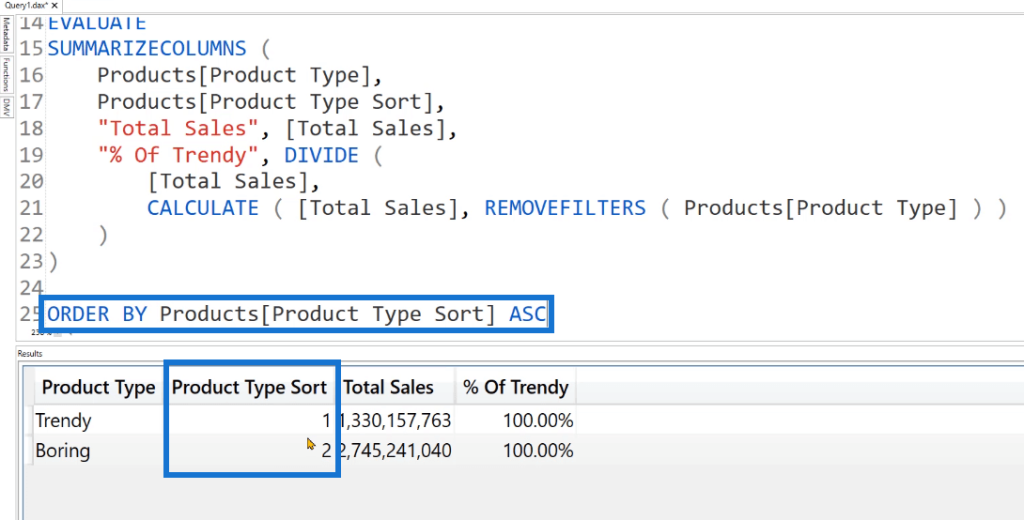
To sort this column, write the ORDER BY keyword after the SUMMARIZECOLUMNS syntax. Then after the column name, write either ASC or DESC depending on the sort order you want the column to be.
DAX Query Example: START AT
The next thing you’ll learn is the START AT keyword.
START AT is a deprecated keyword. Its use isn’t recommended for most DAX queries. However, you might still find some DAX code that makes use of this. So it’s still important to know what it is and in what cases it can be used.
Basic Example
First, write the EVALUATE keyword. This example uses the Products table. Before writing START AT, use ORDER BY first and then specify the columns you want to include.
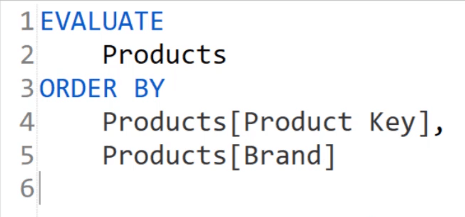
You can then write START AT. This syntax will follow the order similar to how you wrote your columns under ORDER BY. For this example, the Products Key column will start at “2” and the Brand column will start at “Contoso.”
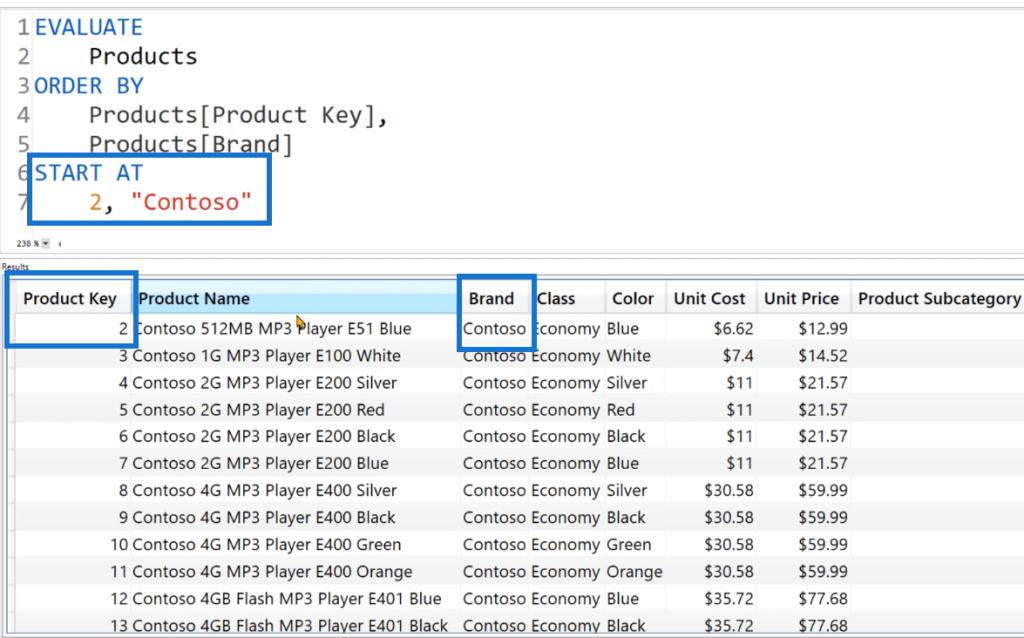
When you press F5, you can see in the Results table that the specified columns follow the direction of the query.
Now let’s see what happens when another column is added. In this case, the Color column should start at “Silver.”
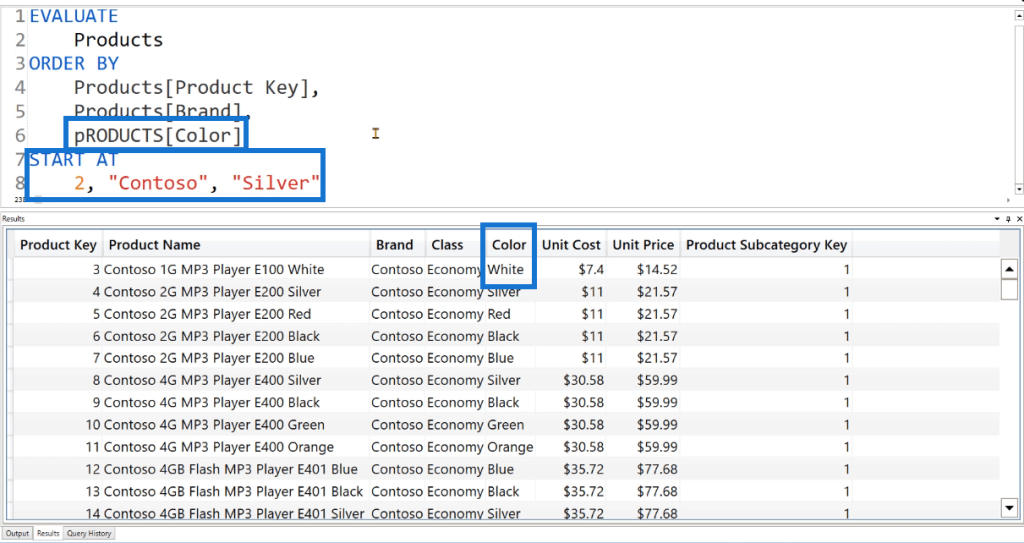
When you run this query, you can see that the first entry under the Color column is “white.” It is not guaranteed that the result will always follow all the conditions when using START AT.
For this example, there is no instance in the Products table that contains 2, Contoso, and Silver all in the same row. Instead, the DAX engine is trying to create the best match to the query you’ve created.
Complex Example
Let’s look at another example:
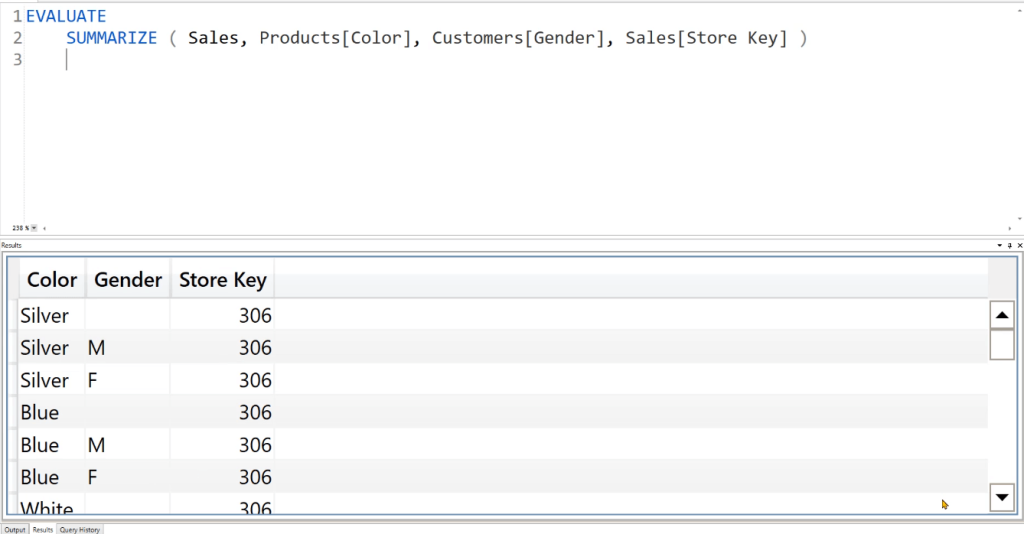
After EVALUATE, write the ORDER BY keyword followed by the three specified columns. Afterwards, write START AT. In this case, the Color column should start at “Red,” the Gender column should start at “M,” and the Store Key column should start at “2.”
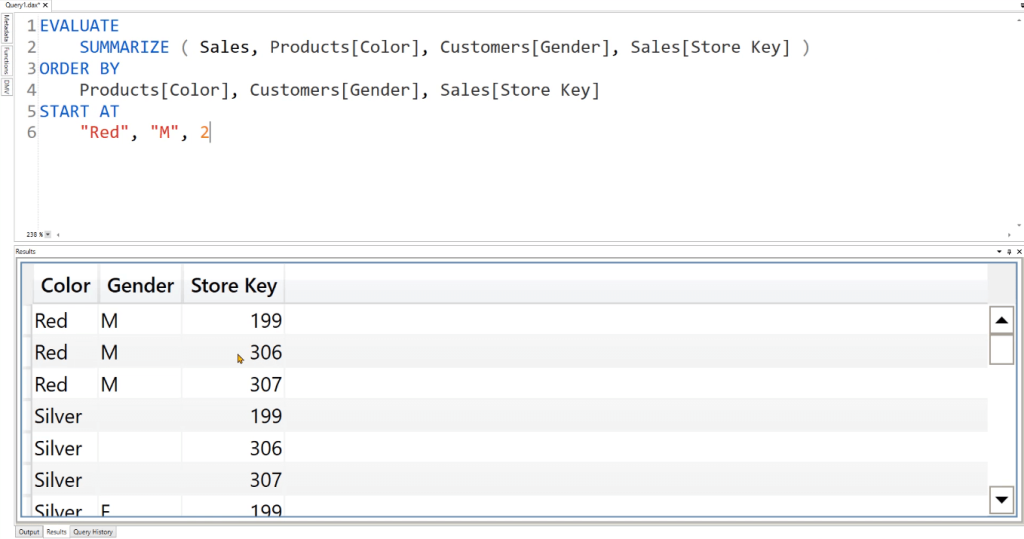
After you run the query, you can see that the DAX engine tried its best to match the specified parameters.
In the results, you can see that two columns are correct, while the Store Key column starts at 199 instead of 2. This is because a Store Key of 2 doesn’t exist in this example’s data model.
Slow DAX Engine
Click the Server Timings button under the Home tab.

A new tab will appear at the bottom. Click the Clear Cache then Run button found in the Run drop-down arrow.
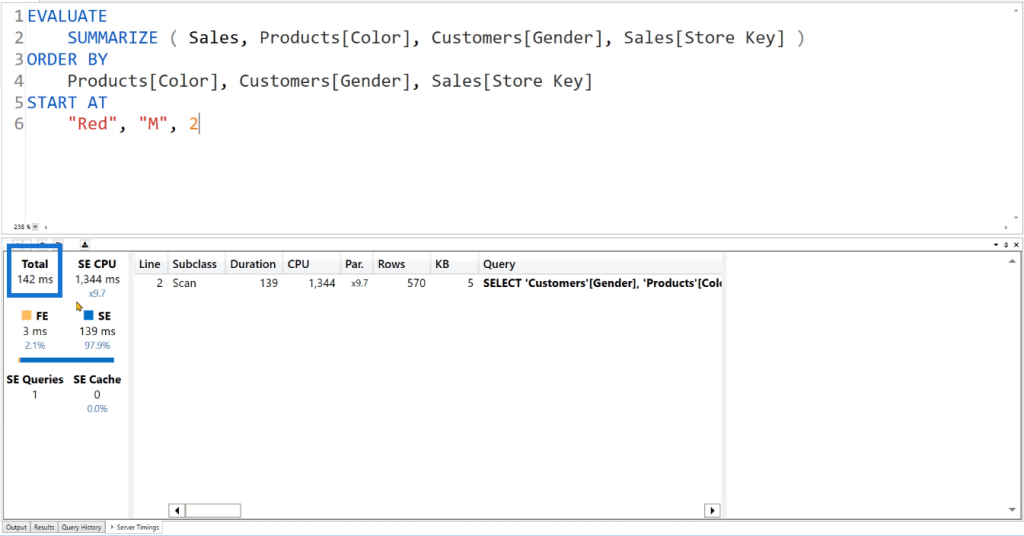
You can see that it takes DAX Studio 142ms to execute the query. If you remove the START AT syntax and run the code again, you can see that this will only take 11ms to execute.
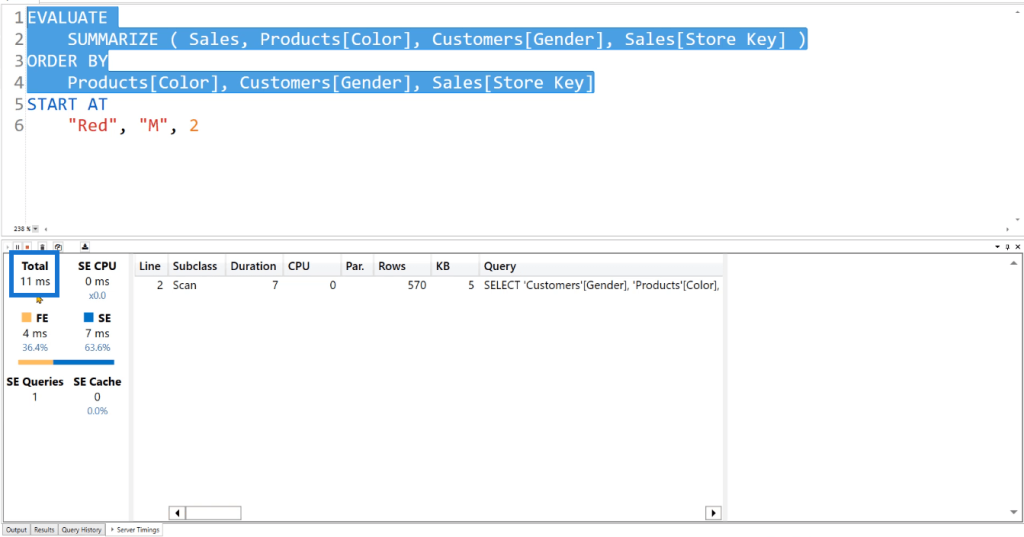
The query takes longer to run if there’s a START AT syntax because it invokes a behavior of the DAX engine called CallBackDataID.
START AT makes your code extremely slow. If it isn’t required to use it, better avoid it.
It has a significant impact in the overall performance of the DAX code you’re writing. This is why it’s best to use other similar functions.
DAX Query Example: TOPNSKIP Function
The next thing you’ll learn in this tutorial is the TOPNSKIP function. This function is similar to TOPN, but it has one subtle difference along with an additional parameter. To further understand this, let’s look at an example.
TOPN Vs TOPNSKIP
First, write the EVALUATE keyword. Then, write the TOPN argument below to view the Top 100 rows of the Products Table.
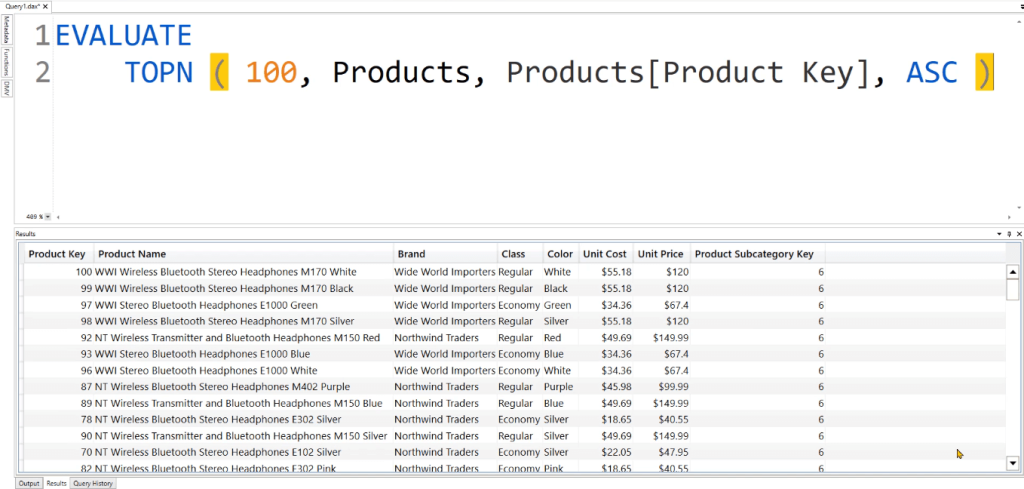
This table has also been sorted according to ascending order with respect to the Product Key column.
Now, replace TOPN with TOPNSKIP. In the second argument, provide the number of rows you want to skip. In this example, 10 is specified.
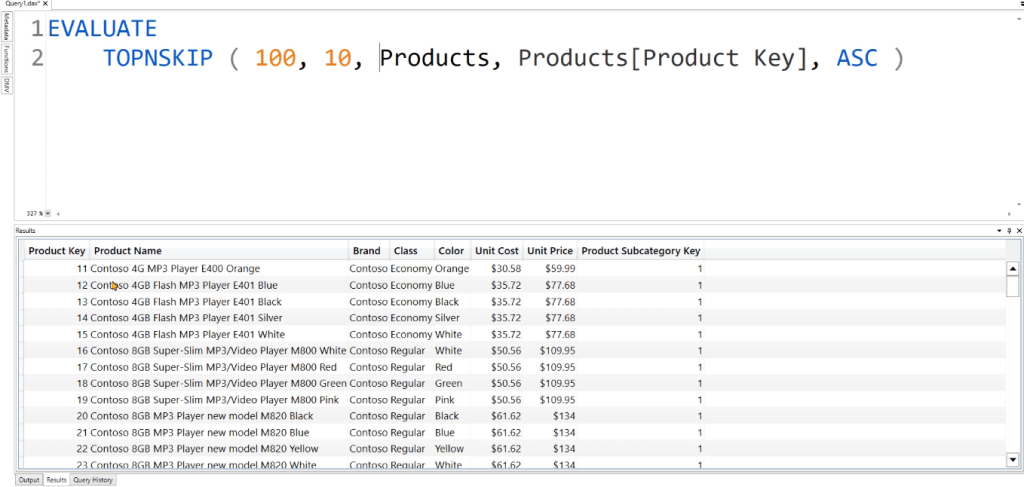
When you run this, you’ll see that the Product Key column now starts at 11 and ends at 110. Note that you can’t use the TOPNSKIP function inside a calculated table or in a tabular data model.
Another Example
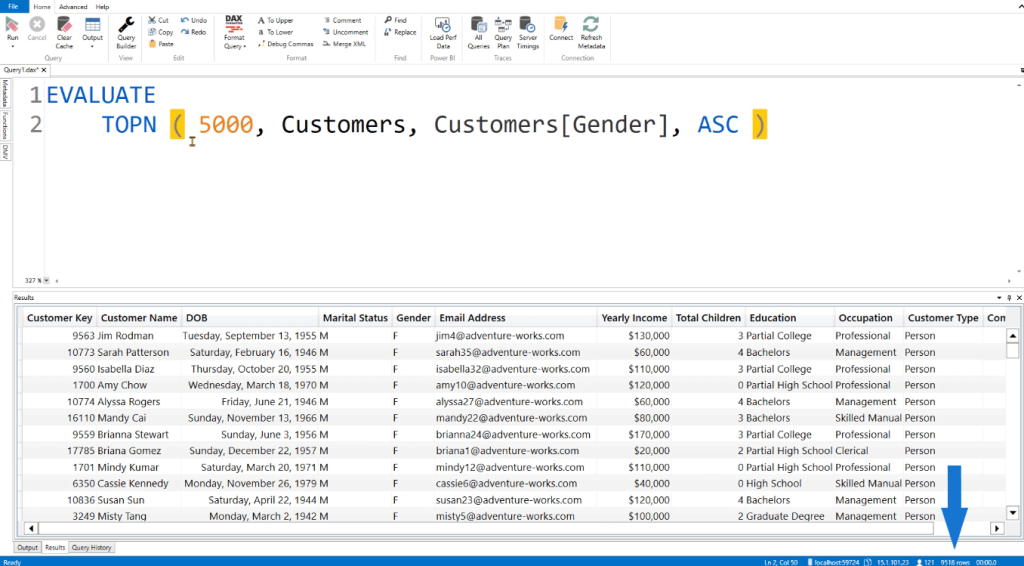
In this next example, let’s view the Top 5000 rows in the Customer Table. This table is sorted in ascending order with respect to the Gender column.
If you use the TOPN function, you can see that the table returns 9,518 rows. This means that even if you’ve specified to only show the top 5000 rows, some data were left unfiltered.
However, if you use the TOPNSKIP function, you can see that the table only returns the first 5,000 rows in the Gender column.
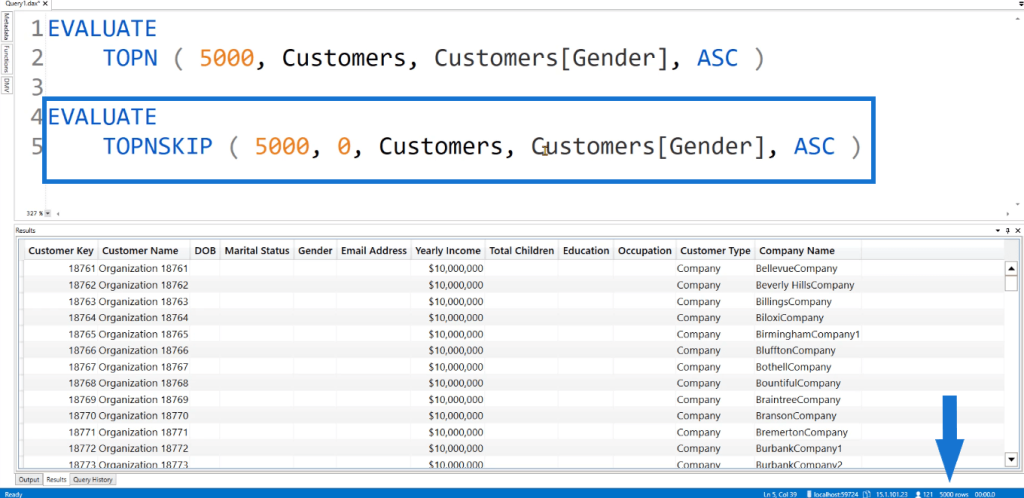
So even if the Customer’s Gender column has multiple rules for a particular gender, the TOPNSKIP function will only return the first 5,000 rows. This result isn’t guaranteed when using the TOPN function.
DAX Query Example: ADDMISSINGITEMS Function
Lastly, let’s look at the ADDMISSINGITEMS function in DAX Studio.
When you use SUMMARIZECOLUMNS, by default it will try to remove blank rows from the result. For example, we can write a query that summarizes the Products Color, Products Brand, and Customer Gender.
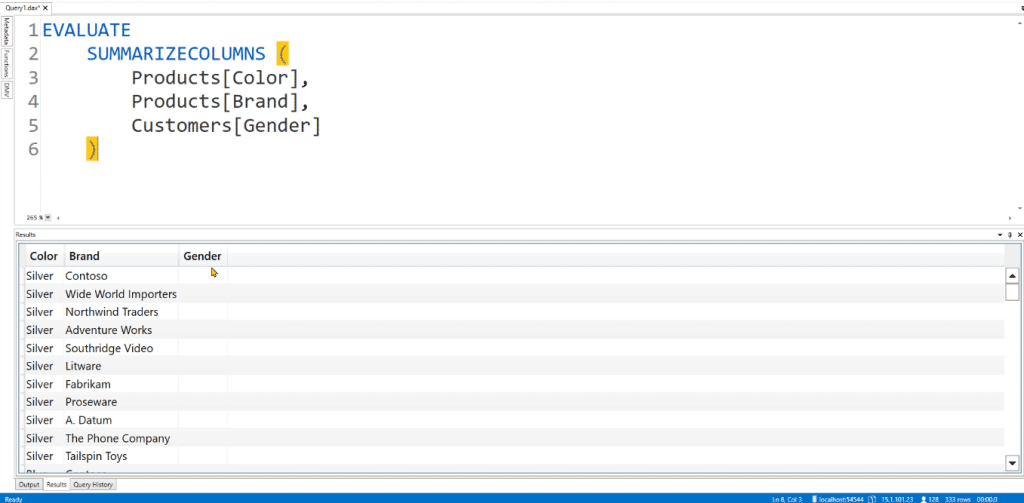
When you press F5, you can see that the table returns three columns. The Gender column is composed of 3 types of gender: Male, Female, and Blank. Blank represents the Company. You can also see that it’s returning 333 rows.
But if you create a Total Sales column, the SUMMARIZECOLUMNS filter will remove the rows which contain blank values for the Total Sales. Instead of 333 rows, the table now only contains 323 rows.
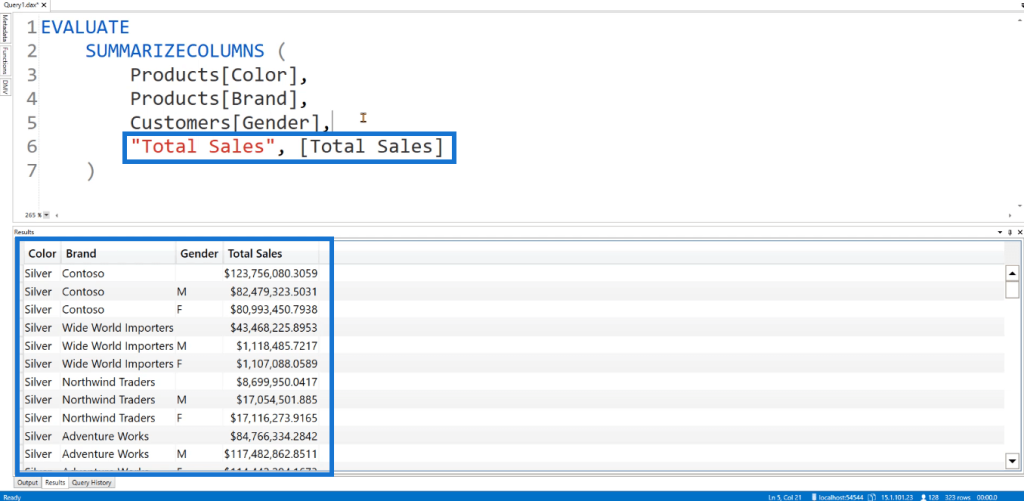
There are 2 options to bring back those rows. The first option is to add a zero after the Total Sales. In the results, you can see that 10 rows return a zero value for Total Sales.
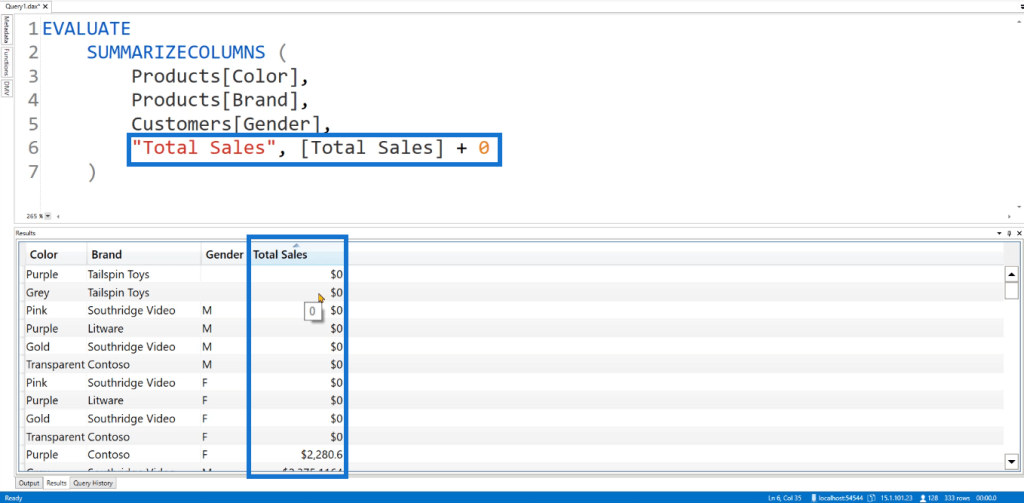
However, this option doesn’t always produce the best result. Instead, there’s a specific function you can use to resolve this problem: the ADDMISSINGITEMS function.
To use this function, place this after EVALUATE. In the first argument, write the columns. You also need to paste these columns in the groupBy parameter of SUMMARIZECOLUMNS.
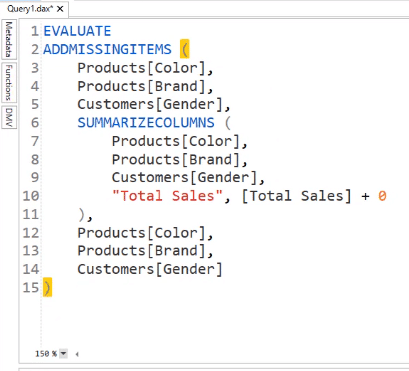
When you run this query, you’ll see that the table now returns 333 rows.

If you sort the Total Sales columns and remove the zero, the table will return blank values under the Total Sales column.
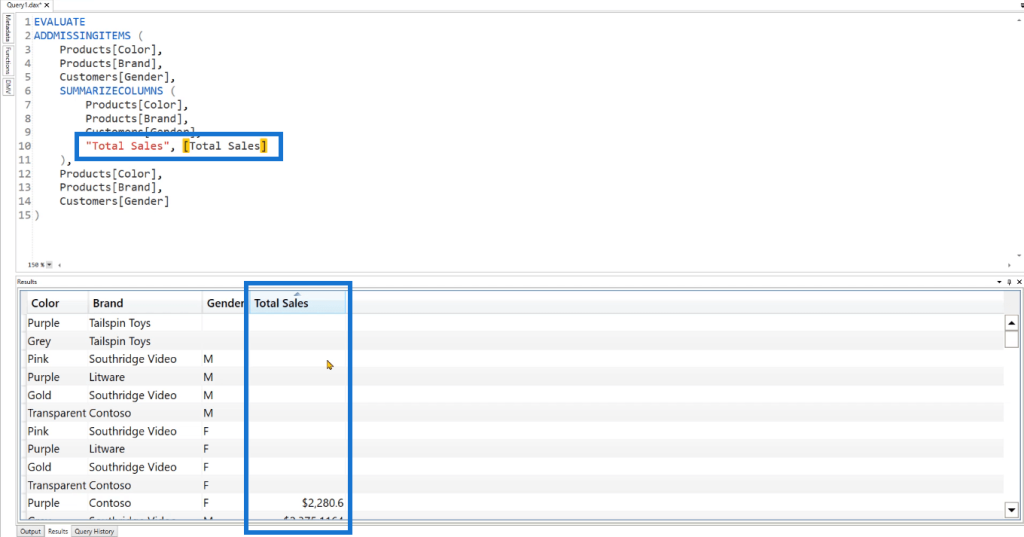
So instead of reporting a zero, the table returns a blank for rows that were removed by the SUMMARIZECOLUMNS function.
Using ADDMISSINGITEMS And FILTER
You can also use the ADDMISSINGITEMS function together with FILTER. For example, let’s filter out the rows containing “Tailspin Toys.” In the query, it’s saying that the Brand column must not contain ( <> ) Tailspin Toys.
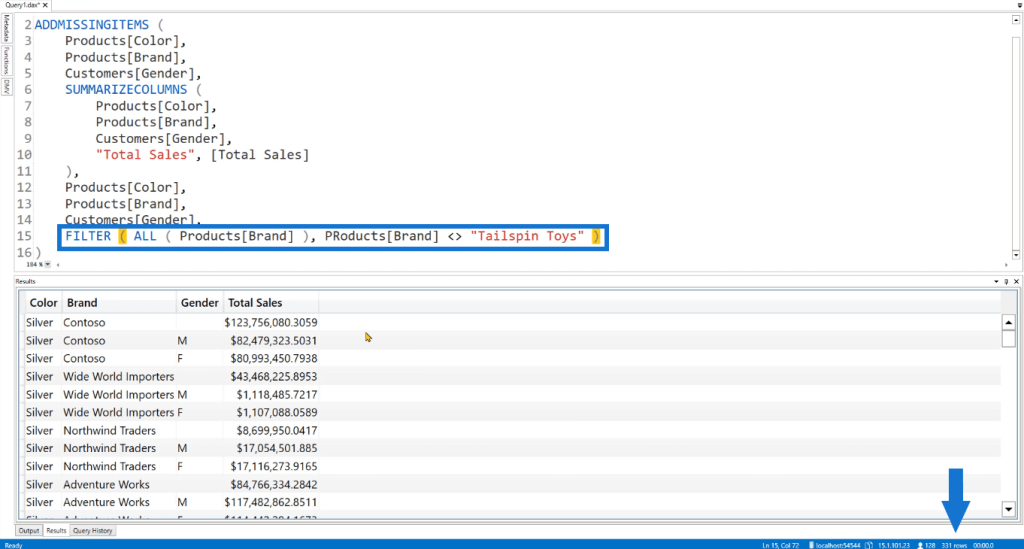
When you press F5, you can see that the table now only returns 331 rows. So those two rows containing the “Tailspin Toys” brand were removed.
***** Related Links *****
The TABLE Keyword In DAX Studio: Basic Examples
DAX Function COLUMNSTATISTICS In Power BI
Time Intelligence DAX Functions In Power BI
Conclusion
The two keywords and two functions discussed in this tutorial are basic knowledge you need to have when creating queries in DAX Studio. These will come in handy when dealing with more complex real-world applications.
DAX Studio is a powerful tool for executing and analyzing DAX queries. It’s important to learn the coding basics of this software so that it’s easier when you deal with advanced queries in the future.
Enterprise DNA Experts


