In this blog post, we will deal with some troublesome issues in time intelligence, particularly those issues caused by week granularity and the troubles that can be caused by the irregular number of weeks in a year. We’ll use offsets to come up with accurate time intelligence in DAX.
We have an interesting scenario for you today. This came up a couple of times recently in the Enterprise DNA forum. What people wanted to do was to take a visual (which could be a line graph or a bar chart) and vary it dynamically on the start date. You can watch the full video of this tutorial at the bottom of this blog.
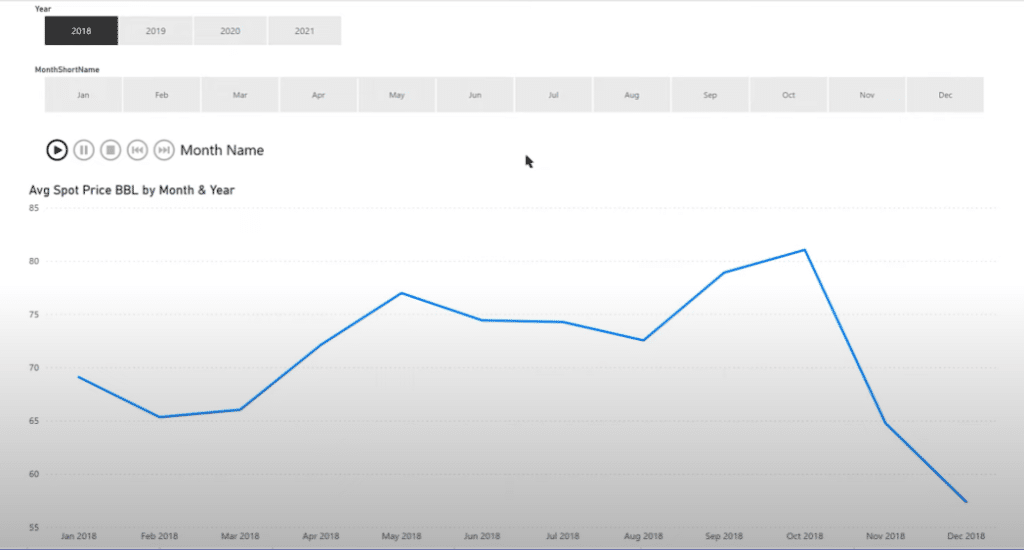
In this case, we used the same dataset that we worked for the average spot price per barrel of oil. Instead of just always starting at the beginning in January, we wanted to be able to click the visual, change it to a different start date, but always show one year of data.
Sample Scenarios Of Time Intelligence In DAX
There are a number of reasons why you might want to do this technique. You can use this if you have a metric that is constantly being readjusted in terms of how it’s calculated. You might only want to show the data from the period of the readjustment forward.
Another reason to use this is if you want to visualize this in an animated way. This will basically take your data and show it dynamically once you click on the play access.

In this visual, we can change the start date month by month to show how it changes in a 12-month period over time. This an interesting and useful visual for different business cases, but theoretically, it also represents a number of key issues related to DAX and data modeling.
Let’s go to Power BI and look at our data model first. This is a really simple data model with an extended dates table and a spot price table connected to the dates.

Using Offsets For Time Intelligence In DAX
One of the things we’ll work on is offsets. The offsets in the extended date table are calculated dynamically. Each time the report is either refreshed or opened, it goes through the M code. For example in a monthly offset, it assigns the current month with 0, the previous month with -1, and two months back with -2. Looking forward in the future, it assigns the next month +1, and for two months in the future +2.
This is a simple concept but incredibly powerful when you’re dealing with time intelligence in DAX and working with months, quarters, and weeks. If you’re not using an offset, it creates a fair amount of complexity sometimes in your calculations.
Using offsets means using a continuous series of numbers where going back a month is always -1 and going forward a month is always +1 regardless of where in the year you might be.
Implementing The Rubber Duck Strategy For Time Intelligence In DAX
In the past, I’ve talked about rubber ducking, which is verbalizing your strategy out loud before you start writing your DAX.

I’m thinking out loud on how I will handle this from a monthly context using time intelligence in DAX. I would start something based on the year and the month selected, and select those using a disconnected table, because if you think about it, every other selection will involve crossing years (with the exception of January).
Let’s say we want 12 months starting in March, we’ll end up with at least two months in the subsequent year. If we use a connected slicer, we can only filter for that year and won’t be able to filter into the next year.
Harvesting The Offsets From The Starting Date
Let’s do this with a connected table for both the month and the year. First, we need to harvest the first offset that deals with the starting date.
And then we want to move that offset forward by 12 months, and then only look at the dates that are within that set of offsets. Let me show you what that looks like in DAX.
Calculating The Monthly Range
This is our measure for Within Range Monthly, where we select our year (which we harvested from the disconnected year table) and our month (which we harvested from the disconnected month table).
We also have this other parameter where if there’s no selection made, it will default to January. This parameter is primarily just for debugging purposes.

Calculating The Starting And Ending Month Offsets
Let’s look at the starting month offset by calculating the MAX offset. We remove all the filters on the dates table, and filter down to the selected month and selected year. For each month, there should be only one offset that corresponds to that month and year.

From that point, we can take the ending month offset, which is just the starting month offset + 11 months.

And then we look at each selected date and determine whether it falls within the initial month offset and the end month offset. if it falls within that period, we give it a 1 and if not, we give it a 0.

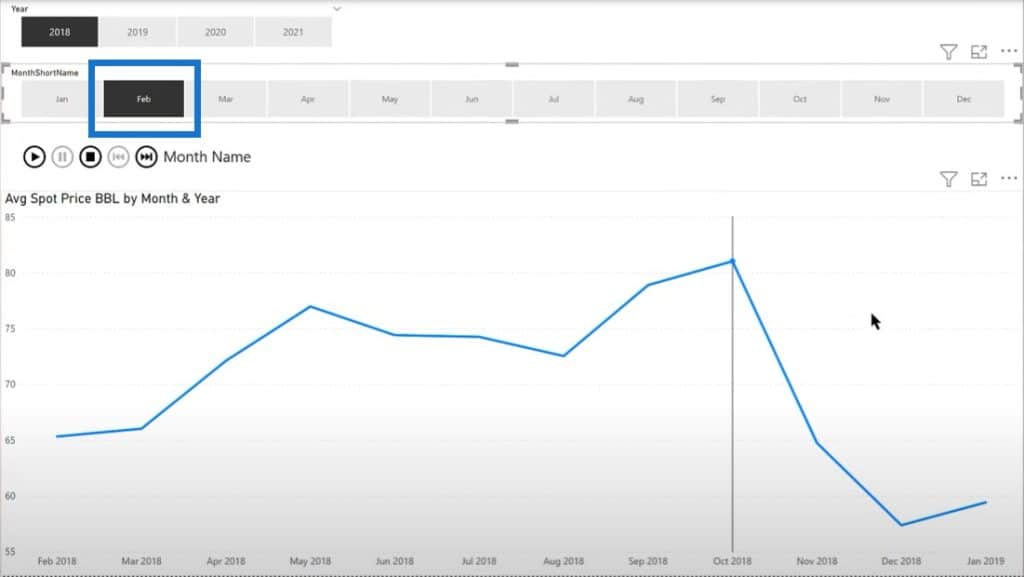
If we go back to the monthly view in our visual, we can see the Within Range visual which we have set as equal to one. So it’s only showing those months within the start to ending offset. For example, if we click on February, we see February to January.
Calculating The Weekly Range
Let’s see how this looks like from a weekly standpoint. The visual initially starts okay and goes from week 1 to week 52. So far, so good.
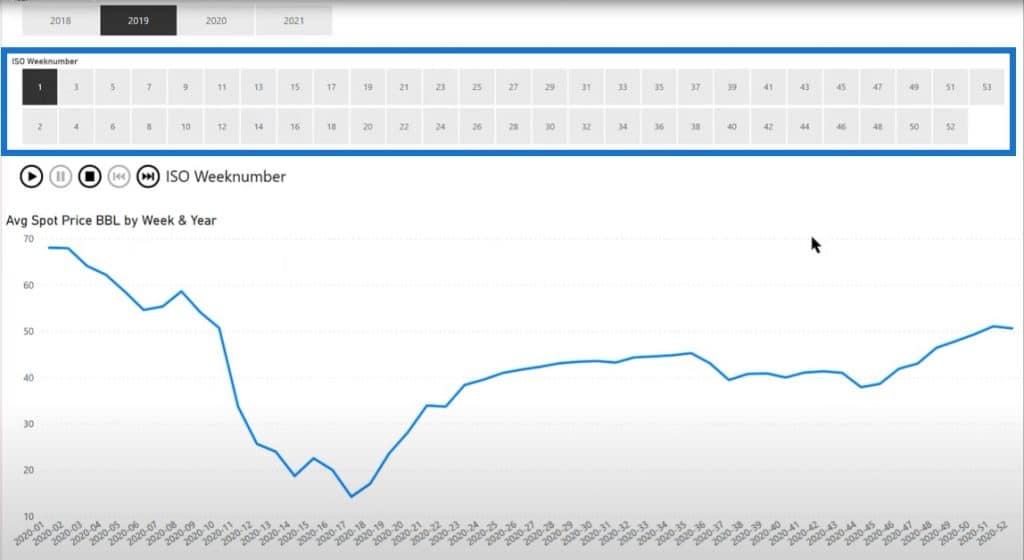
But if we click on the other years in the year slicer, we can see 52nd week while some have a 53rd week, which presents a lot of problems. You can see from this example that the problem is starting to manifest itself.
We have a starting period of year 2020 and week 15, but the ending period is year 2021 and week 13 instead of year 2021 and week 14.
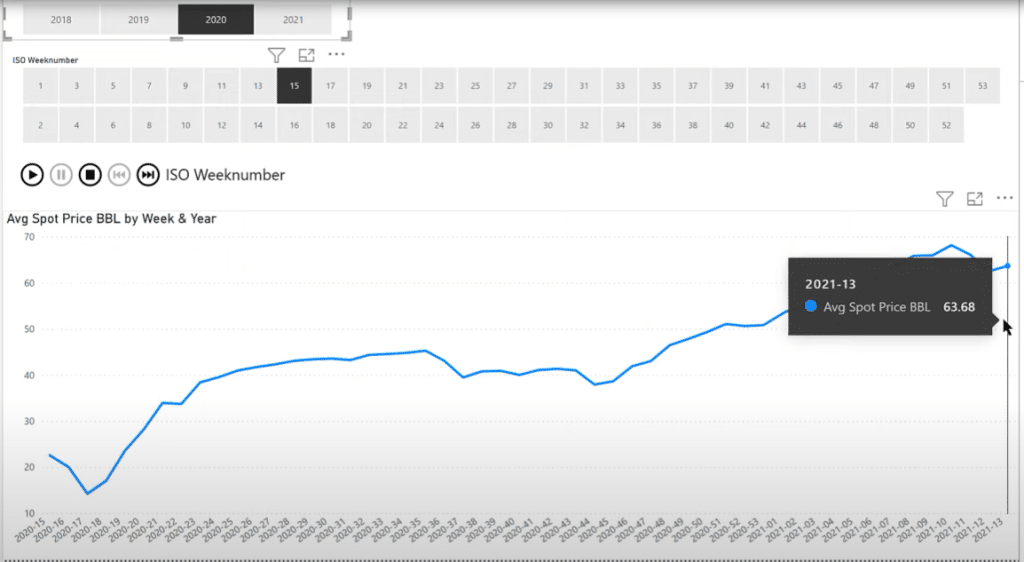
If we go back to week 1, we can see that it starts out okay, but ends at week 52. If we look at week 53 calculation here, the max week number for 2020 and 2021 is 53 weeks. This is not going to work for weekly granularity.

Let’s see what we can do to make this work. We need to fix the DAX calculation right here in this part:

This is because for some cases, 51 is correct when there are only 52 weeks in a year, but for the year where there are 53 weeks, it will leave off that last period. This is exactly what we saw in the dynamic visual for weeks, where the calculation removed that final period in years 2020 and 2021.
To fix this, we go to the Within Range Weekly Wrong measure, which actually looks simpler than the earlier measure. We had a starting offset measure and calculated the max offset. Then we stripped the filter off of dates, and then imposed the filter on selected week and selected year with the assumption that this would lead to the correct offset.

But this doesn’t work because it would not matter if you’re using a max offset or a min offset. All we’re doing is wrapping an aggregator around so that we’re not putting a naked column in a CALCULATE statement.
But if we go back here to the ISO WeekNumber, we can see that a year and a week number do not uniquely determine a weekly offset in that first period.

I came up with a bulletproof way of doing this. You could use MIN, but it makes more sense to create this Week1 Offset measure. In order to get the week 1 offset, we’re dealing with week 2 because it never gets split. Regardless of whether there are 52 or 53 weeks in the year, week 2 stays intact.

In this calculation, we are filtering down to week 2 to get the offset. And then once we get that week 2 offset, we just subtract one from it. This will unambiguously give us the week 1 offset. This ends up solving our problem.
Calculating The Within Range Weekly
And then we go back to our Within Range Weekly measure, and write an IF statement where if the harvest number is for week 1, we calculate the week one offset. If it’s not week 1, we just calculate the starting week offset as we did in the previous monthly calculation.

And then the ending week offset will be the beginning week offset + the max week number which could either be 52 or 53. Then we just subtract 1 so as not to double count the starting offset.

We can do the same construct that we used for the monthly range to filter the weeks, where anything that falls between the beginning and the ending offset gets a 1, and anything that doesn’t get a 0.
Then we’re going to place the Within Range Weekly measure into the filter pane. Everything checks out and looks exactly right.
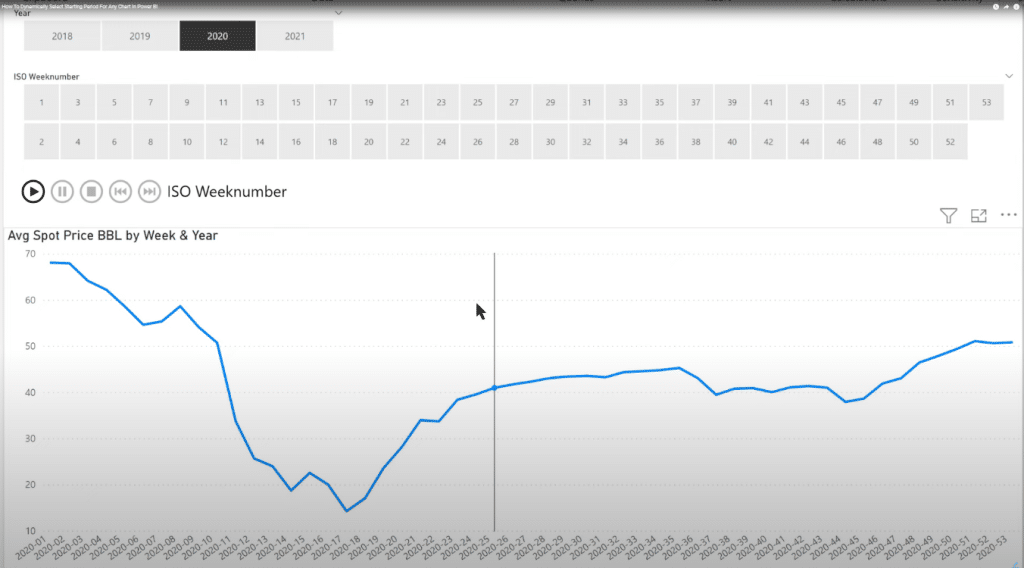
We can click on the play axis and run the week granularity. We can see that it is working properly just like it did in the month context.
***** Related Links *****
Using The Offset Function In Extended Date Tables
Get Power BI Previous Week Values Using DAX & Power Query
Calculate Workdays Between Two Dates In Power BI
Conclusion
This is a pretty deep dive into time intelligence in DAX, where we discussed how we can address some of the problems surrounding week numbers. I hope you found this tutorial helpful and provided you with some additional tools in your toolbox when you’re dealing with a problematic week situation.
If you enjoyed the content covered in this particular tutorial, please don’t forget to subscribe to the Enterprise DNA TV channel. We have a huge amount of content coming out all the time from myself and a range of content creators, all dedicated to improving the way that you use Power BI and the Power Platform.
Brian
[youtube https://www.youtube.com/watch?v=7wQTZLC29mY&t=434s?rel=0&w=784&h=441]


