
In this tutorial, we’ll discuss how we can use the Microsoft SharePoint automate feature to create workflows.
The “automate” feature in SharePoint can help you in micromanaging SharePoint users, libraries, lists, and workflows.
Before we proceed directly to our main topic, let’s first discuss workflows. This way you’ll be able to clearly understand how the “automate” feature works in creating workflows.

Workflow In SharePoint
A workflow is simply a visual representation of any task. Workflows commonly have a trigger and action component. The trigger is the one responsible for executing the workflow. On the other hand, the action is the event or condition that is occurring in the workflow.

SharePoint uses Power Automate in working around workflows. With the help of Power Automate, you’ll be able to create concise and usable workflows. Imagine having a workflow where the trigger is when someone makes changes to an item on the list and the action would be receiving an email notification.
This workflow is similar to what we call “Alert” in SharePoint. Later we’ll try to recreate some of the alerts using Power Automate. Take note that Power Automate can be utilized in different applications. However, in this tutorial, we’ll only focus on using it in SharePoint.
Creating A Workflow Using SharePoint Automate Feature
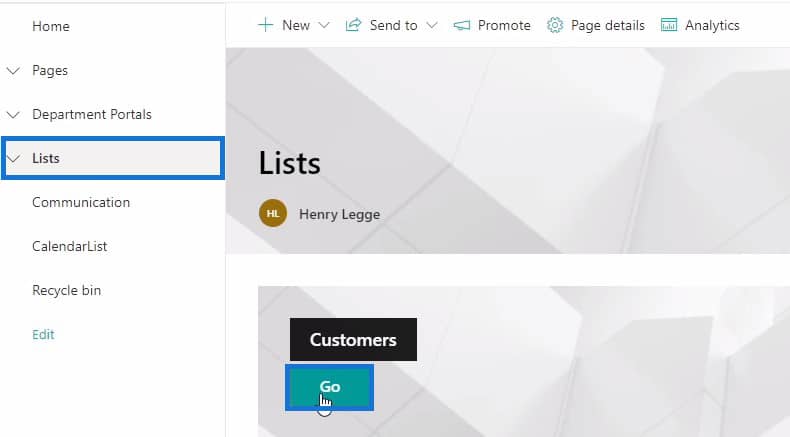
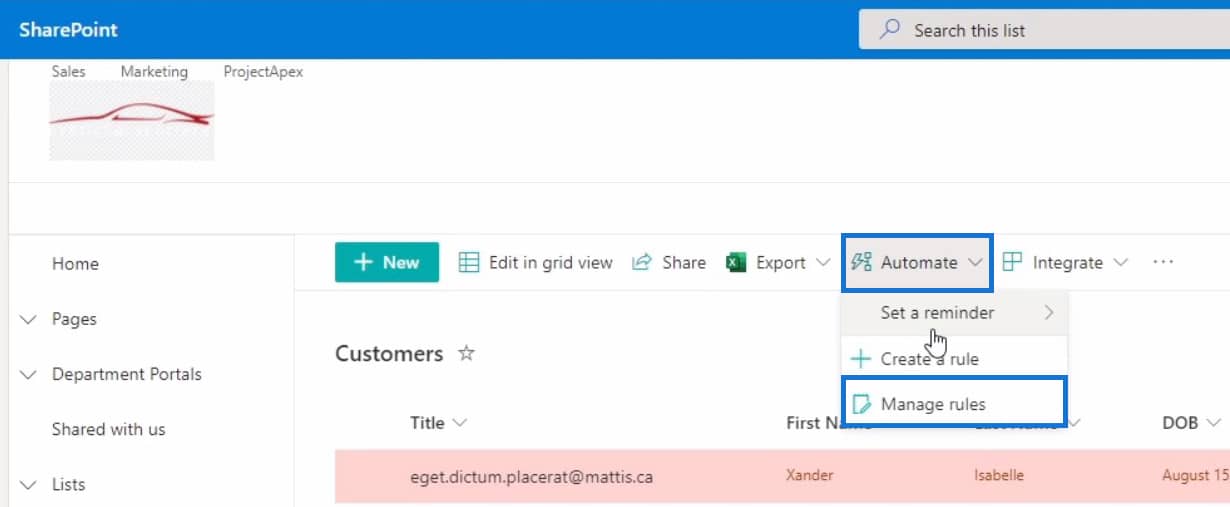
To create a workflow and utilize the “automate” feature in SharePoint, navigate to your “Lists” and click on the “Go” button in the Customers list.
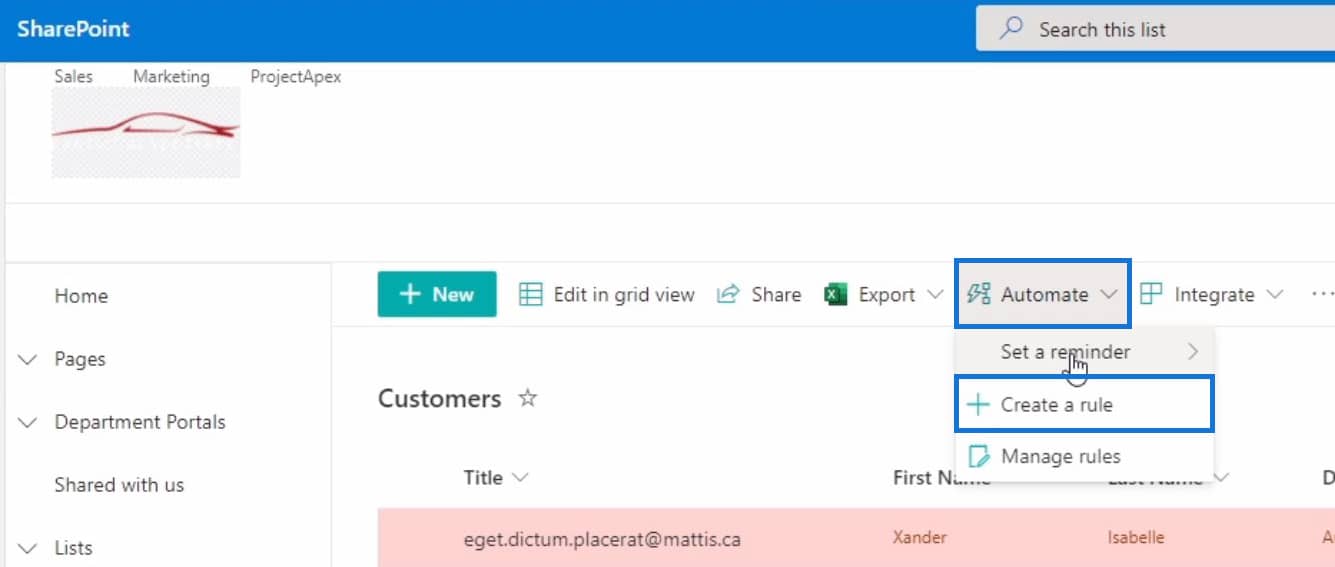
After opening the list, you should see the “Automate” feature right at the top of the list of customers.

Take note that this feature works in any type of list that has a user-type column. In this case, we have the Sales Associate column. Now let’s start creating a workflow wherein if an item is added to the Customers list, an email notification will be sent to us.
To do this, click on the “Automate” dropdown then select the “Create a rule” option.
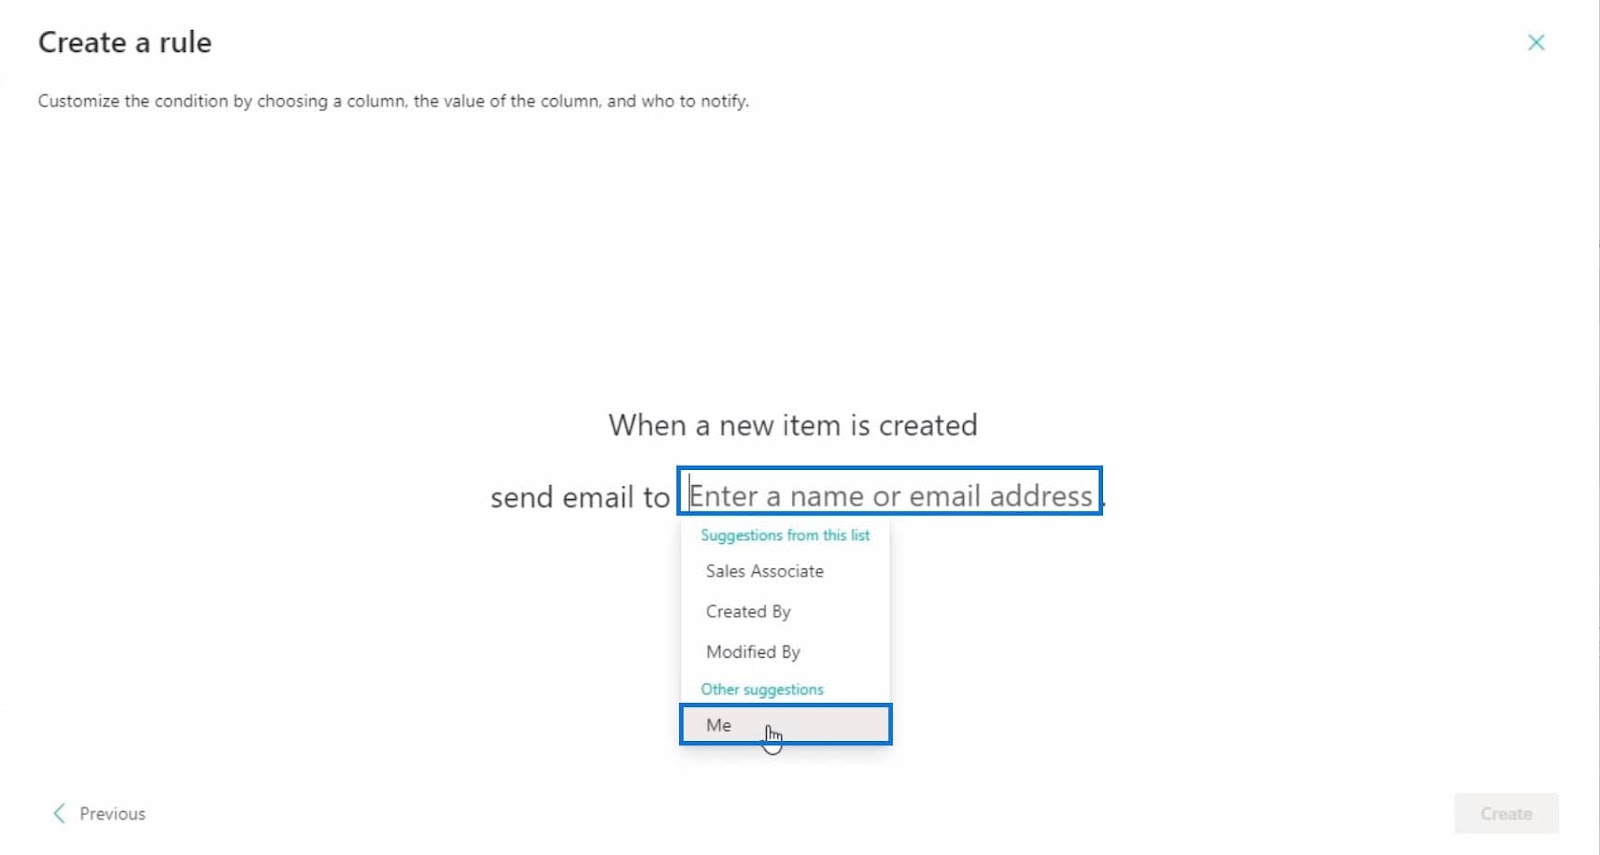
Once you select the “Create a rule” option, a Create a rule window will pop up. This window contains different conditions that you can choose from. Each of these conditions or rules acts as a trigger. For this example, let’s choose the “A new item is created” condition.

After that, you’ll need to customize the condition. However, for this rule, we don’t have to, because there’s no condition that we need to change. In this case, the only thing that we’ll modify is who’ll be notified when a new item is created.
Let’s assign a value to the email address by clicking on it. Then from the dropdown, choose the “Me” option. This means that we’ll be notified through email whenever a new item is created on the Customers list.
Next, click on the Create button to finish customizing the rule.

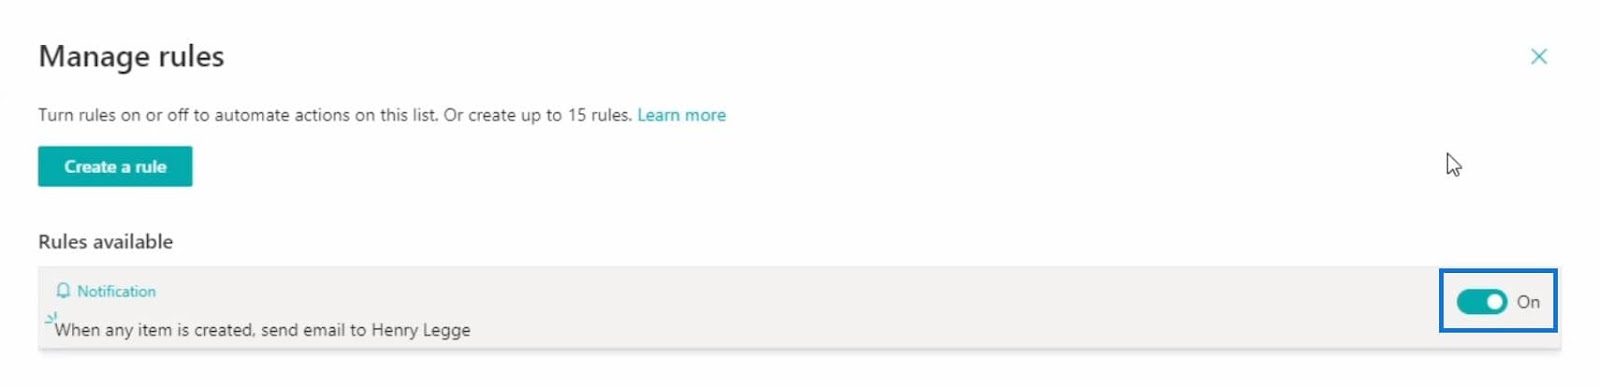
Then make sure that this rule is active by toggling the switch to “On”. Then close the window.
Checking And Testing The Workflow In SharePoint
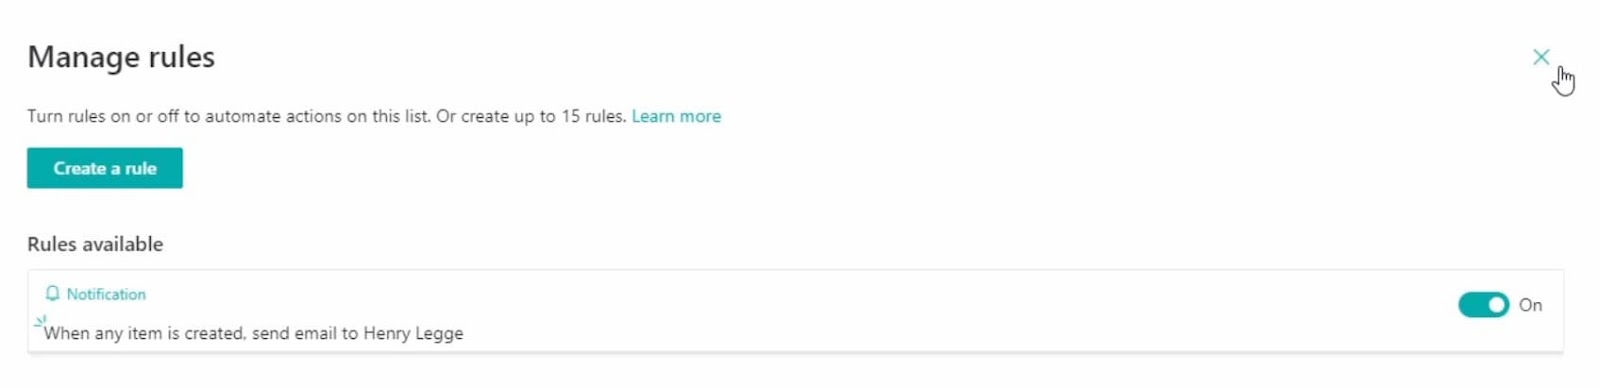
If you want to check if the workflow is created properly, you can click the “Automate” feature and select the “Manage rules” option.
Doing this will take you back to the same window you’ve seen after creating the workflow. This is where you can control the workflows that you’ll be creating by turning them on and off.
Just close this window once you’re done checking the recent workflow that you created. Let’s begin testing the workflow by clicking on the “New” button.

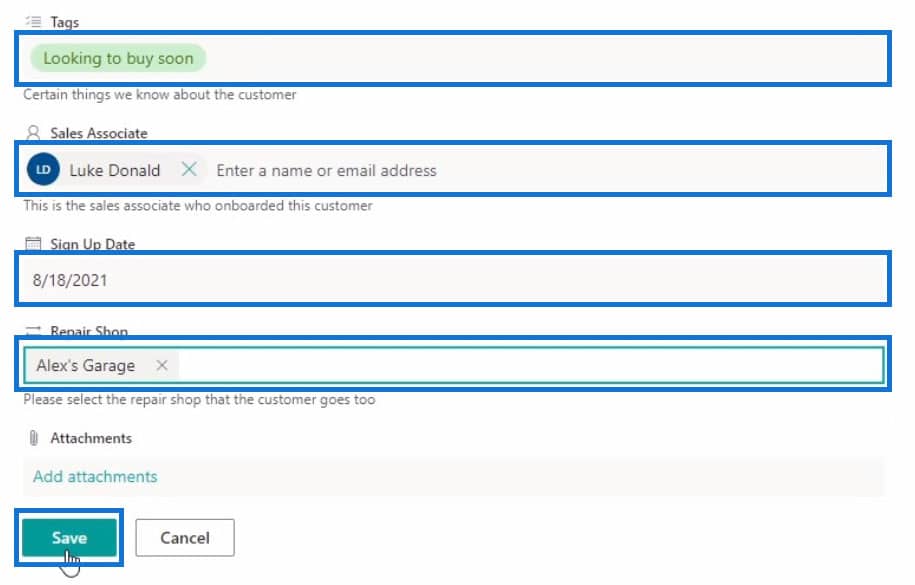
Then fill out the fields for the new item.

After filling out the fields, click on “Save” to finish creating the item.
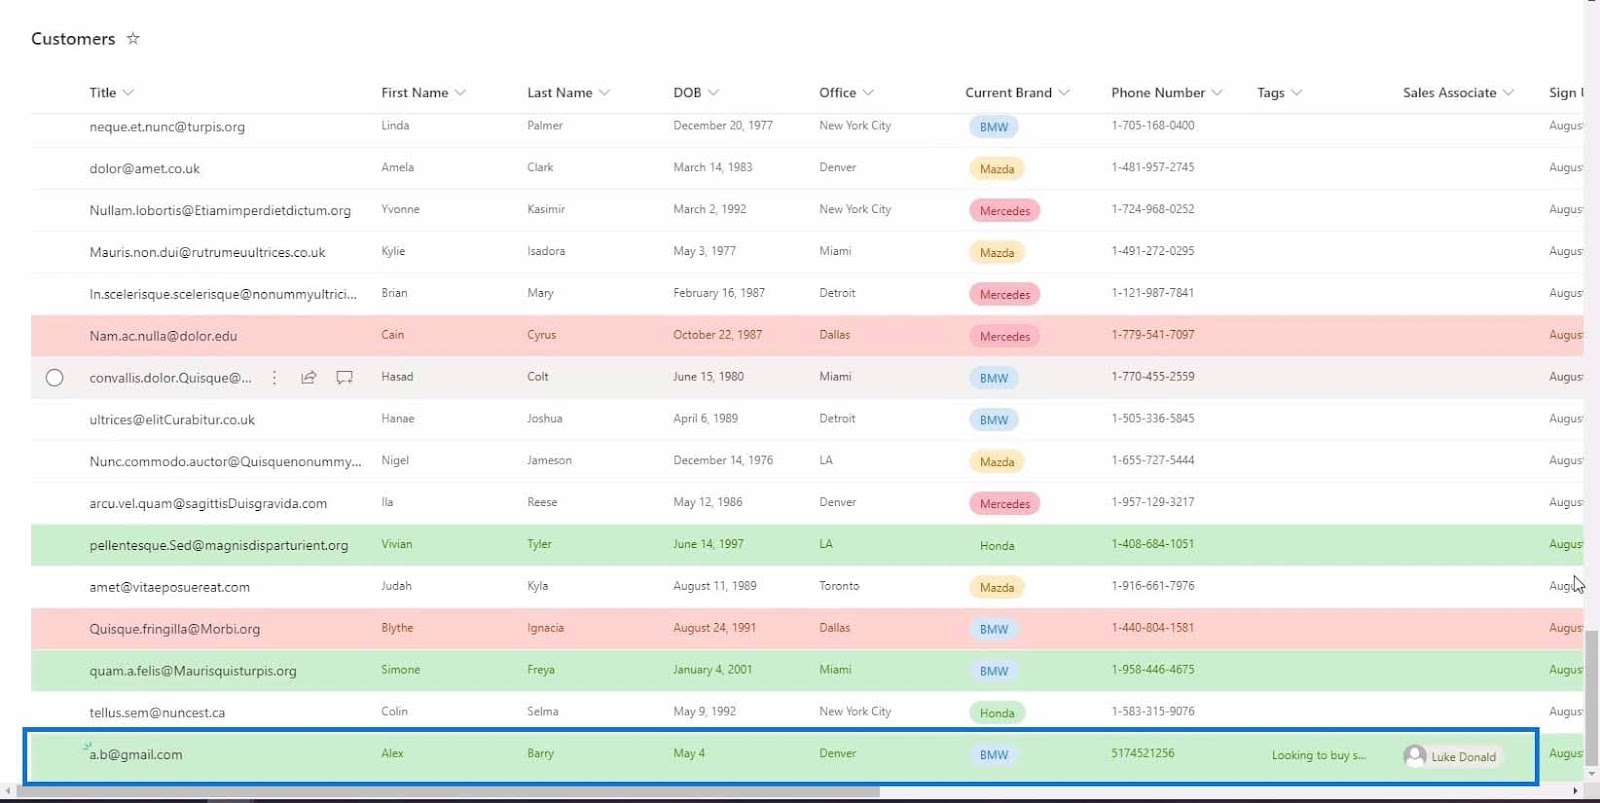
To find the new item, let’s scroll down to the very bottom of the list.
Finally, go to your inbox to check if you received an email regarding the new item created on this list.
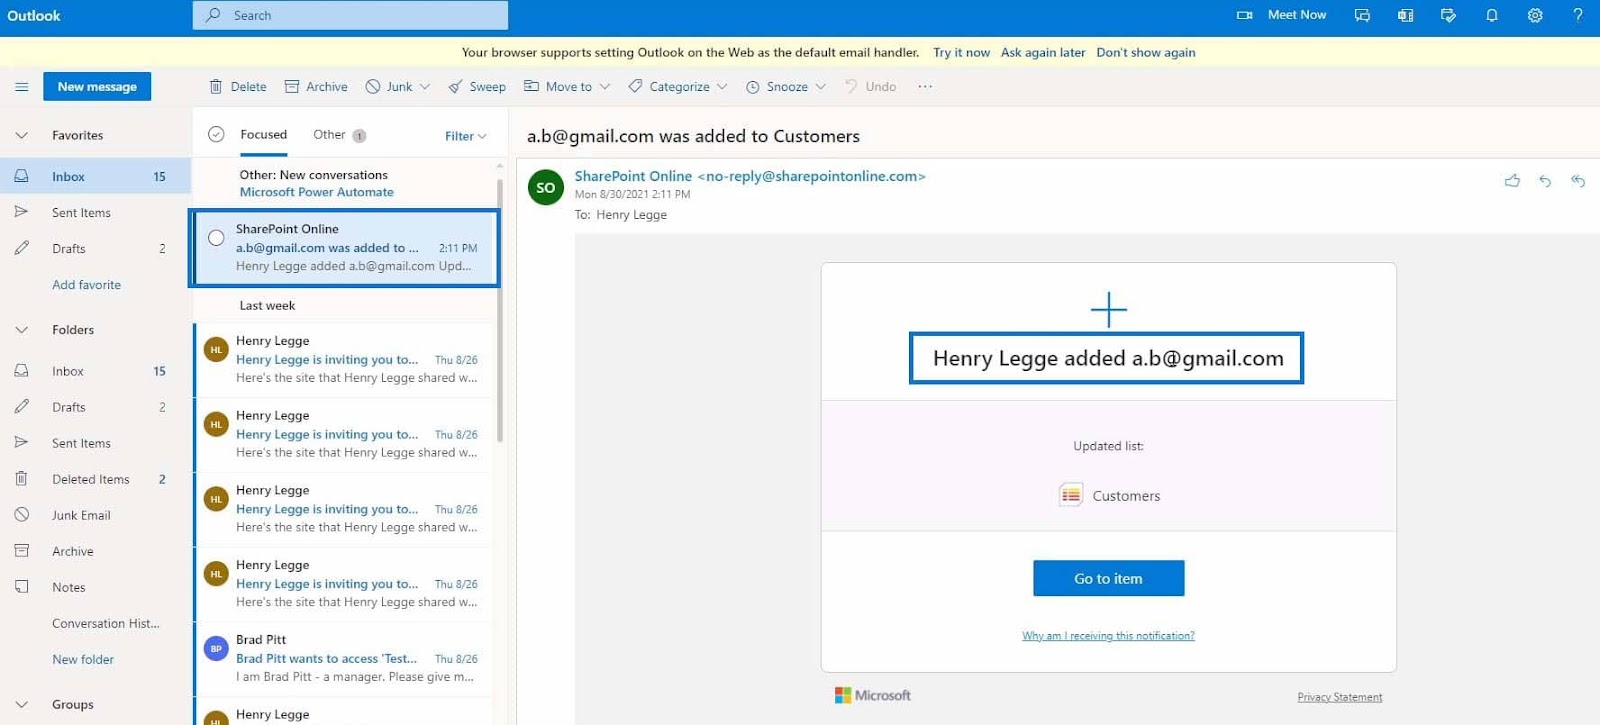
Upon checking my Outlook, I did receive an automated email from SharePoint Online saying “Henry Legge added [email protected]” to the Customers list. This means that the workflow we created is working properly.
As long as the workflow is active, you’ll receive an email whenever anyone creates a new item in the Customers list. Just to clarify, in this example, the trigger of the workflow that we chose is when “A new item is created” and the action is we’ll receive an email.
Creating A Workflow With Conditions Using SharePoint Automate
In the previous example, we created a workflow without customizing the conditions. This time we’ll create another workflow but with conditions. Let’s begin by clicking on “Automate” and selecting the “Create a rule” option.

c

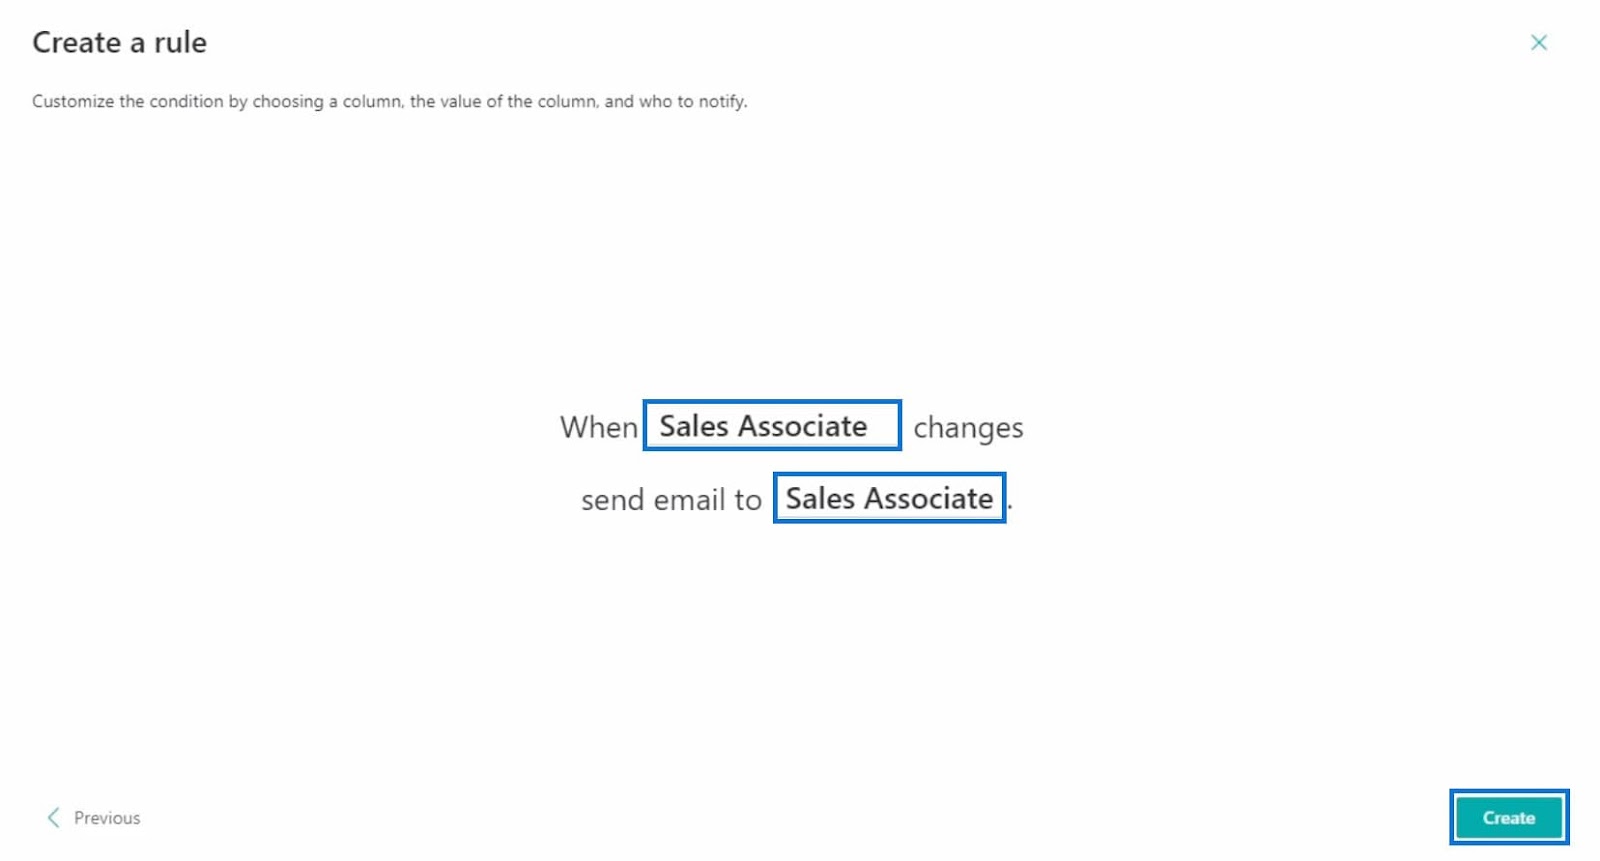
Then from the list of rules, select the “A column changes” option.

With this option, you’re now able to customize the trigger of your condition. For instance, I’ll set the trigger to when the Sales Associate column changes. Sending an email will be the action and I’ll set it to Sales Associate. Just click on the “Create” button to create the workflow.
For this example, each item in the Customers list is connected to a Sales Associate. However, if the Sales Associate gets terminated, the manager is obligated to assign the customer to a new Sales Associate. Then, the newly assigned Sales Associate should receive an email regarding this matter.
After creating the workflow, the “Manage rules” window will pop up and you’ll see that there are 2 rules available which include the workflow we created earlier and the recent one.

Just close the window once you’re done checking the status of the rules.
Testing The Workflow Condition
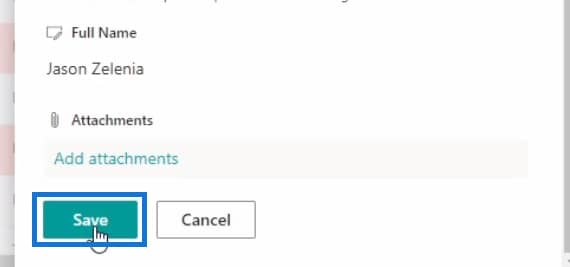
To test our condition, I’m going to select Jason Zelenia from the list and start editing his record by clicking on the Edit button.
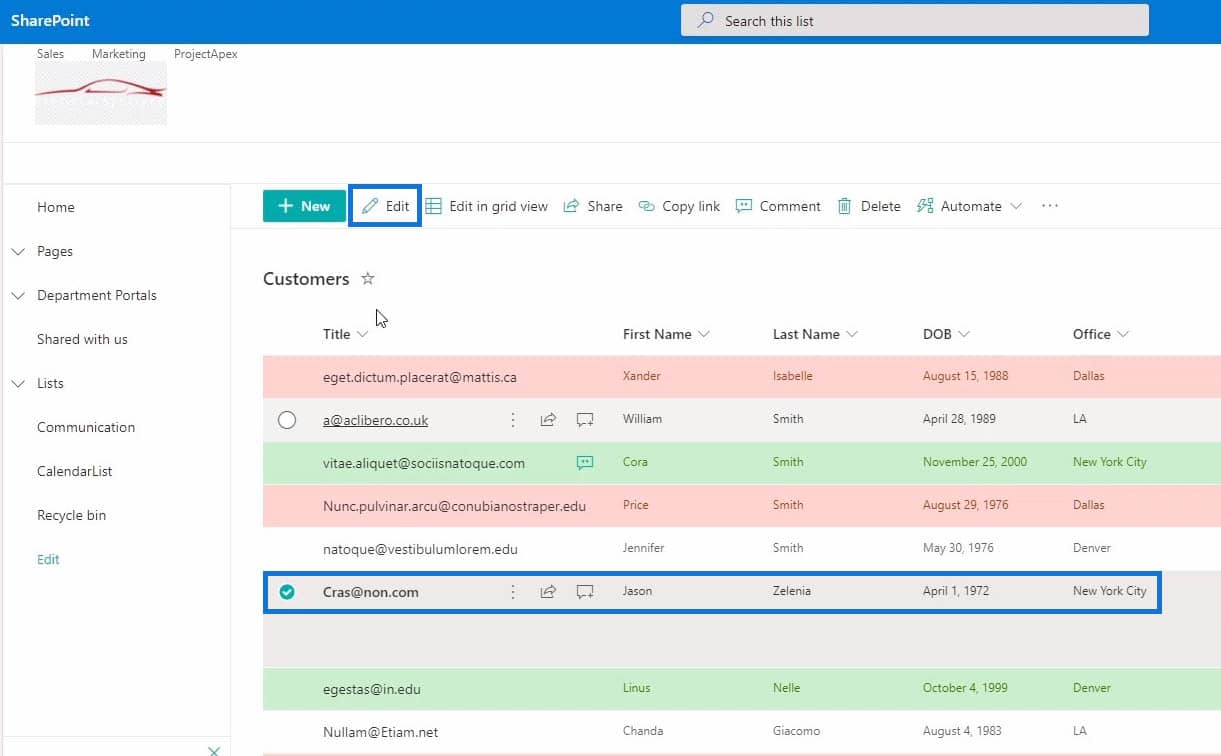
After clicking the Edit button, scroll down from the list of records until you find the Sales Associate field.

In this case, I’ll change the Sales Associate from Jamie Crust to Brad Pitt.
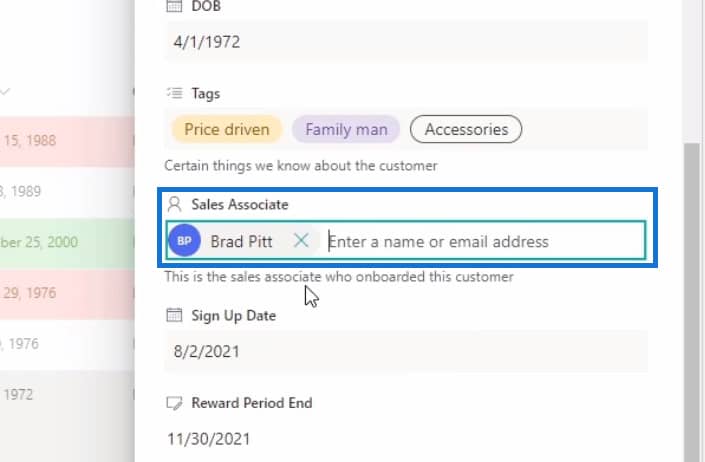
Then click the Save button to save the changes.
Lastly, we’ll check if the workflow is working properly by going into Brad Pitt’s email.
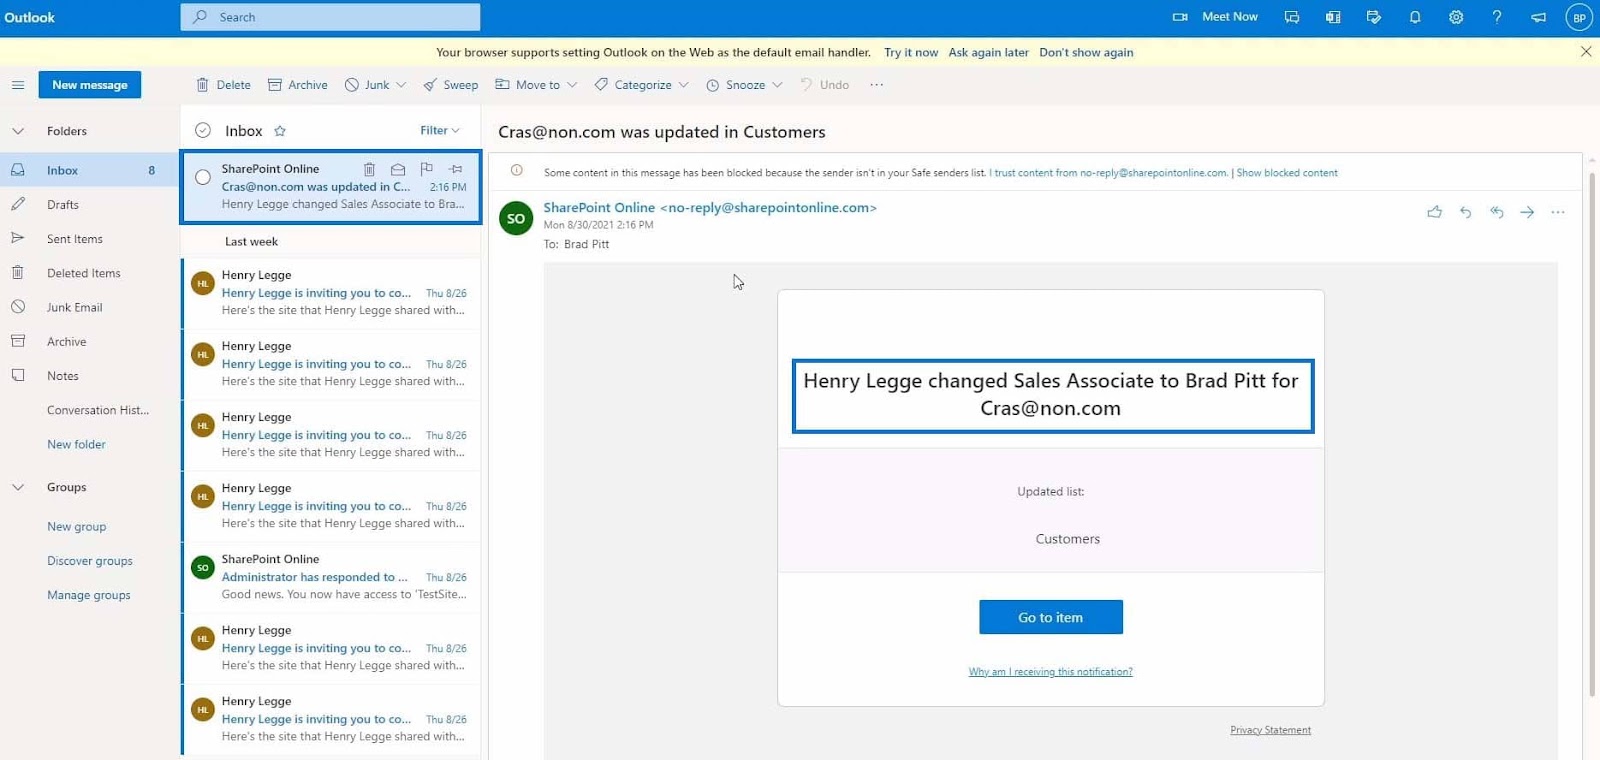
Since Brad Pitt is the new Sales Associate assigned to [email protected], the email was sent to him. In the email, you can click on the “Go to item” button to go directly to the modified item and disable the notification by clicking on the “Why am I receiving this notification?” link.
This is one of the complex workflows that you can create in SharePoint using the automate feature.
***** Related Links *****
Microsoft Power Automate: Workflow Automation
SharePoint Integration With Power Platform
SharePoint List Alerts Setup
Conclusion
To sum up, you’ve learned what a workflow is and its components which are the trigger and action. You were also able to understand how the automate feature works on SharePoint. The “automate” feature in SharePoint is exceptional in terms of alerting people in your organization. With this, you don’t need to send an email manually to someone when something changes in a list or library.

There are more things that you can do with the automate feature so take time to explore more about it. If you’d like to know more about this topic and other related content, you can certainly check out the list of relevant links below.
All the best,
Henry


")