
In this tutorial, we’re going to discuss how to use Python user defined functions and how to create them. User defined functions can help you break down large programs into small parts to make them easier to debug, maintain, and understand.

User defined functions are also great for storing repeated codes in a program. We can execute that code by calling the function when needed.
Let’s start exploring, building, and practicing how to make user defined functions by creating a new notebook. To do that, click on the File menu then hover on New Notebook and select Python 3.

After creating a new notebook, we’re going to start by pressing ESC + B a few times to add multiple code cells.

Let’s add a document string to give a short note about what we’re doing. To do this, it’s important to use the “#” sign at the beginning. Then type the note right after the “#” sign.

Structure Of User Defined Functions In Python
In order to create user defined functions in Python, we should follow its default structure. First, we need to add def to define the function. Then, we’ll add the function name. Lastly, add open and close parenthesis to close the function.

Take note that we can also add arguments inside the parentheses, but for now, we’re just going to leave it blank. After closing the function, we can then add a colon at the end.
This is to make sure that the instructions we’re going to declare are added inside the function we’re creating.

After creating the function, let’s add an instruction that will be executed later on when we call this function. For this example, let’s print the word “hello”.

Upon adding the instruction, click Enter to go to the next line. You’ll notice that the line of code is still indented after hitting Enter. This means that we’re still inside the function. To get out of the function, just hit Backspace once.
After that, we can now execute that function by calling it using the function name. Before we do that, let’s add another document string.

Let’s call the function by typing the function name and adding open and close parentheses. Then click on Shift + Enter.

As a result, we’ll see that this function displays a text that says “hello.”

Next, we’ll add another instruction that will display “Bob.”

Then press Shift + Enter one more time to run the code again.

That’s how we create and call functions in Python.
Adding Arguments In Python User Defined Functions
Now let’s try adding arguments to our function. Let’s add a document string just like the example below.

After that, let’s define our new function with an argument.

For now, we’re only going to add 1 argument using the variable “x.” In this example, the “x” will be a greeting that you want to be displayed when the function is called or executed. Let’s add an instruction that will display the argument we added.

Then we’re going to call our “greeting” function and send a value to the “x” argument. After this, you’ll see the text “Hello Bob” printed as a result.

Modifying Functions In Python
Let’s modify this function. We’ll copy the last function that we created and paste it into the next code cell.

Instead of using print(), we’ll use return() which will allow you to return the value that we’ve set in calling the function.

In addition, using the return() statement allows you to return the value multiple times.


Another good thing with return() is that you can return the value as much as you want. For example, let’s return “Hello Bob” 2000 times.

Let’s move on to another example. This time, we’ll create a formula. In the previous example, we only used one argument but in this example, we’re now going to use two.

In this example, we named our function as “formula1” with arguments being “x” and “y.” We’ve also set a formula in our return statement, then we provided values for “x” and “y” in calling the function. To summarize this formula, 2*2+1+1 is equal to 6.
That’s how we create and use arguments in Python.
Remember that arguments are the values that are being sent to the function when it’s called.
Conditional Statements In Python
We use conditional statements in Python to run a program based on the specified condition. Python analyzes whether these conditional statements meet the conditions being specified or not. Then the results may be processed as true or false.
Let’s begin creating our conditional function by creating variables.

After creating these variables, press Shift + Enter to load them. Next, we’ll start defining our function and we’ll name it “is_approved” with arguments being name, salary, side, and expenses.

Inside the function, we want to get the yearly_total which is equal to “salary*12+side*12-expenses*12”.

Then, we’ll return the name and yearly_total.

In calling the function, we’ll pass the values from the variables that we created earlier. In this case, it’s name1, salary1, side1, and expenses1. We should have an output similar to the example below.

As you can see in our result, we have John together with his yearly_total of 32400.
Next, let’s add our conditional statements. This time we’ll delete “return name, yearly_total” because we won’t use it in this example.

This conditional statement simply means that if the yearly_total of a person is greater than 30000, it will display the name together with the message “, you are approved.”
On the other hand, the else statement will display the return() statement containing the name and message “, you are not approved.” if the yearly_total is less than 30000.
If we try to call the function with our conditional statements, this will be the result.

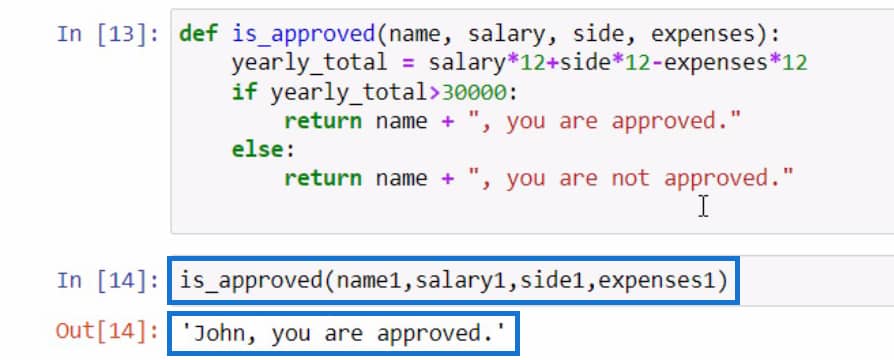
Looking at the result, John is approved because he has more than 30000 for his yearly_total.
Calling Functions In Variables
Next, let’s try putting our statement for calling the function in variables. We’re doing this to save the output for each person we’ve created.

After this, let’s go back to the variables we’ve created and update the variable used for Jill and John.

After updating the variables, make sure to run the program again to save the changes.

Let’s display the results by using the print() statement and the result variables.

Upon displaying the results, we can see that everyone is approved because Bob, Jill, and John have more than 30000 in their yearly_total. So, let’s change our threshold from 30000 to 35000 and run the program again.

If you can still remember, John only has around 32000 in his yearly_total. But we changed the threshold to 35000. As a result, John is now not approved.
***** Related Links *****
Python Scripting In Power BI Data Reports
Python Intellisense And Autocomplete Installation
Using Python In Power BI | Dataset And String Function
Conclusion
In summary, we’ve learned the proper syntax for Python user defined functions as well as the importance of having a document string at the start of a new function that we’re going to create.
We’ve also discussed the arguments which are useful in different situations. In this blog, we used it to display greetings and create a formula. Keep in mind that arguments are the values being submitted to the function when it’s called.
In addition, we learned about conditional statements used in user defined functions namely the “if” and “else” conditions. You can use these to declare conditions in a function and decide if it should execute certain statements or not.
All the best,
Gaellim


")