
Ever find yourself staring at a heap of info in Excel, scratching your head about how to make it all neat and tidy? You’re in the right place! Today, we’re tackling one of Excel’s superpowers: sorting data alphabetically across multiple columns.
To sort alphabetically in Excel with multiple columns, first select your entire data set, making sure to include all relevant columns. Go to the “Data” tab on the Excel ribbon, then click “Sort”. In the dialog box that opens, select the primary column you’d like to sort by in the “Sort by” dropdown, then choose whether you want this to be sorted alphabetically, in ascending or descending order.

In this article, we’ll get our hands dirty with Excel and teach you how to sort data alphabetically across multiple columns. We’ll break down the basics of how Excel’s sorting function works, and guide you through the process step-by-step, using clear, easy-to-follow instructions.
So, let’s dive in and transform you into an Excel whiz!
Understanding Excel Sorting Function

Alright, before we dive into the nitty-gritty of multi-column sorting, let’s first take a moment to understand what Excel’s sorting function is all about.
Think of the sorting function as your own personal data organizer. It’s a feature that allows you to arrange your data in a particular order — and that’s super handy when dealing with tons of information. Excel’s sorting function is like having a personal librarian who knows exactly where each book should go.
When it comes to sorting, Excel gives you two options: ascending or descending order.
Ascending order means arranging the data from smallest to largest, or in the case of text, from A to Z.
Descending order means arranging the data from largest to smallest, or from Z to A for text.
But here’s where things get a bit more interesting. Excel doesn’t limit you to sorting just one column. It lets you sort multiple columns, which means you can arrange your data based on more than one criterion.
Imagine you’re dealing with a list of names, with separate columns for first name and last name. Excel allows you to sort the list by last name and then sort those with the same last names by first name. Pretty cool, right?
So, in a nutshell, Excel’s sorting function is a powerful tool that helps you make sense of your data. It organizes your information in a logical, easy-to-read manner, saving you time and effort.
Now that we’ve got the basics down, let’s move on to the fun part — learning how to sort data alphabetically in columns!
How to Sort a Single Column in Excel
Before we jump into the deep end with multi-column sorting, let’s take a quick dip in the shallow end by sorting a single column in ascending order and then descending order.
1. Ascending Sort Single Excel Columns
To sort a single column in ascending order, follow the below steps:
Step 1: Open your Excel worksheet
Kick things off by opening the worksheet that has the raw data you want to sort.
Step 2: Select the data to be sorted
Click on the header of the column that you want to sort. This will highlight the entire column. If you don’t want to sort the entire column, just click and drag to select the specific cells you want to sort.
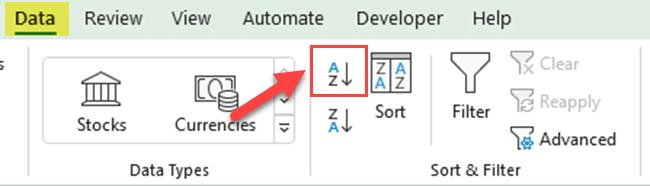
Step 3: Go to the Data tab and find the Sort and Filter group
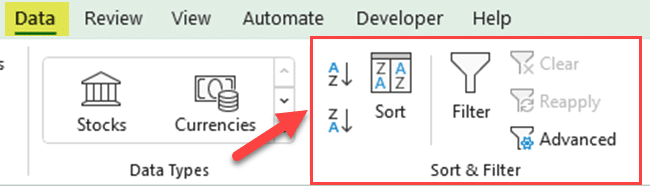
Step 4: Click on the A-Z button to sort the selected column in ascending order
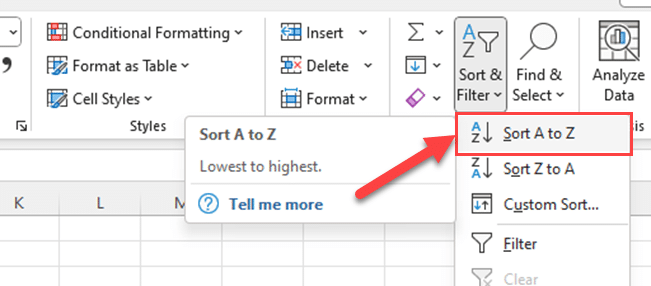
Step 5: Alternatively, you can find the same sorting options from the Home tab. Go to the Editing group, then click on the Sort and Filtering options
2. Descending Sort
If you want to sort a single column in descending order, you have to follow the same process. Here are the steps:
Step 1: Open your Excel worksheet
Kick things off by opening the worksheet that has the data you want to sort.
Step 2: Select the data to be sorted

Click on the header of the column that you want to sort. This will highlight the entire column. If you don’t want to sort the entire column, just click and drag to select the specific cells you want to sort.
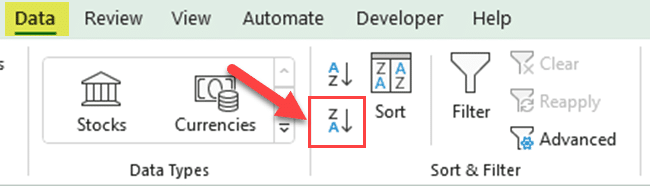
Step 3: Go to the Data tab and find the Sort and Filter group.
Step 4: Click on the Z-A button to sort the selected column in descending order.
Step 5: Just like with the ascending sort filter option, you can also get the descending sorting option from the Home tab. Go to the Editing group and click on Sort and Filter

And there you have it! You’ve just sorted a single column in ascending and descending order in Excel. Now, let’s take things up a notch and sort multiple columns.
How to Sort Multiple Columns in Excel
Alright, now that you’ve mastered single-column sorting, it’s time to turn up the heat and tackle multiple columns. Don’t sweat it, though — if you’ve got the single column down, this is just a hop, skip, and jump away.
Step 1: Open your Excel worksheet
Start by opening the worksheet that holds all the data you want to sort.
Step 2: Select your data
Before sorting, you need to select your data. Click on the top-left cell of your data range, hold your mouse button down, drag it to the bottom-right cell of the data range, and then let go of the mouse button. All your data should be highlighted.
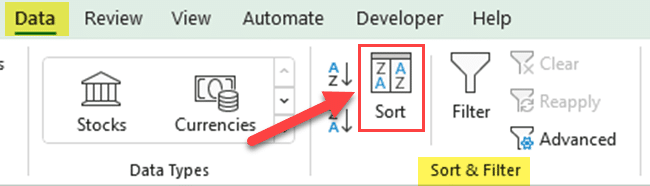
Step 3: Navigate to the “Data” tab and click on Sort in the Sort & Filter group
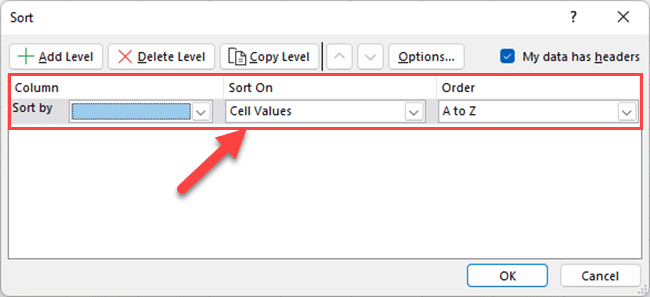
Step 4: In the Sort dialog box, choose the first column you want to sort under the Sort by drop-down menu and specify the sorting order
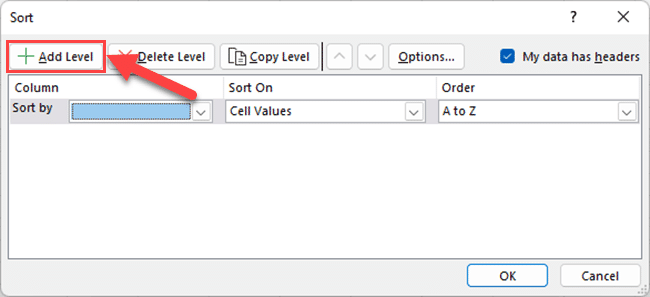
Step 5: Click on “Add Level” to sort another column and repeat the process until you have set all the rows in desired sort order priority
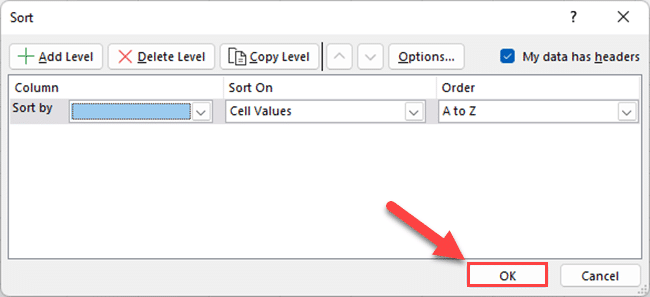
Step 6: Click on OK to apply your sorting
And there you have it! That’s how you sort multiple columns alphabetically in an Excel spreadsheet. You’re officially a sorting superstar!
In the next section, we’ll look at some advanced techniques for sorting columns in Excel.
Advanced Sorting Options for Columns in Excel
Excel has advanced sorting options that help you to customize the sorting process further. Here are some of these options:
1. Using Custom Sort in Filters
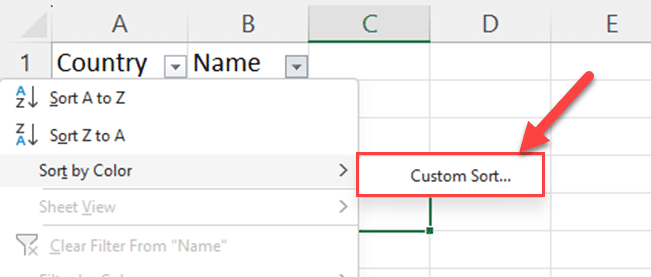
Excel allows you to sort data in more ways than just alphabetically. You can also sort by color, by cell icon, or even by a custom list you’ve created.
For instance, if you have a column that uses cell color to indicate priority levels, you can sort your data based on those colors.
Simply go to the “Sort” dialog box, select the column, and then choose “Sort by Color” from the “Sort On” drop-down.

2. Sorting by More Than One Criteria
We’ve covered how to sort by more than one column, but you can also sort by more than one criterion within a single column.
For example, you might want to sort a column of text by cell color first and then alphabetically.
This can be done by adding two sort levels for the same column, each with a different “Sort On” criterion.
3. Employing the SORT Function
The SORT function in Excel can help you sort data based on multiple columns. Here is an example:
=SORT(range, [sort_index1], [sort_order1], [sort_index2], [sort_order2], ...)In this formula, you have to specify the following:
The data range
Columns to sort by (index)
Sort order (1 for ascending, -1 for descending)
You can add more columns to sort by adding more sort_index and sort_order pairs to the SORT function.
4. Sorting Data with Merged Cells
Data with merged cells can be tricky to sort. When you try to sort a range that includes merged cells, Excel will give you an error message.
But don’t panic, there’s a workaround.
You’ll need to unmerge all the cells, sort the data, and then reapply the merging. Just make sure to copy the merged cell’s value to all of the unmerged cells before sorting.
These advanced techniques can give you even more control over your data. So go ahead, dive into these deeper waters, and see what Excel sorting can really do!
Next, we’ll troubleshoot some common issues you might run into when sorting Excel columns.
Troubleshooting Common Issues When Sorting Excel Columns
Even though Excel is a powerful tool, it’s not without its quirks. You might run into a few bumps along the road while sorting but don’t fret. We’re here to help you troubleshoot some of the most common issues.
1. Data Not Sorting Correctly
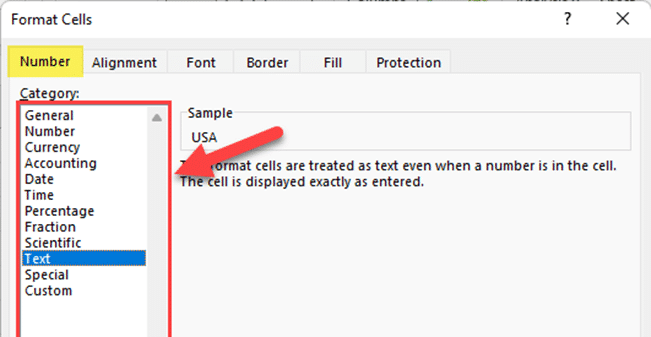
Sometimes your data won’t sort correctly because it isn’t stored in the correct format. For instance, if numbers are stored as text, they might not sort numerically.
To apply a common cell format to your data, press Ctrl+1, go to the Number tab, and select the suitable format under “Category.”
2. How to Manage Blank Spaces
If your data isn’t sorting as expected, check for extra spaces at the start or end of your cells. Excel includes these spaces in its sorting, which might throw off your results.
You can remove extra spaces using Excel’s TRIM function by typing “=TRIM(A1)” in a new cell (if A1 is the cell containing the leading space) and then copy the result to the original cell.
Also, make sure that there are no unexpected blank rows or cells in your dataset. Blank cells can affect your sorting process. If you find any blank cells, you can either delete the entire row or fill it with the correct data.
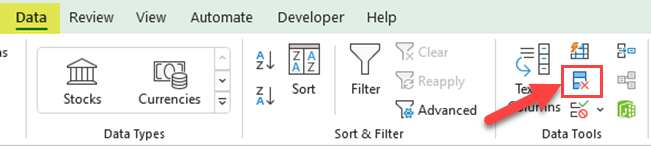
3. How to Remove Duplicate Columns
Before sorting your data, it’s a good idea to remove duplicate rows. This ensures that your sorted data is accurate and representative. Follow these steps to remove duplicates:
Step 1: Select your entire data range, including headers, by clicking and dragging over the cells.
Step 3: Go to the “Data” tab in the Excel toolbar and click “Remove Duplicates.”
Step 4: Excel will pop up the “Remove Duplicates” dialog box. Select all column checkboxes or simply click the “Select All” button
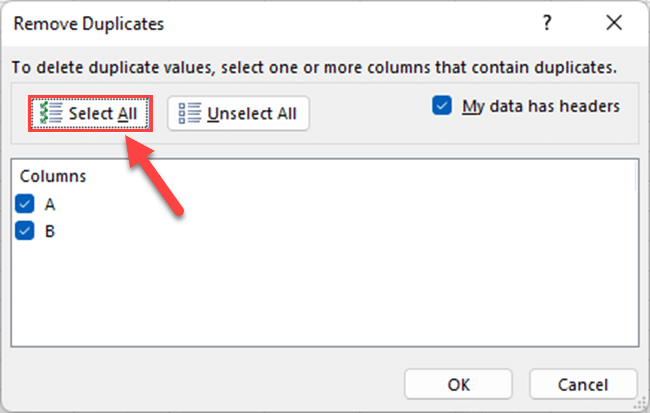
Step 5: Click “OK”
Excel will remove any duplicate rows and shows a message that how many duplicate rows were removed.
4. Excel Crashes or Hangs During Sorting
If Excel crashes or hangs during sorting, your worksheet might be too large, or your computer might not have enough resources. Try closing other applications to free up memory.
If your worksheet is large, consider breaking it down into smaller, more manageable chunks.
Remember, sorting can be a complex process, especially with large datasets. If you run into trouble, take a step back and try to troubleshoot one issue at a time. You’ve got this!
Additional Tips and Tricks for Column Sorting in Excel
Now that you’ve gotten a handle on sorting in Excel, how about we sprinkle in a little extra magic?
To help you become an even more efficient data maestro, we’re going to share some additional tips and tricks that can make your sorting tasks quicker, smoother, and generally more awesome.
1. Using Keyboard Shortcuts
Keyboard shortcuts can save you time and enhance your productivity when working with Excel data. Here are a few shortcuts for sorting alphabetically:
Alt + A + S + A: Sort the selected data alphabetically from A to Z.
Alt + A + S + D: Sort the selected data alphabetically from Z to A.
Alt + D + S: Open the Sort dialog box to apply custom sorting.
Remember to select the desired data range or cell in the same row or column before using these keyboard shortcuts. Otherwise, you will get the wrong results.
2. Saving and Reusing Sort Options
Excel allows you to save your custom sort settings to reuse them later. Follow these steps to save your sorting options:
Step 1: Select your data range or the cells within the column you want to sort
Step 2: Click the “Data” tab on the ribbon, then click the “Sort” button
Step 3: In the “Sort” dialog box, select the column name from the Sort by drop-down. Note that if there are no column headers, Excel is showing column letters.
Step 4: Expand the “Order” drop-down menu and click “Custom List…”
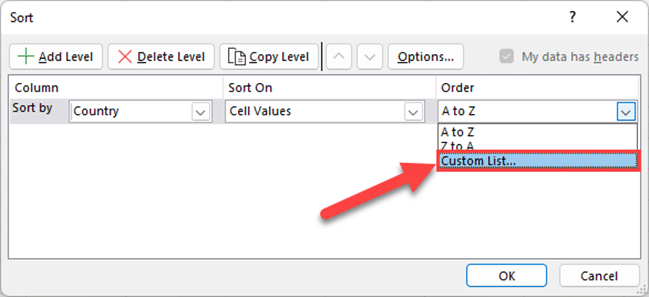
Step 5: Select “NEW LIST” from “Custom lists” and type the items in the “List entries” box in the order you want, then click “Add”
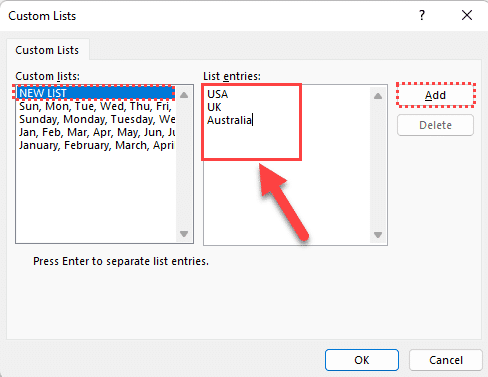
Step 6: Click “OK” in the dialog boxes
Now your custom sort settings are saved, and you can see them in the Custom Lists section of the Order drop-down menu in the Sort dialog box for future use.
So, there you go — a handful of extra tips and tricks to supercharge your Excel sorting prowess. These nuggets can make all the difference when it comes to navigating your data like a pro, saving you time and a whole lot of clicks!
Final Thoughts
You’ve made it through our deep dive into the world of Excel sorting. From the basics of single-column sorting to more advanced multiple-column techniques, and even a foray into troubleshooting, you’ve covered a lot of ground.
But remember, this is just the beginning. Excel is an incredibly powerful tool, with countless more features and functionalities waiting to be discovered.
This guide should have armed you with the skills and knowledge to tackle data sorting in Excel like a pro. But don’t stop here. The real magic happens when you take these lessons and apply them to your own work.
Practice these skills, experiment with your data, and don’t be afraid to make a few mistakes along the way. Excel is a learning journey, and every step you take, every button you click, takes you one step closer to mastering this essential tool.
To learn more Excel tricks, check out the video below:


")